
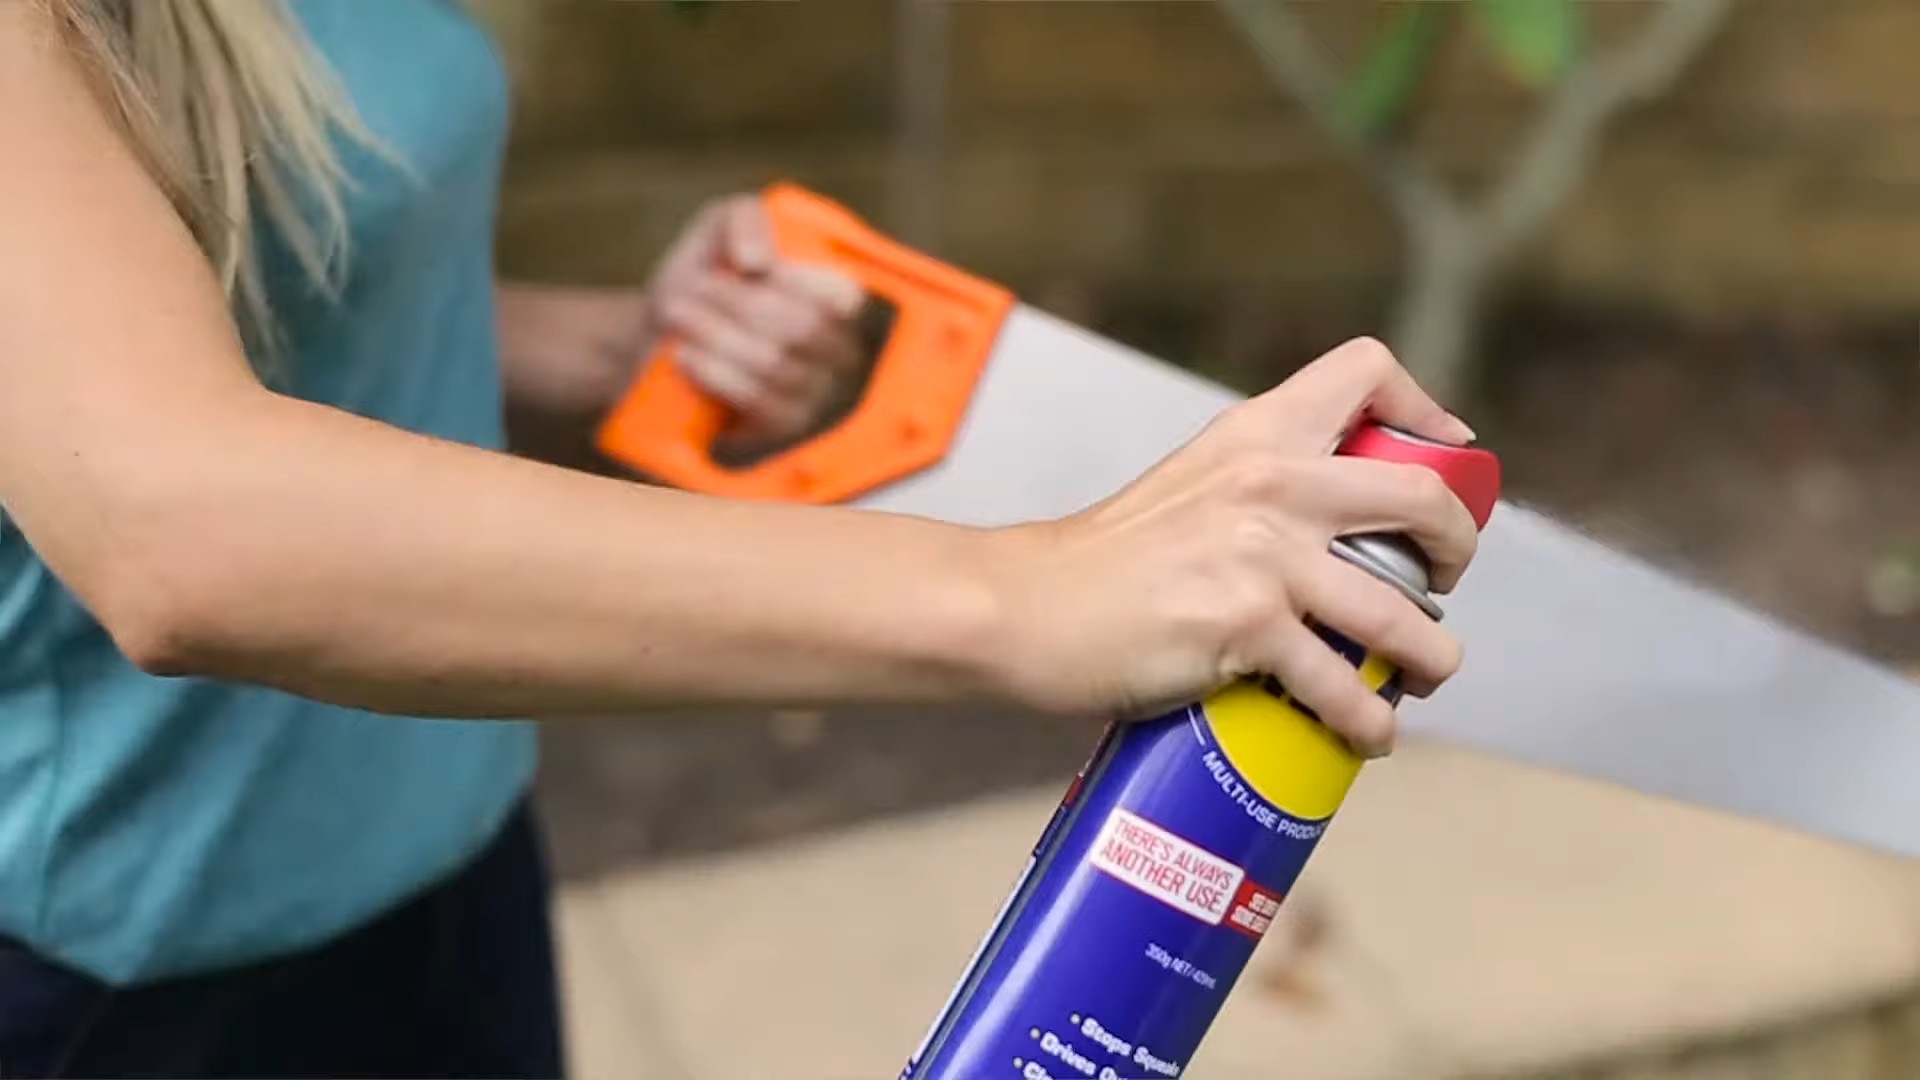
WD40 rust removal tools – sounds like a mission impossible, right? Well, get ready to be amazed because I’m about to share some seriously game-changing DIY tricks that will have your rusty tools looking brand new again! We’ve all been there: you reach for your trusty wrench, only to find it’s covered in a layer of stubborn rust. It’s frustrating, unsightly, and can even impact the tool’s performance. But fear not, because you don’t need to toss those tools in the trash or spend a fortune on replacements.
For generations, resourceful folks have been seeking effective ways to combat rust. From ancient blacksmiths using natural oils to modern-day mechanics relying on chemical solutions, the battle against corrosion is a timeless one. But what if I told you that a simple can of WD40 could be your secret weapon?
These WD40 rust removal tools hacks are essential because they save you time, money, and the headache of dealing with rusty equipment. Imagine being able to restore your favorite gardening tools, revive your workshop essentials, and keep your equipment in tip-top shape, all with a product you probably already have in your garage. I’m going to walk you through some easy-to-follow steps and show you how to harness the power of WD40 to banish rust and keep your tools performing their best. Let’s get started!
DIY Rust Removal with WD-40: A Comprehensive Guide
Hey there, fellow DIY enthusiasts! Rust, the bane of every tool owner’s existence. It’s unsightly, weakens metal, and can make your favorite tools unusable. But don’t despair! Before you toss those rusty relics, let me show you how to revive them using the magic of WD-40. This isn’t just a quick spray-and-wipe solution; we’re diving deep into a multi-faceted approach to tackle even the most stubborn rust.
What You’ll Need
Before we get started, gather your supplies. Having everything on hand will make the process smoother and more efficient.
* WD-40 Multi-Use Product: The star of the show! Make sure you have a can (or two, depending on the extent of the rust).
* Wire Brush: A sturdy wire brush is essential for scrubbing away loose rust particles. I prefer a brush with both steel and brass bristles for different levels of abrasion.
* Sandpaper (Various Grits): We’ll use sandpaper to smooth out the surface after removing the bulk of the rust. I recommend having 120-grit, 220-grit, and 400-grit on hand.
* Steel Wool: For finer rust removal and polishing. Grade 0000 steel wool is ideal.
* Rags or Paper Towels: For wiping away excess WD-40 and rust residue.
* Safety Glasses: Protect your eyes from flying rust particles. Trust me, you don’t want to skip this!
* Gloves: Protect your hands from the WD-40 and sharp edges.
* Rust Converter (Optional): For heavily rusted items, a rust converter can help neutralize any remaining rust and prevent it from spreading.
* Protective Coating (Optional): After removing the rust, you might want to apply a protective coating like paint, oil, or a rust inhibitor to prevent future corrosion.
* Small Container (Optional): For soaking smaller parts in WD-40.
* Old Toothbrush (Optional): Great for getting into tight spaces and crevices.
Step-by-Step Rust Removal Process
Alright, let’s get down to business! Here’s the detailed process I use to remove rust with WD-40:
1. Preparation is Key:
* First, put on your safety glasses and gloves. Safety first!
* Clean the tool or item to remove any loose dirt, grease, or debris. You can use a damp cloth or a degreaser if necessary. This will allow the WD-40 to penetrate the rust more effectively.
2. Apply WD-40 Liberally:
* Spray the rusted area generously with WD-40. Don’t be shy! You want to saturate the rust.
* For smaller parts, you can soak them in a container filled with WD-40 for several hours or even overnight. This is especially helpful for heavily rusted items.
3. Let it Soak:
* Allow the WD-40 to soak into the rust for at least 10-15 minutes. For stubborn rust, I recommend letting it soak for several hours or even overnight. The longer it soaks, the easier it will be to remove the rust.
4. Scrub with a Wire Brush:
* Using a wire brush, scrub the rusted area vigorously. Apply firm pressure and work in a back-and-forth motion.
* You’ll notice the rust starting to loosen and flake off.
* If the rust is particularly stubborn, reapply WD-40 and continue scrubbing.
* Use the steel bristle brush for the initial heavy rust removal and switch to the brass bristle brush for more delicate areas to avoid scratching the metal.
5. Sandpaper Time:
* Once you’ve removed the bulk of the rust with the wire brush, it’s time to smooth out the surface with sandpaper.
* Start with 120-grit sandpaper to remove any remaining rust and imperfections.
* Then, move on to 220-grit sandpaper to further smooth the surface.
* Finally, finish with 400-grit sandpaper to create a smooth, polished finish.
* Remember to sand in the direction of the grain (if there is one) to avoid creating scratches.
6. Steel Wool for the Final Touch:
* After sanding, use grade 0000 steel wool to polish the surface and remove any remaining fine rust particles.
* Apply a small amount of WD-40 to the steel wool and gently rub the surface in a circular motion.
* This will give your tool a nice, smooth, and polished finish.
7. Clean and Inspect:
* Wipe away any remaining WD-40 and rust residue with a clean rag or paper towel.
* Inspect the tool or item to ensure that all the rust has been removed.
* If you find any remaining rust, repeat steps 2-6.
8. Rust Converter (Optional):
* If you’re dealing with heavily rusted items, you might want to apply a rust converter to neutralize any remaining rust and prevent it from spreading.
* Follow the instructions on the rust converter label carefully.
* Typically, you’ll need to apply the rust converter to the clean, dry surface and allow it to dry completely.
9. Protective Coating (Optional):
* To prevent future rust, apply a protective coating to the tool or item.
* You can use paint, oil, a rust inhibitor, or a clear coat.
* Follow the instructions on the product label carefully.
* For tools, I like to use a light coat of oil to protect them from moisture.
Dealing with Stubborn Rust
Sometimes, rust is particularly stubborn and requires extra effort. Here are a few tips for dealing with those tough cases:
* Repeat the Process: Don’t be afraid to repeat the entire process multiple times. Sometimes, it takes several applications of WD-40 and scrubbing sessions to remove all the rust.
* Heat it Up: Applying heat to the rusted area can help loosen the rust. You can use a heat gun or a hairdryer. Be careful not to overheat the metal, as this can damage it. After heating, immediately apply WD-40 and scrub.
* Vinegar Soak: If WD-40 alone isn’t doing the trick, try soaking the item in white vinegar for several hours or overnight. Vinegar is a mild acid that can help dissolve rust. After soaking, rinse the item thoroughly with water and dry it completely before applying WD-40 and scrubbing.
* Electrolysis: For extremely rusted items, you can try electrolysis. This involves using an electric current to remove the rust. However, electrolysis can be dangerous if not done properly, so be sure to research the process thoroughly before attempting it.
Preventing Future Rust
Once you’ve removed the rust, it’s important to take steps to prevent it from returning. Here are a few tips:
* Keep Your Tools Clean and Dry: After each use, clean your tools with a cloth and dry them thoroughly.
* Store Your Tools Properly: Store your tools in a dry, well-ventilated area. Avoid storing them in damp or humid environments.
* Apply a Protective Coating: Regularly apply a protective coating like oil, a rust inhibitor, or a clear coat to your tools.
* Use Desiccants: Place desiccants (drying agents) in your toolbox or storage area to absorb moisture.
* Regular Inspection: Regularly inspect your tools for signs of rust and address any issues promptly.
Specific Applications
Let’s look at some specific examples of how to use this method on different types of tools:
Rusty Screwdrivers and Wrenches
These are common victims of rust. The process is straightforward:
1. Spray liberally with WD-40.
2. Let it soak for at least 30 minutes.
3. Use a wire brush to scrub the rust, paying close attention to the crevices.
4. Sand with progressively finer grits of sandpaper.
5. Finish with steel wool.
6. Apply a thin coat of oil to prevent future rust.
Rusty Garden Tools (Shovels, Rakes, Hoes)
Garden tools are exposed to moisture and soil, making them prone to rust.
1. Remove any caked-on dirt and debris.
2. Spray with WD-40 and let it soak.
3. Use a wire brush to remove the rust. For large areas, you might consider using a power drill with a wire brush attachment (exercise caution!).
4. Sand the surface smooth.
5. Apply a rust-resistant paint or coating to protect the metal.
Rusty Nuts

Conclusion
So, there you have it! This simple WD40 rust removal tools trick is a game-changer for anyone battling stubborn rust on their beloved tools. We’ve explored how this readily available household product can be a surprisingly effective solution, saving you time, money, and the frustration of dealing with corroded equipment.
Why is this a must-try? Because it’s accessible, affordable, and, most importantly, it works! Forget about expensive rust removers or hours of tedious scrubbing. WD40 offers a quick and relatively effortless way to restore your tools to their former glory. Think of the satisfaction of seeing that orange menace disappear, revealing the shiny metal underneath. It’s not just about aesthetics; removing rust extends the life of your tools, ensuring they perform optimally for years to come.
But don’t stop there! Experiment with different application methods. For heavily rusted tools, consider soaking them in WD40 for an extended period, perhaps overnight. You can also try using a combination of WD40 and a wire brush for particularly stubborn spots. For delicate tools, a soft cloth and gentle application might be all you need.
Consider these variations to tailor the process to your specific needs:
* **For intricate tools:** Use a cotton swab or toothbrush to apply WD40 to hard-to-reach areas.
* **For large tools:** Spray WD40 liberally and use a larger brush or scouring pad.
* **For preventative maintenance:** After removing rust, apply a thin coat of WD40 to your tools to help prevent future corrosion.
We’re confident that this WD40 rust removal tools method will become your go-to solution for keeping your tools in top condition. It’s a simple yet powerful technique that can make a significant difference in the longevity and performance of your equipment.
Now it’s your turn! We encourage you to try this DIY trick and see the results for yourself. Don’t be afraid to experiment and find what works best for you. And most importantly, share your experience with us! Let us know in the comments how WD40 helped you conquer rust and restore your tools. Your tips and insights could help other readers discover the magic of this simple solution. We’re eager to hear your success stories and learn from your experiences. Happy rust-busting!
Frequently Asked Questions (FAQs)
1. Is WD40 really effective at removing rust from tools?
Yes, WD40 is surprisingly effective at removing rust from tools, especially light to moderate rust. Its penetrating properties help to loosen the rust particles, making them easier to remove with a brush or cloth. While it might not be as potent as specialized rust removers for extremely heavy rust, it’s a readily available and affordable option for most situations. The key is to allow the WD40 to soak into the rust for a sufficient amount of time before attempting to remove it.
2. How long should I let WD40 sit on the rusted tool before trying to remove the rust?
The soaking time depends on the severity of the rust. For light rust, 15-30 minutes might be sufficient. For moderate rust, let it sit for at least an hour, or even longer. For heavily rusted tools, consider soaking them overnight. The longer the WD40 has to penetrate the rust, the easier it will be to remove. You can also reapply WD40 periodically during the soaking process to keep the area saturated.
3. What’s the best way to apply WD40 to my tools for rust removal?
There are several ways to apply WD40, depending on the size and shape of your tools. For general application, spraying WD40 directly onto the rusted area is effective. For hard-to-reach areas or intricate tools, use a cotton swab, toothbrush, or small brush to apply the WD40 precisely. For larger tools, you can spray WD40 liberally and then spread it around with a cloth or brush. In some cases, submerging the entire tool in WD40 might be the best option, especially for heavily rusted items.
4. What kind of brush or cloth should I use to remove the rust after applying WD40?
The type of brush or cloth you use depends on the type of tool and the severity of the rust. For most tools, a wire brush is effective for removing rust. However, be careful not to scratch or damage the underlying metal, especially on delicate tools. For more delicate tools, use a soft cloth, nylon brush, or even a scouring pad. You can also use steel wool, but be gentle to avoid scratching. Always test the brush or cloth on a small, inconspicuous area first to ensure it doesn’t damage the tool.
5. Is WD40 safe to use on all types of tools?
WD40 is generally safe to use on most types of metal tools. However, it’s always a good idea to test it on a small, inconspicuous area first, especially on tools with special coatings or finishes. Avoid using WD40 on tools with rubber or plastic parts, as it can potentially damage these materials over time. Also, be mindful of any electrical components and avoid spraying WD40 directly onto them.
6. Does WD40 prevent rust from coming back after I’ve removed it?
WD40 can help prevent rust from returning, but it’s not a permanent solution. After removing the rust, applying a thin coat of WD40 to your tools will create a protective barrier against moisture and oxygen, which are the primary causes of rust. However, this barrier will eventually wear off, so you’ll need to reapply WD40 periodically, especially if your tools are exposed to humid or corrosive environments. For long-term rust prevention, consider using a specialized rust inhibitor or protective coating.
7. What are some alternatives to WD40 for rust removal?
While WD40 is a convenient and effective option, there are several alternatives for rust removal, depending on the severity of the rust and the type of tool. These include:
* **Vinegar:** Soaking tools in white vinegar can dissolve rust over time.
* **Baking soda:** Making a paste of baking soda and water can help scrub away rust.
* **Lemon juice and salt:** A mixture of lemon juice and salt can also be used to scrub away rust.
* **Commercial rust removers:** These are specifically formulated to remove rust and may be more effective for heavy rust.
* **Electrolysis:** This is a more advanced method that uses electricity to remove rust.
8. Can I use WD40 to clean other things besides tools?
Yes, WD40 has a wide range of uses beyond rust removal on tools. It can be used to:
* Loosen rusted bolts and screws.
* Clean and lubricate moving parts.
* Remove sticky residue from surfaces.
* Protect metal surfaces from corrosion.
* Displace moisture from electrical components.
However, it’s important to use WD40 appropriately and avoid using it on surfaces that could be damaged by its solvents.
9. Is it necessary to wear gloves or other protective gear when using WD40?
While WD40 is generally considered safe, it’s always a good idea to wear gloves when using it, especially for prolonged periods. WD40 can irritate the skin in some individuals, and wearing gloves will help protect your hands. You should also work in a well-ventilated area to avoid inhaling the fumes. If you’re spraying WD40, consider wearing eye protection to prevent it from getting into your eyes.
10. Where can I buy WD40?
WD40 is widely available at most hardware stores, auto parts stores, home improvement stores, and even some grocery stores. You can also purchase it online from various retailers. It’s a common household product that’s easy to find and relatively inexpensive.
Leave a Comment