
Watermelon gardening in reused sacks? Sounds a little unconventional, right? But trust me, it’s a game-changer! I’m so excited to share this incredibly simple and rewarding DIY trick that will have you harvesting juicy watermelons even if you’re short on space or dealing with less-than-ideal soil.
For centuries, humans have cultivated watermelons, tracing their origins back to Africa. From ancient Egyptian tombs adorned with watermelon depictions to the summertime picnics we all cherish today, this fruit has always held a special place in our hearts (and stomachs!). But what if I told you that you don’t need acres of land to enjoy the sweet taste of homegrown watermelon?
That’s where this ingenious DIY hack comes in. Many of us dream of growing our own food, but are often limited by space, poor soil conditions, or simply the perceived complexity of gardening. This method of watermelon gardening in reused sacks tackles all those challenges head-on. It’s budget-friendly, eco-conscious (hello, upcycling!), and surprisingly easy to implement. Imagine the satisfaction of biting into a perfectly ripe watermelon, knowing you grew it yourself, using materials you already had on hand. Plus, it’s a fantastic conversation starter! So, let’s ditch the gardening myths and dive into this simple yet effective way to bring the joy of watermelon cultivation to your own backyard (or balcony!).
Growing Watermelons in Sacks: A DIY Guide for Small Spaces
Hey there, fellow gardeners! Dreaming of juicy, homegrown watermelons but short on space? Don’t worry, I’ve got you covered! I’m going to walk you through a fantastic DIY project: growing watermelons in reused sacks. It’s a budget-friendly, space-saving, and surprisingly effective way to enjoy these summer treats, even if you only have a balcony or small patio. Let’s get started!
What You’ll Need: The Supply List
Before we dive in, let’s gather our supplies. This is what I usually use, and you can adapt it based on what you have available:
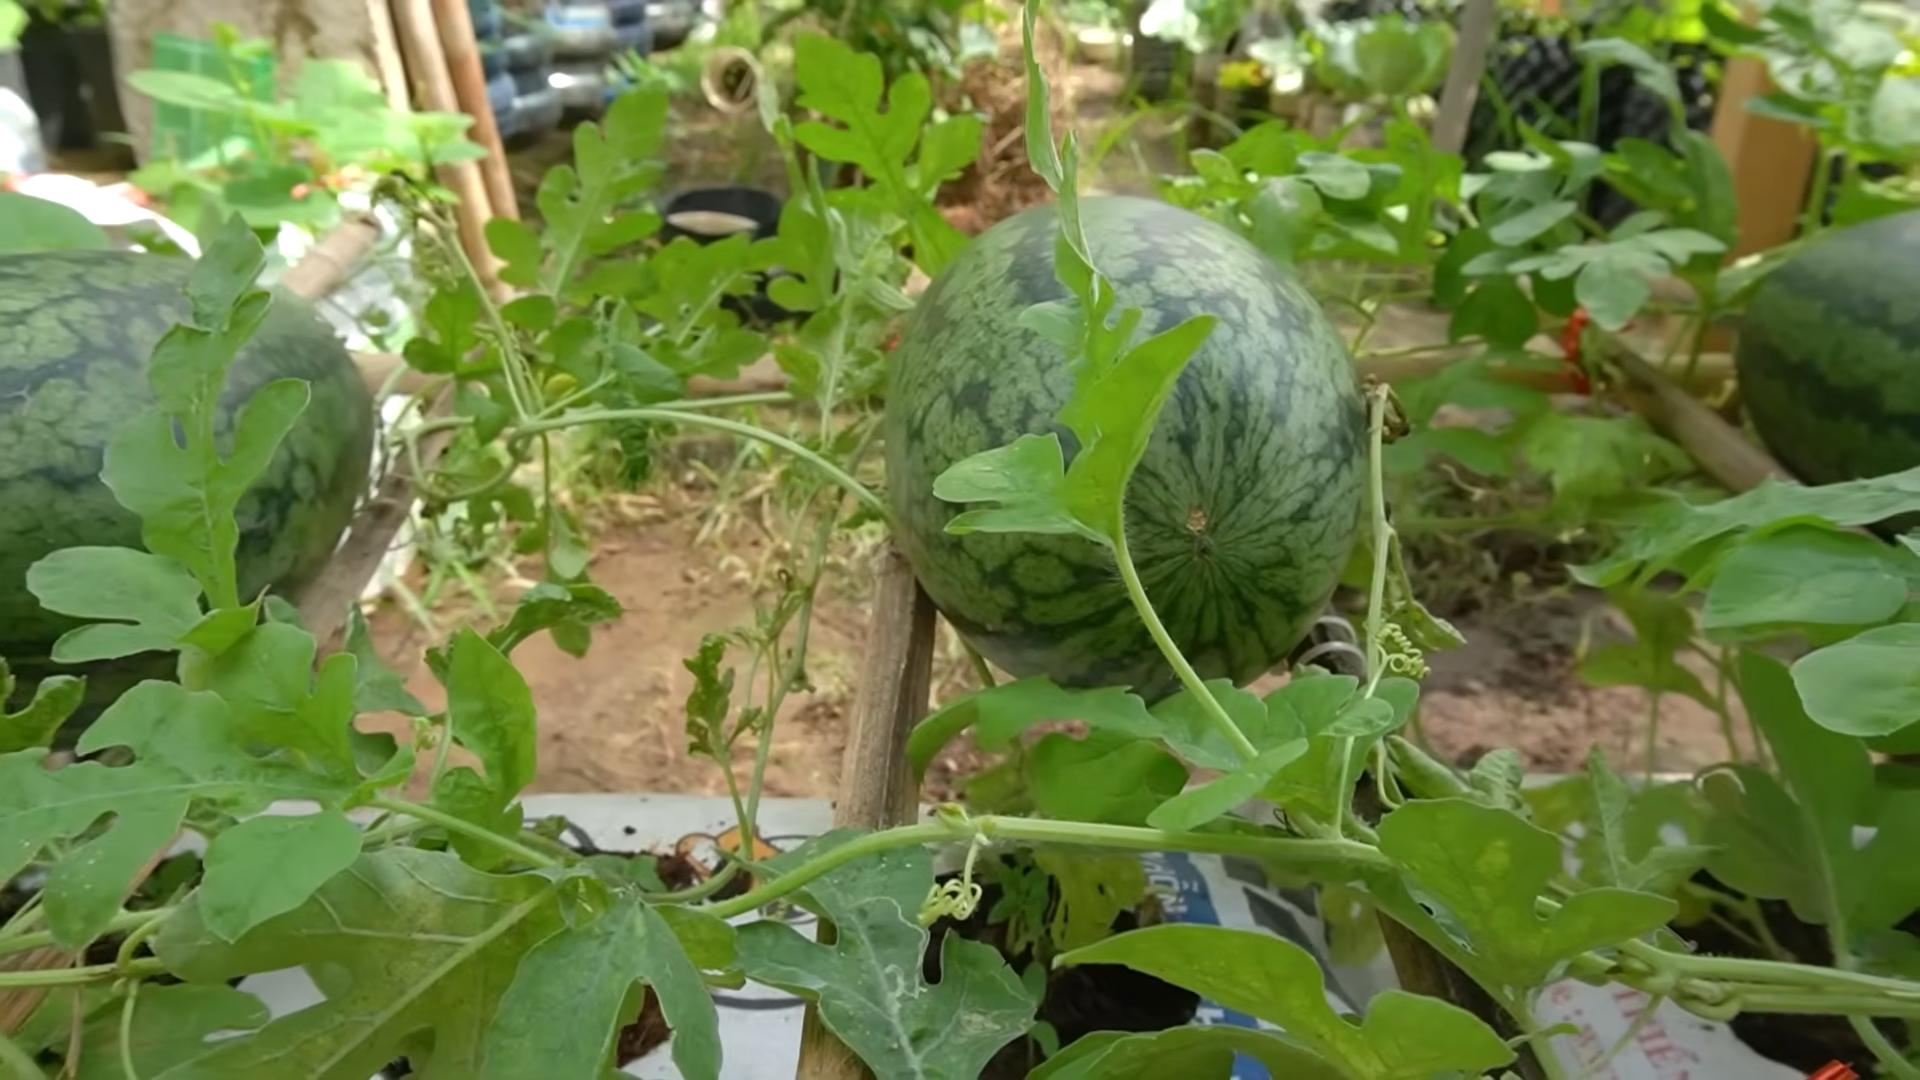
* **Sacks:** Burlap sacks, large feed bags (cleaned thoroughly!), or even heavy-duty reusable shopping bags will work. Aim for sacks that are at least 24 inches in diameter and 24 inches tall. The bigger, the better, as watermelons need room for their roots.
* **Potting Mix:** A high-quality potting mix is crucial. I prefer a mix that’s well-draining and rich in organic matter. You can buy a pre-made mix or create your own by combining equal parts compost, peat moss (or coconut coir), and perlite.
* **Watermelon Seeds or Seedlings:** Choose a variety that’s suitable for your climate and growing season. Bush or compact varieties are generally better suited for container gardening. I personally love Sugar Baby for its small size and sweet flavor.
* **Slow-Release Fertilizer:** Watermelons are heavy feeders, so a slow-release fertilizer will provide them with the nutrients they need throughout the growing season. Look for a fertilizer with a balanced NPK ratio (e.g., 10-10-10).
* **Trowel or Shovel:** For scooping and mixing soil.
* **Watering Can or Hose:** Essential for keeping your watermelon plants hydrated.
* **Support Structure (Optional):** Depending on the watermelon variety, you might need a trellis or support structure to keep the fruits off the ground. This is especially important for larger varieties.
* **Gloves:** To protect your hands.
* **Scissors or Utility Knife:** For cutting the sacks if needed.
* **Drainage Material (Optional):** Gravel or small rocks to place at the bottom of the sacks for improved drainage.
Step-by-Step Guide: Planting Your Watermelon
Now for the fun part! Let’s get those watermelon seeds or seedlings into their new homes.
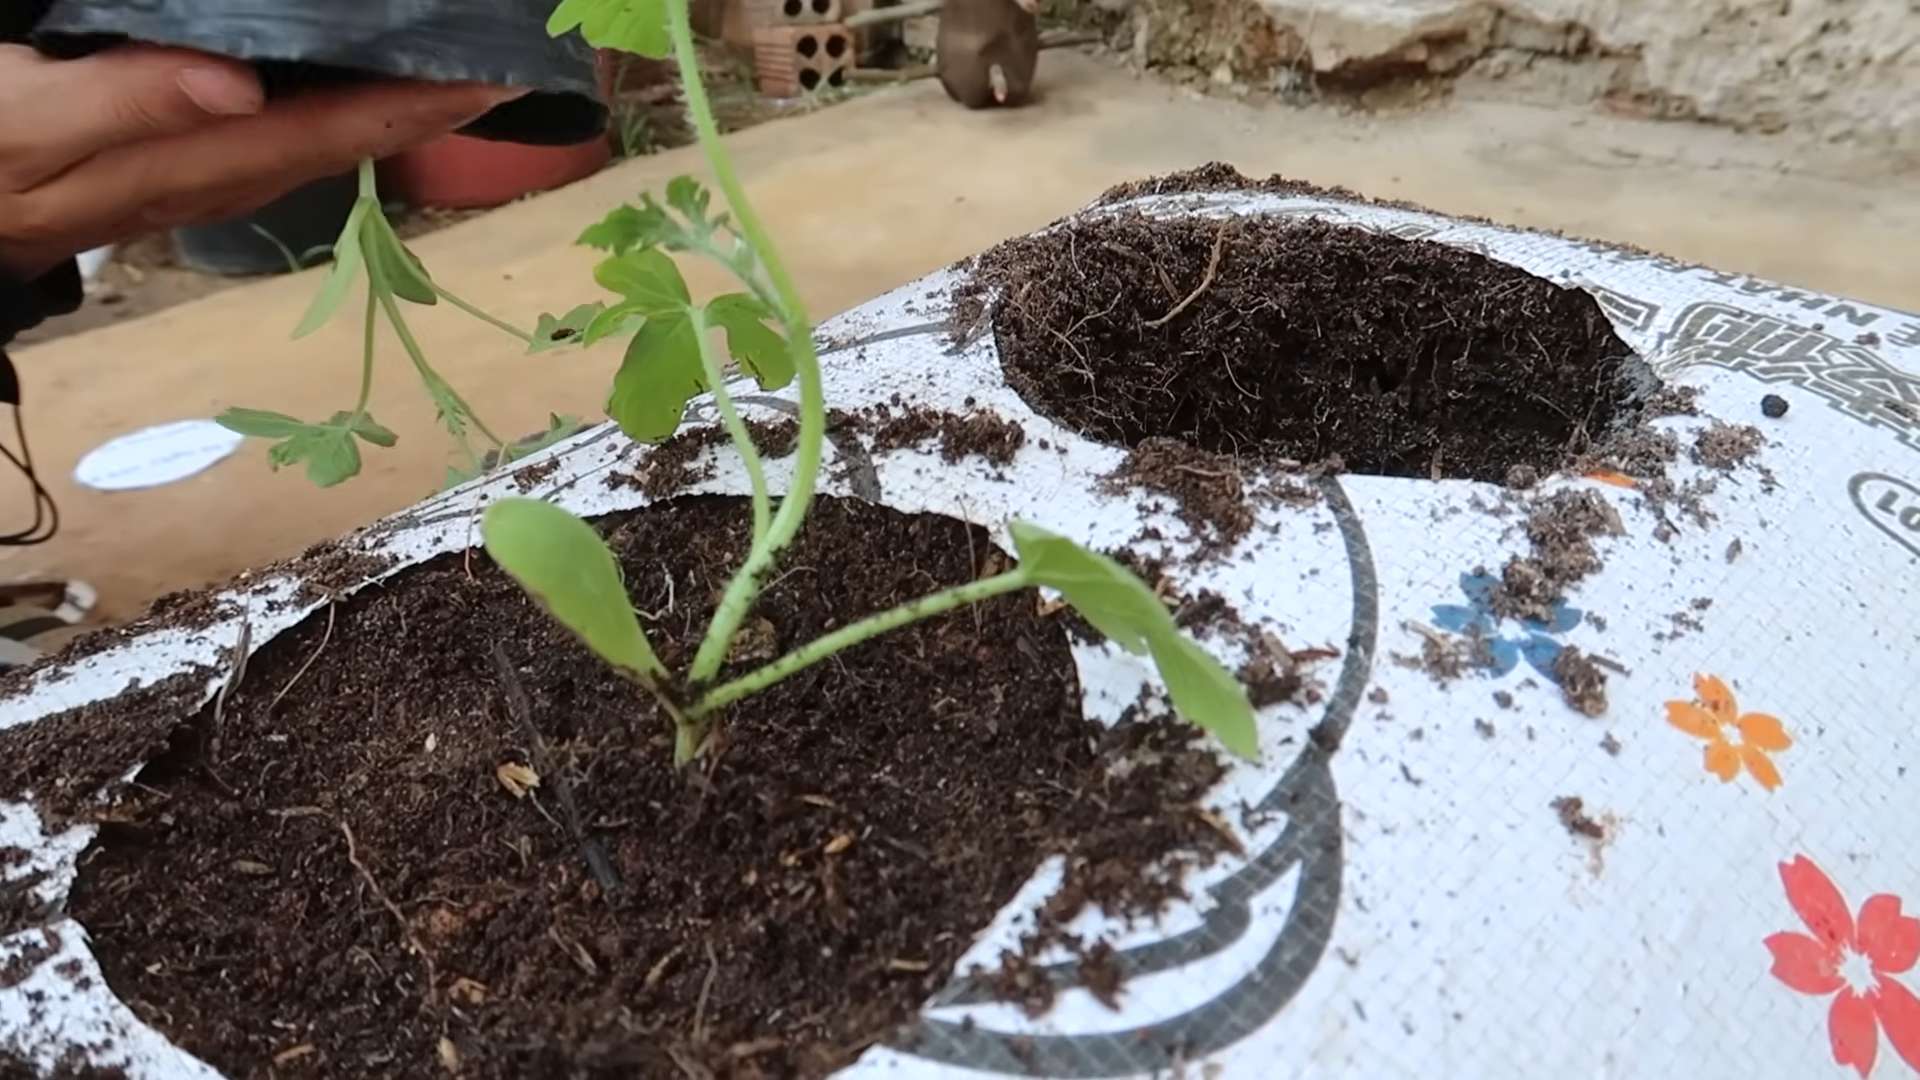
1. **Prepare the Sacks:** If you’re using burlap sacks, you might want to line them with a plastic bag (poke holes for drainage!) to help retain moisture. For feed bags or reusable shopping bags, make sure they’re clean and have drainage holes at the bottom. I usually cut several holes, about half an inch in diameter, spaced evenly around the bottom of the sack.
2. **Add Drainage (Optional):** If you’re concerned about drainage, place a layer of gravel or small rocks at the bottom of the sack. This will help prevent the roots from sitting in water. I usually add about 2-3 inches of gravel.
3. **Fill with Potting Mix:** Fill the sack with potting mix, leaving about 4-6 inches of space at the top. This will give you room to water without the soil overflowing. Gently pat down the soil to remove any air pockets.
4. **Plant the Seeds or Seedlings:**
* **From Seed:** Sow 2-3 watermelon seeds per sack, about 1 inch deep. Space them a few inches apart. Water gently after planting.
* **From Seedling:** Carefully remove the seedling from its container, gently loosening the roots. Dig a hole in the potting mix that’s large enough to accommodate the root ball. Place the seedling in the hole and backfill with potting mix. Water thoroughly.
5. **Add Slow-Release Fertilizer:** Sprinkle a slow-release fertilizer around the base of the plant, following the instructions on the fertilizer package. Gently work the fertilizer into the top layer of soil.
6. **Water Thoroughly:** Water the sack deeply until water drains out of the bottom. This will help settle the soil and ensure that the roots are well-hydrated.
7. **Choose a Sunny Location:** Watermelons need at least 6-8 hours of direct sunlight per day. Place your sacks in a sunny spot where they’ll receive plenty of light.
Caring for Your Watermelon Plants: The Nurturing Phase
Once your watermelon plants are in their sacks, it’s time to provide them with the care they need to thrive.
1. **Watering:** Watermelons need consistent moisture, especially during hot weather. Check the soil moisture regularly by sticking your finger into the soil. If the top inch feels dry, it’s time to water. Water deeply, ensuring that the entire root zone is moistened. Avoid overhead watering, as this can lead to fungal diseases. I prefer to water at the base of the plant.
2. **Fertilizing:** Watermelons are heavy feeders and need regular fertilization to produce large, juicy fruits. In addition to the slow-release fertilizer you added at planting, you can supplement with a liquid fertilizer every 2-3 weeks. Look for a fertilizer that’s high in phosphorus and potassium, which are essential for fruit development. I like to use a seaweed emulsion or fish emulsion fertilizer.
3. **Pruning (Optional):** Some gardeners prune their watermelon plants to encourage fruit production. You can remove some of the side shoots (vines) to direct the plant’s energy towards developing the main fruits. However, pruning is not essential, and you can still get a good harvest without it.
4. **Pollination:** Watermelons require pollination to set fruit. If you’re growing your watermelons indoors or in an area with limited bee activity, you may need to hand-pollinate the flowers. To do this, use a small paintbrush to transfer pollen from the male flowers to the female flowers. Female flowers have a small, immature watermelon at the base of the flower.
5. **Support Structure:** As the watermelons grow, they can become quite heavy. If you’re growing a larger variety, you’ll need to provide some sort of support structure to keep the fruits off the ground. You can use a trellis, a sling made from old pantyhose, or even a piece of wood to support the fruits. This will prevent them from rotting and ensure that they ripen properly.
6. **Pest and Disease Control:** Keep an eye out for pests and diseases that can affect watermelon plants. Common pests include aphids, squash bugs, and cucumber beetles. Common diseases include powdery mildew and fusarium wilt. If you notice any signs of pests or diseases, take action immediately. You can use organic pesticides or fungicides to control these problems. I prefer to use neem oil or insecticidal soap for pest control.
Harvesting Your Watermelons: The Sweet Reward
After all your hard work, it’s finally time to harvest your watermelons! Knowing when a watermelon is ripe can be tricky, but here are a few things to look for:
1. **The Tendril:** The tendril closest to the watermelon should be brown and dry.
2. **The Ground Spot:** The spot where the watermelon rests on the ground (the “ground spot”) should be yellow or cream-colored.
3. **The Sound:** When you thump the watermelon, it should sound hollow.
4. **Days to Maturity:** Check the seed packet or plant tag for the estimated days to maturity. This will give you a general idea of when your watermelons should be ripe.
Once you’ve determined that your watermelon is ripe, use a sharp knife to cut it from the vine. Leave a few inches of stem attached to the watermelon.
Tips and Tricks for Success
Here are a few extra tips and tricks to help you grow the best watermelons possible in sacks:
* Choose the Right Variety: As I mentioned earlier, bush or compact varieties are generally better suited for container gardening. Look for varieties like Sugar Baby, Bush Sugar Baby, or Golden Midget.
* Use a Large Sack: The bigger the sack, the better. Watermelons need plenty of room for their roots to grow.
* Provide Good Drainage: Waterlogged soil can lead to root rot. Make sure your sacks have adequate drainage holes.
* Water Regularly: Watermelons need consistent moisture, especially during hot weather.
* Fertilize Regularly: Watermelons are heavy feeders and need regular fertilization to produce large, juicy fruits.
* Protect from Pests and Diseases: Keep an eye out for pests and diseases and take action immediately if you notice any problems.
* Rotate Your Crops: Don’t plant watermelons in the same sack year after year. Rotate your crops to prevent soilborne diseases.
* Mulch Around the Plants: Mulching helps to retain moisture, suppress weeds, and regulate soil temperature. I like to use straw or wood chips as mulch.
* Be Patient: Growing watermelons takes time
Conclusion
So, there you have it! Growing watermelons in reused sacks isn’t just a quirky gardening experiment; it’s a game-changer for small-space gardeners, eco-conscious individuals, and anyone looking to add a touch of ingenuity to their backyard. We’ve walked you through the process, from selecting the right sack to nurturing your watermelon vine to its juicy, sweet potential.
Why is this DIY trick a must-try? Because it tackles several common gardening challenges head-on. Limited space? Sacks are your answer. Poor soil? You control the growing medium within the sack. Pest problems? Elevated sacks offer better protection. Plus, you’re giving a second life to materials that might otherwise end up in a landfill, contributing to a more sustainable lifestyle.
But the beauty of this method lies in its adaptability. Feel free to experiment with different sack sizes. Larger sacks will accommodate more soil and support larger watermelon varieties, while smaller sacks are perfect for personal-sized melons like Sugar Babies. Consider adding a trellis or support system as your watermelon vine grows, especially if you’re growing heavier varieties. You can also tailor the soil mix to your specific watermelon variety’s needs. Some gardeners swear by adding bone meal for phosphorus, which promotes strong root development and abundant flowering. Others incorporate compost tea for a boost of beneficial microbes.
Don’t be afraid to get creative with your sack design! Paint them with vibrant colors, add drainage holes in unique patterns, or even create a vertical watermelon garden by hanging multiple sacks from a sturdy frame. The possibilities are endless!
Ultimately, the success of your watermelon gardening in reused sacks hinges on your dedication and attention to detail. Regularly check the moisture levels of the soil, provide adequate sunlight, and protect your plants from pests and diseases. With a little patience and care, you’ll be rewarded with a bountiful harvest of delicious, homegrown watermelons.
We wholeheartedly encourage you to give this DIY trick a try. It’s a rewarding experience that connects you with nature, promotes sustainability, and provides you with fresh, flavorful fruit. And most importantly, don’t keep your success (or your learning experiences!) to yourself. Share your journey with us! Post photos of your watermelon sacks, tell us about your favorite varieties, and let us know what tips and tricks you’ve discovered along the way. Together, we can create a community of sack-gardening enthusiasts and inspire others to embrace this innovative and eco-friendly approach to growing their own food. Happy gardening!
Frequently Asked Questions (FAQ)
What kind of sacks are best for growing watermelons?
The ideal sacks are those made from durable, breathable materials like burlap, woven polypropylene (feed sacks), or even sturdy reusable shopping bags. Avoid using plastic bags, as they don’t allow for proper drainage and can lead to root rot. The size of the sack will depend on the watermelon variety you plan to grow. For smaller varieties like Sugar Baby, a 15-20 gallon sack is sufficient. For larger varieties, opt for a 30-50 gallon sack. Ensure the sack is clean and free of any harmful chemicals or residues before using it.
How do I prepare the sacks for planting?
First, thoroughly clean the sacks to remove any dirt or debris. If using burlap sacks, consider lining them with a layer of landscape fabric to prevent the soil from drying out too quickly. This also helps to contain the soil and prevent it from seeping through the burlap. Next, create drainage holes in the bottom of the sack. This is crucial for preventing waterlogging, which can lead to root rot. Space the holes evenly apart, about 2-3 inches in diameter. Finally, fold down the top edge of the sack to create a sturdy rim. This will make it easier to fill the sack with soil and provide additional support for the growing watermelon vine.
What type of soil mix should I use?
Watermelons thrive in well-draining, nutrient-rich soil. A good soil mix for growing watermelons in sacks consists of equal parts of the following:
* **Compost:** Provides essential nutrients and improves soil structure.
* **Potting Soil:** Offers good drainage and aeration.
* **Garden Soil (optional):** If your garden soil is of good quality, you can incorporate it into the mix. However, avoid using heavy clay soil, as it can compact and restrict root growth.
You can also amend the soil mix with slow-release fertilizer or bone meal to provide additional nutrients.
How often should I water my watermelons in sacks?
Watermelons need consistent moisture, especially during hot weather. Check the soil moisture level daily by sticking your finger into the soil. If the top inch feels dry, it’s time to water. Water deeply, until water drains out of the drainage holes. Avoid overwatering, as this can lead to root rot. The frequency of watering will depend on the weather conditions, the size of the sack, and the watermelon variety. As a general rule, watermelons in sacks may need to be watered daily or even twice a day during hot, dry spells.
How much sunlight do watermelons need?
Watermelons need at least 6-8 hours of direct sunlight per day to thrive. Choose a sunny location for your watermelon sacks. If you live in a particularly hot climate, consider providing some afternoon shade to prevent the fruits from scorching.
How do I support the watermelon vine as it grows?
As the watermelon vine grows, it will need support to prevent the fruits from touching the ground and rotting. You can use a trellis, a tomato cage, or even a simple wooden frame to support the vine. For heavier watermelon varieties, you may need to provide additional support for the fruits themselves. You can use slings made from old t-shirts or pantyhose to cradle the watermelons and prevent them from breaking off the vine.
How do I protect my watermelons from pests and diseases?
Watermelons are susceptible to various pests and diseases, including aphids, squash bugs, vine borers, and powdery mildew. Regularly inspect your plants for signs of infestation or disease. If you spot any problems, take action immediately. You can use organic pest control methods, such as insecticidal soap or neem oil, to control aphids and squash bugs. To prevent vine borers, wrap the base of the stem with aluminum foil or pantyhose. To prevent powdery mildew, ensure good air circulation around the plants and avoid overhead watering.
When is the watermelon ripe and ready to harvest?
Determining when a watermelon is ripe can be tricky, but there are a few telltale signs to look for:
* **The tendril closest to the fruit turns brown and dry.**
* **The spot where the watermelon rests on the ground (the “ground spot”) turns from white to yellow.**
* **The watermelon sounds hollow when you thump it.**
The time from planting to harvest varies depending on the watermelon variety, but it typically takes 70-90 days.
Can I grow different varieties of watermelons in sacks?
Absolutely! Experiment with different watermelon varieties to find your favorites. Smaller varieties like Sugar Baby and Bush Sugar Baby are well-suited for growing in sacks. You can also try growing larger varieties, but you’ll need to use larger sacks and provide adequate support for the fruits.
What are some other creative uses for reused sacks in the garden?
Reused sacks are incredibly versatile in the garden! Besides watermelons, you can use them to grow potatoes, tomatoes, peppers, cucumbers, and even herbs. They’re also great for creating raised garden beds or for starting seeds indoors. Get creative and see what other ways you can incorporate reused sacks into your gardening routine!

Leave a Comment