
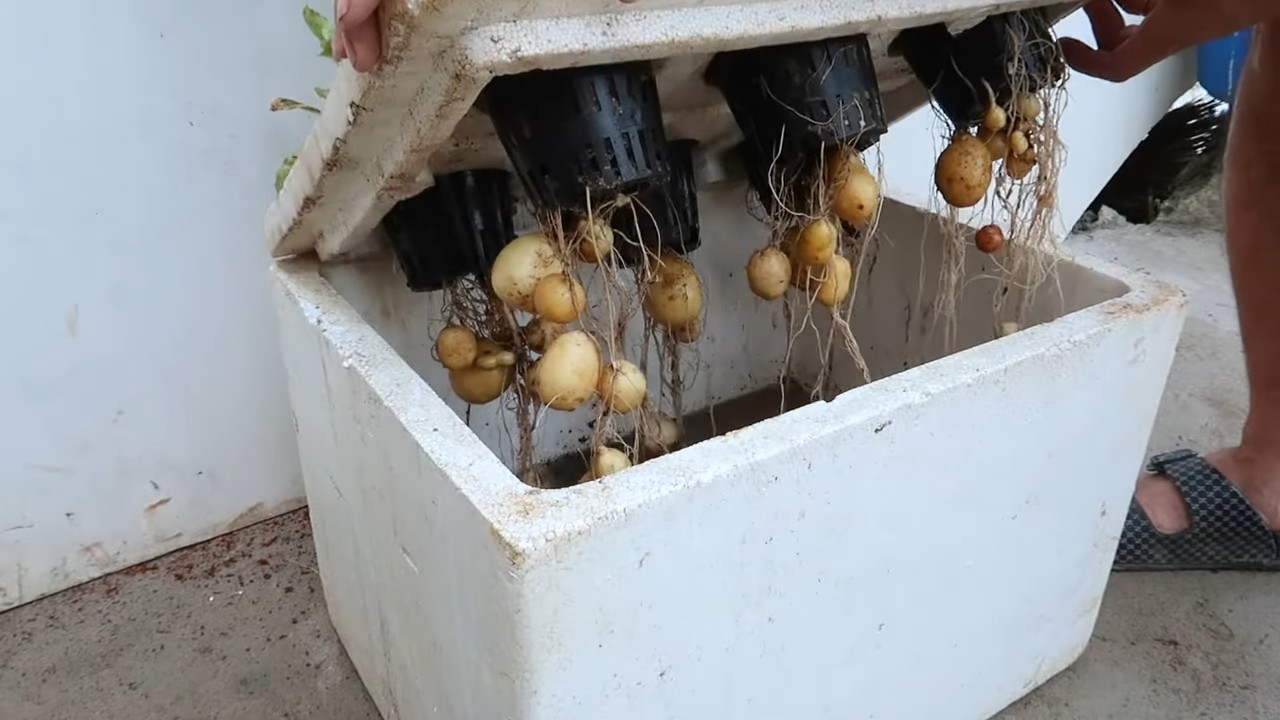
Water Only Potato Growing: Imagine harvesting a bounty of delicious potatoes without ever touching soil! Sounds like something out of a science fiction movie, right? Well, get ready to be amazed because this DIY trick is not only real, but it’s also surprisingly simple. I’m so excited to share this with you!
For centuries, potatoes have been a staple food around the world, originating in the Andes Mountains of South America. From humble peasant fare to gourmet delicacies, the potato’s versatility is undeniable. But what if I told you there’s a way to grow them that bypasses the traditional methods of tilling, planting, and weeding?
In today’s busy world, who has time for extensive gardening? That’s where this water only potato growing hack comes in. It’s perfect for apartment dwellers, those with limited space, or anyone who wants to experience the joy of growing their own food without the hassle. This method is not only space-saving and low-maintenance, but it also offers a fascinating glimpse into the power of hydroponics. Plus, it’s a fantastic project to do with kids, teaching them about plant growth in a fun and engaging way. So, ditch the dirt and let’s dive into the wonderful world of water-grown potatoes!
Kartoffeln nur mit Wasser ziehen: Ein DIY-Experiment
Hallo liebe Gartenfreunde! Habt ihr euch jemals gefragt, ob man Kartoffeln wirklich nur mit Wasser ziehen kann? Ich war auch neugierig und habe mich entschieden, es selbst auszuprobieren. Und wisst ihr was? Es funktioniert! Es ist ein faszinierendes Experiment, das nicht nur Spaß macht, sondern auch zeigt, wie widerstandsfähig diese kleinen Knollen sind. Hier ist meine Anleitung, wie ihr eure eigenen “Wasser-Kartoffeln” ziehen könnt.
Was ihr braucht:
* Eine oder mehrere Bio-Kartoffeln (am besten mit “Augen”, also kleinen Trieben)
* Ein sauberes Glasgefäß oder eine Vase (die Größe hängt von der Kartoffel ab)
* Zahnstocher
* Wasser (am besten gefiltert oder abgestanden)
* Ein sonniger Platz (aber nicht in direkter Mittagssonne)
Schritt-für-Schritt-Anleitung:
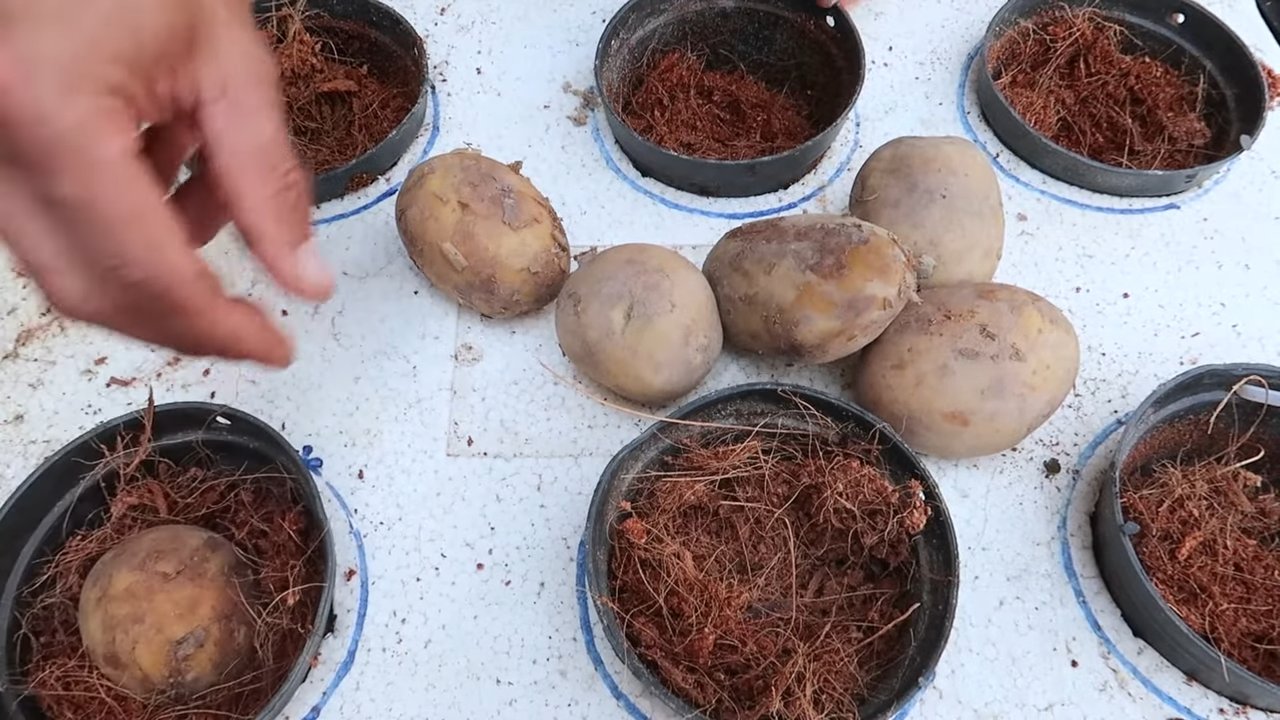
1. Die Kartoffel vorbereiten: Sucht euch eine Kartoffel aus, die schon ein paar “Augen” hat. Das sind die Stellen, aus denen die Triebe wachsen werden. Wenn die Augen noch klein sind, ist das kein Problem, sie werden sich entwickeln. Achtet darauf, dass die Kartoffel fest und gesund aussieht, ohne weiche Stellen oder Schimmel.
2. Zahnstocher anbringen: Nehmt eure Zahnstocher und steckt sie rund um die Mitte der Kartoffel. Sie sollten gleichmäßig verteilt sein und etwa zur Hälfte in der Kartoffel stecken. Diese Zahnstocher dienen dazu, die Kartoffel im Glas zu stabilisieren, sodass nur die untere Hälfte im Wasser ist.
3. Das Glas vorbereiten: Füllt euer Glasgefäß mit Wasser. Achtet darauf, dass das Wasser sauber ist. Ich verwende am liebsten gefiltertes Wasser oder lasse Leitungswasser einen Tag lang stehen, damit das Chlor verdunsten kann.
4. Die Kartoffel ins Glas setzen: Platziert die Kartoffel vorsichtig auf dem Glas, sodass die Zahnstocher am Rand des Glases aufliegen. Die untere Hälfte der Kartoffel sollte im Wasser sein, die obere Hälfte bleibt trocken. Achtet darauf, dass die Augen nach oben zeigen, damit die Triebe nach oben wachsen können.
5. Den richtigen Standort finden: Stellt das Glas mit der Kartoffel an einen hellen Ort, aber vermeidet direkte Mittagssonne. Ein Fensterbrett, das nach Osten oder Westen ausgerichtet ist, ist ideal. Zu viel direkte Sonne kann das Wasser zu schnell erwärmen und die Kartoffel schädigen.
6. Wasserstand kontrollieren und wechseln: Überprüft regelmäßig den Wasserstand und füllt bei Bedarf Wasser nach. Das Wasser sollte immer die untere Hälfte der Kartoffel bedecken. Wechselt das Wasser alle paar Tage, um Algenbildung und Fäulnis zu vermeiden. Ich wechsle das Wasser alle 2-3 Tage.
7. Geduld haben und beobachten: Jetzt heißt es Geduld haben! Es kann ein paar Tage oder sogar Wochen dauern, bis die ersten Triebe erscheinen. Beobachtet die Kartoffel genau und freut euch über jeden neuen Trieb und jede neue Wurzel.
Was passiert jetzt? Die Entwicklung beobachten
Nach ein paar Tagen oder Wochen (je nach Kartoffelsorte und Umgebungstemperatur) solltet ihr die ersten Anzeichen von Leben sehen.
* Wurzelbildung: Zuerst werden sich kleine, weiße Wurzeln aus der unteren Hälfte der Kartoffel bilden. Diese Wurzeln sind wichtig, da sie Wasser und Nährstoffe aufnehmen.
* Triebwachstum: Dann werden die Augen anfangen, sich zu öffnen und kleine, grüne Triebe zu bilden. Diese Triebe werden immer länger und entwickeln Blätter.
Es ist wirklich faszinierend, diesen Prozess zu beobachten. Ich habe festgestellt, dass die Kartoffel, die ich verwendet habe, innerhalb von zwei Wochen beeindruckende Wurzeln und Triebe entwickelt hat.
Herausforderungen und Tipps
Obwohl das Ziehen von Kartoffeln nur mit Wasser relativ einfach ist, gibt es ein paar Herausforderungen, denen ihr begegnen könntet. Hier sind ein paar Tipps, die euch helfen können:
* Fäulnis: Wenn die Kartoffel anfängt zu faulen, ist das ein Zeichen dafür, dass zu viel Wasser vorhanden ist oder das Wasser nicht oft genug gewechselt wird. Entfernt die faulen Stellen vorsichtig und wechselt das Wasser häufiger.
* Algenbildung: Algen können sich im Wasser bilden, besonders wenn das Glas an einem sehr hellen Ort steht. Wechselt das Wasser regelmäßig und reinigt das Glas bei Bedarf.
* Schimmel: Schimmel kann sich auf der Kartoffel bilden, besonders wenn die Luftfeuchtigkeit hoch ist. Sorgt für eine gute Belüftung und entfernt den Schimmel vorsichtig mit einem feuchten Tuch.
* Nährstoffmangel: Obwohl die Kartoffel anfangs genug Nährstoffe gespeichert hat, kann es nach einiger Zeit zu einem Nährstoffmangel kommen. Ihr könnt dem Wasser ein paar Tropfen Flüssigdünger hinzufügen, um die Kartoffel zu unterstützen. Ich verwende einen organischen Flüssigdünger in sehr geringer Konzentration.
Was passiert, wenn die Triebe zu lang werden?
Wenn die Triebe zu lang werden, könnt ihr sie entweder einfach wachsen lassen oder sie abschneiden und in Wasser stellen, um neue Pflanzen zu ziehen. Das Abschneiden der Triebe kann auch dazu beitragen, dass die Kartoffel mehr Energie in die Wurzelbildung steckt.
Kann man die Kartoffel auch einpflanzen?
Ja, natürlich! Wenn ihr möchtet, könnt ihr die Kartoffel auch in Erde einpflanzen, sobald sie genügend Wurzeln und Triebe entwickelt hat. Wählt einen Topf mit guter Drainage und verwendet eine hochwertige Blumenerde. Achtet darauf, die Kartoffel nicht zu tief einzupflanzen, die Triebe sollten noch aus der Erde herausschauen.
Warum funktioniert das überhaupt?
Kartoffeln sind Knollen, die Stärke und andere Nährstoffe speichern. Diese Nährstoffe ermöglichen es der Kartoffel, Wurzeln und Triebe zu bilden, auch wenn sie nur in Wasser steht. Das Wasser liefert die notwendige Feuchtigkeit, während die Kartoffel die Energie für das Wachstum liefert.
Die Vorteile des Wasser-Kartoffel-Experiments
* Einfach und kostengünstig: Ihr braucht nur eine Kartoffel, ein Glas und Wasser.
* Lehrreich: Es ist eine tolle Möglichkeit, Kindern (und Erwachsenen!) den Lebenszyklus einer Pflanze zu zeigen.
* Dekorativ: Eine Kartoffel im Glas ist ein ungewöhnlicher und interessanter Blickfang.
* Nachhaltig: Ihr könnt Kartoffeln, die ihr sonst vielleicht weggeworfen hättet, noch sinnvoll nutzen.
Meine persönlichen Erfahrungen
Ich war wirklich überrascht, wie gut das Experiment funktioniert hat. Innerhalb weniger Wochen hatte meine Kartoffel beeindruckende Wurzeln und Triebe entwickelt. Es war faszinierend zu sehen, wie die Kartoffel aus eigener Kraft wächst und gedeiht. Ich habe auch festgestellt, dass die Kartoffel im Wasser weniger anfällig für Schädlinge ist als im Garten.
Fazit
Das Ziehen von Kartoffeln nur mit Wasser ist ein einfaches, aber faszinierendes DIY-Experiment, das jeder ausprobieren kann. Es ist eine tolle Möglichkeit, den Lebenszyklus einer Pflanze zu beobachten, etwas Neues zu lernen und gleichzeitig einen ungewöhnlichen Blickfang zu schaffen. Probiert es aus und lasst mich wissen, wie es bei euch funktioniert! Ich bin gespannt auf eure Erfahrungen. Viel Spaß beim Gärtnern!
Conclusion
So, there you have it! Growing potatoes using only water might sound like something out of a science fiction novel, but it’s a surprisingly simple and rewarding experiment that can bring a touch of agricultural magic to your home. This method, while unconventional, offers a unique opportunity to witness the power of nature firsthand and cultivate your own food source with minimal resources.
Why is this water-only potato growing trick a must-try? Firstly, it’s incredibly accessible. You don’t need a garden, soil, or even a lot of space. A simple container, some water, and a potato are all you need to embark on this exciting journey. Secondly, it’s a fantastic educational experience, especially for children. Watching the roots sprout and the plant grow from a single potato is a captivating lesson in botany and sustainability. Thirdly, it’s a conversation starter! Imagine the looks of amazement when you tell your friends and family that you’re growing potatoes in water.
But the benefits don’t stop there. This method allows for close observation of the potato’s growth process. You can easily monitor the root development, the emergence of sprouts, and the overall health of the plant. This level of visibility is simply not possible when growing potatoes in soil.
Looking for variations? Consider experimenting with different types of potatoes. Russet, Yukon Gold, and red potatoes all have slightly different characteristics and may respond differently to the water-only growing method. You can also try adding a diluted liquid fertilizer to the water every few weeks to provide the plant with extra nutrients. Be careful not to over-fertilize, as this can damage the roots. Another interesting variation is to use colored glass containers. The color of the glass might affect the amount of light that reaches the roots, potentially influencing growth.
Ready to give it a try? We wholeheartedly encourage you to embark on this exciting adventure. It’s a fun, educational, and ultimately rewarding experience that will give you a newfound appreciation for the power of nature. Don’t be afraid to experiment, adapt, and learn from your mistakes. Every potato is different, and every growing environment is unique.
Most importantly, we want to hear about your experience! Share your photos, tips, and challenges in the comments below. Let’s create a community of water-only potato growers and learn from each other. Did you find that a particular type of potato worked better than others? Did you encounter any unexpected challenges? What were your biggest successes? Your insights will be invaluable to other aspiring potato growers. So, grab a potato, fill a container with water, and get ready to witness the magic of **water only potato growing**! We can’t wait to see what you create.
Frequently Asked Questions (FAQ)
What kind of potatoes work best for water-only growing?
While you can technically use any type of potato, some varieties tend to perform better than others in a water-only environment. Potatoes with more “eyes” or sprouts are generally a good choice, as they indicate a higher potential for growth. Russet potatoes, Yukon Gold potatoes, and red potatoes are all popular options. Experimenting with different varieties is part of the fun! Keep in mind that organic potatoes are often preferred as they haven’t been treated with growth inhibitors.
How much light do the potatoes need when grown in water?
Potatoes grown in water need indirect sunlight. Direct sunlight can overheat the water and damage the roots. A bright, well-lit room is ideal. If you don’t have a naturally bright space, you can supplement with artificial grow lights. Position the lights a few inches above the potato and provide 12-16 hours of light per day. Monitor the water temperature and adjust the lighting as needed to prevent overheating.
How often should I change the water?
It’s crucial to change the water regularly to prevent the buildup of bacteria and algae, which can harm the potato and its roots. We recommend changing the water every 2-3 days. When changing the water, gently rinse the potato and the container to remove any debris. Use fresh, clean water at room temperature. Avoid using chlorinated water, as chlorine can be harmful to plants. If you use tap water, let it sit for 24 hours to allow the chlorine to dissipate.
Can I add fertilizer to the water?
Yes, you can add a diluted liquid fertilizer to the water to provide the potato with extra nutrients. However, it’s essential to use a balanced fertilizer and dilute it significantly. A general rule of thumb is to use about one-quarter of the recommended dosage on the fertilizer label. Over-fertilizing can damage the roots and inhibit growth. Add fertilizer every 2-3 weeks, alternating with regular water changes. Monitor the plant’s health and adjust the fertilizer dosage as needed.
How long does it take to grow potatoes in water?
The time it takes to grow potatoes in water can vary depending on several factors, including the type of potato, the amount of light, the water quality, and the temperature. Generally, you can expect to see sprouts within a week or two. The plant will continue to grow and develop roots over the next few weeks. It may take several months to produce mature potatoes, but the process of watching the plant grow is rewarding in itself.
What do I do if the water starts to smell bad?
If the water starts to smell bad, it’s a sign that bacteria or algae are growing in the container. Immediately change the water and thoroughly clean the container with soap and water. Rinse the container well to remove any soap residue. You can also add a small amount of hydrogen peroxide to the water to help kill bacteria and algae. Monitor the water quality closely and change the water more frequently if the problem persists.
Can I eat the potatoes grown in water?
While it’s technically possible to eat the potatoes grown in water, it’s important to exercise caution. Potatoes grown in water may not be as nutritious or flavorful as potatoes grown in soil. Additionally, there is a risk of contamination from bacteria or algae in the water. If you choose to eat the potatoes, make sure to wash them thoroughly and cook them properly. It’s also a good idea to start with a small amount to see how your body reacts.
What if my potato starts to rot?
If your potato starts to rot, it’s important to remove it from the water immediately to prevent the rot from spreading. Discard the potato and thoroughly clean the container. Start with a fresh potato and fresh water. Make sure to change the water regularly and provide adequate light to prevent the problem from recurring.
Is this method sustainable for long-term potato production?
While growing potatoes in water is a fun and educational experiment, it’s not necessarily the most sustainable method for long-term potato production. Potatoes grown in soil tend to be more nutritious and flavorful. Additionally, soil provides a more stable and supportive environment for the plant. However, water-only potato growing can be a great way to start seeds or propagate new plants.
What are some common problems and how can I fix them?
Some common problems include slow growth, yellowing leaves, and root rot. Slow growth can be caused by insufficient light or nutrients. Yellowing leaves can be a sign of nutrient deficiency or overwatering. Root rot is caused by bacteria or algae in the water. To fix these problems, make sure to provide adequate light and nutrients, change the water regularly, and monitor the plant’s health closely.
Leave a Comment