
Strawberry plastic bottle gardening: Who knew turning trash into treasure could be so delicious? I’m so excited to share this incredibly rewarding and surprisingly simple DIY project that will have you harvesting sweet, juicy strawberries right from your balcony, patio, or even a sunny windowsill! Forget those expensive, store-bought berries – imagine plucking your own, bursting with flavor, knowing you grew them yourself using recycled materials.
The concept of vertical gardening, which this project embraces, has roots stretching back centuries. From the Hanging Gardens of Babylon to the more recent innovations in urban farming, people have always sought creative ways to cultivate plants in limited spaces. This particular method, utilizing plastic bottles, is a modern adaptation, perfectly suited for today’s eco-conscious gardener.
Let’s face it, space is a premium these days, especially for those of us living in apartments or smaller homes. But that shouldn’t stop you from enjoying the joys of fresh produce! This strawberry plastic bottle gardening hack is the perfect solution. It’s not only space-saving but also incredibly budget-friendly, utilizing materials you likely already have on hand. Plus, it’s a fantastic way to reduce waste and contribute to a more sustainable lifestyle. Ready to transform those empty plastic bottles into a thriving strawberry patch? Let’s get started!

Erdbeer-Garten aus Plastikflaschen: Eine DIY-Anleitung
Hallo liebe Gartenfreunde! Habt ihr auch so wenig Platz im Garten oder auf dem Balkon, aber trotzdem Lust auf frische Erdbeeren? Dann habe ich hier die perfekte Lösung für euch: Einen Erdbeer-Garten aus Plastikflaschen! Das ist nicht nur super platzsparend, sondern auch eine tolle Möglichkeit, Plastikmüll zu recyceln. Und das Beste: Es ist kinderleicht! Lasst uns loslegen!
Was du brauchst:
* Mehrere große Plastikflaschen (am besten 1,5 oder 2 Liter)
* Ein scharfes Messer oder eine Schere
* Einen Bohrer oder einen Nagel
* Erde (am besten Erdbeer- oder Gemüseerde)
* Erdbeerpflanzen (am besten junge Pflanzen)
* Eine Schnur oder Draht zum Aufhängen
* Optional: Sprühfarbe (um die Flaschen zu verschönern)
* Optional: Vlies oder Jute (um die Erde vor dem Austrocknen zu schützen)
Vorbereitung der Plastikflaschen
Bevor wir mit dem Bepflanzen beginnen, müssen wir die Plastikflaschen vorbereiten. Das ist aber gar nicht schwer, versprochen!
1. Reinigung: Zuerst solltet ihr die Plastikflaschen gründlich reinigen. Entfernt alle Etiketten und spült sie mit warmem Wasser und Spülmittel aus. Lasst sie anschließend gut trocknen. Das ist wichtig, damit keine Rückstände die Erdbeerpflanzen beeinträchtigen.
2. Löcher bohren: Jetzt kommen wir zum Bohren der Löcher. Diese Löcher sind wichtig für die Entwässerung, damit die Erde nicht zu feucht wird und die Wurzeln der Erdbeerpflanzen nicht faulen.
* Nehmt den Bohrer oder den Nagel und bohrt mehrere kleine Löcher in den Boden der Flasche. Ich empfehle, mindestens 5-6 Löcher zu bohren, um eine gute Drainage zu gewährleisten.
* Bohrt auch ein paar Löcher in den oberen Bereich der Flasche, knapp unterhalb des Flaschenhalses. Diese Löcher dienen der Belüftung und verhindern Staunässe.
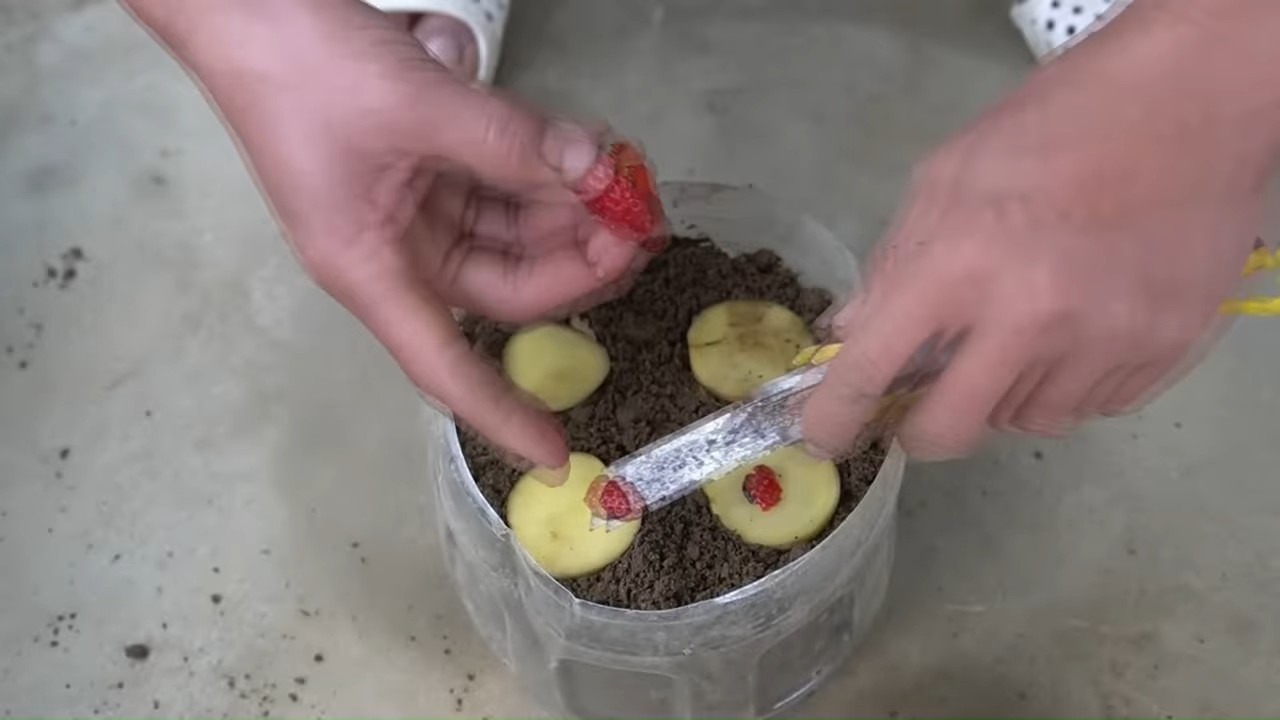
3. Schneiden der Pflanzlöcher: Jetzt kommt der wichtigste Schritt: das Schneiden der Pflanzlöcher. Hier werden später die Erdbeerpflanzen eingesetzt.
* Nehmt das scharfe Messer oder die Schere und schneidet runde oder ovale Löcher in die Seiten der Flasche. Die Größe der Löcher sollte so sein, dass die Erdbeerpflanzen gut hineinpassen, aber nicht herausfallen können.
* Ich empfehle, die Löcher versetzt anzuordnen, damit die Pflanzen genügend Platz haben und sich nicht gegenseitig behindern.
* Die Anzahl der Löcher hängt von der Größe der Flasche ab. Bei einer 1,5-Liter-Flasche könnt ihr etwa 3-4 Löcher schneiden, bei einer 2-Liter-Flasche auch mehr.
* Achtet darauf, dass die Löcher nicht zu nah am Boden der Flasche sind, damit die Erde nicht herausfällt.
4. Optional: Verschönerung der Flaschen: Wenn ihr möchtet, könnt ihr die Plastikflaschen jetzt noch mit Sprühfarbe verschönern. Das ist natürlich kein Muss, aber es macht den Erdbeer-Garten optisch ansprechender.
* Wählt eine Farbe, die euch gefällt und die gut zum Rest eures Gartens oder Balkons passt.
* Sprüht die Flaschen gleichmäßig mit der Farbe ein und lasst sie gut trocknen, bevor ihr mit dem Bepflanzen beginnt.
* Ihr könnt die Flaschen auch mit Mustern oder Motiven bemalen. Lasst eurer Kreativität freien Lauf!
Bepflanzung der Plastikflaschen
Jetzt kommt der spaßige Teil: das Bepflanzen der Plastikflaschen mit den Erdbeerpflanzen!
1. Vorbereitung der Erde: Füllt die Plastikflaschen mit Erde. Am besten eignet sich Erdbeer- oder Gemüseerde, da diese speziell auf die Bedürfnisse von Erdbeerpflanzen abgestimmt ist.
* Füllt die Erde vorsichtig in die Flaschen, bis sie fast voll sind. Lasst etwa 2-3 cm Platz bis zum oberen Rand, damit die Erde beim Gießen nicht überschwappt.
* Drückt die Erde leicht an, damit sie sich setzt.
2. Einsetzen der Erdbeerpflanzen: Jetzt könnt ihr die Erdbeerpflanzen in die Pflanzlöcher einsetzen.
* Nehmt die Erdbeerpflanzen vorsichtig aus ihren Töpfen und lockert die Wurzeln etwas auf.
* Setzt die Pflanzen in die Pflanzlöcher ein und achtet darauf, dass die Wurzeln gut mit Erde bedeckt sind.
* Drückt die Erde um die Pflanzen herum leicht an, damit sie einen guten Halt haben.
3. Gießen: Gießt die Erdbeerpflanzen nach dem Einsetzen gründlich. Das ist wichtig, damit die Erde sich setzt und die Wurzeln gut anwachsen können.
* Gießt die Pflanzen am besten von oben, damit die Erde gleichmäßig feucht wird.
* Achtet darauf, dass das Wasser gut abfließen kann, damit keine Staunässe entsteht.
4. Optional: Schutz vor Austrocknung: Um die Erde vor dem Austrocknen zu schützen, könnt ihr sie mit Vlies oder Jute abdecken. Das ist besonders an heißen Tagen sinnvoll.
* Schneidet das Vlies oder die Jute in passende Stücke und legt sie über die Erde.
* Befestigt das Vlies oder die Jute mit kleinen Steinen oder Klammern, damit es nicht vom Wind weggetragen wird.
Aufhängen des Erdbeer-Gartens
Jetzt müssen wir den Erdbeer-Garten noch aufhängen. Hierfür gibt es verschiedene Möglichkeiten.
1. Befestigung der Schnur oder des Drahtes: Nehmt die Schnur oder den Draht und befestigt sie an den Flaschen.
* Führt die Schnur oder den Draht durch die Löcher im oberen Bereich der Flasche.
* Verknotet die Schnur oder den Draht fest, damit die Flaschen sicher hängen.
* Achtet darauf, dass die Schnur oder der Draht stabil genug ist, um das Gewicht der bepflanzten Flaschen zu tragen.
2. Aufhängen: Hängt die Flaschen an einem sonnigen Ort auf. Erdbeerpflanzen brauchen viel Sonne, um gut zu wachsen und Früchte zu tragen.
* Achtet darauf, dass die Flaschen nicht zu eng nebeneinander hängen, damit die Pflanzen genügend Platz haben.
* Hängt die Flaschen am besten an einem Ort auf, der vor Wind geschützt ist, damit sie nicht herunterfallen.
* Ihr könnt die Flaschen an einem Balkongeländer, einem Zaun oder einem Baum aufhängen.
Pflege des Erdbeer-Gartens
Damit euer Erdbeer-Garten gut gedeiht und viele leckere Erdbeeren trägt, ist eine regelmäßige Pflege wichtig.
1. Gießen: Gießt die Erdbeerpflanzen regelmäßig, besonders an heißen Tagen. Die Erde sollte immer leicht feucht sein, aber nicht zu nass.
* Gießt die Pflanzen am besten morgens oder abends, wenn die Sonne nicht so stark scheint.
* Vermeidet es, die Blätter der Pflanzen zu gießen, da dies zu Pilzbefall führen kann.
2. Düngen: Düngt die Erdbeerpflanzen regelmäßig mit einem speziellen Erdbeerdünger. Das sorgt für eine reiche Ernte.
* Beachtet die Anweisungen auf der Verpackung des Düngers.
* Düngt die Pflanzen am besten alle 2-3 Wochen.
3. Entfernen von Unkraut: Entfernt regelmäßig Unkraut aus den Flaschen. Unkraut entzieht den Erdbeerpflanzen Nährstoffe und Wasser.
4. Schutz vor Schädlingen: Achtet auf Schädlinge wie Schnecken oder Blattläuse. Bei Befall solltet ihr die Schädlinge bekämpfen, um die Erdbeerpflanzen zu schützen.
* Es gibt verschiedene natürliche Mittel zur Schädlingsbekämpfung, wie zum Beispiel Brennnesseljauche oder Knoblauchsud.
5. Ernte: Wenn die Erdbeeren rot und reif sind, könnt ihr sie ernten. Pflückt die Erdbeeren vorsichtig ab, damit ihr die Pflanzen nicht beschädigt.
* Erntet die
Conclusion
So, there you have it! Transforming ordinary plastic bottles into a thriving vertical strawberry garden is not just a fun project; it’s a sustainable, space-saving, and incredibly rewarding way to enjoy fresh, homegrown strawberries. We’ve walked you through the simple steps, highlighting the ease and accessibility of this DIY trick. But why is this method a must-try?
Firstly, it’s an eco-conscious choice. By repurposing plastic bottles, you’re actively reducing waste and giving these materials a new lease on life. In a world grappling with plastic pollution, every little bit helps. Secondly, it’s perfect for those with limited space. Whether you have a small balcony, a tiny patio, or even just a sunny windowsill, this vertical garden allows you to maximize your growing potential without sacrificing precious square footage. Imagine the joy of plucking ripe, juicy strawberries right outside your kitchen window!
Beyond the practical benefits, this project offers a unique opportunity to connect with nature and experience the satisfaction of growing your own food. There’s something truly special about nurturing a plant from seedling to harvest, and this method makes it accessible to everyone, regardless of their gardening experience.
But the possibilities don’t stop there! Feel free to experiment with different variations to personalize your strawberry plastic bottle gardening project. Consider painting the bottles in vibrant colors to add a touch of whimsy to your garden. You could also try using different types of soil mixes to see which one yields the best results for your strawberries. Why not add companion plants like basil or marigolds to deter pests and enhance the flavor of your strawberries?
For a more advanced approach, you could even incorporate a simple irrigation system using a drip line to ensure consistent watering. This is especially helpful if you live in a hot or dry climate. Another fun variation is to create a tiered system by stacking multiple bottle gardens on top of each other, creating a stunning vertical display.
The key is to have fun and let your creativity flow. Don’t be afraid to experiment and adapt the method to suit your own needs and preferences. After all, gardening is a journey of discovery, and there’s always something new to learn.
We wholeheartedly encourage you to give this DIY strawberry plastic bottle gardening trick a try. It’s a simple, affordable, and incredibly rewarding project that will bring joy and fresh strawberries to your life. Once you’ve created your own vertical strawberry garden, we’d love to hear about your experience! Share your photos, tips, and tricks in the comments below. Let’s inspire each other to create a greener and more sustainable world, one strawberry plant at a time. Happy gardening!
Frequently Asked Questions (FAQ)
What type of plastic bottles are best for this project?
Ideally, you should use sturdy, food-grade plastic bottles. Look for bottles that are relatively thick and can withstand the weight of the soil and plants. Two-liter soda bottles or larger juice bottles work well. Make sure to thoroughly clean the bottles before using them to remove any residue. Avoid using bottles that have contained harsh chemicals, as these could contaminate the soil and harm your plants. Clear or translucent bottles are preferable as they allow you to monitor the soil moisture levels.
What kind of soil should I use for my strawberry plastic bottle garden?
A well-draining potting mix is essential for growing healthy strawberries in plastic bottles. Avoid using garden soil, as it tends to compact and doesn’t provide adequate drainage. A good mix would include equal parts of potting soil, perlite, and compost. The potting soil provides nutrients, the perlite improves drainage, and the compost adds organic matter. You can also add a slow-release fertilizer to the mix to provide a steady supply of nutrients to your plants.
How often should I water my strawberry plants in plastic bottles?
The frequency of watering will depend on several factors, including the weather, the type of soil you’re using, and the size of the bottles. As a general rule, you should water your strawberry plants when the top inch of soil feels dry to the touch. Avoid overwatering, as this can lead to root rot. Make sure the bottles have drainage holes to allow excess water to escape. During hot weather, you may need to water your plants more frequently.
Where should I place my strawberry plastic bottle garden?
Strawberries need at least six to eight hours of sunlight per day to thrive. Choose a location that receives plenty of sunlight, such as a sunny balcony, patio, or windowsill. If you live in a hot climate, you may need to provide some afternoon shade to protect your plants from scorching. You can also rotate the bottles periodically to ensure that all sides of the plants receive adequate sunlight.
How do I prevent pests and diseases in my strawberry plastic bottle garden?
Regularly inspect your plants for signs of pests or diseases. Common pests that affect strawberries include aphids, spider mites, and slugs. You can control these pests by handpicking them off the plants, using insecticidal soap, or introducing beneficial insects like ladybugs. To prevent fungal diseases, ensure good air circulation around your plants and avoid overwatering. You can also use a fungicide if necessary. Companion planting with herbs like basil or marigolds can also help deter pests.
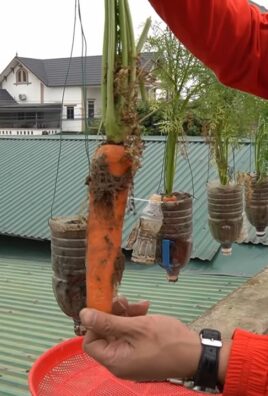
Can I grow other plants besides strawberries in plastic bottles?
Yes, you can grow a variety of other plants in plastic bottles, including herbs, vegetables, and flowers. Some good options include lettuce, spinach, kale, basil, mint, and petunias. Choose plants that have shallow root systems and don’t require a lot of space. Make sure to provide adequate drainage and use a suitable potting mix for the specific plants you’re growing.
How do I overwinter my strawberry plants in plastic bottles?
If you live in a cold climate, you’ll need to protect your strawberry plants from frost and freezing temperatures. You can move the bottles indoors to a sunny location or a greenhouse. Alternatively, you can wrap the bottles in burlap or bubble wrap to insulate them. Water the plants sparingly during the winter months, as they will be dormant. In the spring, gradually acclimate the plants to outdoor conditions before placing them back in their permanent location.
How long will my strawberry plants last in plastic bottles?
With proper care, strawberry plants can last for several years in plastic bottles. However, they may become less productive over time. It’s a good idea to propagate new plants from runners every few years to ensure a continuous supply of strawberries. You can also repot the plants into larger containers as they grow.
What are runners and how do I use them to propagate new strawberry plants?
Runners are horizontal stems that grow from the base of the strawberry plant. They produce small plantlets that can be used to propagate new plants. To propagate new plants from runners, simply place the plantlet in a small pot filled with potting mix. Keep the soil moist and the plantlet will develop roots. Once the roots are established, you can cut the runner from the mother plant and transplant the new plant into its own plastic bottle.
Is this strawberry plastic bottle gardening method sustainable?
Yes, this method is highly sustainable. It repurposes waste materials, reduces the need for large garden spaces, and allows you to grow your own food locally, reducing your carbon footprint. By using organic gardening practices, you can further enhance the sustainability of this method.
Leave a Comment