
Strawberry Garden Tip: Unlock the secrets to a bountiful harvest right in your own backyard! Imagine plump, juicy strawberries bursting with flavor, ready to be plucked and enjoyed fresh from the vine. Sounds like a dream, right? Well, it doesn’t have to be! For centuries, cultivating strawberries has been a cherished tradition, from ancient Roman gardens to the sprawling fields of modern farms. These little red gems have always held a special place in our hearts (and stomachs!).
But let’s be honest, sometimes growing strawberries can feel a bit…challenging. Pests, diseases, and unpredictable weather can all conspire to thwart your efforts. That’s where this DIY guide comes in! I’m going to share some simple yet effective tricks and hacks that will help you overcome common obstacles and maximize your strawberry yield.
Whether you’re a seasoned gardener or just starting out, you’ll find valuable insights to transform your strawberry patch into a thriving oasis. Why spend a fortune at the grocery store when you can enjoy the satisfaction of growing your own delicious, organic strawberries? Plus, there’s nothing quite like the taste of a homegrown strawberry warmed by the sun. So, grab your gardening gloves, and let’s dive into these essential Strawberry Garden Tip that will have you enjoying a strawberry feast in no time!
DIY Strawberry Tower: A Vertical Garden for Sweet Success
Hey there, fellow garden enthusiasts! I’m so excited to share one of my favorite DIY projects with you: building a strawberry tower! If you’re short on space, or just want a visually stunning way to grow your own delicious strawberries, this is the perfect project for you. It’s surprisingly easy, and the results are incredibly rewarding. Trust me, there’s nothing quite like plucking a sun-ripened strawberry from your own vertical garden. Let’s get started!
Materials You’ll Need
Before we dive in, let’s gather all the necessary materials. This will save you time and frustration later on.
* Two Plastic Buckets: One large (about 5-gallon) and one slightly smaller (about 2-gallon). The smaller one needs to fit inside the larger one with some space around it.
* Drill with Various Drill Bits: You’ll need a large drill bit (around 2-3 inches) for the planting holes and a smaller bit for drainage and irrigation.
* Landscape Fabric or Burlap: This will line the inner bucket and prevent soil from washing out.
* Potting Soil: Use a high-quality potting mix specifically formulated for containers.
* Gravel or Small Rocks: For drainage at the bottom of the tower.
* PVC Pipe (1-2 inch diameter): This will be the irrigation system. It should be slightly taller than your assembled tower.
* End Cap for PVC Pipe: To seal the bottom of the irrigation pipe.
* Strawberry Plants: Choose everbearing varieties for a continuous harvest throughout the season. I recommend starting with about 15-20 plants.
* Measuring Tape or Ruler: For accurate hole placement.
* Marker or Pen: To mark the drilling spots.
* Gloves: To protect your hands.
* Safety Glasses: Always a good idea when drilling!
* Utility Knife or Scissors: For cutting the landscape fabric.
Preparing the Buckets
This is where we start transforming ordinary buckets into a strawberry paradise!
1. Drill Planting Holes in the Larger Bucket: This is the most crucial step, so take your time and be precise.
* Start by marking the locations for your planting holes. I like to stagger them in rows, creating a visually appealing spiral pattern. Space the holes about 6-8 inches apart, both vertically and horizontally.
* Use your large drill bit to create the holes. Be careful not to crack the plastic. Apply steady pressure and let the drill do the work.
* Deburr the edges of the holes with a utility knife or sandpaper to prevent damage to your strawberry plants.
2. Prepare the Inner Bucket for Irrigation: This bucket will house the irrigation system and help distribute water evenly throughout the tower.
* Drill numerous small drainage holes (about 1/4 inch) in the bottom and sides of the smaller bucket. These holes will allow water to seep out and nourish the strawberry plants.
* Line the inside of the smaller bucket with landscape fabric or burlap. This will prevent soil from clogging the drainage holes. Secure the fabric with tape or staples if needed.
3. Prepare the PVC Irrigation Pipe: This pipe will deliver water directly to the center of the tower.
* Drill small holes (about 1/8 inch) along the length of the PVC pipe, spacing them about 2-3 inches apart. These holes will allow water to seep out and irrigate the soil.
* Attach the end cap to the bottom of the PVC pipe. This will prevent water from draining out too quickly.
Assembling the Strawberry Tower
Now for the fun part – putting everything together!
1. Place the Larger Bucket: Choose a sunny location for your strawberry tower. Strawberries need at least 6-8 hours of sunlight per day.
2. Add a Layer of Gravel: Pour a layer of gravel or small rocks (about 2-3 inches) into the bottom of the larger bucket. This will improve drainage and prevent the soil from becoming waterlogged.
3. Insert the Inner Bucket: Carefully place the smaller bucket inside the larger bucket, centering it as much as possible. The smaller bucket should sit on top of the gravel layer.
4. Position the Irrigation Pipe: Insert the PVC pipe into the center of the smaller bucket, pushing it down until it reaches the gravel layer. Make sure the pipe is standing upright.
5. Start Filling with Potting Soil: Begin filling the space between the two buckets with potting soil. As you fill, gently pack the soil around the inner bucket and the PVC pipe.
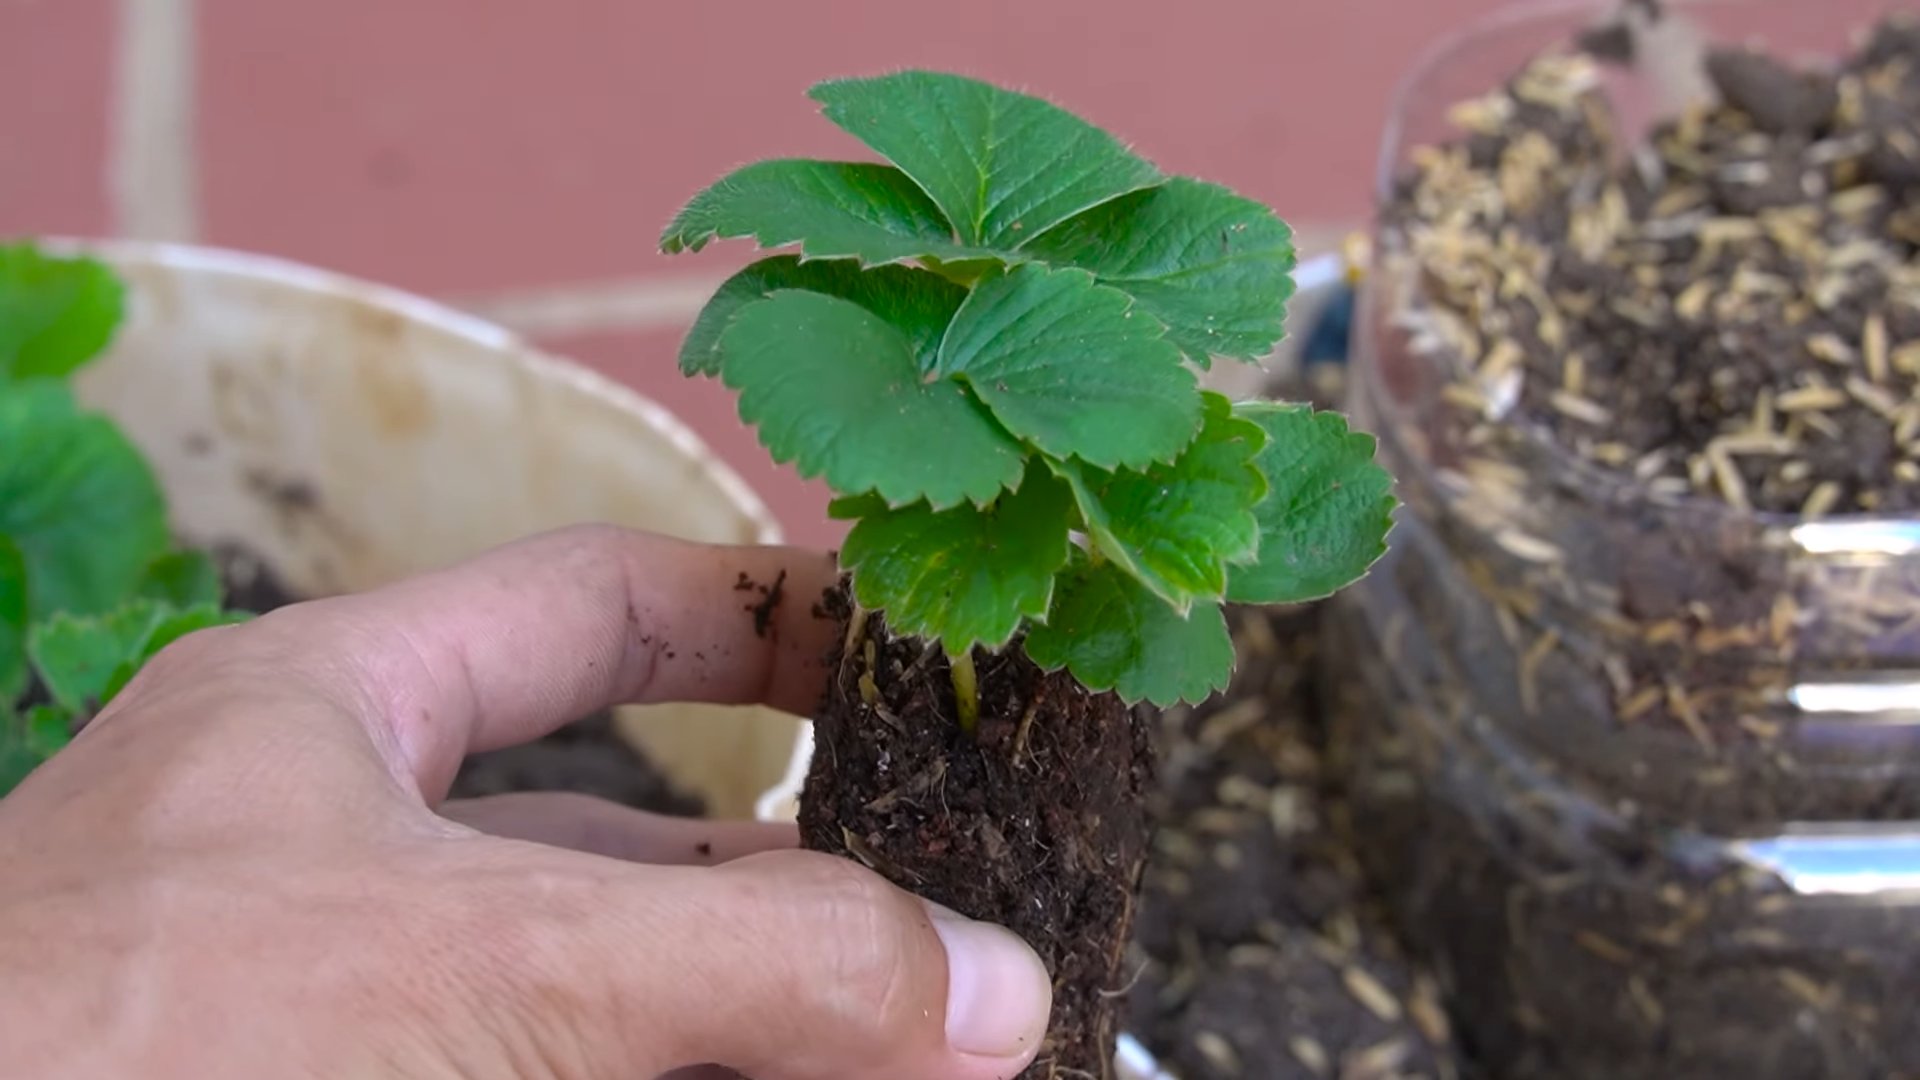
6. Plant Your Strawberry Plants: Once you reach the first row of planting holes, carefully insert your strawberry plants. Gently tease the roots apart and position the plants so that the crown (where the stems meet the roots) is just above the soil level.
7. Continue Filling and Planting: Continue filling the tower with potting soil and planting your strawberry plants, row by row, until you reach the top.
8. Top it Off: Fill the top of the inner bucket with potting soil, leaving a few inches of space at the top for watering. You can also plant a few strawberry plants on top of the tower for a fuller look.
Caring for Your Strawberry Tower
Congratulations! You’ve built your own strawberry tower. Now, let’s talk about how to keep it thriving.
1. Watering: Water your strawberry tower regularly, especially during hot, dry weather. Pour water directly into the PVC pipe, allowing it to slowly seep out and irrigate the soil. You can also water the plants from the top, but make sure to avoid getting the foliage wet, as this can lead to fungal diseases. I usually water mine every other day, but you’ll need to adjust based on your local climate and the moisture level of the soil.
2. Fertilizing: Strawberries are heavy feeders, so it’s important to fertilize them regularly. Use a balanced fertilizer specifically formulated for strawberries or other fruiting plants. Follow the instructions on the fertilizer package. I like to use a slow-release fertilizer at planting time and then supplement with a liquid fertilizer every few weeks.
3. Sunlight: As mentioned earlier, strawberries need at least 6-8 hours of sunlight per day. Make sure your strawberry tower is located in a sunny spot. If you live in a particularly hot climate, you may need to provide some afternoon shade to prevent the plants from getting scorched.
4. Pest and Disease Control: Keep an eye out for common strawberry pests, such as aphids, slugs, and spider mites. Treat infestations promptly with insecticidal soap or other appropriate methods. To prevent fungal diseases, avoid overwatering and ensure good air circulation around the plants. You can also use a fungicide if necessary.
5. Pruning: Remove any dead or diseased leaves and runners (the long stems that strawberry plants send out) to encourage healthy growth and fruit production.
6. Winter Protection: In colder climates, you’ll need to protect your strawberry tower from freezing temperatures. You can wrap the tower in burlap or move it to a sheltered location, such as a garage or shed.
Troubleshooting Tips
Even with the best care, you might encounter a few challenges along the way. Here are some common issues and how to address them:
* Yellowing Leaves: This could be a sign of overwatering, nutrient deficiency, or pest infestation. Check the soil moisture, fertilize the plants, and inspect for pests.
* Small or Few Strawberries: This could be due to insufficient sunlight, poor pollination, or nutrient deficiency. Make sure your strawberry tower is getting enough sunlight, encourage pollination by planting flowers nearby, and fertilize the plants regularly.
* Root Rot: This is caused by overwatering and poor drainage. Make sure your strawberry tower has good drainage and avoid overwatering. If you suspect root rot, you may need to repot the plants in fresh soil.
* Pest Infestations: Regularly inspect your plants for pests and treat infestations promptly.
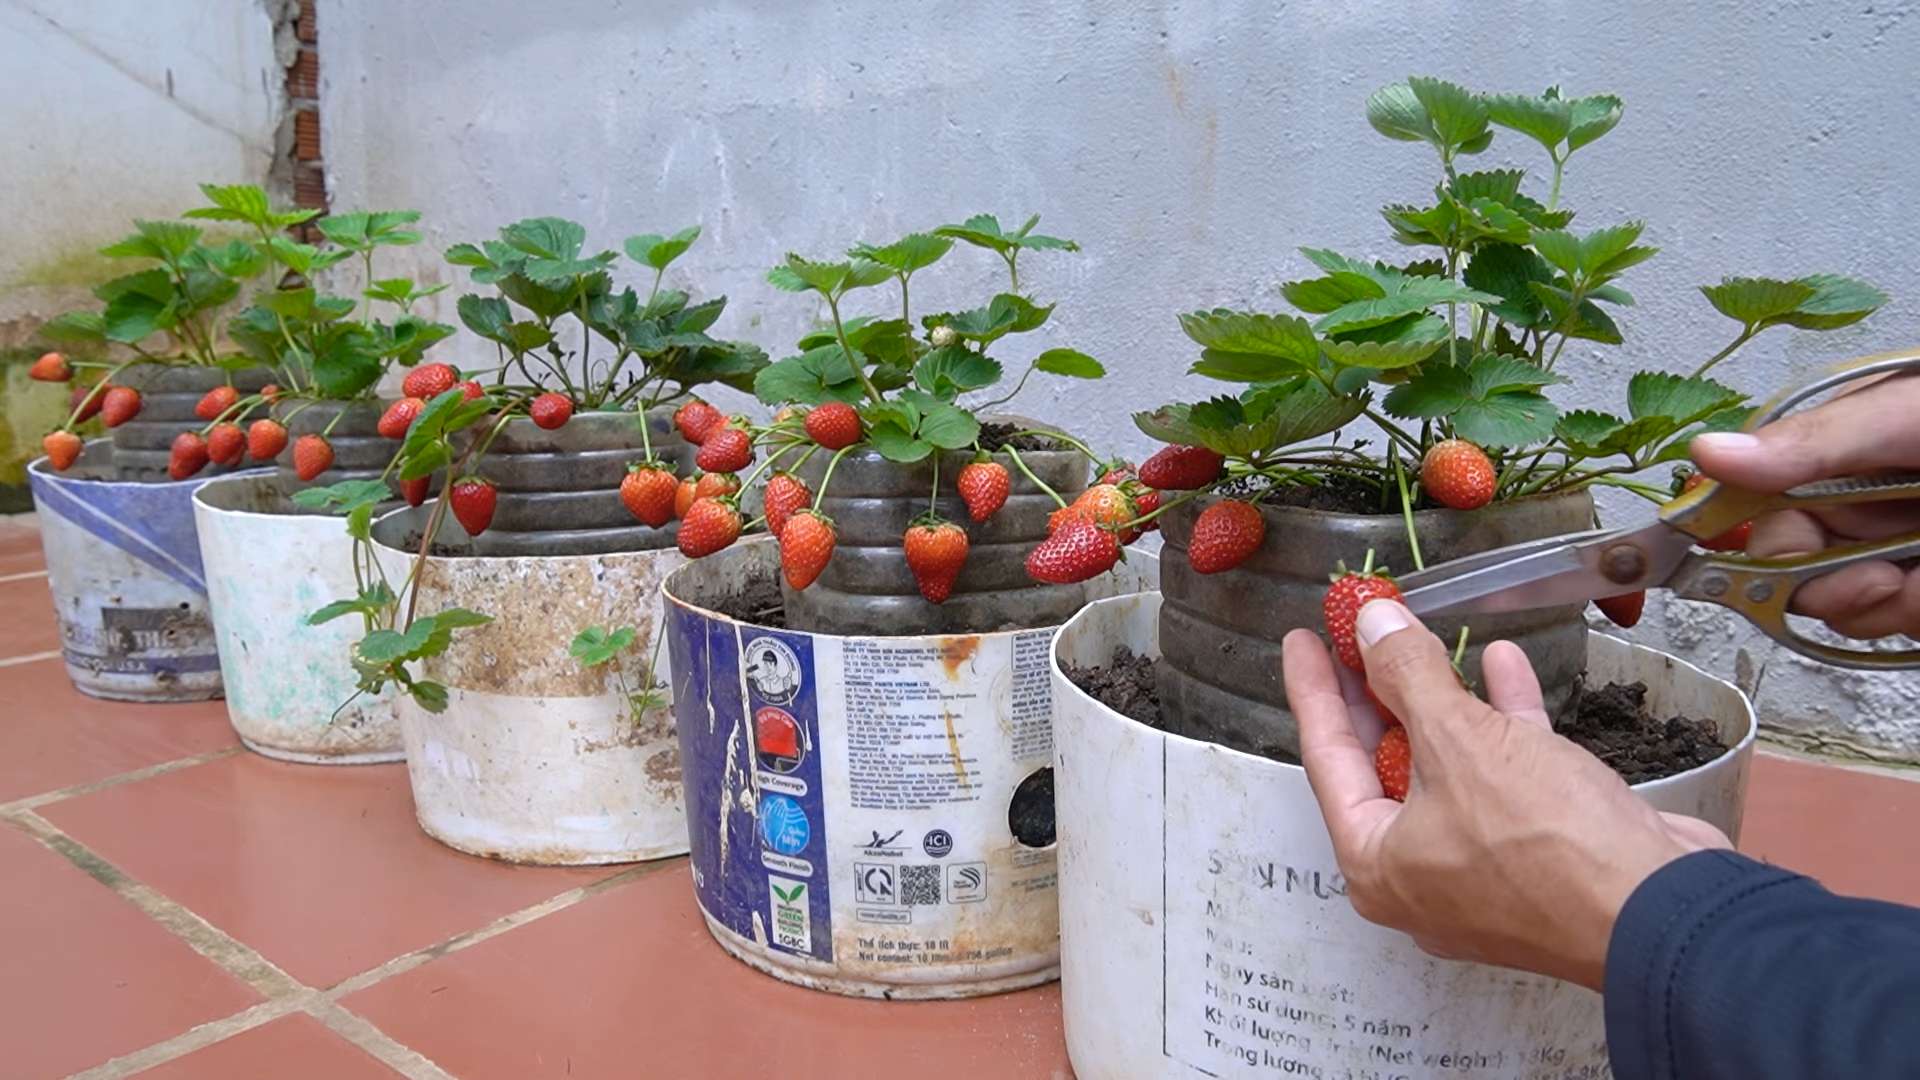
Enjoying Your Harvest
The best part of building a strawberry tower is, of course, enjoying the delicious fruits of your labor! Harvest your strawberries when they are fully ripe and red. Gently pluck them from the plant, being careful not to damage the surrounding foliage. Enjoy your fresh strawberries in salads, smoothies, desserts, or simply eat them straight from the tower!
I hope you found this guide helpful. Building a strawberry tower is a fun and rewarding project that will provide you with fresh, delicious strawberries all season long. Happy gardening!
Conclusion
So, there you have it! This simple, yet incredibly effective strawberry garden tip is more than just a gardening hack; it’s a pathway to a more abundant, healthier, and ultimately, more rewarding strawberry harvest. We’ve walked you through the process, highlighting the benefits of using this DIY method to protect your precious berries from pests, diseases, and the dreaded ground rot. Think of it as giving your strawberries a little boost, a leg up in the world, allowing them to thrive and reach their full potential.
Why is this a must-try? Because it addresses several key challenges faced by strawberry growers, especially those with limited space or those battling persistent garden pests. It’s a cost-effective solution, utilizing readily available materials, and it’s incredibly easy to implement, even for beginner gardeners. Imagine the satisfaction of harvesting plump, juicy, perfectly ripe strawberries, knowing that you played a direct role in their success.
But the beauty of this strawberry garden tip lies in its adaptability. Feel free to experiment with different materials for your supports. Instead of plastic bottles, consider using repurposed yogurt containers, small terracotta pots, or even carefully crafted wooden platforms. The key is to provide a clean, dry surface for the strawberries to rest upon.
For those in particularly hot climates, consider using lighter-colored materials to reflect sunlight and prevent the berries from overheating. You could also add a layer of mulch around the base of the plants to help retain moisture and regulate soil temperature.
And for those battling specific pests, consider adding companion plants around your strawberry patch. Marigolds, for example, are known to repel nematodes and other harmful insects. Basil is another great companion plant, attracting beneficial insects and improving the overall health of your strawberry plants.
We wholeheartedly encourage you to give this strawberry garden tip a try. It’s a small investment of time and effort that can yield significant rewards. Don’t be afraid to get creative and adapt the method to suit your specific needs and preferences.
Most importantly, we want to hear about your experiences! Share your photos, tips, and stories in the comments below. Let us know what worked for you, what challenges you faced, and any variations you tried. Together, we can create a community of strawberry enthusiasts, sharing our knowledge and helping each other grow the best strawberries possible. Let’s transform our gardens into strawberry paradises, one simple tip at a time! We are confident that this strawberry garden tip will become a staple in your gardening routine.
Frequently Asked Questions (FAQ)
What are the main benefits of using this strawberry garden tip?
The primary benefits include:
* Protection from Pests: Elevating the strawberries off the ground reduces their exposure to slugs, snails, and other ground-dwelling pests.
* Prevention of Rot: By keeping the berries dry and well-ventilated, you minimize the risk of fungal diseases and fruit rot.
* Improved Air Circulation: Better air circulation promotes healthy plant growth and reduces the likelihood of mold and mildew.
* Easier Harvesting: Elevated berries are easier to spot and pick, saving you time and effort.
* Cleaner Berries: Strawberries stay cleaner as they are not in direct contact with the soil.
* Increased Yield: Healthier plants and reduced fruit loss translate to a higher overall yield.
What materials can I use for the supports?
While plastic bottles are a readily available and cost-effective option, you can use a variety of materials, including:
* Repurposed Yogurt Containers: Clean and sturdy yogurt containers work well, especially for smaller strawberry plants.
* Small Terracotta Pots: These provide a more aesthetically pleasing option and can help regulate soil temperature.
* Wooden Platforms: You can build small wooden platforms or use scrap wood to create supports. Ensure the wood is untreated to avoid contaminating the soil.
* Rocks or Pebbles: Larger rocks or pebbles can be placed under the berries to lift them off the ground.
* Strawberry Supports: There are commercially available strawberry supports made of plastic or metal.
How high should the supports be?
The height of the supports should be sufficient to keep the strawberries off the ground and allow for adequate air circulation. A height of 2-4 inches is generally sufficient. Adjust the height based on the size of your strawberry plants and the expected size of the berries.
When is the best time to implement this strawberry garden tip?
The best time to implement this tip is when the strawberry plants begin to produce fruit. This is when the berries are most vulnerable to pests and diseases. However, you can also implement it earlier in the season to provide support for the plants as they grow.
Will this tip work for all types of strawberries?
Yes, this tip is suitable for all types of strawberries, including June-bearing, everbearing, and day-neutral varieties. The key is to adjust the size and height of the supports to accommodate the specific needs of your plants.
How often should I check the supports?
Regularly check the supports to ensure they are still providing adequate support and that the strawberries are not touching the ground. Adjust or replace the supports as needed. Also, inspect the berries for any signs of pests or diseases.
Can I use this tip in raised beds or containers?
Yes, this tip is particularly well-suited for raised beds and containers, as it helps to maximize space and improve drainage. In raised beds, you can use the supports to create a tiered effect, allowing for more efficient use of space. In containers, the supports can help to prevent the berries from touching the sides of the container, which can lead to rot.
What if I live in a very windy area?
If you live in a windy area, you may need to secure the supports to prevent them from being blown over. You can use stakes or garden twine to anchor the supports to the ground or to the sides of the raised bed or container.
Are there any downsides to using this strawberry garden tip?
The only potential downside is the added time and effort required to implement the tip. However, the benefits far outweigh the drawbacks, especially when you consider the increased yield and reduced fruit loss.
How do I clean the supports after the growing season?
After the growing season, clean the supports thoroughly with soap and water to remove any dirt, debris, or pathogens. Allow them to dry completely before storing them for the next season. This will help to prevent the spread of diseases.
Can I use this method for other fruits or vegetables?
While this tip is specifically designed for strawberries, it can also be adapted for other low-growing fruits and vegetables that are susceptible to ground rot, such as melons or cucumbers. The key is to choose supports that are appropriate for the size and weight of the fruit or vegetable.
What companion plants work well with strawberries?
Several companion plants can benefit strawberries, including:
* Marigolds: Repel nematodes and other harmful insects.
* Basil: Attracts beneficial insects and improves the overall health of strawberry plants.
* Borage: Attracts pollinators and deters pests.
* Thyme: Repels cabbage moths and other pests.
* Garlic: Repels aphids and other pests.
How do I know if my strawberries are ripe?
Ripe strawberries should be a deep red color and have a slightly soft texture. They should also have a sweet, fragrant aroma. Gently tug on the berry; if it comes off easily, it’s ripe.
What are some common strawberry diseases and how can I prevent them?
Common strawberry diseases include gray mold, leaf spot, and powdery mildew. To prevent these diseases, ensure good air circulation, avoid overwatering, and remove any infected leaves or berries promptly. You can also use organic fungicides as a preventative measure.
Where can I find more information about growing strawberries?
There are many resources available online and in libraries that can provide more information about growing strawberries. Your local agricultural extension office is also a great resource for information specific to your region.

Leave a Comment