
Start Cucumber Plants from Seed and unlock a world of fresh, homegrown goodness right in your backyard! Have you ever dreamed of biting into a crisp, juicy cucumber, knowing you nurtured it from a tiny seed? Well, dream no more! This DIY guide will empower you to cultivate your own thriving cucumber patch, even if you’re a complete beginner.
Growing cucumbers has been a tradition for centuries, with evidence suggesting their cultivation dates back over 3,000 years! From ancient civilizations to modern-day gardens, these refreshing fruits have held a special place in our diets and cultures. But let’s face it, buying cucumbers from the store can be disappointing. They often lack the vibrant flavor and satisfying crunch of a freshly picked cucumber. Plus, you never really know what chemicals or pesticides might have been used in their cultivation.
That’s where this DIY trick comes in. I’m going to show you how easy and rewarding it is to start cucumber plants from seed yourself. Not only will you enjoy the unparalleled taste of homegrown cucumbers, but you’ll also save money, reduce your environmental impact, and gain a deeper connection to the food you eat. So, grab your gardening gloves, and let’s get started on this exciting journey to cucumber cultivation!
Starting Cucumber Plants from Seed: A Gardener’s Guide
Hey there, fellow gardening enthusiasts! I’m so excited to share my tried-and-true method for starting cucumber plants from seed. It’s a rewarding process that gives you a head start on the growing season and allows you to choose from a wider variety of cucumber types than you might find at your local nursery. Plus, it’s incredibly satisfying to watch those tiny seeds sprout and grow into thriving plants!
Why Start Cucumber Seeds Indoors?
While cucumbers are warm-weather lovers, starting them indoors gives them a significant advantage. Here’s why I prefer it:
* Extended Growing Season: By starting seeds indoors 3-4 weeks before the last expected frost, you can harvest cucumbers earlier in the season.
* Protection from Pests and Diseases: Young seedlings are vulnerable. Starting them indoors shields them from common garden pests and diseases.
* Control Over Environment: You can provide the ideal temperature, light, and moisture levels for optimal germination and growth.
* Cost-Effective: Buying seed packets is generally cheaper than purchasing established seedlings.
* Wider Variety Selection: Seed catalogs offer a much broader range of cucumber varieties than you’ll typically find as starter plants.
Materials You’ll Need
Before we dive in, let’s gather all the necessary supplies. This will make the process smoother and more enjoyable.
* Cucumber Seeds: Choose your favorite variety! Consider factors like disease resistance, fruit size, and intended use (slicing, pickling, etc.).
* Seed Starting Trays or Pots: I prefer using seed starting trays with individual cells, but small pots (2-3 inches in diameter) work just as well. Make sure they have drainage holes!
* Seed Starting Mix: This is crucial! Don’t use regular garden soil, as it’s too heavy and can harbor diseases. Seed starting mix is light, airy, and sterile.
* Watering Can or Spray Bottle: For gentle watering.
* Heat Mat (Optional): Cucumbers germinate best in warm soil (70-80°F). A heat mat can significantly improve germination rates, especially in cooler climates.
* Grow Lights (Optional): If you don’t have a sunny windowsill, grow lights will provide the necessary light for healthy seedling development.
* Plant Labels: To keep track of your cucumber varieties.
* Small Trowel or Spoon: For handling the seed starting mix.
Step-by-Step Instructions: Sowing the Seeds
Now for the fun part! Let’s get those cucumber seeds planted.
1. Prepare the Seed Starting Trays/Pots: Fill each cell or pot with seed starting mix, leaving about half an inch of space at the top. Gently tap the tray or pot to settle the mix.
2. Moisten the Soil: Water the seed starting mix thoroughly until it’s evenly moist but not soggy. You want it to feel like a wrung-out sponge.
3. Sow the Seeds: Place 2-3 cucumber seeds in the center of each cell or pot. This increases the chances of at least one seed germinating.
4. Cover the Seeds: Gently cover the seeds with about ¼ to ½ inch of seed starting mix.
5. Water Again: Lightly water the surface of the soil to ensure good seed-to-soil contact.
6. Label Your Trays/Pots: Use plant labels to clearly identify the cucumber variety you’ve planted in each tray or pot. This will save you confusion later on!
7. Provide Warmth: Place the seed starting trays or pots on a heat mat (if using) or in a warm location. The ideal temperature for cucumber seed germination is between 70-80°F (21-27°C).
8. Maintain Moisture: Keep the seed starting mix consistently moist but not waterlogged. Check the moisture level daily and water as needed. A spray bottle is great for this.
9. Wait for Germination: Cucumber seeds typically germinate within 5-10 days. Be patient!
Caring for Cucumber Seedlings
Once your cucumber seeds have sprouted, it’s time to provide them with the care they need to thrive.
1. Provide Adequate Light: As soon as the seedlings emerge, they need plenty of light. Place them under grow lights or in a sunny windowsill that receives at least 6 hours of direct sunlight per day. If using a windowsill, rotate the trays or pots regularly to prevent the seedlings from leaning towards the light.
2. Maintain Warmth: Continue to provide warmth, especially at night. Cucumbers are sensitive to cold temperatures.
3. Water Carefully: Water the seedlings when the top inch of soil feels dry to the touch. Avoid overwatering, as this can lead to root rot. Water at the base of the plants to avoid wetting the foliage, which can encourage fungal diseases.
4. Thin Seedlings (If Necessary): If more than one seed germinated in a cell or pot, thin the seedlings to one strong, healthy plant. Use small scissors to snip off the weaker seedlings at the soil line. Don’t pull them out, as this can disturb the roots of the remaining seedling.
5. Fertilize (Optional): Once the seedlings have developed their first true leaves (the leaves that appear after the initial seed leaves), you can start fertilizing them with a diluted liquid fertilizer. Use a balanced fertilizer (e.g., 10-10-10) diluted to half strength. Fertilize every 1-2 weeks.
6. Harden Off Seedlings: About a week before you plan to transplant your cucumber seedlings outdoors, you’ll need to “harden them off.” This process gradually acclimates them to outdoor conditions, reducing the risk of transplant shock. Start by placing the seedlings outdoors in a sheltered location for a few hours each day, gradually increasing the amount of time they spend outdoors. Protect them from direct sunlight and strong winds.
Transplanting Cucumber Seedlings Outdoors
The final step is transplanting your cucumber seedlings into the garden. This is a crucial step, so follow these guidelines carefully.
1. Choose the Right Location: Cucumbers need a sunny location with well-drained soil. They also prefer soil that is rich in organic matter.
2. Prepare the Soil: Amend the soil with compost or well-rotted manure to improve drainage and fertility.
3. Check the Weather: Make sure the danger of frost has passed and the soil has warmed up to at least 60°F (15°C). Cucumbers are very sensitive to cold temperatures.
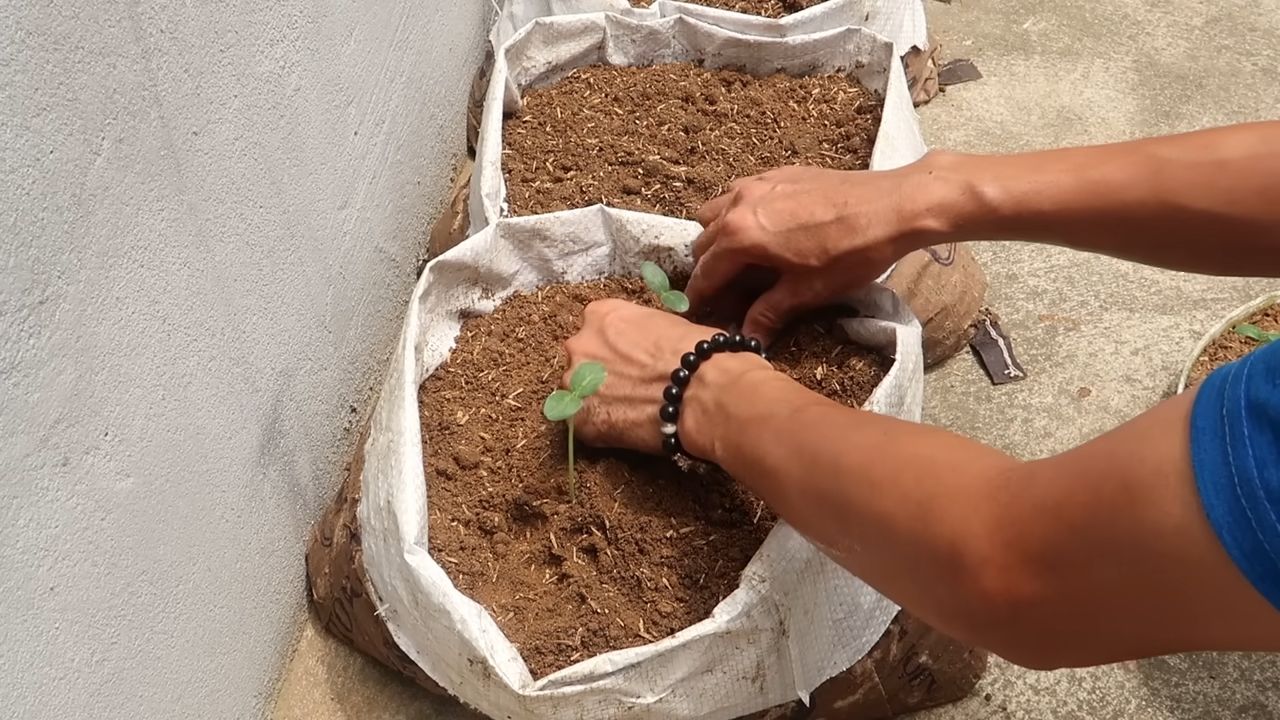
4. Dig Holes: Dig holes that are slightly larger than the root balls of the seedlings. Space the holes according to the recommended spacing for your chosen cucumber variety (usually 18-36 inches apart).
5. Gently Remove Seedlings: Carefully remove the seedlings from their trays or pots. Gently loosen the root ball if it’s tightly bound.
6. Plant the Seedlings: Place the seedlings in the holes and backfill with soil. Gently firm the soil around the base of the plants.
7. Water Thoroughly: Water the seedlings thoroughly after planting.
8. Mulch: Apply a layer of mulch around the plants to help retain moisture, suppress weeds, and regulate soil temperature.
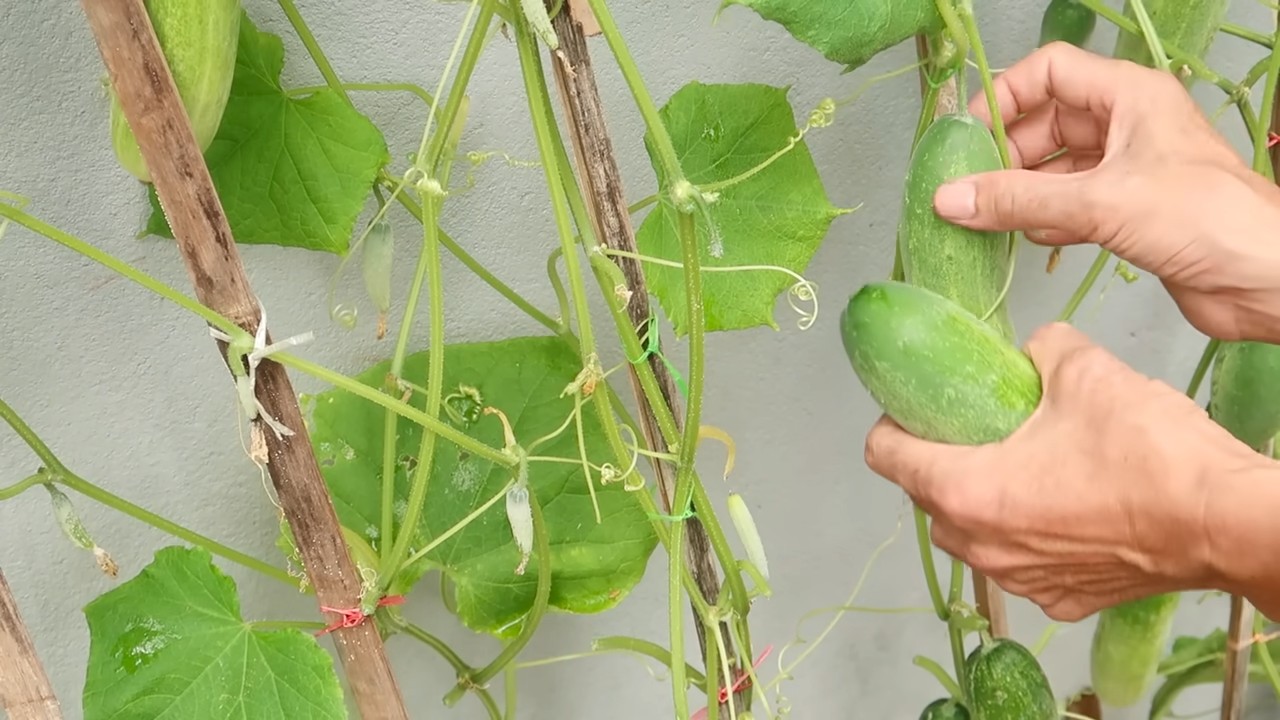
9. Provide Support (If Necessary): If you’re growing vining cucumber varieties, provide them with a trellis or other support structure. This will help keep the fruits off the ground and improve air circulation.
Troubleshooting
Even with the best intentions, things can sometimes go wrong. Here are a few common problems you might encounter and how to address them:
* Poor Germination: If your cucumber seeds aren’t germinating, make sure the soil is warm enough and consistently moist. Old seeds may also have a lower germination rate.
* Leggy Seedlings: Leggy seedlings are tall and spindly, with weak stems. This is usually caused by insufficient light. Provide more light or move the seedlings closer to the light source.
* Damping Off: Damping off is a fungal disease that can kill young seedlings. It’s often caused by overwatering and poor air circulation. Use a sterile seed starting mix, avoid overwatering, and provide good air circulation.
* Yellowing Leaves: Yellowing leaves can be caused by a variety of factors, including nutrient deficiencies, overwatering, and pests. Check the soil moisture and nutrient levels and inspect the plants for pests.
Enjoy Your Homegrown Cucumbers!
Starting cucumber plants from seed is a rewarding experience that allows you to enjoy fresh, homegrown cucumbers all season long. With a little patience and care, you can successfully grow your own cucumber plants and impress your friends and family with your gardening skills. Happy gardening!
Conclusion
So, there you have it! Starting cucumber plants from seed might seem daunting at first, but with a little patience and these simple steps, you’ll be harvesting fresh, crisp cucumbers from your own garden in no time. This DIY approach not only saves you money compared to buying transplants, but it also gives you complete control over the variety you grow and ensures your plants are healthy and strong from the very beginning.
Why is this a must-try? Because nothing beats the satisfaction of nurturing a plant from a tiny seed to a bountiful producer. Plus, you’ll avoid the risk of introducing diseases or pests that can sometimes come with store-bought seedlings. You’ll also have a wider selection of cucumber varieties to choose from, allowing you to experiment with different flavors, textures, and sizes. Imagine the possibilities! From classic slicing cucumbers for salads to pickling varieties for homemade pickles, the choice is yours.
Don’t be afraid to experiment with variations! Try starting your seeds in different types of containers, such as peat pots or biodegradable pots, to minimize root disturbance when transplanting. You can also adjust the soil mix to suit your specific climate and growing conditions. For example, if you live in a particularly hot and dry area, you might want to add more moisture-retentive materials like vermiculite or coconut coir to your seed starting mix. Consider succession planting, sowing new seeds every few weeks, to ensure a continuous harvest throughout the growing season.
And speaking of variations, consider exploring different cucumber varieties. There are bush varieties perfect for container gardening and vining varieties that thrive on trellises. Some varieties are specifically bred for disease resistance, which can be a huge advantage, especially if you’ve had problems with cucumber diseases in the past.
Ultimately, the best way to learn is by doing. So, grab a packet of cucumber seeds, gather your supplies, and get started! We’re confident that you’ll be amazed at how easy and rewarding it is to start cucumber plants from seed yourself.
We encourage you to try this DIY trick and share your experience with us! Let us know in the comments below what varieties you’re growing, what challenges you faced, and what tips you discovered along the way. Your insights could help other gardeners succeed in their own cucumber-growing adventures. Happy gardening!
Frequently Asked Questions (FAQs)
Q: How long does it take for cucumber seeds to germinate?
A: Cucumber seeds typically germinate within 3 to 10 days, depending on the temperature and moisture levels. The ideal soil temperature for germination is between 70°F and 85°F (21°C and 29°C). Keeping the soil consistently moist, but not waterlogged, is crucial for successful germination. Using a heat mat can help speed up the process, especially in cooler climates.
Q: What kind of soil should I use for starting cucumber seeds?
A: A well-draining seed starting mix is ideal. You can purchase a pre-made mix from a garden center or create your own by combining equal parts peat moss (or coconut coir), vermiculite, and perlite. Avoid using garden soil, as it can be too heavy and may contain diseases or pests. The key is to provide a light and airy medium that allows the roots to develop easily.
Q: How often should I water my cucumber seedlings?
A: Water your cucumber seedlings regularly to keep the soil consistently moist, but not waterlogged. Check the soil moisture level daily by sticking your finger about an inch into the soil. If it feels dry, it’s time to water. Water gently to avoid disturbing the seedlings. Overwatering can lead to root rot, so it’s important to find the right balance.
Q: When should I transplant my cucumber seedlings outdoors?
A: Transplant your cucumber seedlings outdoors after the last frost and when the soil has warmed up to at least 60°F (16°C). Cucumber plants are very sensitive to cold temperatures, so it’s important to wait until the weather is consistently warm. Harden off your seedlings by gradually exposing them to outdoor conditions for a week before transplanting. This will help them adjust to the sun, wind, and temperature changes.
Q: How much sunlight do cucumber plants need?
A: Cucumber plants need at least 6 to 8 hours of direct sunlight per day. Choose a sunny location in your garden where your plants will receive plenty of sunlight. If you’re growing cucumbers in containers, make sure to place them in a spot that gets full sun. Insufficient sunlight can lead to weak growth and reduced fruit production.
Q: What are some common pests and diseases that affect cucumber plants?
A: Common pests that affect cucumber plants include aphids, cucumber beetles, and squash bugs. Common diseases include powdery mildew, downy mildew, and bacterial wilt. Regularly inspect your plants for signs of pests or diseases and take action promptly. Organic pest control methods, such as insecticidal soap or neem oil, can be effective for controlling pests. Proper watering and good air circulation can help prevent diseases. Choosing disease-resistant varieties is also a good strategy.
Q: Can I grow cucumbers in containers?
A: Yes, you can definitely grow cucumbers in containers! Choose a large container that is at least 12 inches in diameter and 12 inches deep. Bush varieties are particularly well-suited for container gardening. Make sure the container has drainage holes to prevent waterlogging. Use a high-quality potting mix and provide a trellis or other support for the vines to climb.
Q: How do I know when my cucumbers are ripe?
A: The size and color of ripe cucumbers vary depending on the variety. Generally, cucumbers are ready to harvest when they are firm, smooth, and have reached the desired size for their variety. The skin should be a deep green color, although some varieties may turn yellow or white when ripe. Check the seed packet or plant tag for specific information on when to harvest your cucumbers.
Q: What are some tips for getting the best cucumber harvest?
A: Here are a few tips for maximizing your cucumber harvest:
* Provide consistent watering, especially during hot and dry weather.
* Fertilize your plants regularly with a balanced fertilizer.
* Harvest cucumbers frequently to encourage continued production.
* Provide support for the vines to climb, such as a trellis or fence.
* Monitor your plants for pests and diseases and take action promptly.
* Consider succession planting to extend your harvest season.
Q: What are the benefits of starting cucumber plants from seed versus buying transplants?
A: Starting cucumber plants from seed offers several benefits:
* Cost savings: Seeds are generally much cheaper than transplants.
* Wider variety selection: You’ll have access to a greater range of cucumber varieties when starting from seed.
* Healthier plants: You can ensure your plants are healthy and strong from the very beginning.
* Control over growing conditions: You have complete control over the soil, watering, and fertilization.
* Personal satisfaction: There’s a unique sense of accomplishment that comes with nurturing a plant from seed to harvest.
By taking the time to start cucumber plants from seed, you’re setting yourself up for a successful and rewarding gardening experience.


Leave a Comment