
Soil bag carrots: who knew growing your own delicious, crunchy carrots could be so incredibly easy and space-saving? Forget tilling a garden bed or wrestling with rocky soil. I’m about to share a game-changing DIY trick that will have you harvesting vibrant carrots straight from a humble bag of soil!
For centuries, cultivating carrots has been a testament to human ingenuity. From their humble beginnings as wild, pale roots to the vibrant orange varieties we know and love, carrots have nourished communities worldwide. But let’s be honest, traditional gardening can be intimidating, especially if you’re short on space or time.
That’s where this simple yet effective DIY hack comes in. Imagine enjoying the satisfaction of growing your own food, even if you only have a balcony or a small patio. This method of growing soil bag carrots eliminates the need for extensive gardening knowledge or specialized equipment. It’s perfect for beginners, apartment dwellers, or anyone looking for a fun and rewarding gardening project. I’ll guide you through each step, ensuring you have a bountiful harvest of sweet, homegrown carrots in no time. So, grab a bag of soil, some carrot seeds, and let’s get growing!
DIY Soil Bag Carrot Garden: Grow Your Own Deliciousness!
Hey there, fellow gardening enthusiasts! Ever dreamed of harvesting your own crunchy, sweet carrots right from your backyard (or even your balcony!)? Well, I’m here to tell you it’s easier than you think, and you don’t even need a traditional garden bed. We’re going to create a thriving carrot patch using nothing but a bag of soil! This method is perfect for beginners, those with limited space, or anyone who wants a fun and easy gardening project. Let’s get started!
What You’ll Need
Before we dive in, let’s gather our supplies. This is a pretty low-cost project, which is always a win in my book!
* **A Large Bag of Potting Soil:** I recommend a bag that’s at least 40 quarts. Make sure it’s potting soil, not garden soil. Potting soil is lighter and better draining, which is crucial for carrot development.
* **Carrot Seeds:** Choose your favorite variety! Nantes, Chantenay, and Danvers are all popular choices. Consider the length of your carrots when choosing, as shorter varieties are better suited for container gardening.
* **A Sharp Knife or Scissors:** For creating drainage holes and opening the soil bag.
* **Watering Can or Hose:** To keep your carrots hydrated.
* **Optional: Slow-Release Fertilizer:** This will give your carrots an extra boost of nutrients.
* **Optional: Mulch (Straw or Wood Chips):** Helps retain moisture and suppress weeds.
Preparing the Soil Bag
This is where the magic begins! We’re transforming a simple bag of soil into a mini-garden.
1. **Choose Your Location:** Select a spot that gets at least 6-8 hours of sunlight per day. Carrots need plenty of sunshine to thrive. A sunny balcony, patio, or even a spot in your yard will work perfectly.
2. **Lay the Bag Flat:** Place the bag of potting soil horizontally on the ground in your chosen location. Make sure the side you want to plant on is facing up.
3. **Create Drainage Holes:** This is super important! Carrots hate soggy soil. Using your sharp knife or scissors, carefully poke several drainage holes in the bottom of the bag. Space them about 4-6 inches apart. I usually make about 10-12 holes for a large bag.
4. **Cut Open the Top of the Bag:** Carefully cut along the top of the bag, creating a rectangular opening. Don’t remove the top completely; leave a few inches attached on one side to act as a sort of “hinge.” This will help keep the soil contained.
5. **Loosen the Soil:** Gently loosen the soil inside the bag with your hands or a small trowel. Be careful not to compact it further. This will help the carrot seeds germinate and their roots grow easily.
6. **Optional: Add Slow-Release Fertilizer:** If you’re using slow-release fertilizer, now’s the time to mix it into the top few inches of the soil. Follow the instructions on the fertilizer package for the correct amount.
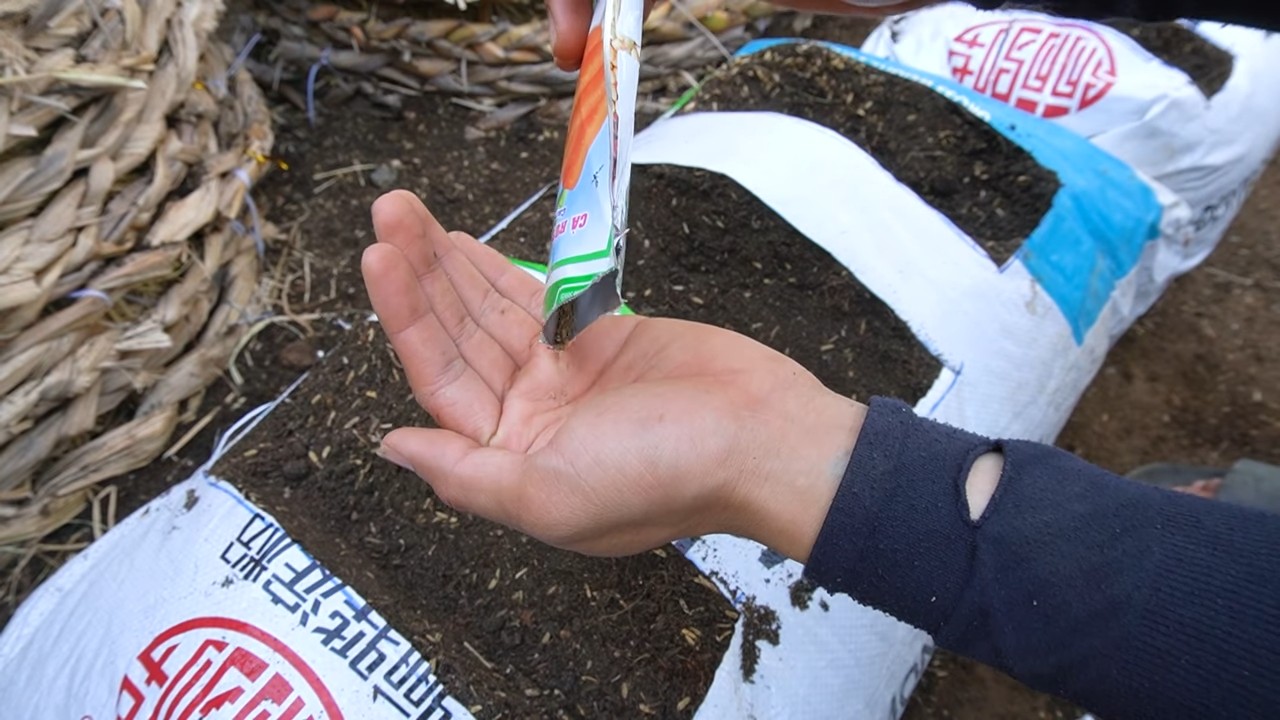
Planting the Carrot Seeds
Now for the fun part – planting those tiny seeds that will eventually become delicious carrots!
1. **Water the Soil:** Before planting, thoroughly water the soil in the bag. You want it to be moist but not waterlogged. This will help the seeds germinate.
2. **Sow the Seeds:** Carrot seeds are tiny, so it’s easy to over-sow. Sprinkle the seeds thinly and evenly over the surface of the soil. Aim for about 1/2 inch spacing between seeds. Don’t worry if they’re a little closer together; we’ll thin them out later.
3. **Cover the Seeds:** Gently cover the seeds with a thin layer of soil (about 1/4 inch). You can use your hands or a small trowel to do this.
4. **Water Again:** Lightly water the soil again after covering the seeds. Use a gentle spray to avoid washing the seeds away.
5. **Optional: Add Mulch:** If you’re using mulch, spread a thin layer of straw or wood chips over the soil surface. This will help retain moisture, suppress weeds, and regulate soil temperature.
Caring for Your Carrot Garden
Consistent care is key to a successful carrot harvest. Here’s what you need to do to keep your carrots happy and healthy.
1. **Watering:** Keep the soil consistently moist, but not waterlogged. Water deeply whenever the top inch of soil feels dry to the touch. Avoid overhead watering, as this can promote fungal diseases. Drip irrigation or a watering can with a gentle rose head is ideal.
2. **Thinning:** This is crucial for carrot development! When the seedlings are about 2 inches tall, thin them out so that they are about 1-2 inches apart. This will give the remaining carrots enough space to grow. Don’t just pull them out; gently snip them off at the soil line with scissors to avoid disturbing the roots of the remaining plants. You can even eat the thinnings! They’re like tiny, flavorful carrot greens.
3. **Weeding:** Keep the area around your carrots free of weeds. Weeds compete with carrots for nutrients and water. Gently hand-pull any weeds that appear.
4. **Fertilizing:** If you didn’t use slow-release fertilizer, you can feed your carrots with a liquid fertilizer every 2-3 weeks. Choose a fertilizer that’s high in phosphorus and potassium, which are essential for root development. Follow the instructions on the fertilizer package.
5. **Sunlight:** Make sure your carrots are getting at least 6-8 hours of sunlight per day. If they’re not getting enough sun, they may become leggy and produce small, underdeveloped roots.
6. **Pest Control:** Carrots are generally pest-resistant, but they can be susceptible to carrot rust flies. These flies lay their eggs near the base of the plants, and the larvae burrow into the roots, causing damage. To prevent carrot rust flies, cover your carrots with a row cover or insect netting. You can also use organic insecticides if necessary.
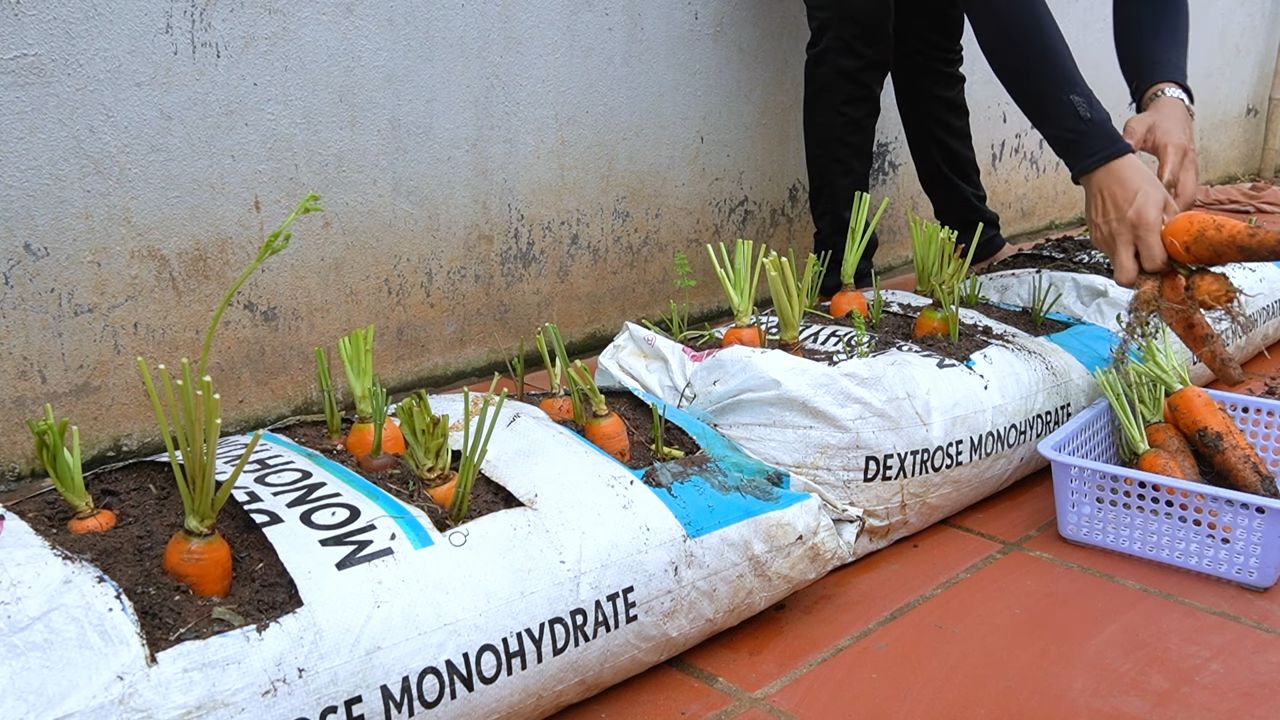
Harvesting Your Carrots
The moment we’ve all been waiting for! Harvesting your own homegrown carrots is incredibly rewarding.
1. **Check for Maturity:** Carrots are typically ready to harvest 60-80 days after planting, depending on the variety. Check the seed packet for specific maturity dates. You can also gently brush away some of the soil around the base of the plants to check the size of the carrots.
2. **Harvesting:** To harvest your carrots, gently loosen the soil around the base of the plant with a trowel or garden fork. Then, grasp the carrot greens firmly and pull straight up. If the carrot is difficult to pull, loosen the soil further.
3. **Washing and Storing:** After harvesting, wash your carrots thoroughly to remove any dirt. Trim off the greens, leaving about 1/2 inch of stem. Store your carrots in the refrigerator in a plastic bag or container. They should last for several weeks.
Troubleshooting
Even with the best care, sometimes things don’t go exactly as planned. Here are a few common problems you might encounter and how to fix them.
* **Poor Germination:** If your seeds aren’t germinating, it could be due to several factors:
* **Old Seeds:** Carrot seeds have a relatively short shelf life. Make sure your seeds are fresh.
* **Dry Soil:** Keep the soil consistently moist during germination.
* **Cold Temperatures:** Carrot seeds germinate best in warm soil (60-70°F).
* **Forked or Stunted Roots:** This is often caused by rocky or compacted soil. Make sure your potting soil is loose and well-draining. You can also add some sand or perlite to improve drainage.
* **Green Shoulders:** If the tops of your carrots are exposed to sunlight, they can turn green and bitter. To prevent this, hill up the soil around the base of the plants as they grow.
* **Pests:** Keep an eye out for pests like aphids, spider mites, and carrot rust flies. Use organic pest control methods to keep them under control.
Enjoy Your Homegrown Carrots!
And there you have it! A simple and rewarding way to grow your own delicious carrots using just a bag of soil. I hope you found this guide helpful. Happy gardening, and enjoy the fruits (or rather, vegetables!) of your labor! I love roasting my homegrown carrots with a little olive oil, salt, and pepper. They’re also fantastic in salads, soups, and stews. Let me know in the comments how your soil bag carrot garden turns out!
Conclusion
So, there you have it! Transforming a simple soil bag into a thriving carrot garden is not just a quirky DIY project; it’s a game-changer for anyone looking to enjoy fresh, homegrown carrots, regardless of space constraints. We’ve walked you through the process, highlighting the ease and accessibility of this method. But why is this soil bag carrots trick a must-try?
Firstly, it’s incredibly space-efficient. Forget about needing a large garden plot. A soil bag carrot garden can thrive on a balcony, patio, or even a sunny corner of your driveway. This makes it perfect for apartment dwellers, urban gardeners, or anyone with limited outdoor space.
Secondly, it’s cost-effective. You’re repurposing a soil bag, reducing waste, and potentially saving money on buying carrots from the store. The initial investment is minimal, and the reward – a bounty of delicious, homegrown carrots – is substantial.
Thirdly, it’s a fantastic learning experience. Gardening is a rewarding hobby, and this project is a great way to get your hands dirty (literally!) and learn about plant growth, soil composition, and the satisfaction of nurturing something from seed to harvest.
But the benefits don’t stop there. The controlled environment of a soil bag can lead to healthier, more uniform carrots. You have greater control over the soil quality, drainage, and pest management, resulting in a superior crop compared to traditional in-ground gardening.
Looking for variations? Absolutely! Consider these ideas to personalize your soil bag carrot garden:
* Companion Planting: Interplant your carrots with herbs like rosemary or sage. These herbs can help deter pests and enhance the flavor of your carrots.
* Succession Planting: Plant new seeds every few weeks to ensure a continuous harvest throughout the growing season.
* Container Combinations: Group your soil bag carrot garden with other container vegetables like lettuce, radishes, or spinach for a diverse and productive mini-garden.
* Carrot Varieties: Experiment with different carrot varieties! Try Nantes for classic sweetness, Chantenay for shorter, sturdier roots, or even colorful varieties like purple or yellow carrots for a visual treat.
* Vertical Support: If your soil bag is prone to tipping, consider building a simple wooden frame around it for added stability.
We’re confident that you’ll find this DIY soil bag carrot garden project to be both enjoyable and rewarding. It’s a simple, effective, and sustainable way to grow your own food and connect with nature.
So, what are you waiting for? Grab a soil bag, some carrot seeds, and get started! We encourage you to try this DIY trick and share your experience with us. Post photos of your soil bag carrot garden on social media using #SoilBagCarrots and let us know how it goes. We can’t wait to see your success! Happy gardening!
Frequently Asked Questions (FAQ)
What kind of soil should I use for my soil bag carrot garden?
The best soil for growing carrots in a soil bag is a loose, well-draining mix that is rich in organic matter. Avoid heavy clay soils, as they can hinder root development and lead to misshapen carrots. A good option is a blend of potting mix, compost, and perlite or vermiculite. The potting mix provides a base for nutrients, the compost adds organic matter and improves soil structure, and the perlite or vermiculite enhances drainage and aeration. You can also purchase a pre-mixed vegetable garden soil specifically formulated for container gardening. Ensure the soil is free of rocks and debris, as these can also interfere with carrot growth.
How often should I water my soil bag carrot garden?
Watering frequency depends on several factors, including the weather, the size of your soil bag, and the type of soil you’re using. Generally, you should water your soil bag carrot garden when the top inch of soil feels dry to the touch. Carrots need consistent moisture to develop properly, but overwatering can lead to root rot. Water deeply and thoroughly, ensuring that the water drains out of the bottom of the bag. During hot, dry weather, you may need to water daily or even twice a day. In cooler, wetter weather, you may only need to water every few days. A good rule of thumb is to check the soil moisture regularly and adjust your watering schedule accordingly.
How much sunlight do carrots need in a soil bag?
Carrots need at least six hours of direct sunlight per day to thrive. Choose a location for your soil bag carrot garden that receives ample sunlight throughout the day. If you live in a particularly hot climate, some afternoon shade may be beneficial to prevent the soil from drying out too quickly. If you don’t have a sunny spot, you can supplement with grow lights. Position the grow lights a few inches above the plants and provide 12-14 hours of light per day.
When is the best time to plant carrots in a soil bag?
The best time to plant carrots in a soil bag depends on your climate. In general, carrots are a cool-season crop and can be planted in early spring or late summer for a fall harvest. In warmer climates, you can plant carrots throughout the winter. Check your local planting calendar for specific dates. When planting, sow the seeds directly into the soil bag, spacing them about an inch apart. Cover the seeds with a thin layer of soil and water gently. Keep the soil moist until the seeds germinate, which usually takes about 7-14 days.
How do I prevent pests and diseases in my soil bag carrot garden?
Several strategies can help prevent pests and diseases in your soil bag carrot garden. First, use a high-quality potting mix that is free of pathogens. Second, practice good sanitation by removing any dead or diseased leaves from the plants. Third, water your carrots at the base of the plant to avoid wetting the foliage, which can encourage fungal diseases. Fourth, monitor your plants regularly for signs of pests or diseases. Common carrot pests include carrot rust flies, aphids, and nematodes. Diseases include leaf blight and root rot. If you detect pests or diseases, take action immediately. You can use organic pesticides or fungicides to control these problems. Companion planting with herbs like rosemary or sage can also help deter pests.
How long does it take for carrots to grow in a soil bag?
Carrots typically take 60-80 days to mature, depending on the variety and growing conditions. You can start harvesting carrots when they are about half their mature size. To harvest, gently loosen the soil around the carrot and pull it out of the bag. Be careful not to damage the other carrots in the bag.
Can I reuse the soil bag for another crop after harvesting the carrots?
Yes, you can reuse the soil bag for another crop after harvesting the carrots, but it’s important to replenish the soil with nutrients. After harvesting, remove any remaining plant debris from the bag. Then, amend the soil with compost or other organic matter to improve its fertility. You may also want to add a slow-release fertilizer to provide the new crop with the nutrients it needs. Consider rotating crops to prevent the buildup of soilborne diseases. For example, after growing carrots, you could plant legumes like beans or peas, which help to fix nitrogen in the soil.

Leave a Comment