
Shoe Box DIY Ideas: Unleash Your Inner Creative Genius!
Ever stare at a stack of empty shoe boxes and wonder if there’s more to life than just tossing them in the recycling bin? I know I have! For generations, resourceful folks have found clever ways to repurpose everyday items, and the humble shoe box is no exception. From ancient civilizations storing precious artifacts in handcrafted containers to modern-day crafters transforming cardboard into masterpieces, the spirit of DIY has always been about making the most of what we have.
But why should you bother with shoe box DIY ideas? In today’s world, where sustainability and creativity are highly valued, learning how to upcycle is more important than ever. Not only does it reduce waste and save you money, but it also allows you to personalize your space and express your unique style. Plus, let’s be honest, who doesn’t love the satisfaction of creating something amazing from something seemingly ordinary?
This article is packed with brilliant and easy-to-follow shoe box DIY ideas that will inspire you to transform those cardboard containers into functional and beautiful creations. Whether you’re looking for clever storage solutions, fun kids’ crafts, or unique home decor, I’ve got you covered. Get ready to unleash your inner artist and discover the endless possibilities that lie within those unassuming shoe boxes!

Transforming Ordinary Shoe Boxes into Extraordinary Treasures: A DIY Guide
Hey there, fellow DIY enthusiasts! Ever look at a pile of empty shoe boxes and think, “There has to be more to life than just recycling these?” Well, you’re absolutely right! Shoe boxes are a goldmine of potential for all sorts of creative projects. I’m going to walk you through some fantastic ways to upcycle those cardboard containers into functional and beautiful items. Get ready to unleash your inner artist!
Organizing Your Life, One Shoe Box at a Time
Let’s start with organization. Shoe boxes are perfect for decluttering and tidying up various spaces in your home.
DIY Drawer Dividers
Tired of rummaging through messy drawers? This simple hack will bring order to your chaos.
Materials You’ll Need:
* Shoe boxes (various sizes depending on your drawer dimensions)
* Ruler or measuring tape
* Pencil
* Scissors or a craft knife
* Glue (hot glue or craft glue)
* Fabric scraps, wrapping paper, or paint (for decorating, optional)
Step-by-Step Instructions:
1. Measure Your Drawers: The first step is crucial. Carefully measure the inside dimensions of your drawers – length, width, and height. Write these measurements down; accuracy is key!
2. Cut the Shoe Boxes: Based on your drawer measurements, determine how many dividers you want and how tall they should be. Mark the cutting lines on your shoe boxes using a ruler and pencil. Remember to account for the height of the drawer so the dividers don’t stick out. I usually aim for about 2/3 of the drawer height.
3. Assemble the Dividers: Cut along the marked lines using scissors or a craft knife. Be careful when using a craft knife! For added stability, you can glue multiple layers of cardboard together.
4. Decorate (Optional): This is where you can get creative! You can wrap the dividers in fabric scraps, cover them with pretty wrapping paper, or paint them to match your drawer’s interior. I love using self-adhesive shelf liner for a quick and easy makeover.
5. Arrange in Drawers: Once the glue is dry (if you used any) and the decorations are complete, arrange the dividers in your drawers to create compartments for your belongings. Now you can neatly organize socks, underwear, ties, or anything else that tends to get jumbled.
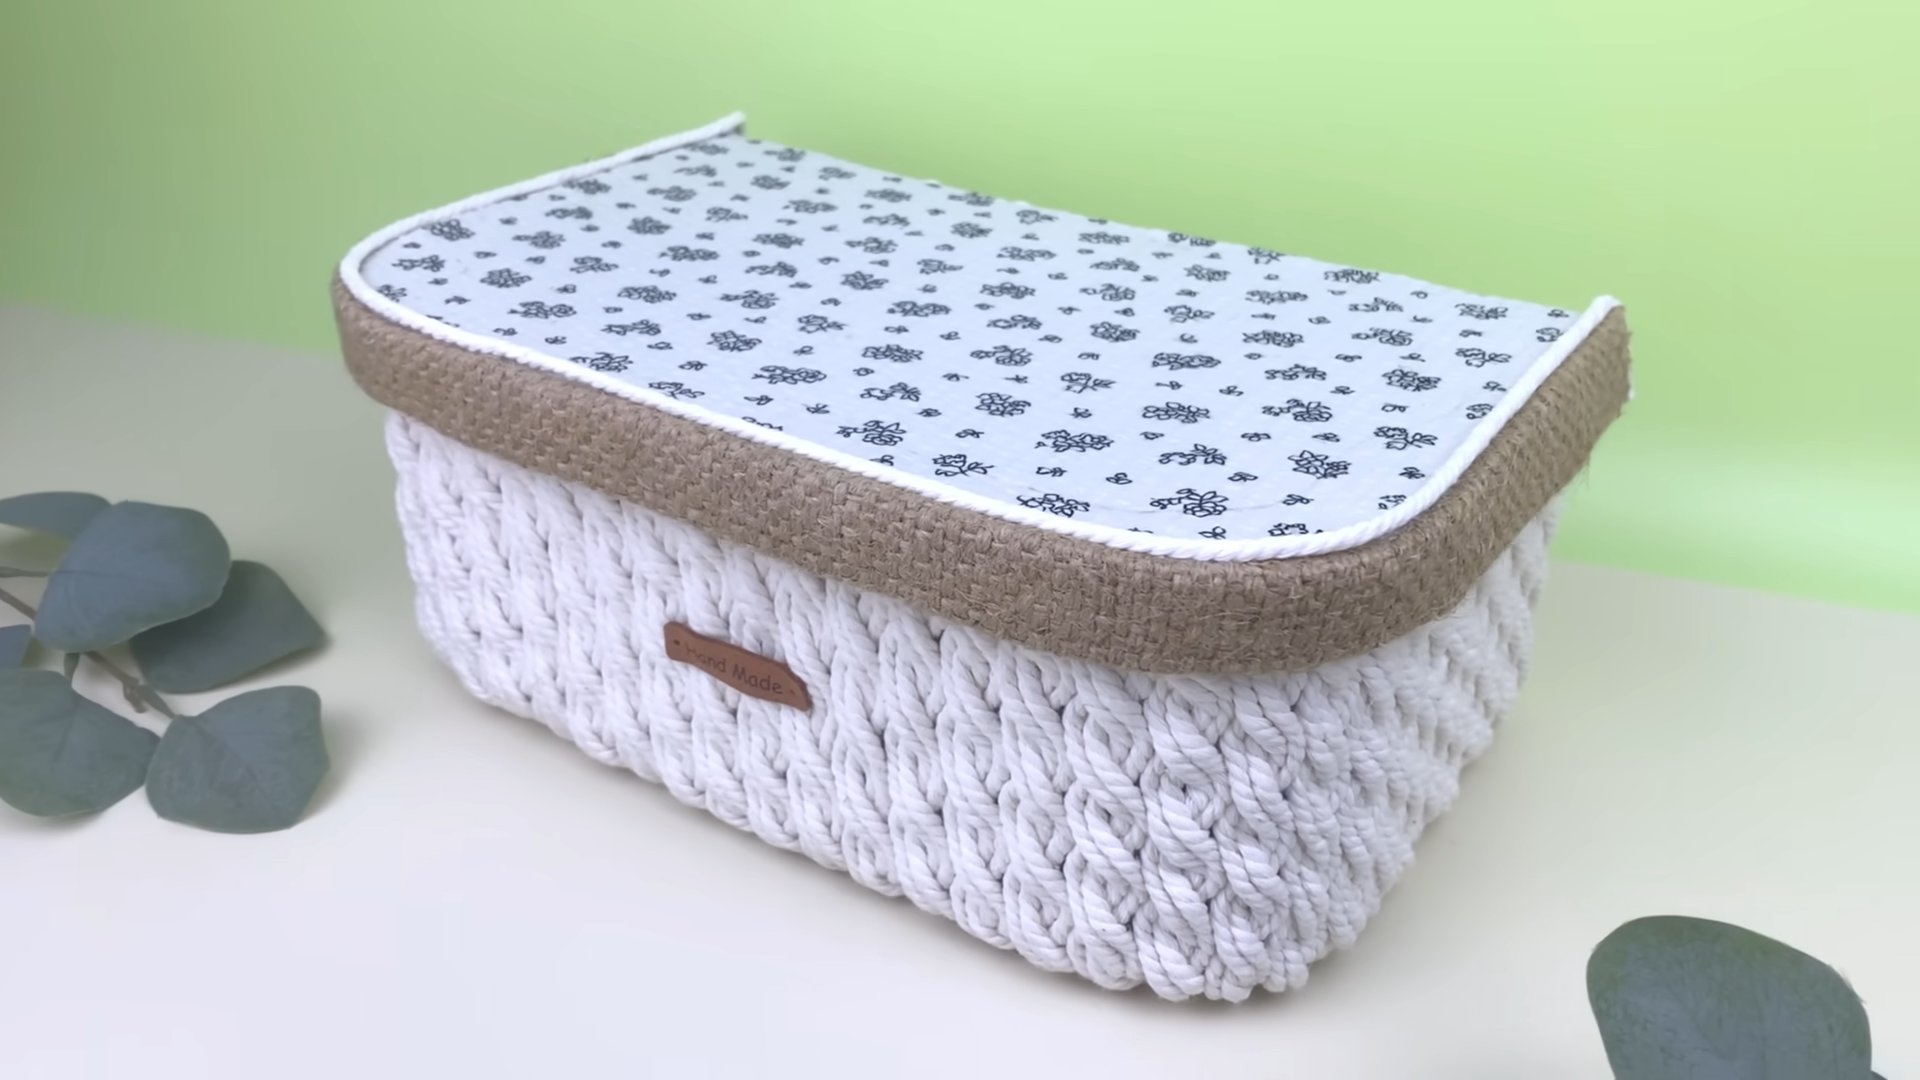
Stylish Storage Bins
These storage bins are perfect for shelves, closets, or under the bed.
Materials You’ll Need:
* Shoe boxes (with lids)
* Fabric, wrapping paper, or contact paper
* Scissors
* Glue or double-sided tape
* Optional: Handles (rope, leather scraps, drawer pulls)
Step-by-Step Instructions:
1. Choose Your Covering: Select the fabric, wrapping paper, or contact paper you want to use to cover the shoe boxes. I personally love using burlap for a rustic look or patterned contact paper for a modern vibe.
2. Measure and Cut: Measure the surface area of the shoe box (including the lid) and cut the covering material slightly larger than needed. This allows for overlap and ensures complete coverage.
3. Apply the Covering: Apply glue or double-sided tape to the shoe box surface, working in sections. Carefully smooth the covering material onto the box, pressing out any air bubbles. Fold the excess material over the edges and glue or tape it down.
4. Repeat for the Lid: Repeat the process for the lid of the shoe box. Make sure the covering material aligns with the box when the lid is closed.
5. Add Handles (Optional): If you want to add handles, mark the desired location on the box. Use a craft knife or drill to create holes for the handles. Attach the handles using glue, screws, or rope. I’ve used old belts cut into strips for a unique handle look!
6. Enjoy Your Stylish Storage Bins: Now you have beautiful and functional storage bins that can be used to organize anything from books and toys to craft supplies and accessories.
Creative Decor Projects
Shoe boxes aren’t just for organizing; they can also be transformed into stunning decor pieces.
DIY Shadow Box
Create a personalized display for your cherished memories.
Materials You’ll Need:
* Shoe box (with lid)
* Paint or decorative paper
* Glue
* Small items to display (photos, souvenirs, trinkets)
* Optional: Fabric or felt for the background
Step-by-Step Instructions:
1. Prepare the Shoe Box: Paint the inside and outside of the shoe box with your desired color or cover it with decorative paper. Let it dry completely.
2. Create the Background: Cut a piece of fabric or felt to fit the bottom of the shoe box. Glue it in place to create a soft and visually appealing background.
3. Arrange Your Items: Arrange the items you want to display inside the shoe box. Experiment with different layouts until you find one that you like.
4. Secure the Items: Use glue or double-sided tape to secure the items in place. Make sure they are firmly attached so they don’t move around when the shadow box is displayed.
5. Add a Hanger (Optional): If you want to hang your shadow box on the wall, attach a picture hanger to the back of the box.
6. Display Your Masterpiece: Now you have a beautiful shadow box that showcases your treasured memories.
Faux Book Storage
Disguise your storage with this clever trick.
Materials You’ll Need:
* Shoe boxes (with lids)
* Craft paint in various colors
* Paintbrushes
* Ruler
* Pencil
* Black marker
* Glue
Step-by-Step Instructions:
1. Paint the Boxes: Paint each shoe box and lid with a different color of craft paint. This will give them the appearance of different books. Let the paint dry completely.
2. Create the “Spines”: Use a ruler and pencil to draw lines on the sides of the shoe boxes (the “spines” of the books). These lines will represent the titles and author names.
3. Write the “Titles”: Use a black marker to write titles and author names on the “spines” of the books. Get creative with the titles! You can use real book titles or make up your own.
4. Add Details: Add details to the “spines” of the books, such as decorative lines or patterns. This will make them look more realistic.
5. Glue the Lids: Glue the lids onto the shoe boxes.
6. Stack and Display: Stack the faux books on a shelf or table to create a unique and eye-catching display. You can use them to store small items or simply as decorative accents.
Fun and Functional Projects
Let’s explore some projects that are both fun to make and useful in your daily life.
Charging Station
Keep your devices organized and charged in one convenient location.
Materials You’ll Need:
* Shoe box (with lid)
* Craft knife or scissors
* Power strip
* Drill (optional)
* Decorative paper or paint
* Glue
Step-by-Step Instructions:
1. Prepare the Shoe Box: Decorate the shoe box with decorative paper or paint. Let it dry completely.
2. Cut Holes for Cords: Use a craft knife or scissors to cut holes in the back of the shoe box for the power cords to pass through. Make sure the holes are large enough to accommodate the cords but not too large that they are unsightly.
3. Insert the Power Strip: Place the power strip inside the shoe box.
4. Drill Holes for Device Placement (Optional): If you want to create slots for your devices to stand upright, use a drill to create holes in the lid of the shoe box. The size of the holes will depend on the size of your devices.
5. Organize Your Cords: Plug your devices into the power strip and neatly arrange the cords inside the shoe box.
6. Close the Lid: Close the lid of the shoe box and enjoy your organized charging station.
Pet Bed
Spoil your furry friend with a cozy and comfortable bed.
Materials You’ll Need:
* Shoe box (large size)
* Soft fabric or blanket
* Stuffing (cotton, batting, or old pillows)
* Scissors
* Glue or sewing machine (optional)
Step-by-Step Instructions:
1. Prepare the Shoe Box: Make sure the shoe box is clean and sturdy.
2. Create the Cushion: Cut a piece of fabric or blanket to fit the bottom of the shoe box.
3. Stuff
Conclusion
So, there you have it! Transforming humble shoe boxes into functional and stylish organizational solutions is not only incredibly rewarding but also surprisingly simple. We’ve explored a range of ideas, from elegant drawer dividers to charming wall shelves, each showcasing the versatility of this often-discarded resource. But why is this shoe box DIY approach a must-try? It’s about more than just saving money; it’s about embracing sustainability, unleashing your creativity, and personalizing your living space in a way that reflects your unique style.
Think about the satisfaction of knowing you’ve repurposed something destined for the landfill, giving it a new lease on life. Imagine the pride you’ll feel when guests admire your cleverly crafted storage solutions, unaware of their humble origins. This isn’t just about tidying up; it’s about transforming your home into a haven of organized beauty, all thanks to a little ingenuity and a few shoe boxes.
Don’t be afraid to experiment with variations on the ideas we’ve presented. For example, if you’re creating drawer dividers, consider using different fabrics or decorative papers to match the aesthetic of your bedroom. If you’re building wall shelves, play around with different configurations and paint colors to create a truly unique display. You could even incorporate LED strip lights into your shoe box shelves for a touch of ambient lighting. The possibilities are truly endless!
For those seeking a more rustic look, consider using burlap or twine to cover your shoe boxes. This adds texture and a natural element to your décor. Alternatively, if you prefer a modern aesthetic, opt for sleek, minimalist designs and neutral color palettes. You can even use metallic spray paint to give your shoe box creations a touch of glamour.
Remember, the key to a successful shoe box DIY project is to have fun and let your creativity flow. Don’t be afraid to make mistakes – they’re often the best learning opportunities. And most importantly, don’t be afraid to personalize your creations to reflect your own unique style.
We wholeheartedly encourage you to try these shoe box DIY ideas and discover the transformative power of repurposing. We’re confident that you’ll be amazed at what you can create with a little imagination and a few spare shoe boxes.
But don’t just take our word for it! We want to hear about your experiences. Share your creations with us on social media using #ShoeBoxDIY and let us see your amazing transformations. We can’t wait to see what you come up with! Let’s inspire each other to create beautiful and sustainable homes, one shoe box at a time. Your journey to a more organized and stylish home starts now!
Frequently Asked Questions (FAQ)
Q: What kind of shoe boxes work best for these DIY projects?
A: Generally, sturdy shoe boxes made from thicker cardboard are ideal. Look for boxes that hold heavier shoes, like boots or athletic shoes, as they tend to be more durable. Avoid using flimsy boxes that are easily crushed or damaged. The size of the box will depend on the specific project you’re undertaking. For drawer dividers, smaller boxes are suitable, while larger boxes are better for shelves or storage containers. If you’re planning to paint or cover the boxes, make sure the surface is relatively smooth and free of excessive printing or labels.
Q: How can I reinforce shoe boxes to make them more durable?
A: There are several ways to reinforce shoe boxes. One simple method is to use packing tape to reinforce the corners and edges. You can also line the inside of the box with cardboard or foam board for added support. Another option is to use hot glue to attach wooden dowels or popsicle sticks to the inside of the box, creating a stronger frame. For projects that require more significant reinforcement, consider using wood glue and screws to attach thin pieces of plywood to the sides of the box. This will create a much sturdier and more durable structure.
Q: What are some good adhesives to use for decorating shoe boxes?
A: The best adhesive will depend on the materials you’re using to decorate your shoe boxes. For fabric, hot glue or fabric glue are good choices. For paper, Mod Podge or craft glue work well. If you’re attaching heavier embellishments, like beads or buttons, hot glue is usually the most reliable option. When using hot glue, be careful not to burn yourself. Always test the adhesive on a small, inconspicuous area of the shoe box before applying it to the entire surface. This will ensure that the adhesive doesn’t damage the box or the decorative materials.
Q: How can I prevent my shoe box DIY projects from looking cheap or flimsy?
A: The key to creating high-quality shoe box DIY projects is to pay attention to detail and use quality materials. Start by reinforcing the boxes as described above. Then, take your time when decorating them. Use clean, precise cuts and apply adhesives evenly. Choose decorative materials that complement each other and create a cohesive look. Consider adding finishing touches, like decorative trim or hardware, to elevate the overall appearance of your projects. Finally, don’t be afraid to experiment and try new techniques. The more you practice, the better you’ll become at creating beautiful and durable shoe box DIY projects.
Q: Can I use these shoe box DIY ideas for organizing items other than shoes?
A: Absolutely! The beauty of these DIY projects is their versatility. You can use them to organize a wide variety of items, from clothing and accessories to craft supplies and office materials. Shoe box drawer dividers are perfect for organizing socks, underwear, and jewelry. Shoe box shelves can be used to display books, plants, or decorative items. Shoe box storage containers are ideal for storing toys, games, or seasonal decorations. Get creative and think about how you can adapt these ideas to suit your specific organizational needs.
Q: What are some sustainable alternatives to traditional decorative materials for shoe box DIY?
A: There are many eco-friendly options for decorating your shoe box creations. Consider using recycled paper, fabric scraps, or natural materials like leaves, twigs, and shells. You can also use non-toxic paints and glues. Another great option is to repurpose old clothing or linens to cover your shoe boxes. This not only adds a unique touch but also helps to reduce textile waste. Look for opportunities to incorporate sustainable practices into every step of your DIY process.
Q: How do I measure and cut fabric or paper to perfectly fit my shoe boxes?
A: Accurate measurements are crucial for a professional-looking finish. First, measure the length, width, and height of each side of the shoe box. Add an extra inch or two to each measurement to allow for overlap and folding. Use a ruler and a sharp utility knife or scissors to cut the fabric or paper according to your measurements. For curved edges, you can create a template out of cardboard and use it to trace the shape onto the fabric or paper. When applying the fabric or paper, start by centering it on the surface of the shoe box and then smooth it out, working from the center outwards. This will help to prevent wrinkles and bubbles.
Q: How can I make my shoe box storage solutions look more cohesive and less like a collection of random boxes?
A: Consistency is key to creating a cohesive look. Use the same color palette, decorative materials, and finishing touches for all of your shoe box projects. Consider creating a theme or style that ties everything together. For example, you could create a nautical-themed storage solution using blue and white paint, rope accents, and seashell embellishments. Or you could create a vintage-inspired storage solution using antique-style paper, lace trim, and vintage buttons. By maintaining a consistent aesthetic, you can transform a collection of random shoe boxes into a stylish and organized storage system.

Leave a Comment