
Sack tomato growing at home is easier than you might think! Forget sprawling gardens and back-breaking weeding. Imagine plucking juicy, sun-ripened tomatoes right from your patio, balcony, or even your front porch. Sounds dreamy, right? Well, it’s totally achievable with this simple and rewarding DIY project.
Growing tomatoes in sacks isn’t a newfangled invention. In fact, resourceful gardeners have been using similar methods for generations, adapting to limited spaces and challenging climates. Think of it as a modern twist on ancient container gardening techniques, bringing the bounty of the countryside to even the smallest urban dwellings.
Why should you embrace sack tomato growing at home? Because it’s incredibly practical! Whether you’re a seasoned gardener or a complete newbie, this method offers a low-cost, low-effort way to enjoy fresh, homegrown tomatoes. Plus, it’s a fantastic solution for those with limited space, poor soil, or mobility issues. I’m going to show you how to create your own thriving tomato garden in a sack, and trust me, the taste of those homegrown tomatoes will be worth every bit of effort!
DIY Upside-Down Tomato Planter: Grow Tomatoes in a Sack!
Hey there, fellow gardening enthusiasts! I’m so excited to share one of my favorite gardening hacks with you: growing tomatoes upside-down in a sack! It’s a fun, space-saving, and surprisingly effective way to get a bountiful harvest. Plus, it looks pretty cool hanging on your porch or balcony. Let’s dive in!
Why Grow Tomatoes Upside-Down?
Before we get started, you might be wondering why you’d even *want* to grow tomatoes upside-down. Well, there are several benefits:
* Space Saving: Perfect for small patios, balconies, or anyone with limited garden space.
* Pest Control: Less contact with soil-borne pests and diseases.
* Weed-Free: No weeding required!
* Better Air Circulation: Reduces the risk of fungal diseases.
* Unique Aesthetic: It’s a conversation starter!
What You’ll Need
Okay, let’s gather our supplies. This is a relatively inexpensive project, and you probably have some of these items lying around already.
* A Sturdy Sack: I recommend a heavy-duty woven polypropylene bag (like a feed sack or a large reusable shopping bag). Burlap can work, but it might not last the whole season. Make sure it’s at least 24 inches deep.
* Tomato Seedling: Choose a determinate (bush) variety for best results. Indeterminate (vining) varieties can get too heavy. Roma, Celebrity, or Patio tomatoes are good choices.
* Potting Mix: A high-quality potting mix is crucial for healthy growth. Avoid garden soil, as it can compact and hinder drainage.
* Water-Absorbing Polymer Crystals (Optional): These help retain moisture in the soil, which is especially helpful in hanging planters.
* Slow-Release Fertilizer: Provides a steady supply of nutrients throughout the growing season.
* Landscape Fabric or Coffee Filter: To prevent soil from washing out of the drainage holes.
* Sharp Knife or Scissors: For cutting the hole in the sack.
* Watering Can or Hose: For watering your tomato plant.
* Strong Rope or Chain: For hanging the sack.
* Gloves: To keep your hands clean.
Step-by-Step Instructions: Creating Your Upside-Down Tomato Planter
Alright, let’s get our hands dirty! Follow these steps carefully, and you’ll have your upside-down tomato planter ready in no time.
1. Prepare the Sack:
* First, inspect your sack for any holes or tears. If you find any, patch them up with duct tape or strong fabric glue.
* Next, turn the sack inside out. This will make it easier to work with.
* Now, we need to create drainage holes. Using your knife or scissors, carefully cut several small holes (about 1/2 inch in diameter) in the bottom of the sack. Space them a few inches apart.
* Cut small squares of landscape fabric or coffee filter and place them over the drainage holes on the inside of the sack. This will prevent soil from washing out. You can secure them with a dab of hot glue if you want, but it’s usually not necessary.
* Turn the sack right side out again.
2. Prepare the Planting Hole:
* This is the most important part! We need to create a hole in the bottom of the sack that’s large enough to accommodate the tomato seedling, but not so large that the soil will fall out.
* Find the center of the bottom of the sack.
* Using your knife or scissors, carefully cut a circular hole that’s about 2-3 inches in diameter. The size will depend on the size of the root ball of your tomato seedling. You want it to be snug, but not too tight.
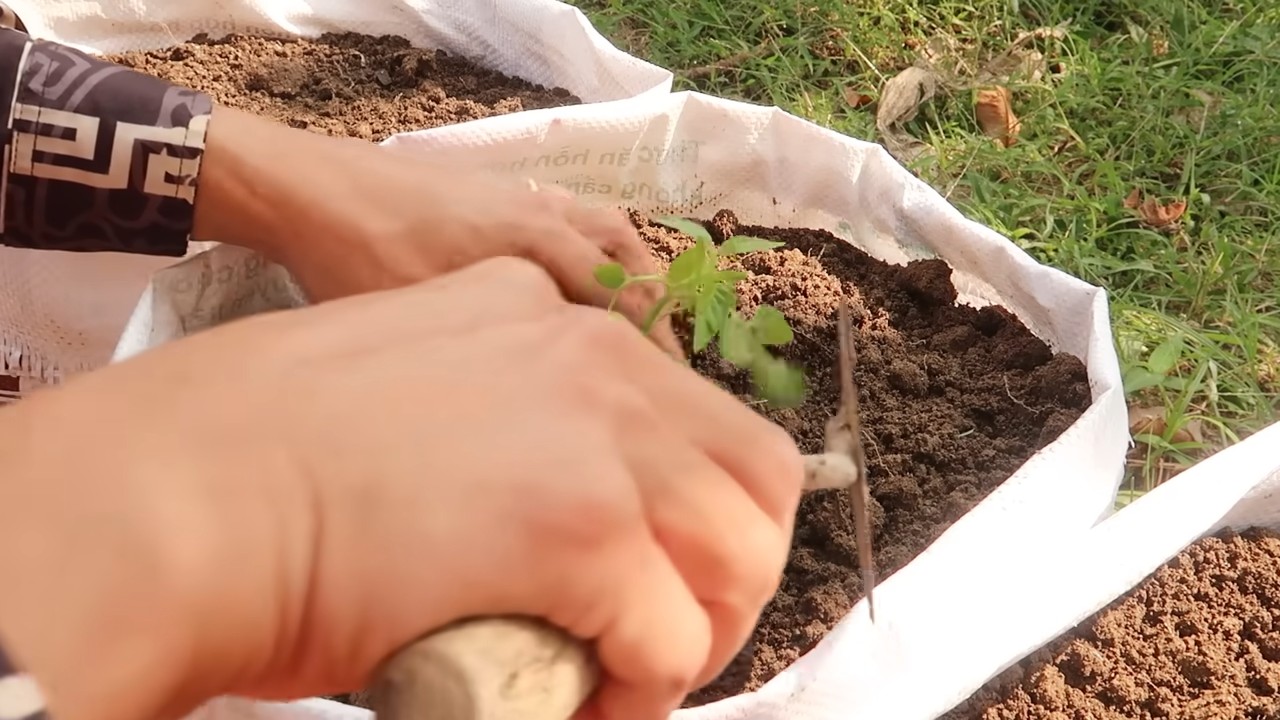
3. Plant the Tomato Seedling:
* Gently remove the tomato seedling from its container. Be careful not to damage the roots.
* Carefully feed the root ball of the tomato seedling through the hole in the bottom of the sack. The leaves and stem should be hanging down.
* Gently adjust the seedling so that the root ball is centered in the hole.
4. Add Potting Mix:
* Now, we need to fill the sack with potting mix.
* Start by adding a layer of potting mix around the root ball of the tomato seedling.
* If you’re using water-absorbing polymer crystals, mix them into the potting mix according to the package directions.
* Add a slow-release fertilizer to the potting mix according to the package directions.
* Continue adding potting mix until the sack is almost full, leaving a few inches of space at the top.
* Gently pat down the potting mix to remove any air pockets.
5. Water Thoroughly:
* Water the potting mix thoroughly until water drains out of the drainage holes. This will help settle the soil and ensure that the roots are well-hydrated.
6. Hang the Planter:
* This is where the strong rope or chain comes in.
* Attach the rope or chain to the top of the sack, making sure it’s securely fastened. You can use grommets, carabiners, or simply tie a strong knot.
* Choose a sunny location to hang your planter. Tomatoes need at least 6-8 hours of sunlight per day.
* Hang the planter from a sturdy hook, beam, or tree branch. Make sure the support can handle the weight of the planter, especially when it’s full of water and tomatoes.
Maintaining Your Upside-Down Tomato Planter
Now that your upside-down tomato planter is hanging, it’s important to provide proper care to ensure a healthy and productive plant.
* Watering: Water your tomato plant regularly, especially during hot, dry weather. Check the soil moisture by sticking your finger into the potting mix. If it feels dry, it’s time to water. Water deeply until water drains out of the drainage holes. Be careful not to overwater, as this can lead to root rot.
* Fertilizing: Even with slow-release fertilizer, your tomato plant may need supplemental feeding. Use a liquid tomato fertilizer every 2-3 weeks, following the package directions.
* Sunlight: Make sure your tomato plant is getting enough sunlight. If it’s not getting at least 6-8 hours of sunlight per day, consider moving it to a sunnier location.
* Pruning: Prune away any suckers (small shoots that grow between the main stem and the branches) to encourage fruit production.
* Pest Control: Keep an eye out for pests, such as aphids, whiteflies, and tomato hornworms. If you find any pests, treat them with an appropriate insecticide or organic pest control method.
* Supporting the Plant: As the tomato plant grows and produces fruit, it may become heavy and require additional support. You can use twine or plant ties to support the branches and prevent them from breaking.
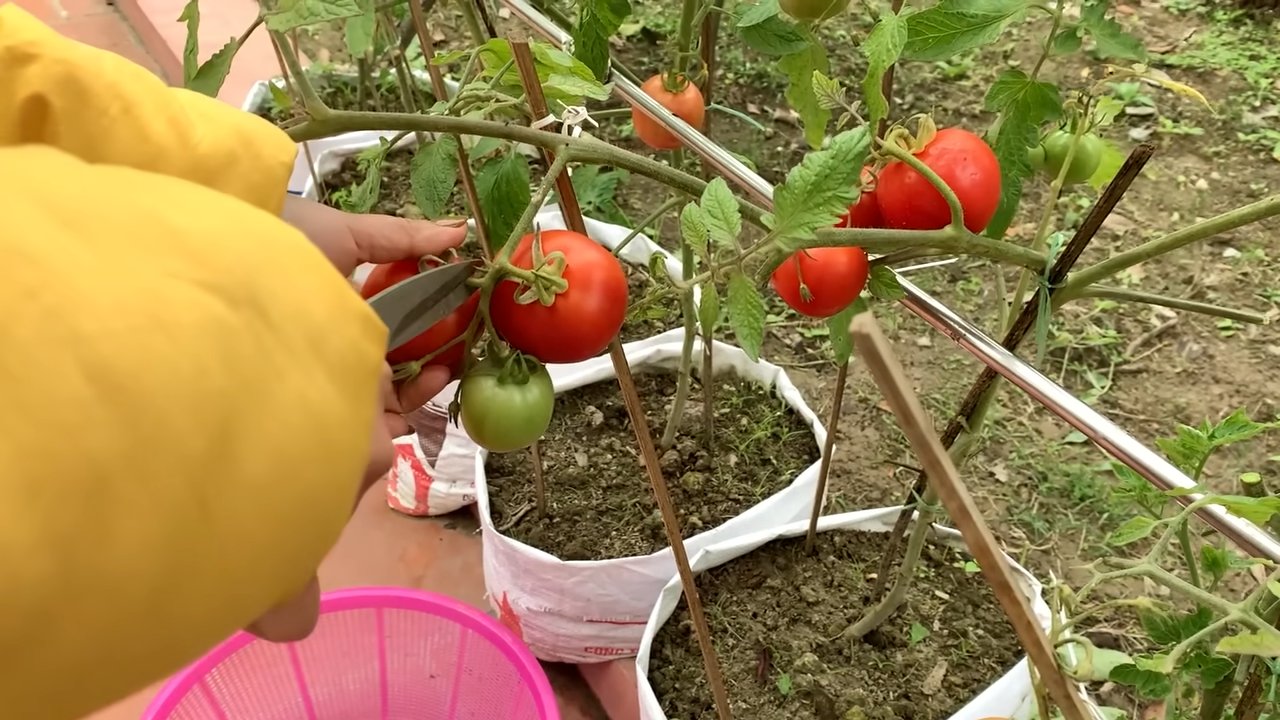
* Harvesting: Harvest your tomatoes when they are fully ripe and have reached their mature color. Gently twist the tomatoes off the vine.
Troubleshooting
Even with the best care, you might encounter some problems with your upside-down tomato planter. Here are some common issues and how to address them:
* Yellowing Leaves: This could be a sign of overwatering, underwatering, nutrient deficiency, or disease. Check the soil moisture and adjust your watering accordingly. Fertilize with a balanced fertilizer. Inspect the plant for signs of disease and treat as necessary.
* Blossom End Rot: This is a common problem in tomatoes, characterized by a dark, leathery spot on the bottom of the fruit. It’s caused by a calcium deficiency. To prevent blossom end rot, add calcium to the soil before planting and water regularly. You can also use a calcium spray on the foliage.
* Pests: As mentioned earlier, keep an eye out for pests and treat them promptly.
* Slow Growth: This could be due to lack of sunlight, poor soil, or nutrient deficiency. Make sure your tomato plant is getting enough sunlight and fertilize regularly.
Tips and Tricks for Success
Here are a few extra tips to help you get the most out of your upside-down tomato planter:
* Choose the Right Variety: As I mentioned earlier, determinate (bush) tomato varieties are best for upside-down planters. They tend to be more compact and less likely to become too heavy.
* Start with a Healthy Seedling: Choose a healthy, vigorous tomato seedling from a reputable nursery.
* Use High-Quality Potting Mix: Don’t skimp on the potting mix! A good-quality potting mix will provide the nutrients and drainage that your tomato plant needs to
Conclusion
So, there you have it! Transforming a simple sack into a thriving tomato garden is not just a cost-effective alternative to traditional gardening; it’s a gateway to fresh, flavorful tomatoes right at your doorstep. We’ve explored the ins and outs of sack tomato growing, highlighting its ease, space-saving benefits, and the sheer joy of nurturing your own food source.
This method isn’t just about saving money; it’s about connecting with nature, understanding the growing process, and enjoying the unparalleled taste of homegrown tomatoes. Imagine the satisfaction of plucking a sun-ripened tomato, still warm from the sun, and using it in your favorite salad or sauce. That’s the magic of sack tomato growing.
But the beauty of this DIY project lies in its adaptability. Feel free to experiment with different types of sacks. Burlap sacks offer a rustic charm, while plastic feed sacks are incredibly durable and readily available. Just remember to ensure proper drainage regardless of the material you choose.
Consider also the variety of tomatoes you plant. While cherry tomatoes and other smaller varieties thrive exceptionally well in sacks due to their manageable size and prolific fruiting, don’t shy away from trying larger heirloom varieties. Just be sure to provide adequate support as the plants grow, perhaps with stakes or a trellis system.
Furthermore, think about companion planting. Basil, marigolds, and other herbs not only enhance the flavor of your tomatoes but also deter pests naturally. Planting these alongside your tomatoes in the sack can create a mini-ecosystem that promotes healthy growth and reduces the need for chemical interventions.
Don’t be afraid to get creative with your sack garden. You can paint the sacks with vibrant colors or add decorative elements to personalize your growing space. This is your chance to express your creativity while enjoying the benefits of fresh, homegrown tomatoes.
We wholeheartedly encourage you to give sack tomato growing a try. It’s a rewarding experience that will not only provide you with delicious tomatoes but also connect you with the natural world in a meaningful way. The process is simple, the materials are readily available, and the results are incredibly satisfying.
Once you’ve embarked on your sack tomato growing adventure, we’d love to hear about your experiences. Share your tips, tricks, and photos with us in the comments section below. Let’s build a community of sack tomato enthusiasts and inspire others to embrace this simple yet effective gardening method. Your insights could be invaluable to someone just starting out, and together, we can unlock the full potential of sack tomato growing. So, grab a sack, some soil, and your favorite tomato seedlings, and get ready to enjoy the taste of homegrown goodness!
Frequently Asked Questions (FAQ)
What kind of sack is best for growing tomatoes?
The best type of sack depends on your preferences and what’s readily available. Burlap sacks are a popular choice due to their natural, breathable material and rustic aesthetic. However, they tend to decompose over time, so they might not last for multiple seasons. Plastic feed sacks are more durable and waterproof, making them a longer-lasting option. Just be sure to poke plenty of drainage holes in the bottom to prevent waterlogging. You can even use large, heavy-duty garbage bags, but again, drainage is crucial. Ultimately, the key is to choose a sack that’s sturdy enough to hold the soil and plants and provides adequate drainage.
How often should I water my sack tomatoes?
Watering frequency depends on several factors, including the weather, the type of sack you’re using, and the size of your tomato plants. Generally, you should water your sack tomatoes when the top inch of soil feels dry to the touch. During hot, sunny weather, you may need to water them daily, or even twice a day. In cooler, cloudier weather, you can water them less frequently. Burlap sacks tend to dry out faster than plastic sacks, so keep that in mind. The best way to determine if your tomatoes need water is to check the soil moisture regularly. Avoid overwatering, as this can lead to root rot.
What kind of soil should I use for sack tomato growing?
The ideal soil for sack tomato growing is a well-draining, nutrient-rich potting mix. Avoid using garden soil, as it can be too heavy and compact, hindering drainage and root growth. A good potting mix will contain a blend of peat moss, perlite, and vermiculite, which provide excellent drainage and aeration. You can also amend the potting mix with compost or other organic matter to boost its nutrient content. Tomatoes are heavy feeders, so they need plenty of nutrients to thrive. Consider adding a slow-release fertilizer to the potting mix at planting time to provide a steady supply of nutrients throughout the growing season.
How do I fertilize my sack tomatoes?
Tomatoes are heavy feeders and require regular fertilization to produce abundant fruit. You can use a variety of fertilizers, including granular, liquid, and slow-release options. A balanced fertilizer with an NPK ratio of 10-10-10 or 14-14-14 is a good starting point. Follow the instructions on the fertilizer package carefully, as over-fertilizing can damage your plants. Liquid fertilizers can be applied every 1-2 weeks, while granular fertilizers can be applied every 4-6 weeks. Slow-release fertilizers are a convenient option, as they provide a steady supply of nutrients over a longer period. You can also supplement with organic fertilizers, such as compost tea or fish emulsion.
How do I prevent pests and diseases in my sack tomato garden?
Prevention is key when it comes to pests and diseases in your sack tomato garden. Start by choosing disease-resistant tomato varieties. Ensure good air circulation around your plants by spacing them adequately and pruning away any crowded foliage. Regularly inspect your plants for signs of pests or diseases, such as aphids, whiteflies, or tomato hornworms. If you spot any pests, you can try hand-picking them off or using insecticidal soap or neem oil. For diseases, remove any infected leaves or plants immediately. You can also use copper fungicide or other organic fungicides to prevent the spread of disease. Companion planting with herbs like basil and marigolds can also help deter pests naturally.
Can I grow other vegetables in a sack besides tomatoes?
Yes, you can definitely grow other vegetables in a sack besides tomatoes! Many vegetables thrive in this type of container gardening setup. Leafy greens like lettuce, spinach, and kale are excellent choices, as they have shallow root systems and don’t require a lot of space. Herbs like basil, parsley, and cilantro also do well in sacks. Peppers, eggplants, and even strawberries can be successfully grown in sacks, provided you choose a large enough sack and provide adequate support. When choosing vegetables to grow in sacks, consider their size, root depth, and sunlight requirements.
How much sunlight do sack tomatoes need?
Sack tomatoes need at least 6-8 hours of direct sunlight per day to thrive. Choose a location for your sack garden that receives plenty of sunlight throughout the day. If you live in a particularly hot climate, you may need to provide some afternoon shade to prevent the plants from overheating. Insufficient sunlight can lead to leggy growth, reduced fruit production, and increased susceptibility to diseases. Observe your plants regularly to ensure they are getting enough sunlight. If they are not, you may need to move them to a sunnier location.
How do I support my tomato plants in a sack?
As your tomato plants grow, they will need support to prevent them from falling over. You can use a variety of methods to support your sack tomatoes, including stakes, cages, and trellises. Stakes are a simple and inexpensive option, but they may not be strong enough to support large, heavy plants. Tomato cages provide more support and allow the plants to grow upwards. Trellises are a good option for vining tomato varieties, as they provide a framework for the plants to climb. Whichever method you choose, be sure to install the support system early in the growing season, before the plants get too large and unwieldy.
What do I do with my sack tomato garden at the end of the season?
At the end of the growing season, after your tomato plants have stopped producing fruit, you can remove the plants from the sacks and compost them. The soil in the sacks can also be composted or used to amend your garden soil. If you used burlap sacks, they may have started to decompose, so you can compost them as well. Plastic sacks can be cleaned and stored for reuse next season. Alternatively, you can use the sacks to grow other vegetables or flowers during the off-season.

Leave a Comment