
Rooftop Kale Gardening: Imagine stepping onto your rooftop and harvesting fresh, vibrant kale, ready to be transformed into a delicious and healthy meal. Sounds like a dream, right? Well, it doesn’t have to be! This DIY guide will unlock the secrets to successful rooftop kale gardening, even if you’re a complete beginner.
For centuries, humans have cultivated food in unconventional spaces. From the hanging gardens of Babylon to the terrace farming of the Incas, the desire to grow our own food has always found a way. While rooftop gardening might seem like a modern trend, the underlying principle – maximizing available space for cultivation – is deeply rooted in our history.
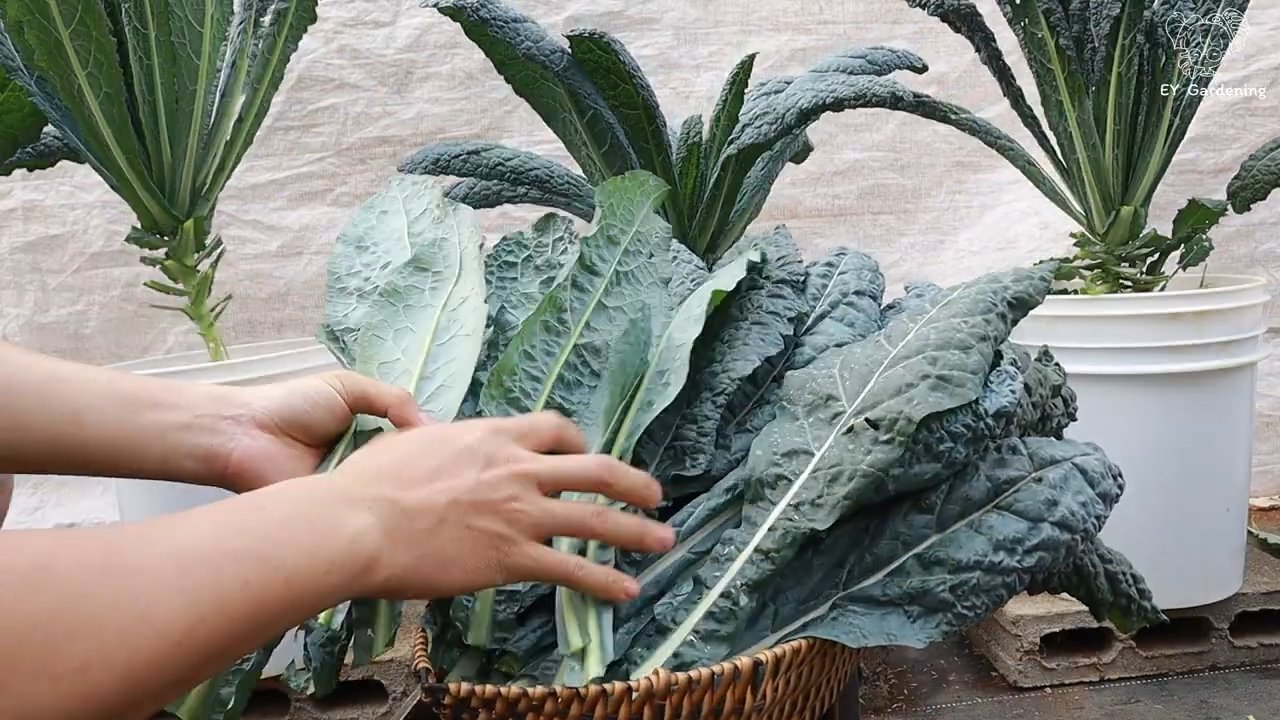
But why rooftop kale gardening, specifically? Well, kale is a nutritional powerhouse, packed with vitamins and antioxidants. Plus, it’s incredibly versatile in the kitchen. More importantly, in today’s world, where access to fresh, healthy produce can be challenging and expensive, growing your own food offers a sense of control and sustainability. This DIY project will show you how to create a thriving rooftop garden, providing you with a constant supply of fresh kale, right at your doorstep. I’m excited to share these simple, effective tricks that will transform your rooftop into a green oasis!
Dein eigener Dachgarten mit Grünkohl: Eine Schritt-für-Schritt-Anleitung
Hey Gartenfreunde! Habt ihr schon mal darüber nachgedacht, euren eigenen Grünkohl auf dem Dach anzubauen? Klingt verrückt, ist aber machbar! Und ich zeige euch, wie es geht. Ein Dachgarten mit Grünkohl ist nicht nur super nachhaltig, sondern auch eine tolle Möglichkeit, frisches Gemüse direkt vor der Haustür zu haben. Außerdem ist es ein echter Hingucker! Also, krempeln wir die Ärmel hoch und legen los!
Was du für deinen Dachgarten brauchst
Bevor wir loslegen, hier eine Liste mit allen Dingen, die du für deinen Grünkohl-Dachgarten benötigst:
* Geeignete Behälter: Wähle leichte, aber robuste Pflanzgefäße oder Hochbeete. Denk daran, dass sie das Gewicht von Erde und Pflanzen tragen müssen. Kunststoff oder recycelte Materialien sind eine gute Wahl.
* Hochwertige Pflanzerde: Verwende eine spezielle Erde für Gemüse, die gut drainiert und reich an Nährstoffen ist.
* Grünkohl-Samen oder Jungpflanzen: Du kannst entweder Samen aussäen oder direkt Jungpflanzen kaufen, um schneller Ergebnisse zu sehen.
* Drainagematerial: Kies, Blähton oder Tonscherben helfen, Staunässe zu vermeiden.
* Gießkanne oder Schlauch: Für die regelmäßige Bewässerung.
* Gartengeräte: Spaten, Schaufel, Handschuhe und eventuell eine kleine Harke.
* Dünger: Organischer Dünger oder Kompost, um den Grünkohl mit ausreichend Nährstoffen zu versorgen.
* Sonnenschutz (optional): Bei sehr intensiver Sonneneinstrahlung kann ein Sonnensegel oder Schattiernetz sinnvoll sein.
* Windschutz (optional): Wenn dein Dach sehr windig ist, kann ein Windschutz helfen, die Pflanzen zu schützen.
* Werkzeug zur Dachinspektion: Um sicherzustellen, dass dein Dach das Gewicht tragen kann und keine Schäden entstehen.
Sicherheitsvorkehrungen: Das A und O beim Dachgarten
Wichtig: Bevor du überhaupt anfängst, solltest du unbedingt prüfen, ob dein Dach für einen Garten geeignet ist.
* Statik prüfen: Lass von einem Fachmann (Statiker) überprüfen, ob dein Dach das zusätzliche Gewicht von Erde, Behältern und Pflanzen tragen kann. Das ist das Allerwichtigste!
* Dachabdichtung kontrollieren: Stelle sicher, dass die Dachabdichtung intakt ist und keine Schäden aufweist. Ein undichtes Dach kann zu großen Problemen führen.
* Sicherheitsmaßnahmen treffen: Trage festes Schuhwerk und eventuell einen Helm, wenn du auf dem Dach arbeitest. Achte darauf, dass du nicht abrutschst.
* Zugang sichern: Sorge für einen sicheren und stabilen Zugang zum Dach. Eine Leiter sollte rutschfest sein und gut gesichert werden.
* Nachbarn informieren: Sprich mit deinen Nachbarn, bevor du mit dem Dachgarten beginnst. So vermeidest du Missverständnisse und kannst eventuell sogar Hilfe bekommen.
Schritt-für-Schritt-Anleitung: So legst du deinen Grünkohl-Dachgarten an
Phase 1: Vorbereitung des Daches und der Behälter
1. Dach reinigen: Bevor du die Behälter aufstellst, reinige das Dach gründlich von Schmutz, Blättern und anderen Ablagerungen. Das verhindert, dass sich Feuchtigkeit unter den Behältern staut.
2. Schutzschicht anbringen: Lege eine Schutzschicht unter die Behälter, um die Dachabdichtung zu schonen. Du kannst dafür alte Teppichreste, Gummimatten oder spezielle Schutzfolien verwenden.
3. Behälter aufstellen: Platziere die Behälter an den gewünschten Stellen. Achte darauf, dass sie stabil stehen und nicht wackeln. Berücksichtige dabei die Sonneneinstrahlung und den Wind.
4. Drainage vorbereiten: Fülle eine Schicht Drainagematerial (Kies, Blähton, Tonscherben) in die Behälter. Das sorgt für eine gute Drainage und verhindert Staunässe.
Phase 2: Grünkohl pflanzen
1. Erde einfüllen: Fülle die Behälter mit hochwertiger Pflanzerde. Lass oben noch ein paar Zentimeter Platz, damit du beim Gießen nicht alles überschwemmst.
2. Samen aussäen (optional): Wenn du Samen verwendest, säe sie gemäß den Anweisungen auf der Packung aus. Drücke die Samen leicht in die Erde und bedecke sie mit einer dünnen Schicht Erde.
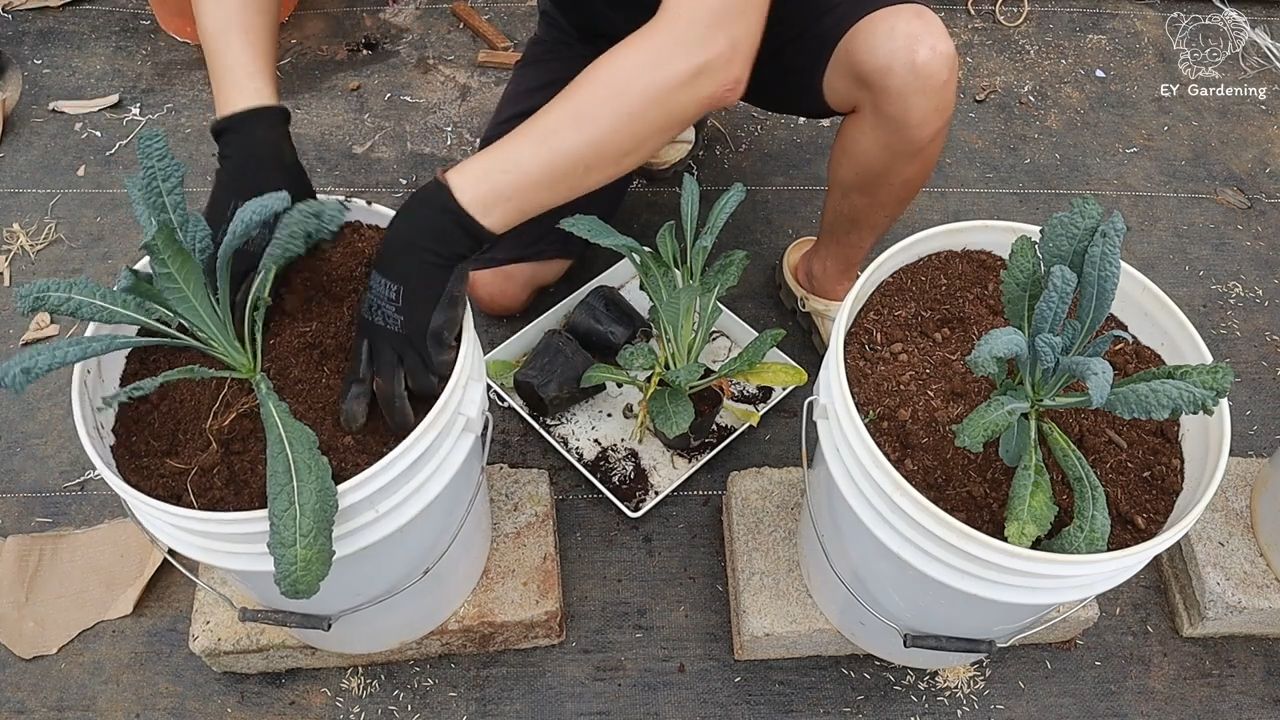
3. Jungpflanzen einsetzen: Wenn du Jungpflanzen verwendest, grabe kleine Löcher in die Erde und setze die Pflanzen vorsichtig ein. Achte darauf, dass die Wurzeln nicht beschädigt werden.
4. Angießen: Gieße die Samen oder Jungpflanzen nach dem Einsetzen gründlich an. Das hilft ihnen, sich in der neuen Umgebung zu etablieren.
Phase 3: Pflege deines Grünkohl-Dachgartens
1. Regelmäßig gießen: Grünkohl braucht regelmäßig Wasser, besonders während trockener Perioden. Gieße am besten früh morgens oder spät abends, um Verdunstung zu vermeiden.
2. Düngen: Dünge den Grünkohl regelmäßig mit organischem Dünger oder Kompost. Das sorgt für ein gesundes Wachstum und eine reiche Ernte.
3. Unkraut entfernen: Entferne regelmäßig Unkraut, damit es dem Grünkohl keine Nährstoffe wegnimmt.
4. Schädlinge bekämpfen: Kontrolliere die Pflanzen regelmäßig auf Schädlinge wie Blattläuse oder Raupen. Bei Bedarf kannst du natürliche Schädlingsbekämpfungsmittel einsetzen.
5. Ernten: Du kannst den Grünkohl ernten, sobald die Blätter groß genug sind. Schneide die äußeren Blätter ab und lass die inneren Blätter weiterwachsen. So kannst du über einen längeren Zeitraum ernten.
6. Windschutz und Sonnenschutz: Überprüfe regelmäßig, ob der Wind- oder Sonnenschutz noch richtig positioniert ist und passe ihn bei Bedarf an.
7. Behälter kontrollieren: Kontrolliere regelmäßig die Behälter auf Beschädigungen und repariere sie gegebenenfalls.
8. Dachinspektion: Überprüfe regelmäßig das Dach auf Schäden und reinige es von Ablagerungen.
Tipps und Tricks für einen erfolgreichen Grünkohl-Dachgarten
* Sortenwahl: Wähle Grünkohlsorten, die für den Anbau in Behältern geeignet sind. Es gibt viele verschiedene Sorten, die sich in Geschmack, Größe und Farbe unterscheiden.
* Fruchtfolge beachten: Pflanze Grünkohl nicht jedes Jahr am selben Standort, um Krankheiten und Schädlingen vorzubeugen.
* Mulchen: Bedecke die Erde mit einer Schicht Mulch (z.B. Stroh oder Holzhackschnitzel), um die Feuchtigkeit zu halten und Unkrautwachstum zu reduzieren.
* Begleitpflanzen: Pflanze Begleitpflanzen wie Ringelblumen oder Kapuzinerkresse, um Schädlinge abzuhalten und die Bestäubung zu fördern.
* Überwinterung: Grünkohl ist winterhart und kann auch bei Frost geerntet werden. Schütze die Pflanzen bei sehr strengem Frost mit einem Vlies.
* Kreativität: Sei kreativ bei der Gestaltung deines Dachgartens! Du kannst verschiedene Behälter kombinieren, Rankgitter aufstellen oder kleine Dekorationen hinzufügen.
* Dokumentation: Mache Fotos von deinem Dachgarten, um den Fortschritt zu dokumentieren und deine Erfahrungen mit anderen zu teilen.
* Austausch: Tausche dich mit anderen Dachgärtnern aus, um Tipps und Tricks zu lernen und neue Ideen zu sammeln.
Häufige Fehler vermeiden
* Falsche Behälterwahl: Wähle keine zu kleinen oder zu schweren Behälter.
* Mangelnde Drainage: Achte auf eine gute Drainage, um Staunässe zu vermeiden.
* Falsche Erde: Verwende keine normale Gartenerde, sondern spezielle Pflanzerde für Gemüse.
* Zu wenig Wasser: Gieße den Grünkohl regelmäßig, besonders während trockener Perioden.
* Zu wenig Dünger: Dünge den Grünkohl regelmäßig, um ein
Conclusion
So, there you have it! Transforming your rooftop into a thriving kale garden isn’t just a whimsical dream; it’s an achievable reality with a little planning and effort. We’ve explored the key steps, from assessing your rooftop’s suitability to selecting the right containers and providing the essential care that kale craves. But why should you embark on this green adventure?
The answer is multifaceted. Firstly, growing your own kale offers unparalleled freshness and flavor. Imagine stepping onto your rooftop, snipping a handful of vibrant green leaves, and adding them directly to your salad or smoothie. The taste difference compared to store-bought kale is remarkable. Secondly, rooftop kale gardening is incredibly rewarding. Witnessing the entire life cycle of your plants, from tiny seedlings to mature, leafy greens, is a deeply satisfying experience. It connects you to nature in a tangible way, even in the heart of the city.
Beyond the personal benefits, rooftop kale gardening contributes to a more sustainable lifestyle. You’re reducing your carbon footprint by minimizing transportation and packaging waste. You’re also creating a small oasis for pollinators and other beneficial insects. And let’s not forget the aesthetic appeal! A lush, green rooftop garden adds beauty and tranquility to your urban environment.
But the real magic lies in the versatility of this DIY project. Feel free to experiment with different kale varieties. Curly kale, Lacinato kale (also known as dinosaur kale), and Red Russian kale each offer unique textures and flavors. Consider companion planting to maximize space and deter pests. Marigolds, nasturtiums, and garlic are excellent choices for planting alongside your kale. You can also explore different container options, from repurposed crates to self-watering planters. The possibilities are endless!
Don’t be afraid to get your hands dirty and embrace the learning process. Gardening is a journey, not a destination. There will be challenges along the way, but the rewards far outweigh the difficulties. And remember, you’re not alone! There’s a vibrant community of urban gardeners eager to share their knowledge and experiences.
We wholeheartedly encourage you to give rooftop kale gardening a try. It’s a fun, fulfilling, and sustainable way to grow your own food and connect with nature. Once you’ve harvested your first batch of homegrown kale, we’d love to hear about your experience! Share your photos, tips, and challenges in the comments below. Let’s inspire each other to create greener, healthier cities, one rooftop at a time. Your journey to fresh, delicious, and homegrown kale starts now!
Frequently Asked Questions (FAQ)
1. Is my rooftop suitable for a kale garden?
This is the most crucial question! Before you even think about planting, assess your rooftop’s structural integrity. Can it handle the weight of soil, containers, and water? Consult with a structural engineer if you have any doubts. Next, consider sunlight exposure. Kale needs at least 6 hours of direct sunlight per day. Observe your rooftop throughout the day to determine if it receives enough sunlight. Also, check local building codes and regulations regarding rooftop gardening. Some areas may have restrictions on container size, height, or weight. Finally, ensure you have easy access to water. Hauling water up to your rooftop can be a chore, so consider installing a hose or rainwater harvesting system.
2. What type of containers should I use for rooftop kale gardening?
The choice of containers depends on your space, budget, and aesthetic preferences. Lightweight containers are essential for rooftop gardening. Plastic pots, fabric grow bags, and repurposed containers are all good options. Make sure the containers have drainage holes to prevent waterlogging. The size of the container will depend on the variety of kale you’re growing. A general rule of thumb is to use a container that is at least 12 inches deep and 12 inches wide for each kale plant. Consider using self-watering containers to reduce the frequency of watering, especially during hot weather. Raised beds are also an option, but they can be heavier and more expensive.
3. What type of soil should I use for growing kale on my rooftop?
Avoid using garden soil, as it can be too heavy and compacted for containers. Instead, use a high-quality potting mix that is specifically designed for container gardening. Look for a mix that contains peat moss, perlite, and vermiculite. These ingredients provide good drainage and aeration. You can also amend the potting mix with compost or other organic matter to improve its fertility. Consider adding slow-release fertilizer to provide your kale plants with a steady supply of nutrients.
4. How often should I water my rooftop kale garden?
The frequency of watering will depend on the weather, the type of container, and the size of the plant. In general, you should water your kale plants when the top inch of soil feels dry to the touch. Water deeply, until water drains out of the drainage holes. Avoid overwatering, as this can lead to root rot. During hot, dry weather, you may need to water your kale plants daily. Check the soil moisture regularly and adjust your watering schedule accordingly.
5. What are some common pests and diseases that affect kale?
Kale is susceptible to a variety of pests and diseases, including aphids, cabbage worms, flea beetles, and powdery mildew. Regularly inspect your plants for signs of infestation or disease. Handpick pests or use insecticidal soap to control them. Apply neem oil to prevent fungal diseases. Crop rotation can also help to prevent soilborne diseases. Consider using row covers to protect your plants from pests.
6. When should I harvest my kale?
You can start harvesting kale leaves when they are about 6-8 inches long. Harvest the outer leaves first, leaving the inner leaves to continue growing. Avoid harvesting more than one-third of the plant at a time. Kale leaves are best harvested in the morning, when they are crisp and tender. Wash the leaves thoroughly before eating.
7. Can I grow kale indoors during the winter?
Yes, you can grow kale indoors during the winter, but you’ll need to provide it with enough light. Place your kale plants near a sunny window or use grow lights. Keep the soil moist but not soggy. Fertilize regularly with a balanced fertilizer.
8. What are some creative ways to use my homegrown kale?
The possibilities are endless! Kale can be used in salads, smoothies, soups, stews, stir-fries, and more. You can also bake kale chips or add kale to your favorite pasta dishes. Get creative and experiment with different recipes.
9. How can I encourage more people to try rooftop kale gardening?
Share your experiences with friends, family, and neighbors. Post photos and videos of your rooftop kale garden on social media. Offer to give away some of your homegrown kale. Organize a rooftop gardening workshop. The more people who see the benefits of rooftop kale gardening, the more likely they are to try it themselves.
10. What if I don’t have a green thumb? Can I still succeed with rooftop kale gardening?
Absolutely! Rooftop kale gardening is surprisingly easy, even for beginners. Start small, with just a few plants. Choose a sunny location and use high-quality potting mix. Water regularly and fertilize as needed. Don’t be afraid to ask for help from experienced gardeners. With a little patience and effort, you can grow your own delicious and nutritious kale, even if you don’t have a green thumb. Remember, the journey of a thousand miles begins with a single seed!

Leave a Comment