
Potato container gardening: ever dreamt of harvesting a mountain of spuds right from your own backyard, even if your “backyard” is just a sunny balcony? I know I have! Forget acres of farmland; with a little ingenuity and a few simple supplies, you can become a potato-growing pro, no matter how limited your space.
Growing potatoes has been a staple for centuries, dating back to the Incas in the Andes Mountains. These humble tubers have nourished civilizations and continue to be a vital part of diets worldwide. But who says you need a sprawling farm to participate in this rich agricultural tradition?
That’s where the magic of DIY comes in! This article is your ultimate guide to mastering potato container gardening. We’ll unlock the secrets to maximizing your yield, choosing the right container, and avoiding common pitfalls. Imagine the satisfaction of digging into fresh, homegrown potatoes – perfect for roasting, mashing, or frying into crispy chips. Plus, it’s a fantastic way to reduce your grocery bill and connect with nature, even in the heart of the city. So, grab your gardening gloves, and let’s get started on this exciting journey to potato-growing success!
Grow Your Own Spuds: A Beginner’s Guide to Potato Container Gardening
Hey there, fellow gardening enthusiasts! Ever dreamed of harvesting your own potatoes, fresh from the earth (or, in this case, a container)? Well, you’re in the right place! I’m going to walk you through the surprisingly easy and rewarding process of growing potatoes in containers. It’s perfect for small spaces, balconies, or anyone who wants a controlled environment for their potato crop. Let’s get digging!
Choosing Your Potato Variety
First things first, let’s talk potatoes! Not all potatoes are created equal, and some varieties are better suited for container gardening than others.
* Early-Season Varieties: These are your best bet! They mature quickly, meaning you’ll be enjoying homegrown potatoes sooner. Think ‘Yukon Gold’, ‘Irish Cobbler’, or ‘Red Norland’.
* Determinate vs. Indeterminate: This is key! Determinate potatoes produce one layer of potatoes and then stop growing. Indeterminate varieties, on the other hand, continue to produce potatoes along the stem as you “hill” them (more on that later!). Indeterminate varieties are ideal for container gardening because you can keep adding soil and encouraging more potato production.
* Consider Your Taste: Do you prefer waxy potatoes for salads or floury potatoes for baking? Choose a variety that you’ll actually enjoy eating!
Gathering Your Supplies
Okay, now that we’ve chosen our potato stars, let’s gather the supporting cast! Here’s what you’ll need:
* A Large Container: This is crucial! You’ll need a container that’s at least 20 inches in diameter and 20 inches deep. The bigger, the better, as it gives the potatoes plenty of room to grow. Think large plastic tubs, trash cans (with drainage holes!), or even fabric grow bags. I personally love using fabric grow bags because they allow for excellent drainage and aeration.
* Seed Potatoes: These aren’t seeds, but rather potatoes specifically grown for planting. You can find them at your local garden center or online. Make sure they’re certified disease-free!
* Potting Mix: Don’t use garden soil! It’s too heavy and compacts easily, which can hinder potato growth. Opt for a high-quality potting mix that’s well-draining. I like to mix in some compost for added nutrients.
* Compost: As mentioned above, compost is a fantastic addition to your potting mix. It provides essential nutrients and improves drainage.
* Watering Can or Hose: You’ll need a way to water your potatoes regularly.
* Optional: Fertilizer specifically formulated for potatoes.
Preparing Your Seed Potatoes
Before planting, you’ll want to “chit” your seed potatoes. This encourages them to sprout before they go into the container, giving them a head start.
* What is Chitting?: Chitting is simply allowing your seed potatoes to sprout small, green shoots (called “eyes”) before planting.
* How to Chit: Place your seed potatoes in a cool, bright location (but not direct sunlight) for a week or two. An egg carton works perfectly for this! You’ll start to see small green shoots emerging from the eyes.
* Cutting Seed Potatoes (Optional): If your seed potatoes are large, you can cut them into smaller pieces, ensuring that each piece has at least one or two eyes. Let the cut pieces dry for a day or two to prevent rotting. I usually don’t cut mine unless they are exceptionally large.
Planting Your Potatoes
Alright, the moment we’ve been waiting for! Let’s get those potatoes in the ground (or, rather, the container!).
1. Prepare the Container: Fill the bottom of your container with about 4-6 inches of potting mix.
2. Plant the Seed Potatoes: Place your chitted seed potatoes on top of the soil, with the sprouts facing upwards. Space them about 8-10 inches apart if you’re planting multiple potatoes in the same container.
3. Cover with Soil: Cover the seed potatoes with another 4-6 inches of potting mix.
4. Water Thoroughly: Water the container well until the water drains out of the bottom.
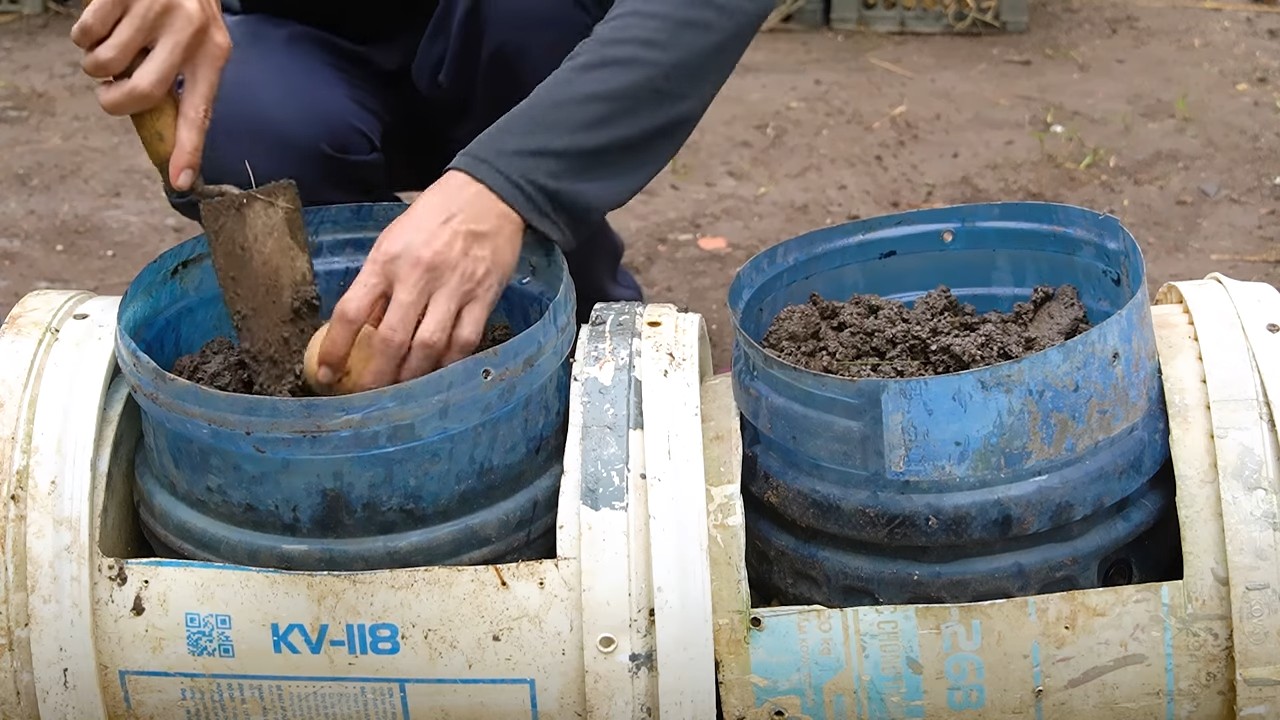
Hilling Your Potatoes
This is where the magic happens! Hilling is the process of adding more soil to the container as the potato plants grow. This encourages the plant to produce more potatoes along the stem.
1. Wait for Growth: Once the potato plants have grown about 6-8 inches tall, it’s time to hill.
2. Add More Soil: Add a few inches of potting mix around the base of the plants, burying the lower part of the stems. Leave the top few inches of the plant exposed.
3. Repeat: Continue to hill the potatoes every few weeks as they grow, until you’ve almost reached the top of the container.
4. Why Hill?: Hilling encourages more potato production along the buried stem. The more you hill, the more potatoes you’ll potentially harvest!
Caring for Your Potato Plants
Now that your potatoes are planted and hilled, it’s time to provide them with the care they need to thrive.
* Watering: Potatoes need consistent moisture, especially during tuber formation. Water deeply whenever the top inch of soil feels dry to the touch. Avoid overwatering, as this can lead to rot.
* Sunlight: Potatoes need at least 6-8 hours of sunlight per day. Place your container in a sunny location.
* Fertilizing: While compost provides some nutrients, you may want to supplement with a fertilizer specifically formulated for potatoes. Follow the instructions on the fertilizer package. I usually fertilize every few weeks.
* Pest Control: Keep an eye out for pests like aphids, potato beetles, and flea beetles. Handpick them off the plants or use an organic insecticide if necessary.
* Disease Prevention: Proper watering and good air circulation can help prevent diseases. Avoid overhead watering, as this can promote fungal growth.
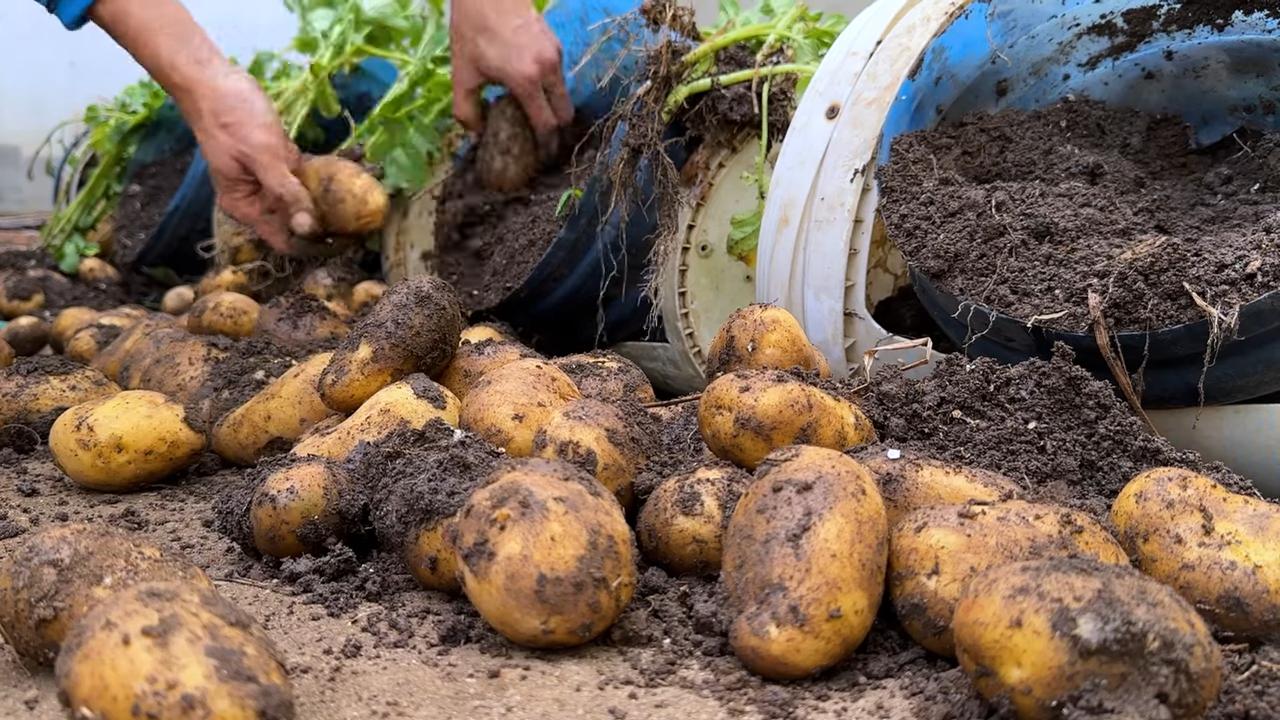
Harvesting Your Potatoes
The most exciting part! Harvesting your homegrown potatoes is incredibly rewarding.
1. When to Harvest: Early-season potatoes can be harvested when the plants start to flower. For larger potatoes, wait until the foliage starts to die back and turn yellow. This usually takes about 70-90 days.
2. How to Harvest: Gently tip the container onto its side and carefully dig through the soil to find the potatoes. Be careful not to damage them!
3. Enjoy Your Harvest: Wash the potatoes and enjoy them fresh from the garden! Store any remaining potatoes in a cool, dark, and dry place.
Troubleshooting
Even with the best care, you might encounter some challenges along the way. Here are a few common issues and how to address them:
* Potato Blight: This fungal disease can cause brown spots on the leaves and stems. Prevent it by ensuring good air circulation and avoiding overhead watering. If blight appears, remove affected foliage immediately.
* Potato Beetles: These pesky beetles can defoliate your potato plants. Handpick them off or use an organic insecticide like neem oil.
* Scab: This disease causes rough, scabby patches on the potato skin. It’s more common in alkaline soils. Amend your soil with sulfur to lower the pH.
* Lack of Potatoes: If your plants are growing well but not producing many potatoes, it could be due to insufficient sunlight, over-fertilizing with nitrogen, or not hilling enough.
Extra Tips for Potato Container Gardening Success
* Rotate Your Crops: Don’t plant potatoes in the same container year after year. This can deplete the soil of nutrients and increase the risk of disease.
* Use a Potato Grow Bag: These bags are specifically designed for growing potatoes and have a flap that allows you to easily harvest potatoes without disturbing the entire plant.
* Experiment with Different Varieties: Try growing different potato varieties each year to find your favorites!
* Don’t Give Up!: Gardening is a learning process. Don’t be discouraged if you don’t have a perfect harvest the first time. Keep experimenting and learning, and you’ll be enjoying homegrown potatoes in no time!
So there you have it! A comprehensive guide to growing your own potatoes in containers. It’s a fun, rewarding, and delicious experience. Happy gardening!
Conclusion
So, there you have it! Transforming a simple container into a thriving potato patch is not only incredibly rewarding but also surprisingly easy. We’ve walked you through the steps, from choosing the right container and seed potatoes to understanding the importance of layering and proper watering. But why should you actually take the plunge and try this method of potato container gardening?
Firstly, it’s a fantastic solution for those with limited space. Whether you have a small balcony, a patio, or even just a sunny corner in your yard, you can successfully grow your own potatoes. No need for acres of land or extensive gardening experience! This makes fresh, homegrown potatoes accessible to everyone, regardless of their living situation.
Secondly, container gardening offers unparalleled control over the growing environment. You can carefully select the soil mix, ensuring it’s perfectly suited for potato growth. You can also easily move the container to chase the sun or protect it from harsh weather conditions. This level of control translates to healthier plants and a more abundant harvest.
Thirdly, and perhaps most importantly, it’s just plain fun! There’s something incredibly satisfying about nurturing a plant from a small seed potato to a bountiful harvest. The anticipation as you carefully dig through the soil to uncover your buried treasure is a feeling that’s hard to beat. It’s a great activity to do with kids, teaching them about where their food comes from and fostering a love for gardening.
But the possibilities don’t end there! Feel free to experiment with different potato varieties. Try growing red potatoes, Yukon Golds, or even fingerling potatoes in separate containers to see which ones thrive best in your environment. You can also add companion plants like marigolds or basil to your container to deter pests and attract beneficial insects. Consider adding a layer of compost tea every few weeks to give your potatoes an extra boost of nutrients.
Don’t be afraid to get creative with your container choices, too. While a standard plastic container works perfectly well, you can also use burlap sacks, old tires, or even repurposed laundry baskets. Just make sure the container is large enough and has adequate drainage.
We are confident that you will find success with potato container gardening. It’s a simple, effective, and enjoyable way to grow your own food. So, grab a container, some seed potatoes, and get ready to experience the joy of harvesting your own homegrown potatoes.
We encourage you to try this DIY trick and share your experience with us! Post photos of your potato containers on social media using [Your Hashtag Here] and let us know what worked well for you and what challenges you encountered. We’re eager to learn from your experiences and build a community of container gardening enthusiasts. Happy growing!
Frequently Asked Questions (FAQ)
What kind of container is best for potato container gardening?
The ideal container for growing potatoes should be at least 20 gallons in size to provide ample space for the roots to develop and the tubers to form. The container should also have drainage holes to prevent waterlogging, which can lead to root rot. Plastic containers are a popular and affordable option, but you can also use burlap sacks, wooden crates, or even large trash cans. Just make sure the material is food-safe and won’t leach harmful chemicals into the soil. Fabric pots are also an excellent choice as they allow for better aeration and drainage.
How many seed potatoes can I plant in one container?
Generally, you should plant no more than 3-4 seed potatoes in a 20-gallon container. Overcrowding can lead to smaller potatoes and reduced yields. If you’re using a larger container, you can increase the number of seed potatoes accordingly, but be sure to leave enough space between them for proper growth. A good rule of thumb is to space the seed potatoes about 10-12 inches apart.
What type of soil should I use for potato container gardening?
Potatoes prefer well-draining, slightly acidic soil with a pH between 6.0 and 6.5. A good potting mix for potatoes should be loose and airy, allowing for good root development. You can create your own mix by combining equal parts of compost, peat moss (or coconut coir), and perlite or vermiculite. Avoid using garden soil, as it can be too heavy and compact, hindering drainage and root growth.
How often should I water my potato plants in a container?
Water your potato plants regularly, especially during hot and dry weather. The soil should be kept consistently moist, but not waterlogged. Check the soil moisture by sticking your finger about an inch deep into the soil. If it feels dry, it’s time to water. Water deeply, allowing the water to drain out of the drainage holes. Avoid overhead watering, as this can promote fungal diseases.
How do I “hill” my potato plants in a container?
“Hilling” is the process of adding more soil to the container as the potato plants grow. This encourages the plants to produce more potatoes along the buried stem. When the potato plants are about 6-8 inches tall, add a few inches of soil to the container, covering the lower part of the stems. Repeat this process every few weeks as the plants continue to grow, until the container is nearly full.
When will my potatoes be ready to harvest?
The time it takes for potatoes to mature depends on the variety and growing conditions. Generally, you can start harvesting “new potatoes” (small, immature potatoes) about 7-8 weeks after planting. These potatoes have thin skins and a delicate flavor. For mature potatoes, wait until the plants have flowered and the foliage starts to die back. This usually takes about 10-12 weeks. To harvest, simply tip the container over and carefully dig through the soil to uncover the potatoes.
What are some common pests and diseases that affect potato plants in containers?
Common pests that can affect potato plants include aphids, potato beetles, and flea beetles. You can control these pests by handpicking them off the plants, using insecticidal soap, or introducing beneficial insects like ladybugs. Common diseases include early blight, late blight, and potato scab. To prevent these diseases, choose disease-resistant varieties, provide good air circulation, and avoid overhead watering.
Can I reuse the soil from my potato container for other plants?
Yes, you can reuse the soil from your potato container, but it’s important to amend it with fresh compost and fertilizer to replenish the nutrients that were used by the potatoes. You should also avoid planting other members of the nightshade family (tomatoes, peppers, eggplants) in the same soil, as they are susceptible to the same diseases.
What kind of fertilizer should I use for potato container gardening?
Potatoes are heavy feeders and require a balanced fertilizer with a higher potassium content. A fertilizer with an NPK ratio of 5-10-10 or 8-24-24 is a good choice. You can also use organic fertilizers like bone meal, kelp meal, or compost tea. Apply the fertilizer according to the package directions, and be careful not to over-fertilize, as this can lead to excessive foliage growth and reduced tuber production.
Can I grow potatoes in containers indoors?
While it’s possible to grow potatoes in containers indoors, it can be challenging to provide them with the necessary light and temperature conditions. Potatoes need at least 6-8 hours of direct sunlight per day, which can be difficult to achieve indoors. You may need to supplement with grow lights. The ideal temperature for potato growth is between 60-70°F (15-21°C).

Leave a Comment