
Pledge Furniture Care Tips: Ever feel like your beloved furniture is losing its luster? Like the warm glow it once had is slowly fading into a dull shadow? I know I have! We all cherish our furniture, from antique heirlooms passed down through generations to the comfy couch we sink into after a long day. But let’s face it, keeping them looking their best can feel like a constant battle against dust, scratches, and the general wear and tear of daily life.
Furniture care has been a concern for centuries. Think about the elaborate rituals surrounding polishing and preserving wooden furniture in royal courts, or the meticulous care given to handcrafted pieces in traditional homes. While we might not have servants dedicated to dusting anymore, the desire to protect and maintain our furniture remains strong.
That’s why I’m so excited to share these DIY Pledge Furniture Care Tips with you! You don’t need to be a professional restorer or spend a fortune on fancy products to keep your furniture looking its best. These simple, effective hacks will help you revive tired surfaces, protect against future damage, and bring back that warm, inviting glow to your home. Ready to learn how to give your furniture the TLC it deserves? Let’s dive in!
DIY Furniture Polish with Pledge-Like Results: Revive Your Wood!
Hey there, fellow DIY enthusiasts! Are you tired of constantly buying expensive furniture polish? Do you love the shine and protection Pledge gives your wood furniture but wish there was a more budget-friendly and natural alternative? Well, you’ve come to the right place! I’m going to share my tried-and-true recipe for a homemade furniture polish that rivals Pledge, leaving your furniture gleaming and protected. Plus, you probably already have most of the ingredients in your pantry!
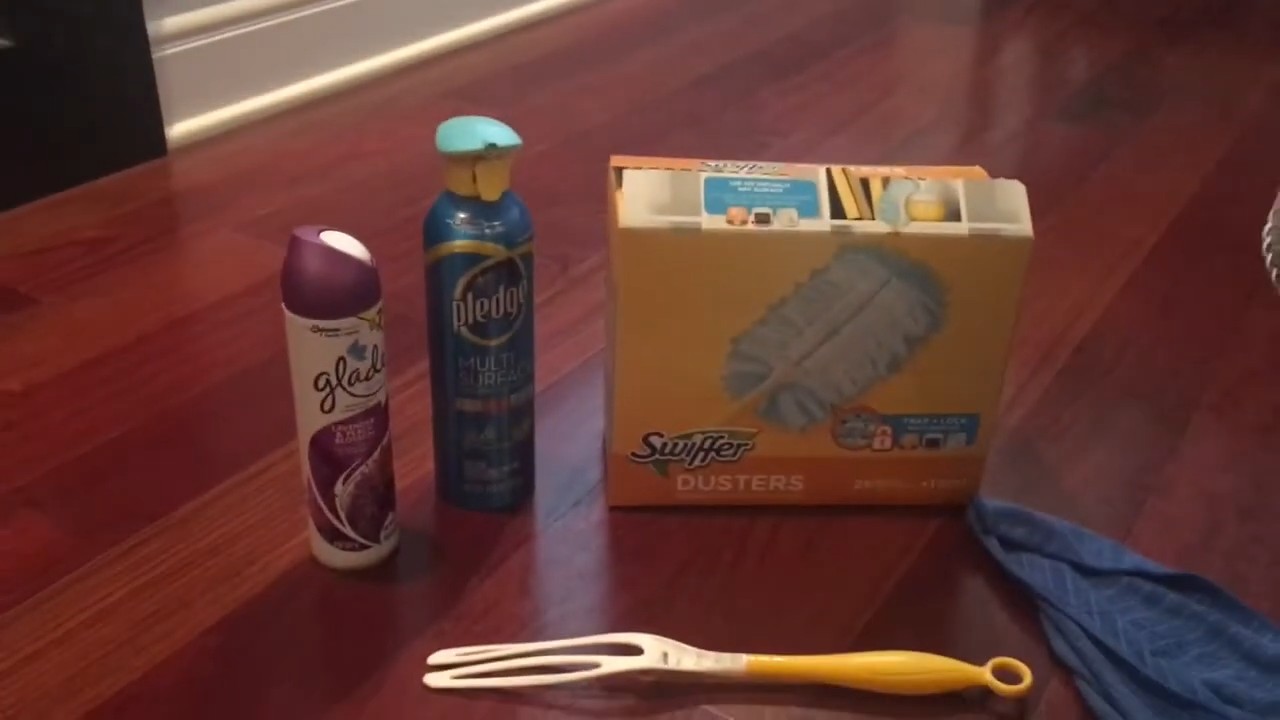
What You’ll Need: The Essential Ingredients
Before we dive into the mixing, let’s gather our supplies. This recipe is super simple, but having everything ready will make the process smooth and enjoyable.
* Olive Oil: This is the base of our polish, providing nourishment and shine to the wood. Extra virgin olive oil is great, but regular olive oil works just as well.
* White Vinegar: Vinegar acts as a gentle cleaner, cutting through grime and removing buildup without damaging the wood. Don’t worry, the vinegar smell dissipates quickly!
* Lemon Juice: Lemon juice adds a pleasant scent and helps to brighten the wood. Freshly squeezed is best, but bottled lemon juice will also do the trick.
* Essential Oil (Optional): If you want to customize the scent, add a few drops of your favorite essential oil. Lemon, orange, lavender, or cedarwood are all excellent choices for furniture polish.
* Spray Bottle: A clean, empty spray bottle is essential for applying the polish evenly.
* Soft Cloths: You’ll need two soft cloths – one for applying the polish and one for buffing. Microfiber cloths are ideal, but old t-shirts work well too.
* Measuring Spoons/Cups: For accurate measurements, grab your measuring spoons and cups.
The Magic Formula: Mixing Your Homemade Polish
Now for the fun part! Let’s create our DIY furniture polish. I’ve experimented with different ratios, and this one consistently delivers amazing results.
1. Combine the Ingredients: In your spray bottle, combine the following:
* 1/4 cup olive oil
* 1/4 cup white vinegar
* 2 tablespoons lemon juice
* 5-10 drops of essential oil (optional)
2. Shake Well: Secure the spray bottle lid tightly and shake vigorously to ensure all the ingredients are thoroughly mixed. This is crucial, as the oil and vinegar tend to separate.
3. Test on an Inconspicuous Area: Before applying the polish to your entire piece of furniture, test it on a small, hidden area to make sure it doesn’t react negatively with the finish. This is especially important for antique or delicate furniture.
Polishing Like a Pro: Application and Buffing Techniques
Alright, we’ve got our polish ready to go! Now, let’s learn how to apply it properly for a flawless finish.
1. Dust the Furniture: Before applying any polish, it’s essential to remove any dust or debris from the surface of your furniture. Use a dry cloth or a duster to thoroughly clean the area.
2. Spray Lightly: Lightly spray the polish onto a small section of the furniture. Avoid oversaturating the wood, as this can lead to a sticky residue.
3. Wipe with a Soft Cloth: Immediately wipe the polish into the wood using a clean, soft cloth. Use circular motions to distribute the polish evenly and lift away any remaining dirt or grime.
4. Buff to a Shine: After wiping the polish into the wood, use a clean, dry cloth to buff the surface to a beautiful shine. This step is crucial for removing any excess polish and creating a smooth, glossy finish.
5. Repeat as Needed: Continue spraying, wiping, and buffing in small sections until you’ve polished the entire piece of furniture.
Troubleshooting Tips: Addressing Common Issues
Even with the best recipe, you might encounter a few minor issues. Here are some troubleshooting tips to help you achieve perfect results.
* Streaky Finish: If you notice streaks after polishing, it’s likely due to using too much polish or not buffing thoroughly enough. Try using a clean, dry cloth to buff the surface again, applying a bit more pressure.
* Sticky Residue: A sticky residue usually indicates that you’ve used too much polish. Wipe the surface with a damp cloth (wring it out well!) and then buff with a dry cloth.
* Dull Finish: If your furniture doesn’t look as shiny as you’d like, try adding a few more drops of lemon juice to your polish mixture. The lemon juice helps to brighten the wood and enhance the shine.
* Cloudy Appearance: A cloudy appearance can be caused by using a dirty cloth or applying the polish to a dusty surface. Make sure to use clean cloths and dust the furniture thoroughly before polishing.
* Strong Vinegar Smell: The vinegar smell should dissipate quickly. If it lingers, try adding a few more drops of essential oil to your polish mixture.
Beyond the Basics: Advanced Polishing Techniques
Want to take your furniture polishing skills to the next level? Here are a few advanced techniques to try.
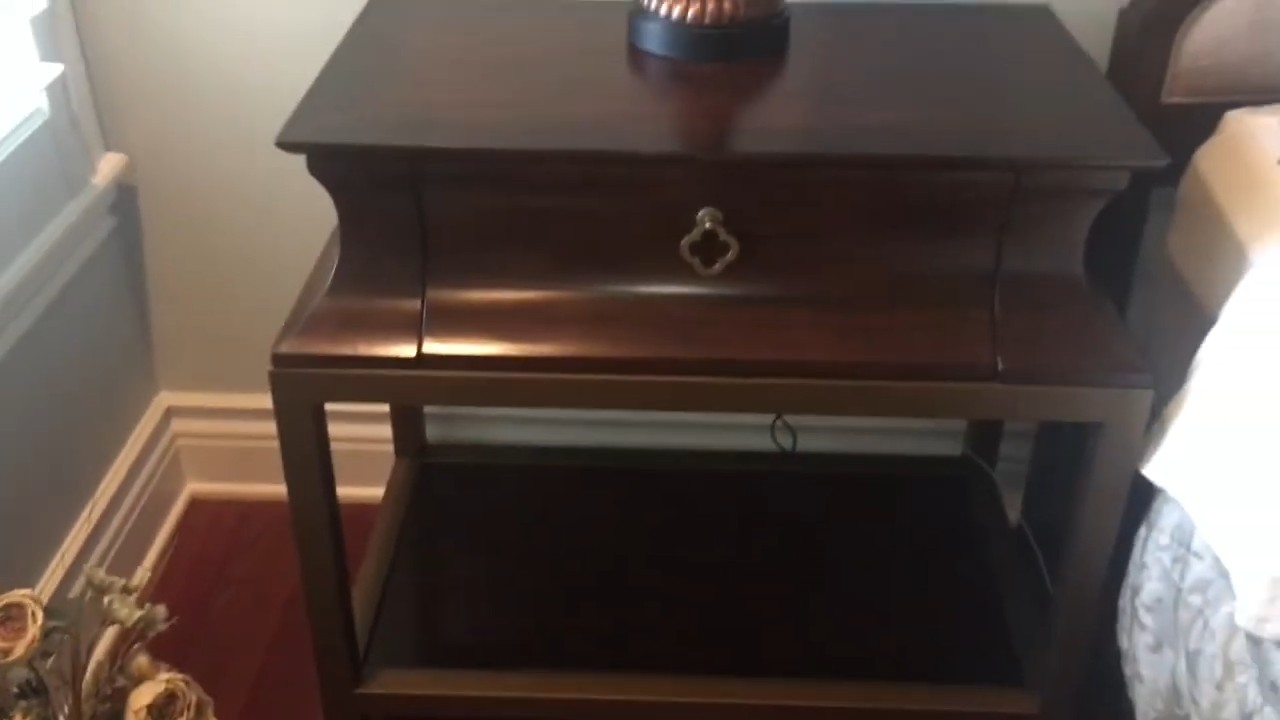
* For Antique Furniture: When polishing antique furniture, be extra gentle. Use a very soft cloth and apply the polish sparingly. Avoid using too much pressure when buffing, as this could damage the delicate finish.
* For Leather Furniture: While this recipe is primarily for wood, you can also use olive oil to condition leather furniture. Simply apply a small amount of olive oil to a soft cloth and gently rub it into the leather. Buff with a clean cloth to remove any excess oil.
* For Preventing Dust Buildup: To help prevent dust buildup, consider adding a few drops of glycerin to your polish mixture. Glycerin creates a protective barrier that repels dust.
* For Scratches: For minor scratches, try rubbing a walnut kernel over the scratch. The natural oils in the walnut can help to conceal the scratch and restore the finish.
Maintaining Your Furniture: Regular Care Tips
Polishing your furniture is just one part of keeping it looking its best. Here are some additional tips for maintaining your furniture and extending its lifespan.
* Dust Regularly: Dust your furniture at least once a week to prevent dust buildup.
* Avoid Direct Sunlight: Direct sunlight can fade and damage wood furniture. Position your furniture away from windows or use curtains or blinds to protect it.
* Use Coasters and Placemats: Always use coasters and placemats to protect your furniture from water rings and heat damage.
* Clean Spills Immediately: Clean up spills immediately to prevent staining.
* Avoid Harsh Cleaners: Avoid using harsh cleaners or abrasive materials on your furniture, as these can damage the finish.
* Consider Professional Cleaning: For valuable or antique furniture, consider having it professionally cleaned and polished every few years.
Safety First: Important Precautions
While this homemade furniture polish is generally safe, it’s always a good idea to take a few precautions.
* Keep Out of Reach of Children and Pets: Store your furniture polish in a safe place, out of reach of children and pets.
* Avoid Contact with Eyes: Avoid getting the polish in your eyes. If contact occurs, rinse thoroughly with water.
* Ventilate the Area: When polishing your furniture, make sure to ventilate the area well.
* Test on an Inconspicuous Area: As mentioned earlier, always test the polish on a small, hidden area before applying it to the entire piece of furniture.
Storage Solutions: Keeping Your Polish Fresh
To ensure your homemade furniture polish stays fresh and effective, proper storage is key.
* Store in a Cool, Dark Place: Store your polish in a cool, dark place away from direct sunlight and heat.
* Use an Opaque Spray Bottle: An opaque spray bottle will help to protect the polish from light, which can degrade the ingredients over time.
* Shake Before Each Use: Remember to shake the bottle well before each use to ensure the ingredients are properly mixed.
* Shelf Life: This homemade furniture polish typically has a shelf life of about 2-3 months. If you notice any changes in color, odor, or consistency, it’s best to discard it and make a fresh batch.
Why This Recipe Works: The Science Behind the Shine
You might be wondering why this simple recipe works so well. Let’s break down the science behind the shine.
* Olive Oil: Olive oil is a natural emollient that moisturizes and nourishes the wood, preventing it from drying out and cracking. It also creates a protective barrier that helps to repel dust and dirt.
* White Vinegar: White vinegar is a mild acid that helps to dissolve dirt, grime, and buildup without damaging the wood finish. It also acts as a natural disinfectant.
* Lemon Juice: Lemon juice contains citric acid, which helps to brighten the wood
Conclusion
So, there you have it! Transforming your furniture care routine with these DIY Pledge furniture care tips is not just about saving money; it’s about taking control of the ingredients you’re using and creating a truly personalized cleaning experience. We’ve explored how to harness the power of simple, readily available ingredients to achieve a shine that rivals, and in some cases surpasses, commercially available products.
The beauty of these DIY solutions lies in their adaptability. Feel free to experiment with essential oils to create custom scents that invigorate your home. Lavender for a calming effect, citrus for a burst of energy, or cedarwood for a classic, woodsy aroma – the possibilities are endless! You can also adjust the ratios of ingredients to suit the specific needs of your furniture. Is your wood particularly dry? Add a touch more oil. Dealing with stubborn fingerprints? A slightly higher concentration of vinegar might do the trick.
Beyond the customization, these DIY Pledge furniture care tips offer peace of mind. Knowing exactly what’s going onto your furniture, especially if you have children or pets, is invaluable. You’re eliminating harsh chemicals and potentially harmful additives, opting instead for natural, gentle alternatives. This is particularly important for antique or delicate pieces that require a more sensitive approach.
Why is this a must-try? Because it’s effective, economical, eco-friendly, and empowering. You’re not just cleaning your furniture; you’re crafting a cleaning solution tailored to your specific needs and preferences. You’re reducing your reliance on store-bought products and minimizing your environmental impact. And you’re saving money in the process!
We understand that venturing into the world of DIY can sometimes feel daunting. But trust us, these recipes are incredibly simple and straightforward. With just a few basic ingredients and a little bit of time, you can create a furniture care solution that will leave your wood gleaming and your home smelling fresh.
Don’t just take our word for it, though. We encourage you to try these DIY Pledge furniture care tips for yourself. Experiment with different variations, find the scent combinations that you love, and discover the satisfaction of creating your own effective and eco-friendly cleaning products.
Once you’ve given these DIY solutions a try, we’d love to hear about your experience! Share your tips, tricks, and variations in the comments below. Let us know what worked best for you, what challenges you encountered, and any creative adaptations you made along the way. Your feedback will not only help other readers but also contribute to a growing community of DIY enthusiasts who are passionate about creating a cleaner, healthier, and more sustainable home. So go ahead, give it a try, and let us know what you think! We’re confident that you’ll be amazed by the results.
Frequently Asked Questions (FAQ)
Q: Can I use these DIY Pledge furniture care tips on all types of wood furniture?
A: While these DIY solutions are generally safe for most types of wood furniture, it’s always a good idea to test them on an inconspicuous area first. This is especially important for antique or delicate pieces, as well as furniture with a unique finish. Look for any signs of discoloration, streaking, or damage. If you’re unsure about the type of wood or finish, consult a professional furniture restorer before proceeding. Avoid using these solutions on unfinished wood, as it may absorb too much moisture.
Q: What essential oils are best for furniture polish?
A: The best essential oils for furniture polish depend on your personal preferences and the desired effect. Lavender is a popular choice for its calming scent, while citrus oils like lemon or orange can provide a refreshing and energizing aroma. Cedarwood is a classic option for a woodsy scent that complements the natural aroma of wood furniture. Other good options include tea tree oil (which has antibacterial properties), eucalyptus oil (which can help to repel dust mites), and rosemary oil (which has a stimulating scent). When using essential oils, be sure to dilute them properly with a carrier oil like olive oil or jojoba oil. A general guideline is to use 10-15 drops of essential oil per cup of carrier oil.
Q: How often should I use these DIY furniture polishes?
A: The frequency of polishing depends on the type of furniture, its location, and how often it’s used. In general, you should polish your furniture every 1-3 months. However, furniture that is exposed to direct sunlight, heat, or humidity may need to be polished more frequently. Similarly, furniture that is used frequently may also require more frequent polishing. If you notice that your furniture is looking dull or dry, it’s time to give it a polish.
Q: Can I use vinegar on all types of wood?
A: While vinegar is a great natural cleaner, it’s important to use it with caution on wood furniture. Vinegar is acidic, and it can damage certain types of finishes, especially those that are delicate or antique. Always dilute vinegar with water before using it on wood furniture. A good ratio is 1 part vinegar to 3 parts water. Test the solution on an inconspicuous area first to ensure that it doesn’t cause any discoloration or damage. Avoid using vinegar on waxed furniture, as it can strip the wax.
Q: How do I store my DIY furniture polish?
A: Store your DIY furniture polish in an airtight container in a cool, dark place. This will help to prevent the ingredients from separating or spoiling. Be sure to label the container with the date and ingredients. Most DIY furniture polishes will last for several months if stored properly. If you notice any changes in the color, smell, or consistency of the polish, discard it.
Q: My DIY furniture polish seems oily. What can I do?
A: If your DIY furniture polish seems too oily, you can try reducing the amount of oil in the recipe. You can also try adding a small amount of vinegar or lemon juice to help cut through the oil. Be sure to test the solution on an inconspicuous area first to ensure that it doesn’t damage the finish. Another option is to use a microfiber cloth to buff the furniture after polishing. Microfiber cloths are very absorbent and will help to remove any excess oil.
Q: Can I use these DIY Pledge furniture care tips on leather furniture?
A: No, these DIY Pledge furniture care tips are specifically formulated for wood furniture and should not be used on leather furniture. Leather requires different cleaning and conditioning methods. Using wood polish on leather can damage the material and cause it to crack or dry out. For leather furniture, use a dedicated leather cleaner and conditioner.
Q: What if I don’t have essential oils? Can I still make these DIY polishes?
A: Yes, you can still make these DIY polishes without essential oils. The essential oils primarily add fragrance and, in some cases, antibacterial properties. If you don’t have essential oils, you can simply omit them from the recipe. The polish will still be effective at cleaning and shining your furniture. You can also try adding a small amount of lemon juice or orange peel to the polish for a natural citrus scent.
Q: How do I clean furniture with intricate carvings or details?
A: Cleaning furniture with intricate carvings or details requires a gentle approach. Use a soft-bristled brush, such as a toothbrush or paint brush, to gently remove dust and dirt from the crevices. You can also use a cotton swab dipped in your DIY furniture polish to clean hard-to-reach areas. Be careful not to apply too much pressure, as this can damage the finish. After cleaning, use a clean, dry cloth to buff the furniture.


Leave a Comment