
Mushroom harvesting DIY: Unlock the Hidden Treasures in Your Own Backyard! Have you ever dreamt of foraging for delicious, earthy mushrooms, but felt intimidated by the prospect of venturing into the wild? What if I told you that you could cultivate your own gourmet fungi right at home, transforming your garden into a mycological marvel?
For centuries, mushroom cultivation has been a cherished practice across various cultures. From ancient Chinese techniques to European traditions, the art of growing mushrooms has provided sustenance and delight. Now, you too can participate in this time-honored tradition!
In today’s fast-paced world, reconnecting with nature and growing your own food has become more important than ever. Not only does it offer a sense of accomplishment and self-sufficiency, but it also provides access to fresh, healthy ingredients free from harmful chemicals. Mushroom harvesting DIY is a fantastic way to achieve this, offering a sustainable and rewarding hobby that can enhance your culinary experiences.
This article will guide you through simple, step-by-step DIY methods for cultivating various types of mushrooms in your home garden. Whether you’re a seasoned gardener or a complete beginner, you’ll discover practical tips and tricks to successfully grow your own delicious mushrooms. Get ready to embark on a fascinating journey into the world of fungi and unlock the secrets to a bountiful harvest!
Pilzzucht im Eigenheim: Dein umfassender DIY-Leitfaden
Hallo liebe Pilzfreunde! Habt ihr euch jemals gefragt, wie es wäre, eure eigenen frischen Pilze zu Hause zu züchten? Es ist einfacher als ihr denkt und unglaublich befriedigend! In diesem Artikel zeige ich euch, wie ihr mit einfachen Mitteln und etwas Geduld eure eigene kleine Pilzzucht starten könnt. Keine Angst, es ist kein Hexenwerk!
Was du für deine Pilzzucht brauchst: Die Materialliste
Bevor wir loslegen, hier eine Liste der Dinge, die ihr benötigt. Keine Sorge, vieles davon habt ihr wahrscheinlich schon zu Hause!
* Pilzbrut: Das ist das A und O! Ihr könnt sie online oder in spezialisierten Gartencentern kaufen. Achtet darauf, die richtige Sorte für eure Bedingungen (Temperatur, Licht) auszuwählen. Austernpilze, Shiitake oder Kräuterseitlinge sind gute Anfängerpilze.
* Substrat: Das ist das Nährmedium für eure Pilze. Stroh, Sägemehl, Kaffeesatz oder Holzspäne eignen sich gut. Je nach Pilzart ist das eine besser geeignet als das andere.
* Behälter: Eimer, Plastiktüten, Gläser oder spezielle Pilzzuchtbeutel – wählt, was euch am besten passt. Wichtig ist, dass sie sauber sind.
* Wasser: Am besten destilliertes oder abgekochtes Wasser, um Verunreinigungen zu vermeiden.
* Sprühflasche: Um das Substrat feucht zu halten.
* Handschuhe: Für sauberes Arbeiten.
* Desinfektionsmittel: Um eure Arbeitsfläche und Werkzeuge zu reinigen.
* Optional: Ein Thermometer und Hygrometer, um Temperatur und Luftfeuchtigkeit zu überwachen.
Die Vorbereitung: Sauberkeit ist das A und O
Pilze sind anfällig für Schimmel und andere Verunreinigungen. Daher ist es super wichtig, dass ihr sauber arbeitet.
1. Arbeitsfläche reinigen: Desinfiziert eure Arbeitsfläche gründlich.
2. Hände waschen: Wascht eure Hände gründlich mit Seife und tragt Handschuhe.
3. Werkzeuge desinfizieren: Desinfiziert alle Werkzeuge, die ihr verwendet.
Substrat vorbereiten: Das Futter für eure Pilze
Die Vorbereitung des Substrats ist entscheidend für den Erfolg eurer Pilzzucht. Je nach verwendetem Material gibt es unterschiedliche Methoden.
Stroh als Substrat
Stroh ist ein beliebtes Substrat, besonders für Austernpilze.
1. Pasteurisieren: Stroh enthält viele Mikroorganismen, die mit den Pilzen konkurrieren können. Daher muss es pasteurisiert werden. Das geht am besten, indem ihr das Stroh in einem großen Topf oder einer Wanne mit heißem Wasser (ca. 70-80°C) für 1-2 Stunden einweicht.
2. Abkühlen lassen: Lasst das Stroh abkühlen, bis ihr es anfassen könnt. Es sollte noch feucht, aber nicht tropfnass sein.
3. Überschüssiges Wasser ausdrücken: Drückt das überschüssige Wasser aus dem Stroh.
Sägemehl als Substrat
Sägemehl ist besonders gut für Shiitake-Pilze geeignet.
1. Sägemehl auswählen: Verwendet am besten unbehandeltes Sägemehl von Laubbäumen.
2. Befeuchten: Befeuchtet das Sägemehl mit Wasser, bis es feucht, aber nicht tropfnass ist.
3. Sterilisieren: Füllt das Sägemehl in hitzebeständige Beutel oder Gläser und sterilisiert es im Dampfkochtopf für 90 Minuten bei 15 PSI (ca. 1 bar). Alternativ könnt ihr es auch im Backofen bei 120°C für 2 Stunden sterilisieren.
4. Abkühlen lassen: Lasst das Sägemehl vollständig abkühlen, bevor ihr es mit der Pilzbrut vermischt.
Kaffeesatz als Substrat
Kaffeesatz ist eine tolle Möglichkeit, Abfall zu recyceln und Pilze zu züchten.
1. Kaffeesatz sammeln: Sammelt euren Kaffeesatz. Achtet darauf, dass er nicht schimmelt.
2. Pasteurisieren: Kaffeesatz ist in der Regel schon pasteurisiert, da er mit heißem Wasser aufgebrüht wurde. Wenn ihr auf Nummer sicher gehen wollt, könnt ihr ihn aber noch einmal kurz in der Mikrowelle erhitzen.
3. Abkühlen lassen: Lasst den Kaffeesatz abkühlen.
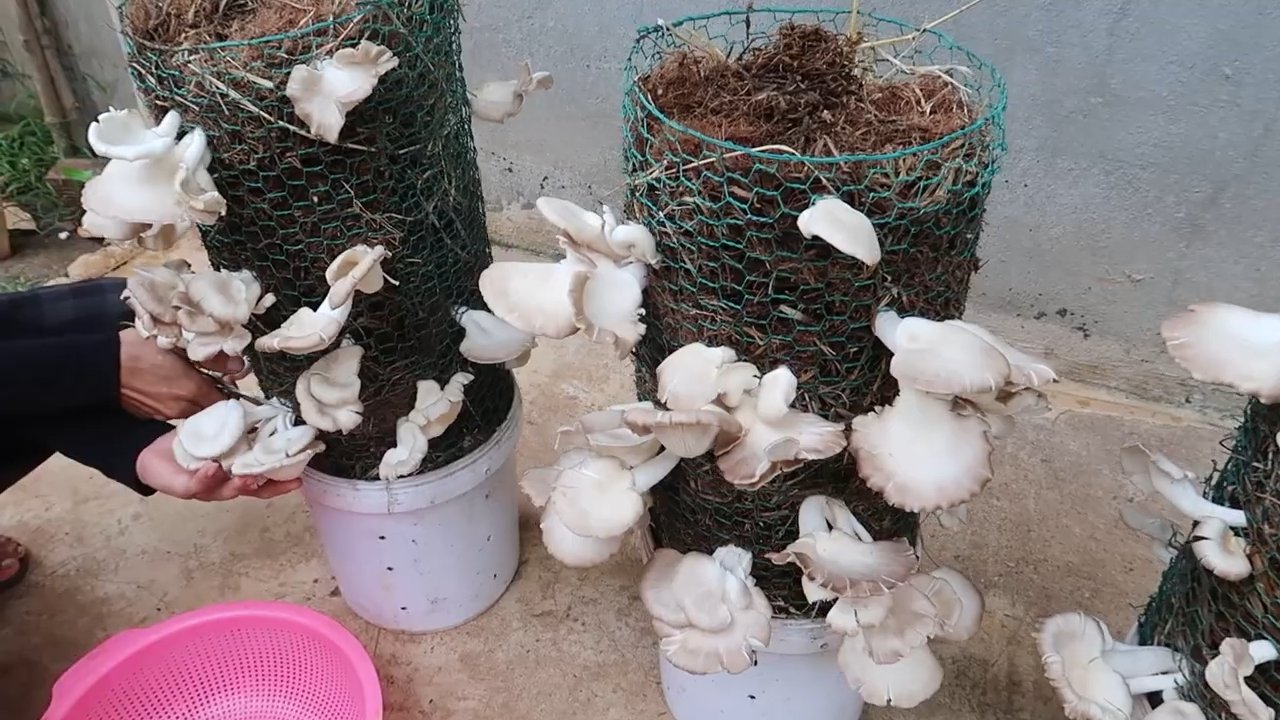
Die Beimpfung: Pilzbrut ins Substrat bringen
Jetzt kommt der spannende Teil: Wir bringen die Pilzbrut ins Substrat!
1. Substrat und Pilzbrut vermischen: Vermischt das vorbereitete Substrat mit der Pilzbrut. Die Menge der Pilzbrut hängt von der Pilzart und der Größe des Behälters ab. Als Faustregel gilt: ca. 5-10% Pilzbrut pro Substratmenge.
2. Schichtweise vorgehen: Ihr könnt das Substrat und die Pilzbrut auch schichtweise in den Behälter füllen. Beginnt mit einer Schicht Substrat, dann eine Schicht Pilzbrut, dann wieder Substrat usw.
3. Festdrücken: Drückt das Substrat leicht an, damit die Pilzbrut guten Kontakt zum Substrat hat.
Die Inkubation: Warten und beobachten
Nach der Beimpfung beginnt die Inkubationsphase. Hier wächst das Myzel (das Pilzgeflecht) durch das Substrat.
1. Behälter verschließen: Verschließt den Behälter mit dem Substrat. Wenn ihr Plastiktüten verwendet, verschließt sie mit einem Clip oder einem Kabelbinder. Wenn ihr Gläser verwendet, legt ein Stück Filterpapier oder Stoff über die Öffnung und befestigt es mit einem Gummiband. Das verhindert, dass Verunreinigungen eindringen, lässt aber Luft zirkulieren.
2. Dunkler und warmer Ort: Stellt den Behälter an einen dunklen und warmen Ort. Die ideale Temperatur hängt von der Pilzart ab. Austernpilze mögen es z.B. gerne zwischen 20-25°C.
3. Regelmäßig kontrollieren: Kontrolliert den Behälter regelmäßig auf Schimmel oder andere Verunreinigungen. Wenn ihr Schimmel entdeckt, müsst ihr das Substrat leider entsorgen.
4. Myzelwachstum beobachten: Nach einigen Tagen oder Wochen (je nach Pilzart) solltet ihr sehen, wie sich das Myzel durch das Substrat ausbreitet. Es sieht aus wie ein weißer, flaumiger Belag.
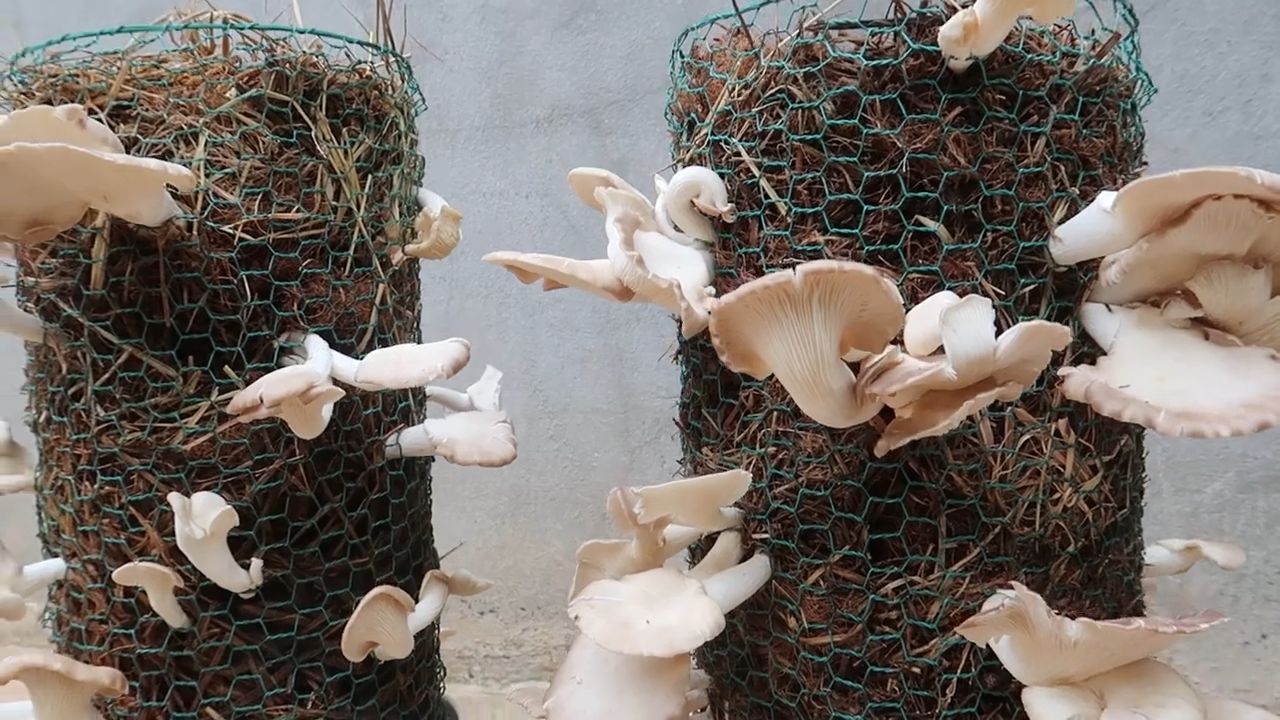
Die Fruchtung: Endlich Pilze ernten!
Wenn das Myzel das Substrat vollständig durchdrungen hat, ist es Zeit für die Fruchtung.
1. Licht: Stellt den Behälter an einen helleren Ort, aber vermeidet direkte Sonneneinstrahlung.
2. Luftfeuchtigkeit: Erhöht die Luftfeuchtigkeit. Das könnt ihr erreichen, indem ihr den Behälter regelmäßig mit Wasser besprüht oder ihn in eine Plastiktüte stellt und diese leicht befeuchtet.
3. Belüftung: Sorgt für ausreichend Belüftung. Öffnet den Behälter regelmäßig, um frische Luft hineinzulassen.
4. Pilze wachsen sehen: Nach einigen Tagen solltet ihr die ersten kleinen Pilze sehen.
5. Ernten: Erntet die Pilze, wenn sie die gewünschte Größe erreicht haben. Schneidet sie am besten mit einem scharfen Messer ab, anstatt sie herauszuziehen.
Nach der Ernte: Die zweite Welle
Nach der ersten Ernte könnt ihr oft noch eine zweite oder sogar dritte Welle von Pilzen ernten.
1. Substrat befeuchten: Befeuchtet das Substrat erneut.
2. Bedingungen beibehalten: Haltet die gleichen Bedingungen wie bei der ersten Fruchtung ein.
3. Wiederholen: Wiederholt den Prozess, bis das Substrat erschöpft ist.
Tipps und Tricks für eine erfolgreiche Pilzzucht
* Pilzart wählen: Wählt eine Pilzart, die zu euren Bedingungen passt. Austernpilze sind z.B. sehr tolerant und einfach zu züchten.
* Sa
Conclusion
So, there you have it! Mastering the art of DIY mushroom harvesting is not just a fun weekend activity; it’s a gateway to a deeper connection with nature, a sustainable food source, and a truly rewarding experience. We’ve walked you through the essential steps, from identifying suitable locations and understanding ethical foraging practices to properly harvesting and preparing your bounty.
But why is this DIY trick a must-try? Beyond the obvious benefit of fresh, delicious mushrooms, it’s about empowerment. It’s about knowing where your food comes from, understanding its life cycle, and appreciating the intricate ecosystems that support it. In a world increasingly disconnected from nature, mushroom harvesting offers a tangible way to reconnect and rediscover the simple joys of foraging.
Furthermore, consider the economic and environmental advantages. By harvesting your own mushrooms, you’re reducing your reliance on commercially grown varieties, which often involve intensive farming practices and long-distance transportation. You’re also contributing to a more sustainable food system by utilizing resources that are already available in your local environment.
Now, let’s talk variations and suggestions. While we’ve focused on general principles, remember that mushroom harvesting is highly dependent on your geographical location and the specific types of mushrooms you’re targeting. Researching local mushroom species is crucial for safe and successful foraging. Consider joining a local mycological society or attending a mushroom identification workshop to learn from experienced foragers.
Experiment with different preparation methods to discover your favorite ways to enjoy your harvested mushrooms. Sauté them with garlic and herbs, add them to soups and stews, or even dehydrate them for long-term storage. The possibilities are endless!
Don’t be afraid to get your hands dirty and explore the world of DIY mushroom harvesting. It’s an adventure that will enrich your life in countless ways. Remember to always prioritize safety, respect the environment, and never consume any mushroom unless you are 100% certain of its identification.
We encourage you to embark on your own mushroom harvesting journey and share your experiences with us. Tell us about your favorite foraging spots, the most interesting mushrooms you’ve found, and any tips or tricks you’ve learned along the way. Your insights can help other aspiring foragers discover the magic of mushroom hunting. So, grab your basket, put on your boots, and get ready to explore the fascinating world of fungi! Happy foraging!
Frequently Asked Questions (FAQ)
Is mushroom harvesting safe for beginners?
Mushroom harvesting can be safe for beginners, but it requires a significant amount of research, caution, and respect for the environment. The most crucial aspect is accurate mushroom identification. Consuming a poisonous mushroom can have serious, even fatal, consequences. Beginners should start by focusing on easily identifiable species and consult with experienced foragers or mycologists. Joining a local mushroom club or attending a guided foraging walk is highly recommended. Never consume a mushroom unless you are absolutely certain of its identification. Use multiple resources for identification, including field guides, online databases, and expert opinions. When in doubt, throw it out!
What are the essential tools for mushroom harvesting?
The essential tools for mushroom harvesting are relatively simple:
* **A sharp knife:** Used to carefully cut the mushroom stem without disturbing the surrounding mycelium.
* **A basket or breathable bag:** Allows for air circulation, preventing mushrooms from becoming soggy and spoiling. Avoid using plastic bags, as they can trap moisture and promote bacterial growth.
* **A field guide:** Essential for identifying mushrooms in the field. Choose a guide that is specific to your region.
* **A brush:** Used to gently clean dirt and debris from the mushrooms.
* **A GPS or compass:** Helpful for navigating in the woods and marking foraging locations.
* **Appropriate clothing:** Wear long sleeves, pants, and sturdy boots to protect yourself from ticks, poison ivy, and other hazards.
* **A whistle:** For safety, in case you get lost.
How do I identify edible mushrooms?
Identifying edible mushrooms is a complex process that requires careful observation and attention to detail. There is no single characteristic that guarantees a mushroom is safe to eat. Instead, you must consider a combination of factors, including:
* **Cap shape and size:** Note the overall shape of the cap, its diameter, and any distinctive features like bumps, scales, or depressions.
* **Gill attachment:** Observe how the gills are attached to the stem. Are they free, attached, or decurrent (running down the stem)?
* **Stem characteristics:** Note the stem’s color, texture, and presence of a ring or volva (a cup-like structure at the base of the stem).
* **Spore print:** Take a spore print by placing the mushroom cap on a piece of paper (white and black paper are helpful) and covering it with a glass or bowl. After several hours, the mushroom will release its spores, creating a pattern that can help with identification.
* **Odor:** Some mushrooms have distinctive odors that can aid in identification. However, never rely solely on smell, as some poisonous mushrooms can have pleasant aromas.
* **Habitat:** Note the type of environment where the mushroom is growing, such as the type of trees nearby, the soil conditions, and the time of year.
Always cross-reference your observations with multiple reliable sources and consult with experts if you are unsure.
What are some ethical considerations for mushroom harvesting?
Ethical mushroom harvesting is crucial for ensuring the long-term sustainability of mushroom populations and the health of the ecosystem. Here are some key considerations:
* **Obtain permission:** Always obtain permission from landowners before foraging on private property.
* **Harvest responsibly:** Avoid over-harvesting mushrooms in a particular area. Take only what you need and leave plenty for the mushrooms to reproduce.
* **Minimize disturbance:** Be careful not to damage the surrounding vegetation or soil when harvesting mushrooms.
* **Avoid trampling:** Stay on established trails whenever possible to avoid trampling sensitive habitats.
* **Leave no trace:** Pack out everything you pack in, including trash and food scraps.
* **Respect wildlife:** Be aware of your surroundings and avoid disturbing wildlife.
* **Educate others:** Share your knowledge of ethical foraging practices with others.
How should I store harvested mushrooms?
Proper storage is essential for preserving the quality and safety of harvested mushrooms. Here are some tips:
* **Clean the mushrooms:** Gently brush off any dirt or debris with a soft brush. Avoid washing the mushrooms unless absolutely necessary, as they can absorb water and become soggy.
* **Store in a breathable container:** Place the mushrooms in a basket, paper bag, or container lined with paper towels. Avoid using plastic bags, as they can trap moisture and promote bacterial growth.
* **Refrigerate promptly:** Store the mushrooms in the refrigerator as soon as possible after harvesting.
* **Use within a few days:** Freshly harvested mushrooms are best consumed within a few days.
* **Consider drying or freezing:** For longer-term storage, consider drying or freezing the mushrooms. To dry mushrooms, slice them thinly and spread them out on a screen or dehydrator. To freeze mushrooms, sauté them lightly in butter or oil before freezing.
What if I’m not sure about a mushroom’s identification?
If you are ever unsure about a mushroom’s identification, **do not consume it**. It is always better to err on the side of caution. Take clear photos of the mushroom from multiple angles, including the cap, gills, stem, and base. Consult with experienced foragers, mycologists, or local mushroom clubs for assistance. There are also online forums and databases where you can post photos and ask for identification help. Remember, accurate identification is paramount to safe mushroom harvesting.
Leave a Comment