
Mogra Jasmine Propagation: Ever dreamed of filling your home with the intoxicating fragrance of Mogra Jasmine, without breaking the bank at the garden center? I know I have! There’s something truly magical about these delicate white blossoms, and the thought of cultivating them myself was incredibly appealing.
For centuries, Mogra Jasmine, also known as Arabian Jasmine, has been cherished in South Asia and the Middle East, not just for its captivating scent but also for its cultural significance. It’s often used in religious ceremonies, perfumes, and even as a symbol of love and purity. Imagine bringing that rich history and beauty into your own backyard!
But let’s be honest, the idea of propagating plants can seem daunting. Where do you even begin? That’s where this DIY guide comes in! I’m going to share some simple, effective tricks for Mogra Jasmine Propagation that anyone can do, regardless of their gardening experience. Whether you’re looking to expand your existing collection, share the joy of Mogra with friends, or simply save some money, mastering these propagation techniques will empower you to create a fragrant oasis right at home. Get ready to roll up your sleeves and let’s get started!
Mogra Jasmin Vermehrung: Dein DIY-Leitfaden für duftende Blüten
Hallo Pflanzenfreunde! Ich freue mich riesig, euch heute zu zeigen, wie ihr eure eigenen Mogra Jasmin Pflanzen vermehren könnt. Mogra Jasmin, auch bekannt als Arabischer Jasmin, ist nicht nur wunderschön, sondern verströmt auch einen betörenden Duft. Stell dir vor, deinen eigenen kleinen Jasmin-Garten zu haben! Keine Sorge, es ist einfacher als du denkst. Ich zeige dir Schritt für Schritt, wie es geht.
Was du für die Mogra Jasmin Vermehrung brauchst
Bevor wir loslegen, lass uns sicherstellen, dass wir alles griffbereit haben. Hier ist eine Liste der Dinge, die du benötigst:
* Eine gesunde Mogra Jasmin Mutterpflanze: Das ist natürlich das A und O! Wähle eine Pflanze, die kräftig wächst und keine Anzeichen von Krankheiten oder Schädlingen aufweist.
* Saubere Gartenschere oder ein scharfes Messer: Hygiene ist wichtig, um Infektionen zu vermeiden. Desinfiziere deine Werkzeuge vor Gebrauch mit Alkohol.
* Bewurzelungshormon (optional, aber empfohlen): Bewurzelungshormon hilft den Stecklingen, schneller und zuverlässiger Wurzeln zu bilden. Du findest es in den meisten Gartencentern.
* Anzuchterde oder eine Mischung aus Torfmoos und Perlit: Diese Substrate sind leicht und gut durchlässig, was für die Wurzelbildung ideal ist. Vermeide normale Blumenerde, da sie zu schwer ist und die Wurzeln ersticken könnte.
* Kleine Töpfe oder Anzuchtbehälter: Wähle Töpfe mit guter Drainage, damit das Wasser gut ablaufen kann.
* Plastiktüten oder eine Mini-Gewächshaus: Um die Luftfeuchtigkeit hoch zu halten, was für die Bewurzelung wichtig ist.
* Sprühflasche mit Wasser: Um die Stecklinge feucht zu halten.
* Ein warmer, heller Standort ohne direkte Sonneneinstrahlung: Direkte Sonne kann die Stecklinge verbrennen.
Die beste Zeit für die Mogra Jasmin Vermehrung
Der beste Zeitpunkt für die Vermehrung von Mogra Jasmin ist im Frühjahr oder Sommer, wenn die Pflanze aktiv wächst. Die wärmeren Temperaturen und längeren Tage fördern die Wurzelbildung.
Schritt-für-Schritt-Anleitung zur Mogra Jasmin Vermehrung durch Stecklinge
Jetzt geht’s ans Eingemachte! Hier ist eine detaillierte Anleitung, wie du deine Mogra Jasmin Stecklinge erfolgreich bewurzeln kannst:
1. Stecklinge vorbereiten:
* Wähle gesunde, nicht blühende Triebe von der Mutterpflanze aus. Die Triebe sollten etwa 10-15 cm lang sein.
* Schneide die Triebe mit deiner sauberen Gartenschere oder dem Messer direkt unterhalb eines Blattknotens ab. Ein Blattknoten ist die Stelle, an der ein Blatt aus dem Stiel wächst.
* Entferne die unteren Blätter des Stecklings, so dass etwa 2-3 Blattpaare am oberen Ende verbleiben. Dies reduziert die Verdunstung und hilft dem Steckling, seine Energie auf die Wurzelbildung zu konzentrieren.
* Schneide die verbleibenden Blätter gegebenenfalls um die Hälfte zurück, um die Verdunstung weiter zu reduzieren.
2. Bewurzelungshormon anwenden (optional):
* Wenn du Bewurzelungshormon verwendest, tauche das untere Ende des Stecklings (etwa 2-3 cm) in das Hormonpulver oder die Hormonlösung.
* Schüttle überschüssiges Hormon ab. Zu viel Hormon kann die Wurzelbildung hemmen.
3. Stecklinge einpflanzen:
* Fülle deine Töpfe oder Anzuchtbehälter mit Anzuchterde oder der Torfmoos-Perlit-Mischung.
* Befeuchte das Substrat gründlich, aber achte darauf, dass es nicht durchnässt ist.
* Mache mit einem Bleistift oder einem Finger ein Loch in die Erde.
* Setze den Steckling in das Loch und drücke die Erde vorsichtig um den Stiel herum fest. Stelle sicher, dass die unteren Blattknoten unter der Erde sind.
* Pflanze mehrere Stecklinge in separate Töpfe, um die Erfolgschancen zu erhöhen.
4. Luftfeuchtigkeit erhöhen:
* Um die Luftfeuchtigkeit zu erhöhen, stülpe eine Plastiktüte über den Topf oder stelle den Topf in ein Mini-Gewächshaus.
* Achte darauf, dass die Plastiktüte die Blätter des Stecklings nicht berührt. Du kannst kleine Stäbe oder Zahnstocher verwenden, um die Tüte abzustützen.
* Alternativ kannst du die Stecklinge mehrmals täglich mit Wasser besprühen, um die Luftfeuchtigkeit hoch zu halten.
5. Standort und Pflege:
* Stelle die Töpfe an einen warmen, hellen Ort ohne direkte Sonneneinstrahlung. Ein Fensterbrett mit indirektem Licht ist ideal.
* Halte das Substrat feucht, aber nicht durchnässt. Überprüfe die Feuchtigkeit regelmäßig und gieße, wenn sich die oberste Schicht der Erde trocken anfühlt.
* Lüfte die Stecklinge regelmäßig, indem du die Plastiktüte oder das Mini-Gewächshaus für einige Stunden am Tag öffnest. Dies verhindert die Bildung von Schimmel.
6. Wurzelbildung beobachten:
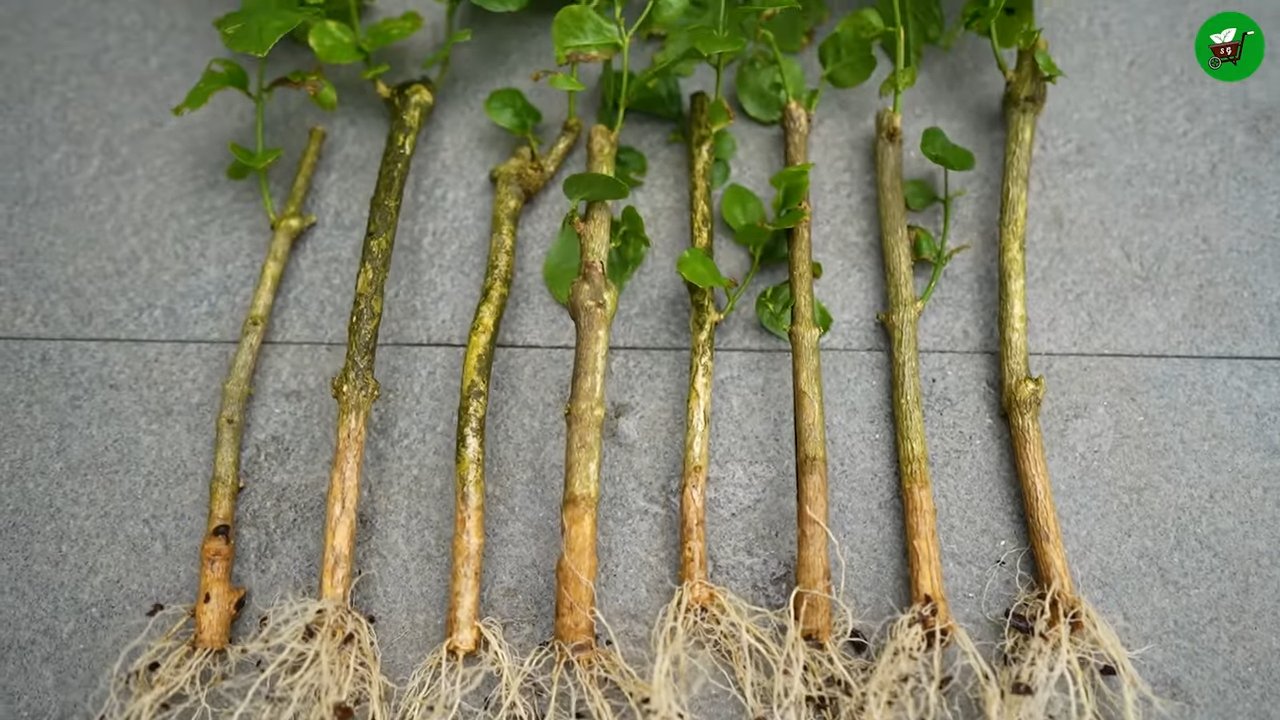
* Nach einigen Wochen (in der Regel 4-8 Wochen) sollten sich Wurzeln gebildet haben. Du kannst vorsichtig an dem Steckling ziehen, um zu prüfen, ob er Widerstand leistet. Wenn du Widerstand spürst, bedeutet das, dass sich Wurzeln gebildet haben.
* Du kannst auch die Wurzeln durch die Drainagelöcher des Topfes sehen.
7. Umpflanzen:
* Sobald die Stecklinge gut bewurzelt sind, kannst du sie in größere Töpfe mit normaler Blumenerde umpflanzen.
* Wähle einen Topf, der etwas größer ist als der vorherige.
* Gieße die Pflanze nach dem Umpflanzen gründlich.
8. Weiterpflege:
* Stelle die umgepflanzten Jasminpflanzen an einen sonnigen Standort.
* Gieße regelmäßig, besonders während der Wachstumsperiode.
* Dünge die Pflanzen regelmäßig mit einem ausgewogenen Dünger.
* Schneide die Pflanzen regelmäßig, um sie in Form zu halten und die Blütenbildung zu fördern.
Häufige Probleme und Lösungen
Auch bei der Vermehrung von Mogra Jasmin können Probleme auftreten. Hier sind einige häufige Probleme und wie du sie lösen kannst:
* Stecklinge faulen: Dies kann durch zu viel Feuchtigkeit oder mangelnde Belüftung verursacht werden. Reduziere die Bewässerung und lüfte die Stecklinge regelmäßig.
* Stecklinge bilden keine Wurzeln: Dies kann durch zu wenig Licht, zu niedrige Temperaturen oder die Verwendung von ungeeigneten Stecklingen verursacht werden. Stelle die Stecklinge an einen helleren Ort, erhöhe die Temperatur und verwende gesunde, kräftige Triebe.
* Schimmelbildung: Dies kann durch zu hohe Luftfeuchtigkeit und mangelnde Belüftung verursacht werden. Lüfte die Stecklinge regelmäßig und verwende ein Fungizid, falls erforderlich.
Zusätzliche Tipps für den Erfolg
Hier sind noch ein paar zusätzliche Tipps, die dir helfen können, deine Mogra Jasmin Stecklinge erfolgreich zu bewurzeln:
* Verwende frische Stecklinge: Stecklinge, die frisch geschnitten wurden, wurzeln besser als ältere Stecklinge.
* Halte die Erde feucht, aber nicht durchnässt: Zu viel Wasser kann zu Fäulnis führen.
* Sei geduldig: Es kann einige Wochen dauern, bis sich Wurzeln bilden. Gib nicht auf, wenn du nicht sofort Ergebnisse siehst.
* Experimentiere: Versuche verschiedene Bewurzelungsmethoden, um herauszufinden, was für dich am besten funktioniert.
Abschließende Gedanken
Die Vermehrung von Mogra Jasmin ist eine lohnende Erfahrung. Mit etwas Geduld und Sorgfalt kannst du deine eigenen duftenden Jasminpflanzen ziehen und deinen Garten mit ihrem betörenden Duft erfüllen. Ich hoffe, dieser Leitfaden hat dir geholfen. Viel Erfolg bei deiner Mogra Jasmin Vermehrung! Und
Conclusion
If you’ve ever been captivated by the intoxicating fragrance of Mogra jasmine and wished you could fill your garden with its exquisite blooms, then mastering the art of Mogra jasmine propagation is an absolute must-try. This isn’t just about saving money on nursery plants; it’s about connecting with nature, nurturing new life, and experiencing the profound satisfaction of creating something beautiful with your own hands.
The beauty of propagating Mogra jasmine lies in its accessibility. You don’t need specialized equipment or years of horticultural experience. With a few simple tools, readily available materials, and a little patience, you can successfully multiply your existing plant and enjoy an abundance of fragrant flowers. Imagine the joy of gifting these homegrown jasmine plants to friends and family, sharing the beauty and fragrance that you cultivated yourself.
Beyond the practical benefits, propagating Mogra jasmine offers a unique opportunity to deepen your understanding of plant life cycles. You’ll witness firsthand the miracle of a small cutting transforming into a thriving plant, developing its own root system and eventually producing those iconic, star-shaped blossoms. This hands-on experience fosters a greater appreciation for the natural world and strengthens your connection to your garden.
Don’t be afraid to experiment with different propagation methods. While stem cuttings are a popular and effective choice, you can also explore air layering or even try propagating from seeds (though this is a slower and less reliable method). Consider varying the rooting medium – some gardeners swear by perlite, while others prefer a mix of coco coir and vermiculite. The key is to find what works best for you and your local climate.
For those seeking a unique twist, consider propagating different varieties of jasmine and creating a fragrant tapestry in your garden. Experiment with different pot sizes and shapes to showcase your newly propagated plants. You can even train them to climb trellises or arbors, creating a stunning vertical display of fragrant blooms.
So, what are you waiting for? Embrace the challenge, get your hands dirty, and embark on your own Mogra jasmine propagation journey. We’re confident that you’ll be amazed by the results. And most importantly, we encourage you to share your experiences with us! Tell us about your successes, your challenges, and any tips or tricks you’ve discovered along the way. Your insights could help other aspiring gardeners unlock the secrets to successful jasmine propagation. Share your photos and stories in the comments below – we can’t wait to see your fragrant creations! Let’s cultivate a community of Mogra jasmine enthusiasts and spread the joy of these beautiful, fragrant plants.
Frequently Asked Questions (FAQ)
What is the best time of year to propagate Mogra jasmine?
The ideal time to propagate Mogra jasmine is during the late spring or early summer. This is when the plant is actively growing, and the cuttings will root more readily. The warmer temperatures and increased daylight hours provide optimal conditions for root development. Avoid propagating during the dormant winter months, as the cuttings are less likely to root successfully. However, if you have a controlled environment like a greenhouse, you can attempt propagation at other times of the year.
What type of cutting should I use for propagation?
The best type of cutting to use for Mogra jasmine propagation is a semi-hardwood cutting. This means a cutting taken from a stem that is neither too soft and green nor too hard and woody. Look for stems that are about 4-6 inches long and have several leaves. The stem should be firm but still pliable. Avoid using cuttings from stems that are flowering or have flower buds, as the plant will focus its energy on flowering rather than root development.
What is the best rooting medium for Mogra jasmine cuttings?
A well-draining rooting medium is essential for successful Mogra jasmine propagation. A mixture of perlite and vermiculite is a popular choice, as it provides excellent aeration and drainage while retaining enough moisture to support root growth. You can also use a mixture of coco coir and perlite, or even a high-quality potting mix specifically formulated for cuttings. Avoid using garden soil, as it can be too heavy and may contain pathogens that can harm the cuttings.
How long does it take for Mogra jasmine cuttings to root?
The time it takes for Mogra jasmine cuttings to root can vary depending on several factors, including the time of year, the temperature, and the humidity. Generally, it takes about 4-8 weeks for roots to develop. You can check for root development by gently tugging on the cutting. If you feel resistance, it means that roots have formed. You can also carefully remove the cutting from the rooting medium and inspect the roots directly.
How do I care for Mogra jasmine cuttings after they have rooted?
Once your Mogra jasmine cuttings have rooted, it’s time to transplant them into individual pots. Use a well-draining potting mix and choose pots that are slightly larger than the root ball. Water the newly transplanted plants thoroughly and place them in a location that receives bright, indirect sunlight. Avoid direct sunlight, as it can scorch the leaves. Keep the soil consistently moist but not waterlogged. Fertilize the plants with a balanced liquid fertilizer every 2-3 weeks during the growing season.
What are some common problems I might encounter when propagating Mogra jasmine?
Some common problems you might encounter when propagating Mogra jasmine include:
* **Rotting:** This is often caused by overwatering or poor drainage. Make sure your rooting medium is well-draining and avoid overwatering.
* **Lack of root development:** This can be caused by several factors, including using the wrong type of cutting, using a poor-quality rooting medium, or not providing enough humidity.
* **Fungal diseases:** These can be prevented by using a sterile rooting medium and providing good air circulation.
Can I propagate Mogra jasmine from seeds?
While it is possible to propagate Mogra jasmine from seeds, it is a much slower and less reliable method than propagating from cuttings. Jasmine seeds can be difficult to germinate, and the resulting plants may not be true to type, meaning they may not have the same characteristics as the parent plant. If you do choose to propagate from seeds, sow them in a well-draining seed starting mix and keep them moist and warm. Germination can take several weeks or even months.
How can I increase my chances of successful Mogra jasmine propagation?
Here are some tips to increase your chances of successful Mogra jasmine propagation:
* Use sharp, clean pruning shears to take your cuttings.
* Dip the cut end of the cutting in rooting hormone to promote root development.
* Provide adequate humidity by covering the cuttings with a plastic bag or dome.
* Keep the rooting medium consistently moist but not waterlogged.
* Provide bright, indirect sunlight.
* Be patient! It can take several weeks for roots to develop.
What are some variations on the standard Mogra jasmine propagation method?
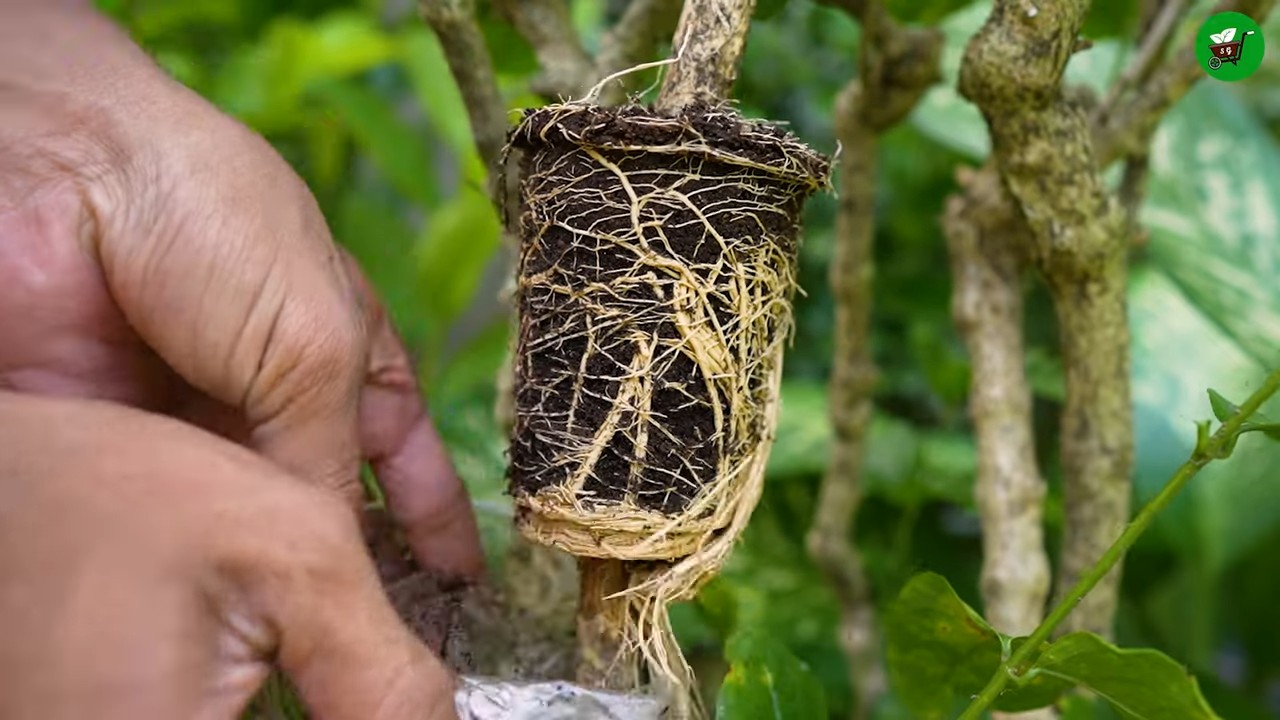
Besides stem cuttings, you can also try air layering. Air layering involves encouraging roots to form on a stem while it is still attached to the parent plant. This is done by wounding the stem, applying rooting hormone, and wrapping it in moist sphagnum moss. Once roots have formed, the stem can be cut from the parent plant and planted in a pot. This method is often used for plants that are difficult to root from cuttings.
How do I know when my propagated Mogra jasmine plant is ready to be planted in the garden?
Your propagated Mogra jasmine plant is ready to be planted in the garden when it has developed a strong root system and is actively growing. The roots should be well-established and filling the pot. The plant should also have several new leaves. Before planting in the garden, gradually acclimate the plant to outdoor conditions by exposing it to increasing amounts of sunlight and wind over a period of several days. This will help the plant adjust to its new environment and prevent transplant shock.
Leave a Comment