
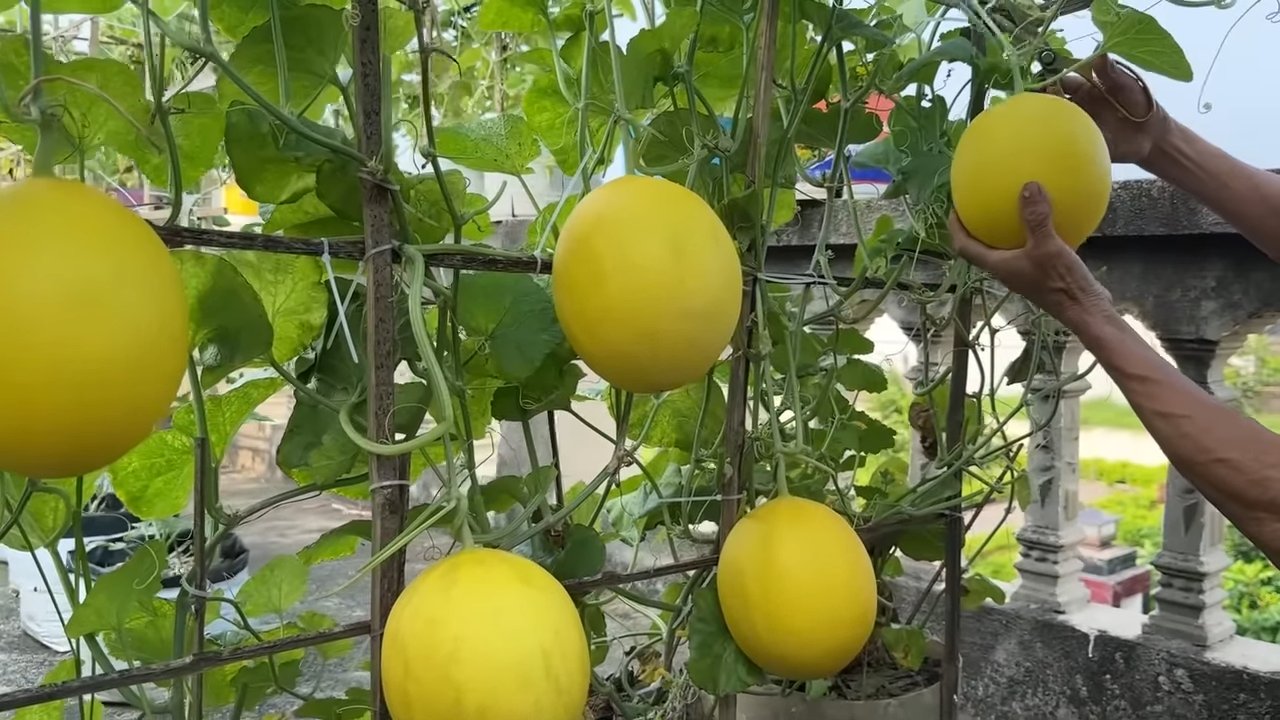
Melon harvest tips are essential for any home gardener dreaming of juicy, sun-ripened sweetness straight from their backyard! Imagine biting into a perfectly ripe melon, the flavors exploding on your tongue – a reward for your hard work and dedication. But let’s be honest, knowing *when* to pick that precious melon can be tricky. Pick it too early, and you’re left with a bland, disappointing fruit. Wait too long, and you risk it becoming overripe and mushy.
Melons have been cultivated for thousands of years, with evidence suggesting their presence in ancient Egypt and beyond. They’ve been a symbol of abundance and refreshment across cultures, and bringing that tradition into your own garden is incredibly rewarding. I remember my grandmother always had a small melon patch, and the anticipation of that first harvest was always a highlight of the summer.
That’s why I’ve put together this guide packed with simple, effective melon harvest tips and DIY hacks. We’ll cover everything from visual cues to the “thump test,” ensuring you’ll never have to guess again. With a little know-how, you can confidently harvest your melons at their peak of flavor, maximizing your yield and enjoying the fruits (literally!) of your labor. Let’s get started and make this your most delicious melon season yet!
DIY: Turning Melon Rinds into Delicious Candied Treats
Okay, so you’ve just enjoyed a juicy, refreshing melon, and you’re staring at the leftover rind. Don’t toss it! I’m going to show you how to transform those seemingly useless rinds into a surprisingly delicious and unique candied treat. It’s a fantastic way to reduce food waste and impress your friends with your culinary creativity. Trust me, these candied melon rinds are addictive!
What You’ll Need:
Before we dive in, let’s gather our supplies. This is what I usually have on hand when I make these:
* Melon rinds (watermelon, cantaloupe, honeydew – any combination works!)
* Granulated sugar
* Water
* Lemon juice (optional, but adds a nice tang)
* Vanilla extract (optional, for extra flavor)
* Food coloring (optional, for a fun visual appeal)
* A large pot
* A sharp knife or vegetable peeler
* A cutting board
* A slotted spoon
* A wire rack
* Parchment paper
Preparing the Melon Rinds
This is the most important part, so pay close attention! We need to get the rinds ready for the candying process.
1. Remove the Flesh and Outer Skin: Using a sharp knife, carefully remove any remaining pink or orange flesh from the inside of the rind. You want to leave only the white part. Then, using a vegetable peeler or paring knife, peel off the tough, green (or orange, depending on the melon) outer skin. This part is bitter and we don’t want that in our candy. I find a vegetable peeler works best for thinner rinds like cantaloupe, while a paring knife is better for the thicker watermelon rind.
2. Cut into Desired Shapes: Now, cut the prepared rinds into whatever shapes you like! I usually go for small cubes (about 1 inch) or strips (about 1 inch wide and 2-3 inches long). Get creative! You could even use cookie cutters for fun shapes. Just make sure they’re relatively uniform in size so they cook evenly.
3. Blanch the Rinds: This step helps to soften the rinds and remove any lingering bitterness. Bring a large pot of water to a boil. Add the melon rind pieces and boil for about 10-15 minutes, or until they become slightly translucent. The time will vary depending on the thickness of your rinds. You want them to be tender but not mushy.
4. Drain and Rinse: Drain the blanched rinds in a colander and rinse them thoroughly with cold water. This stops the cooking process and helps to remove any remaining bitterness.
The Candying Process
Now for the fun part! This is where the magic happens and the rinds transform into sweet, chewy treats.
1. Prepare the Sugar Syrup: In the same pot you used for blanching (make sure it’s clean!), combine equal parts sugar and water. I usually start with 2 cups of sugar and 2 cups of water for a good-sized batch. Add a squeeze of lemon juice (about 1 tablespoon) if you’re using it. This helps to prevent the sugar from crystallizing.
2. Dissolve the Sugar: Heat the sugar and water mixture over medium heat, stirring constantly until the sugar is completely dissolved. Make sure there are no sugar crystals clinging to the bottom of the pot.
3. Add the Rinds: Once the sugar is dissolved, gently add the blanched melon rinds to the syrup. Make sure they are submerged in the liquid.
4. Simmer Slowly: Bring the syrup to a gentle simmer. You want it to bubble very gently, not boil vigorously. Reduce the heat to low and let the rinds simmer in the syrup for about 1-2 hours, or until they become translucent and the syrup has thickened considerably. Stir occasionally to prevent sticking and ensure even cooking. This is where patience is key! The longer they simmer, the more translucent and candied they will become.
5. Add Flavorings (Optional): About 30 minutes before the end of the simmering time, you can add any optional flavorings, such as vanilla extract (about 1 teaspoon) or a few drops of food coloring. If you’re using food coloring, be careful not to add too much, as it can easily overpower the color.
6. Check for Doneness: The rinds are done when they are translucent and the syrup has thickened to a honey-like consistency. You should be able to easily pierce them with a fork.
Drying and Finishing
Almost there! Now we just need to dry the candied rinds and give them a final coating of sugar.
1. Remove from Syrup: Using a slotted spoon, carefully remove the candied melon rinds from the syrup and place them on a wire rack lined with parchment paper. This allows the excess syrup to drip off.
2. Dry the Rinds: Let the rinds dry on the wire rack for at least 12-24 hours, or until they are no longer sticky to the touch. The drying time will depend on the humidity in your area. You can speed up the drying process by placing them in a low oven (around 170°F or 77°C) for a few hours. Just keep a close eye on them to make sure they don’t burn.
3. Coat with Sugar: Once the rinds are dry, place some granulated sugar in a shallow dish. Roll each rind in the sugar, coating it completely. This gives them a nice sweet coating and prevents them from sticking together.
4. Store Properly: Store the candied melon rinds in an airtight container at room temperature. They should last for several weeks, if you can resist eating them all!
Tips and Tricks for Perfect Candied Melon Rinds
* Don’t Overcook: Be careful not to overcook the rinds during the simmering process, as they can become too soft and mushy.
* Adjust Sweetness: If you prefer a less sweet treat, you can reduce the amount of sugar in the syrup.
* Experiment with Flavors: Get creative with your flavorings! Try adding spices like cinnamon, ginger, or cloves to the syrup. You could also use different extracts, such as almond or orange.
* Save the Syrup: Don’t throw away the leftover syrup! It’s delicious drizzled over pancakes, waffles, or ice cream. You can also use it to sweeten tea or coffee.
* Use a Candy Thermometer: For more precise results, you can use a candy thermometer to monitor the temperature of the syrup. You want it to reach the soft-ball stage (around 235-240°F or 113-116°C).
* Different Melon Combinations: I love using a mix of watermelon, cantaloupe, and honeydew rinds for a variety of flavors and textures.
* Patience is Key: The candying process takes time, so be patient and don’t rush it. The longer the rinds simmer in the syrup, the more flavorful and translucent they will become.
* Troubleshooting Sticky Rinds: If your rinds are still sticky after drying for 24 hours, try drying them for a longer period of time or in a low oven. You can also toss them in more sugar to help absorb any excess moisture.
* Consider a Dehydrator: If you have a dehydrator, you can use it to dry the rinds. This will speed up the drying process and ensure that they are evenly dried. Set the dehydrator to a low temperature (around 135°F or 57°C) and dry the rinds for 6-8 hours, or until they are no longer sticky.
Variations to Try
* Spicy Candied Melon Rinds: Add a pinch of cayenne pepper or a few slices of fresh ginger to the syrup for a spicy kick.
* Citrus Candied Melon Rinds: Use orange or grapefruit rinds instead of lemon juice for a citrusy twist. You can also add some grated citrus zest to the syrup.
* Chocolate-Dipped Candied Melon Rinds: Once the rinds are dried and sugared, dip them in melted chocolate for an extra decadent treat.
* Infused Sugar Coating: Instead of plain granulated sugar, try using infused sugar. You can make your own by adding dried herbs, spices, or citrus zest to sugar and letting it sit for a few days.
I hope you enjoy making these candied melon rinds as much as I do! It’s a fun and rewarding way to turn something that would normally be thrown away into a delicious and unique treat. Happy candying!
Conclusion
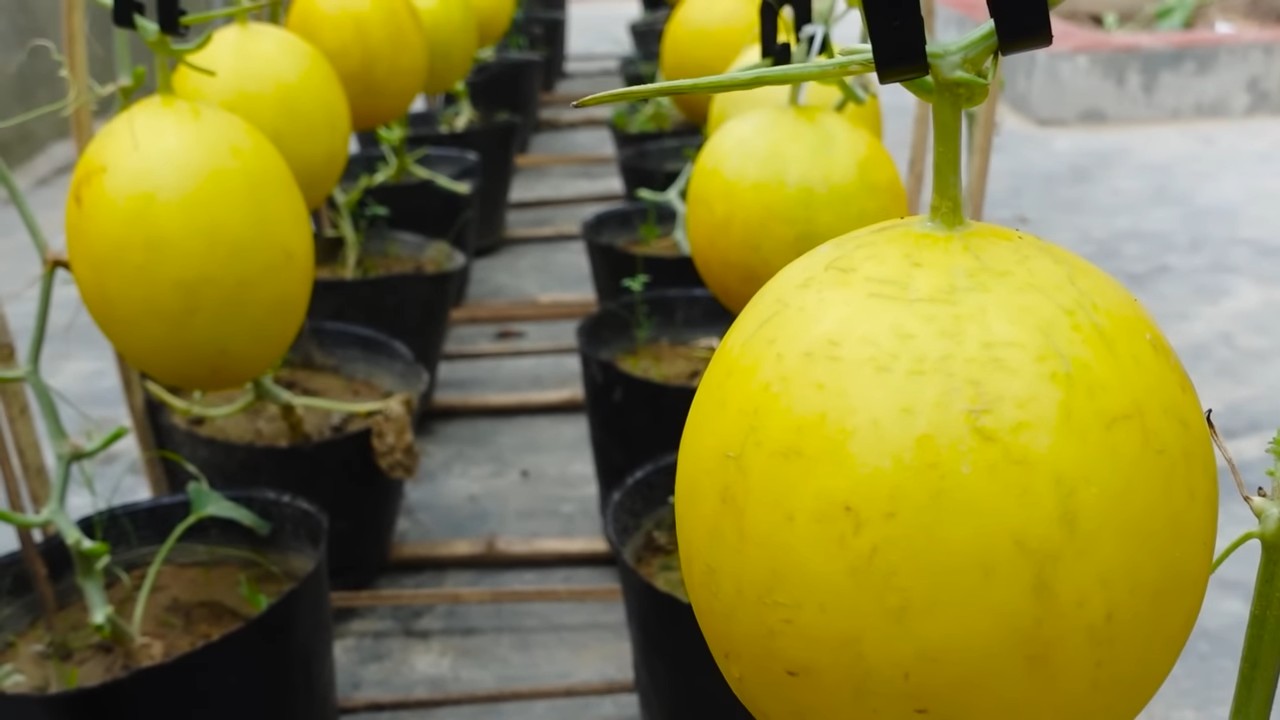
So, there you have it! Mastering these melon harvest tips isn’t just about getting a ripe melon; it’s about maximizing your yield, minimizing waste, and enjoying the fruits (or rather, the melons!) of your labor at their absolute peak of flavor. We’ve covered everything from visual cues and the trusty thump test to stem tendril indicators and the all-important field spot. Ignoring these signs can lead to disappointing harvests – melons that are either bland and underripe or mushy and overripe. Nobody wants that!
This isn’t some complicated, expert-level gardening technique. These melon harvest tips are accessible to anyone, whether you’re a seasoned gardener with acres of land or a beginner growing a single melon vine in a container on your patio. The key is observation and a little bit of patience. Take the time to get to know your melon varieties, understand their growth habits, and pay attention to the subtle signals they give you.
Why is this DIY trick a must-try? Because it empowers you to take control of your harvest and enjoy the best possible flavor from your homegrown melons. Store-bought melons simply can’t compare to the taste of a perfectly ripe, freshly harvested melon. Plus, there’s a certain satisfaction that comes from knowing you nurtured that melon from seed to table.
Variations and Suggestions
Don’t be afraid to experiment! While the general principles of melon harvesting apply across varieties, there can be slight differences. For example, some cantaloupe varieties will slip easily from the vine when ripe, while others require a gentle tug. Watermelons, on the other hand, rely more heavily on the field spot and tendril indicators.
Consider keeping a gardening journal to track your melon harvests each year. Note the date of planting, the variety of melon, the date of harvest, and any observations you make about the ripening process. This will help you fine-tune your harvesting techniques over time and become a true melon-harvesting pro.
Another suggestion is to stagger your planting. Plant a few melon seeds every couple of weeks to extend your harvest season. This way, you’ll have a steady supply of ripe melons to enjoy throughout the summer.
And finally, don’t forget to share your bounty! Homegrown melons make wonderful gifts for friends, family, and neighbors. Spread the joy of fresh, delicious melons and encourage others to try growing their own.
We strongly encourage you to put these melon harvest tips into practice this growing season. We’re confident that you’ll be amazed at the difference it makes in the quality and flavor of your melons.
Now, it’s your turn! Get out there, observe your melons, and put these tips to the test. And most importantly, share your experiences with us! We’d love to hear about your successes, your challenges, and any tips or tricks you’ve discovered along the way. Leave a comment below and let us know how these melon harvest tips worked for you. Happy harvesting!
Frequently Asked Questions (FAQ)
Q: How do I know when my watermelon is ripe?
A: Determining watermelon ripeness involves a combination of factors. The most reliable indicator is the field spot, the area where the melon rests on the ground. When ripe, the field spot should be a creamy yellow color, not white or pale green. Also, check the tendril closest to the stem; it should be brown and dry. Finally, give the watermelon a thump. A ripe watermelon will have a deep, hollow sound, while an unripe one will sound more solid and dull. Remember that different varieties may have slightly different indicators, so research your specific watermelon type.
Q: My cantaloupe is turning orange, but it’s still hard. Is it ripe?
A: The color change is a good sign, but hardness indicates it’s not quite ready. Cantaloupes should have a slight give when gently pressed on the blossom end (the end opposite the stem). If it’s still hard, give it a few more days. Also, check if the cantaloupe slips easily from the vine with a gentle tug. This “slip” is a key indicator of ripeness for many cantaloupe varieties. If it doesn’t slip easily, it’s not quite ready.
Q: What is the “thump test” and how do I do it correctly?
A: The thump test involves gently tapping or thumping the melon and listening to the sound it produces. A ripe melon will have a deep, hollow sound, almost like a drum. An unripe melon will sound more solid and dull. The key is to listen carefully and compare the sound to other melons on the vine. It takes a little practice to get the hang of it, but with experience, you’ll be able to distinguish the subtle differences in sound.
Q: Can I ripen a melon after I’ve picked it?
A: Melons, unlike some fruits, do not significantly ripen after being picked. They may soften slightly, but the sugar content and flavor will not improve. It’s crucial to harvest melons when they are fully ripe on the vine to ensure the best possible taste. If you accidentally pick a melon that’s not quite ripe, you can store it at room temperature for a few days, but don’t expect it to become significantly sweeter.
Q: How long can I store a harvested melon?
A: The storage time for harvested melons depends on the variety and how ripe it was when picked. Generally, whole watermelons can be stored at room temperature for about a week or two. Cantaloupes and honeydews are more perishable and should be refrigerated after harvesting. Whole cantaloupes can last for about 5-7 days in the refrigerator, while honeydews can last for up to two weeks. Once cut, all melons should be refrigerated and consumed within 3-5 days.
Q: What are some common mistakes people make when harvesting melons?
A: One common mistake is picking melons too early, thinking they will ripen off the vine. As mentioned earlier, melons don’t significantly ripen after being picked. Another mistake is relying solely on one indicator of ripeness. It’s best to use a combination of visual cues, the thump test, and stem tendril indicators to ensure accurate harvesting. Overwatering melons close to harvest can also dilute the sugars and affect the flavor. Finally, neglecting to protect melons from pests and diseases can lead to damaged or unripe fruit.
Q: My melon split open on the vine. What does that mean?
A: Melon splitting can be caused by several factors, including inconsistent watering, overwatering, or rapid changes in temperature. When the melon receives a sudden influx of water after a dry period, it can grow too quickly, causing the skin to split. To prevent this, maintain consistent watering throughout the growing season and avoid overwatering, especially as the melons approach maturity.
Q: Are there any specific tools I need for harvesting melons?
A: You don’t need any specialized tools for harvesting melons, but a sharp knife or pruning shears can be helpful for cutting the stem. Make sure the blade is clean to prevent the spread of disease. Gloves can also be useful to protect your hands from dirt and thorns.
Q: How can I tell if my melon has been attacked by pests or diseases?
A: Signs of pest or disease damage can include holes in the rind, discoloration, soft spots, or stunted growth. Inspect your melon plants regularly for any signs of infestation or disease. Common melon pests include aphids, squash bugs, and vine borers. Common diseases include powdery mildew and fusarium wilt. If you notice any problems, take action promptly to control the pests or diseases and prevent further damage.
Q: What’s the best time of day to harvest melons?
A: The best time of day to harvest melons is in the morning, after the dew has dried but before the heat of the day sets in. This will help to prevent the melons from overheating and ensure they retain their freshness.

Leave a Comment