
Growing luffa gourd yourself – doesn’t that sound fantastic? Imagine being able to grow your own natural sponges in your garden! It’s not only a super cool DIY project but also a sustainable and environmentally friendly alternative to conventional sponges.
For centuries, luffa gourds have been cultivated in Asia and Africa, not just as food, but primarily for their fascinating internal structure. After drying and peeling, the luffa gourd transforms into a durable and versatile sponge used for personal care, in the household, and even in industry. Imagine telling your friends that your bath sponge comes from your own garden!
Why should you go to the trouble of growing a luffa gourd yourself? It’s simple: because it’s fun, sustainable, and offers unique value. At a time when we all want to be more conscious of our resources, growing luffa gourds is a great way to reduce plastic waste while learning something new. Plus, it’s an incredibly satisfying feeling to see something through from seed to finished product. In this article, I’ll show you how you can easily grow your own luffa gourd – step-by-step and with lots of useful tips and tricks. Let’s get started together and turn your garden into a small sponge factory!
Growing Luffa Gourd Yourself: Your DIY Guide for Sponge Gourds
Hey there! Have you ever wondered where those natural bath sponges come from? The answer is surprisingly simple: they grow! Specifically, as luffa gourds. I’ll show you how to grow these fascinating plants yourself to harvest your own sustainable sponge. It’s easier than you think and incredibly fun!
What You Need for Growing Luffa
Before we get started, here’s a list of the things you’ll need:
- Luffa seeds: You can find them online or in well-stocked garden centers. Make sure you buy seeds of Luffa aegyptiaca (also called Luffa cylindrica), the species used for sponges.
- Seedling pots: Small pots or seed trays for starting seeds indoors.
- Seed starting mix: Special soil for starting seedlings. It is low in nutrients and loose.
- Larger pots (optional): If you want to grow luffa gourds in pots. They should have a capacity of at least 30 liters.
- Garden soil: High-quality garden soil for the pots or bed.
- Compost or organic fertilizer: to enrich the soil.
- Trellis/Support: Luffa gourds are climbing plants and definitely need a support structure. This can be a fence, a trellis, a climbing frame, or a pergola.
- Watering can or garden hose: For watering the plants.
- Patience: Luffa gourds need time to grow and ripen.
The Preparation: Starting Seeds Indoors
Luffa gourds have a long growing season, so it’s important to start the seeds indoors early. I usually start this in March or April.
- Prepare seeds: To speed up germination, you can soak the seeds in lukewarm water for 24 hours. This softens the seed coat.
- Fill seedling pots: Fill the seedling pots with seed starting mix.
- Sow seeds: Place one to two seeds in each pot, about 1-2 cm deep.
- Water: Water the soil gently so it is moist but not wet.
- Keep warm: Place the pots in a warm, bright place. A temperature of 20-25°C is ideal. A mini-greenhouse or a windowsill above a heater are good options.
- Keep moist: Keep the soil evenly moist, but avoid waterlogging.
- Wait: After about 1-3 weeks, the seeds should germinate.
Planting Out the Luffa Seedlings
Once the luffa seedlings are large enough (about 15-20 cm high) and there is no more risk of frost (usually mid-May), they can be planted outdoors.
- Harden off: Before planting the seedlings out, you should harden them off for a few days. Place them outside for a few hours during the day and bring them back in at night. This acclimates them to the outdoor conditions.
- Prepare the location: Choose a sunny, warm, and wind-protected location for your luffa gourds. The soil should be loose, well-draining, and rich in nutrients.
- Improve the soil: Dig over the soil and mix in compost or organic fertilizer.
- Dig planting holes: Dig planting holes that are slightly larger than the root balls of the seedlings.
- Plant seedlings: Carefully place the seedlings in the planting holes and fill them with soil.
- Water thoroughly: Water the plants well.
- Install support: Make sure the trellis or support is stable and well-secured. The luffa gourds will climb up it.
The Care: Watering, Fertilizing, and Climbing
Luffa gourds are relatively low-maintenance, but they need regular attention to grow well and produce lots of fruit.
- Watering: Water the plants regularly, especially during dry periods. The soil should always be slightly moist, but not wet.
- Fertilizing: Fertilize the plants every few weeks with an organic fertilizer or compost. This promotes growth and fruit production.
- Support climbing: Help the plants climb by attaching their shoots to the support structure.
- Pruning (optional): You can pinch off the side shoots of the plants to encourage fruit production. However, this is not strictly necessary.
- Pests and diseases: Watch out for pests and diseases. If necessary, you can use organic pesticides.
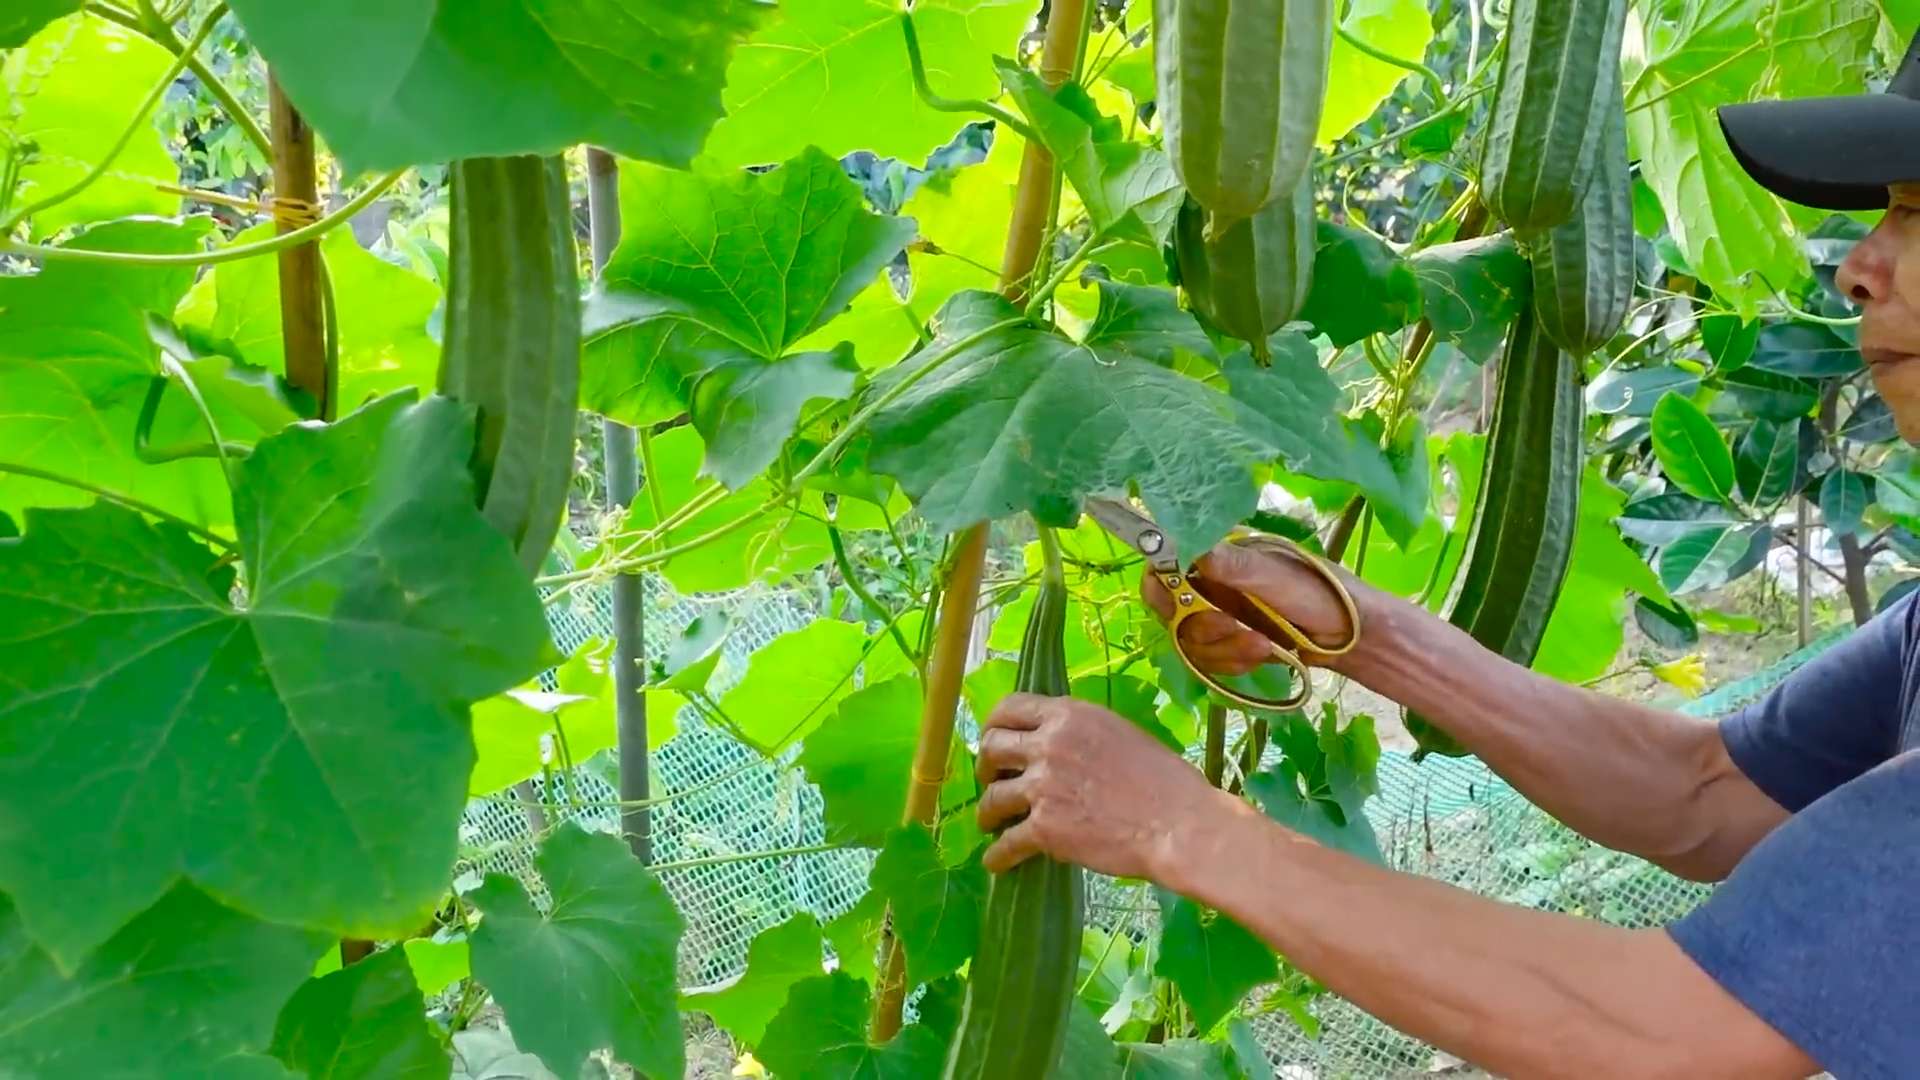
The Harvest: From Vegetable to Sponge
Harvesting the luffa gourds is the most exciting part! The fruits are ripe when they feel light and dry and the skin has turned brown and hard. This can be between September and November, depending on the variety and weather conditions.
- Harvest: Cut the ripe luffa gourds with a sharp knife or garden shears.
- Dry: Let the gourds dry completely in a dry, airy place. This can take several weeks.
- Peel: Once the gourds are completely dry, you can remove the hard skin. The best way to do this is to gently squeeze the gourd and then peel off the skin.
- Remove seeds: Shake the seeds out of the gourd. You can save them for the next season.
- Clean: Rinse the luffa sponges thoroughly with water to remove any remaining pulp.
- Bleach (optional): If you wish, you can lighten the sponges with a mild bleach solution. However, this is not necessary.
- Let dry: Let the sponges dry completely before using them.
Uses for Luffa Sponges
Your homegrown luffa sponges are versatile:
- Bath sponge: Use them for gentle exfoliation of your skin.
- Kitchen sponge: Clean pots, pans, and dishes.
- Gardening: Clean your garden tools.
- Crafts: Use them for creative projects.
Common Mistakes and How to Avoid Them
- Sowing too late: Start seeds indoors early to give the luffa gourds enough time to grow.
- Wrong location: Choose a sunny, warm, and wind-protected location.
- Lack of support: Make sure the plants have a sturdy support structure.
- Not enough water: Water the plants regularly, especially during dry periods.
- Not enough fertilizer: Fertilize the plants regularly to promote growth and fruit production.
- Harvesting too early: Harvest the gourds only when they are fully ripe and dry.
Additional Tips for Successful Luffa Cultivation
Bee-friendly: Luffa flowers are attractive to bees and other pollinators.
Variety selection: There are different luffa varieties. Find out which variety is best suited for your climate.

Conclusion
Growing your own luffa gourd is not only a rewarding garden project but also a sustainable way to obtain a natural and versatile sponge. The advantages are clear: you have full control over the cultivation process, avoid chemical additives, and support the environment. Furthermore, it is a fascinating experience to observe the life cycle of this special plant from sowing to harvest.
Why you should definitely try it:
- Sustainability: Reduce your plastic consumption by switching to a natural, biodegradable sponge.
- Cost-effectiveness: Once planted, you can harvest luffa gourds for years, saving money in the long run.
- Quality: You decide how your luffa gourds are grown and processed, ensuring the best possible quality.
- Unique experience: Growing luffa gourds is an exciting and educational project for the whole family.
- Versatility: Luffa gourds are not only suitable as bath sponges but can also be used in the kitchen, household, and even in the garden.
Variations and Suggestions:
- Luffa soap: Integrate small pieces of dried luffa into homemade soap for an extra exfoliating effect.
- Luffa massage brush: Attach a dried luffa to a handle to create a natural massage brush.
- Luffa cleaning pads: Cut the luffa into small slices and use them as cleaning pads for the face or body.
- Luffa decoration: Use dried luffa gourds as a decorative element in your home or garden. You can paint them, decorate them, or simply hang them as they are.
- Growing in a pot: If you don’t have a garden, you can also grow luffa gourds in large pots on a balcony or terrace. Ensure sufficient sunlight and good drainage.
- Different varieties: Experiment with different luffa varieties to find the one that best suits your needs and climate.
We encourage you to try this DIY project and grow your own luffa gourds. It’s easier than you think and offers numerous benefits. Share your experiences, tips, and tricks with us and the community. Let’s make the world a little greener and more sustainable together – with homegrown luffa gourds!
FAQ – Frequently Asked Questions about Growing Luffa Gourds
What location does the luffa gourd need?
The luffa gourd is a heat-loving plant and needs a sunny, wind-protected location. A spot against a south-facing wall or in a greenhouse is ideal. The soil should be loose, rich in humus, and well-draining. Waterlogging must be avoided at all costs.
How long does it take until I can harvest my own luffa sponges?
The growing period for luffa gourds is typically 5 to 7 months. Sowing is done indoors in the spring (March/April), and planting outdoors takes place after the last frost (mid-May). The harvest season begins in late summer/autumn (September/October), when the fruits are fully ripe and brown.
How do I know if the luffa gourd is ready for harvest?
A ripe luffa gourd can be recognized by its brown color, dry and hard skin, and the rattling of the seeds inside when you shake the fruit. The gourd should detach easily from the stem.
How do I process the harvested luffa gourd into a sponge?
After harvesting, the luffa gourd must be peeled and the seeds removed. This can be a bit tedious, but it’s easier if the gourd has dried for a few days. Afterward, the luffa is thoroughly washed and dried. It’s best to hang it in an airy place. After drying, the luffa is ready to use.
Can I save the luffa gourd seeds for the next season?
Yes, the seeds of the luffa gourd can be saved for the next season. Let the seeds dry completely and store them in a cool, dry, and dark place. Before sowing, you can test the viability of the seeds by placing a few on a damp paper towel and observing if they germinate.
What pests and diseases can affect the luffa gourd?
The luffa gourd is relatively robust but can be affected by aphids, spider mites, or powdery mildew. Ensure good ventilation and avoid waterlogging. If necessary, you can use natural pesticides.
Does the luffa gourd need a trellis or support?
Yes, the luffa gourd is a climbing plant and definitely needs a support structure. Fences, trellises, pergolas, or climbing nets are suitable. The support should be sturdy enough to bear the weight of the heavy fruits.
Can I also grow luffa gourds in a greenhouse?
Yes, growing in a greenhouse is even ideal, as the luffa gourd is protected from weather influences and has a longer growing season. Ensure good ventilation and sufficient space for the plants.
How do I care for the luffa gourd during the growing season?
The luffa gourd needs regular watering, especially during the flowering and fruiting phases. Fertilize the plants regularly with an organic fertilizer. Regularly remove side shoots to promote fruit production.
What should I do if my luffa gourd doesn’t bloom or bear fruit?
If your luffa gourd does not bloom or bear fruit, there can be several reasons. The location may not be sunny enough, the soil too poor in nutrients, or the watering insufficient. Check the site conditions and adjust the care accordingly. Sometimes, hand pollination can also help stimulate fruit production.
Can I also grow luffa gourds in colder regions?
In colder regions, growing luffa gourds is a bit more difficult, but not impossible. Start sowing indoors early and plant the young plants outdoors only after the last frost. Choose a particularly sheltered location and cover the plants with fleece if necessary. Growing in a greenhouse is recommended in colder regions.
We hope this FAQ has answered your questions about growing luffa gourds. Good luck with your garden project
Leave a Comment