
Lazy melon growing hacks – sounds like a dream, right? I know, I know, the thought of juicy, homegrown melons conjures images of endless weeding, watering, and fretting over pests. But what if I told you there’s a way to enjoy the sweet taste of summer without all the back-breaking labor?
Melons have been cultivated for thousands of years, with evidence suggesting their presence in Africa as far back as the second millennium BC. From ancient Egypt, where they were depicted in artwork, to the royal gardens of France, melons have always been a symbol of luxury and deliciousness. But you don’t need to be royalty to enjoy them!
Let’s face it, we’re all busy. Juggling work, family, and everything in between leaves little time for intensive gardening. That’s where these lazy melon growing hacks come in. I’m going to share some simple, effective DIY tricks that will minimize your effort while maximizing your melon harvest. Think less work, more deliciousness. Who wouldn’t want that? These tips are perfect for beginners, busy bees, or anyone who just wants to enjoy fresh, homegrown melons without spending all their free time in the garden. Get ready to unlock the secrets to effortless melon growing!
Lazy Melon Growing Hacks: So erntest du Melonen ohne viel Aufwand!
Hey Leute, ich liebe Melonen! Aber ganz ehrlich, ich bin nicht der fleißigste Gärtner. Deshalb habe ich über die Jahre ein paar Tricks entwickelt, um trotzdem leckere Melonen zu ernten, ohne mich dabei totzuarbeiten. Hier sind meine besten Lazy Melon Growing Hacks, die auch du ganz einfach umsetzen kannst!
Die richtige Sorte wählen: Der Schlüssel zum Erfolg
Bevor wir überhaupt anfangen, ist die Sortenwahl entscheidend. Einige Melonensorten sind einfach pflegeleichter als andere. Ich empfehle dir, nach Sorten zu suchen, die:
* Frühreif sind: So kannst du die Erntezeit verkürzen und das Risiko von Krankheiten und Schädlingen minimieren.
* Kompakt wachsen: Diese Sorten nehmen weniger Platz ein und sind einfacher zu handhaben.
* Resistent gegen Krankheiten sind: Das spart dir jede Menge Ärger und Spritzmittel.
Meine persönlichen Favoriten für faule Gärtner sind:
* ‘Sugar Baby’ Wassermelone: Klein, süß und frühreif. Perfekt für den kleinen Garten.
* ‘Minnesota Midget’ Cantaloupe: Eine robuste und zuverlässige Cantaloupe-Sorte.
* ‘Bush Sugar Baby’ Wassermelone: Eine Busch-Sorte, die sich ideal für Kübel eignet.
Vorbereitung ist alles: Der faule Gärtner denkt voraus
Okay, die Sorte ist gewählt. Jetzt geht’s an die Vorbereitung. Und hier gilt: Je besser du vorbereitet bist, desto weniger Arbeit hast du später.
1. Der perfekte Standort: Sonne, Sonne, Sonne!
Melonen lieben die Sonne! Such dir einen Platz in deinem Garten, der mindestens 6-8 Stunden direkte Sonneneinstrahlung pro Tag bekommt. Je mehr Sonne, desto süßer die Melonen.
2. Der richtige Boden: Gut vorbereitet ist halb gewonnen
Melonen brauchen einen gut durchlässigen, nährstoffreichen Boden. Wenn dein Boden eher sandig oder lehmig ist, solltest du ihn unbedingt verbessern. So geht’s:
* Kompost einarbeiten: Kompost ist Gold wert! Er verbessert die Bodenstruktur, speichert Feuchtigkeit und liefert Nährstoffe. Ich arbeite immer eine ordentliche Schicht Kompost in den Boden ein, bevor ich Melonen pflanze.
* Organischen Dünger verwenden: Hornspäne, Knochenmehl oder ein organischer Gemüsedünger sorgen für eine gute Grundversorgung mit Nährstoffen.
* Den pH-Wert testen: Melonen bevorzugen einen leicht sauren bis neutralen pH-Wert (6,0-7,0). Du kannst den pH-Wert mit einem Bodentest-Kit überprüfen und gegebenenfalls anpassen.
3. Mulchen: Dein bester Freund im Garten
Mulchen ist ein absolutes Muss für faule Gärtner! Es hat so viele Vorteile:
* Es hält den Boden feucht: Du musst weniger gießen.
* Es unterdrückt Unkraut: Du musst weniger jäten.
* Es schützt die Früchte vor Bodenkontakt: Das reduziert das Risiko von Fäulnis.
Ich verwende am liebsten Stroh oder Holzhackschnitzel zum Mulchen. Du kannst aber auch Rasenschnitt oder Laub verwenden.
Aussaat und Pflanzung: Der einfache Weg zum Melonenglück
Du hast zwei Möglichkeiten: Entweder du säst die Melonen direkt ins Beet oder du ziehst sie in Töpfen vor. Ich bevorzuge die Voranzucht, weil sie mir ein paar Wochen Vorsprung verschafft.
1. Voranzucht im Haus (optional):
* Aussaatzeitpunkt: Beginne etwa 4-6 Wochen vor dem letzten erwarteten Frost mit der Aussaat.
* Aussaatgefäße: Verwende kleine Töpfe oder Anzuchtschalen.
* Aussaaterde: Fülle die Gefäße mit Anzuchterde.
* Aussaat: Lege 2-3 Samen pro Topf etwa 1-2 cm tief in die Erde.
* Gießen: Halte die Erde feucht, aber nicht nass.
* Standort: Stelle die Töpfe an einen warmen und hellen Ort.
* Pikieren: Wenn die Sämlinge 2-3 echte Blätter haben, kannst du sie in größere Töpfe pikieren.
2. Direktsaat ins Beet:
* Aussaatzeitpunkt: Warte, bis keine Frostgefahr mehr besteht und der Boden sich erwärmt hat (mindestens 18°C).
* Aussaat: Säe die Samen direkt ins Beet, etwa 2-3 cm tief.
* Abstand: Halte einen Abstand von etwa 60-90 cm zwischen den Pflanzen ein.
* Gießen: Gieße die Samen nach der Aussaat gut an.
3. Auspflanzen der Jungpflanzen:
* Vorbereitung: Härte die Jungpflanzen vor dem Auspflanzen ab, indem du sie tagsüber für ein paar Stunden ins Freie stellst.
* Pflanzloch: Grabe ein Pflanzloch, das etwas größer ist als der Wurzelballen.
* Pflanzen: Setze die Jungpflanzen vorsichtig in die Pflanzlöcher und fülle sie mit Erde auf.
* Gießen: Gieße die Pflanzen nach dem Auspflanzen gut an.
* Mulchen: Bringe eine Schicht Mulch um die Pflanzen herum aus.
Pflegeleichtes Gießen und Düngen: Weniger ist mehr
Melonen brauchen Wasser und Nährstoffe, aber übertreibe es nicht!
1. Gießen: Gezielt und sparsam
* Gießhäufigkeit: Gieße die Melonen regelmäßig, besonders während der Fruchtbildung.
* Gießmethode: Gieße direkt an die Wurzeln und vermeide es, die Blätter zu benetzen. Das reduziert das Risiko von Pilzkrankheiten.
* Wassertest: Stecke deinen Finger in die Erde. Wenn sie sich trocken anfühlt, ist es Zeit zu gießen.
2. Düngen: Weniger ist oft mehr
* Organischer Dünger: Verwende einen organischen Gemüsedünger, um die Melonen mit Nährstoffen zu versorgen.
* Düngerzeitpunkt: Dünge die Melonen während der Wachstumsphase und während der Fruchtbildung.
* Überdüngung vermeiden: Überdüngung kann zu Problemen führen. Halte dich an die Dosierungsanleitung auf der Verpackung.
Trick 17: Melonen auf Stroh betten
Dieser Trick ist super einfach und verhindert, dass die Melonen auf dem feuchten Boden liegen und faulen. Lege einfach ein dickes Strohbett unter die Früchte, sobald sie anfangen zu wachsen.
Schutz vor Schädlingen und Krankheiten: Vorbeugen ist besser als heilen
Melonen können von verschiedenen Schädlingen und Krankheiten befallen werden. Aber keine Panik, mit ein paar einfachen Maßnahmen kannst du das Risiko minimieren.
* Regelmäßige Kontrolle: Kontrolliere die Pflanzen regelmäßig auf Schädlinge und Krankheiten.
* Nützlinge fördern: Locke Nützlinge wie Marienkäfer und Florfliegen in deinen Garten. Sie fressen Blattläuse und andere Schädlinge.
* Krankheitsresistente Sorten wählen: Wie bereits erwähnt, sind krankheitsresistente Sorten eine gute Wahl.
* Natürliche Pflanzenschutzmittel: Wenn du Schädlinge oder Krankheiten entdeckst, verwende natürliche Pflanzenschutzmittel wie Neemöl oder Schachtelhalmextrakt.
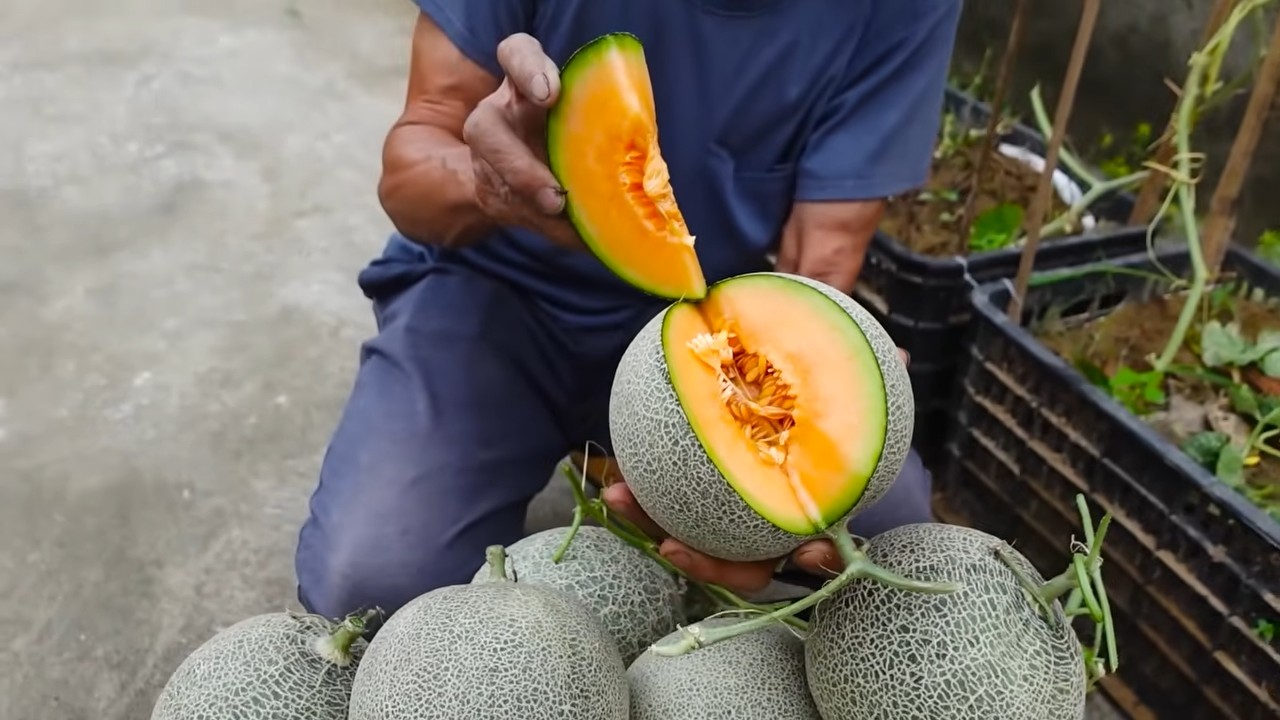
Erntezeit: Der Lohn der Mühe
Der Moment, auf den du gewartet hast! Aber wann sind die Melonen reif?
* Klopftest: Klopfe leicht auf die Melone. Eine reife Wassermelone klingt dumpf, eine reife Cantaloupe klingt hohl.
* Stielansatz: Bei Cantaloupe-Melonen löst sich der Stielansatz leicht von der Frucht, wenn sie reif ist.
* Farbe: Die Farbe der Melone kann sich verändern, wenn sie reif ist. Bei Wassermelonen wird die Unterseite, die auf dem Boden liegt, oft gelblich.
* Duft: Reife Cantaloupe-Melonen duften intensiv.
Wenn du dir unsicher bist, warte lieber noch ein paar Tage, bevor du die Mel
Conclusion
So, there you have it! These lazy melon growing hacks aren’t just about saving time and effort; they’re about maximizing your yield and enjoying the sweet taste of homegrown melons without breaking a sweat. We’ve explored simple yet effective techniques, from the no-dig planting method that minimizes soil disturbance to the self-watering system that keeps your melons hydrated even when you’re away. We’ve also touched upon the importance of companion planting to naturally deter pests and attract beneficial insects, creating a thriving ecosystem around your melon patch.
But why are these hacks a must-try? Because they democratize gardening. They make it accessible to everyone, regardless of their experience level or the amount of time they have available. Imagine biting into a juicy, sun-ripened watermelon that you grew yourself, knowing that you achieved this delicious feat with minimal effort. That’s the power of these lazy melon growing hacks. They empower you to connect with nature, enjoy fresh produce, and experience the satisfaction of growing your own food, all without sacrificing your precious time.
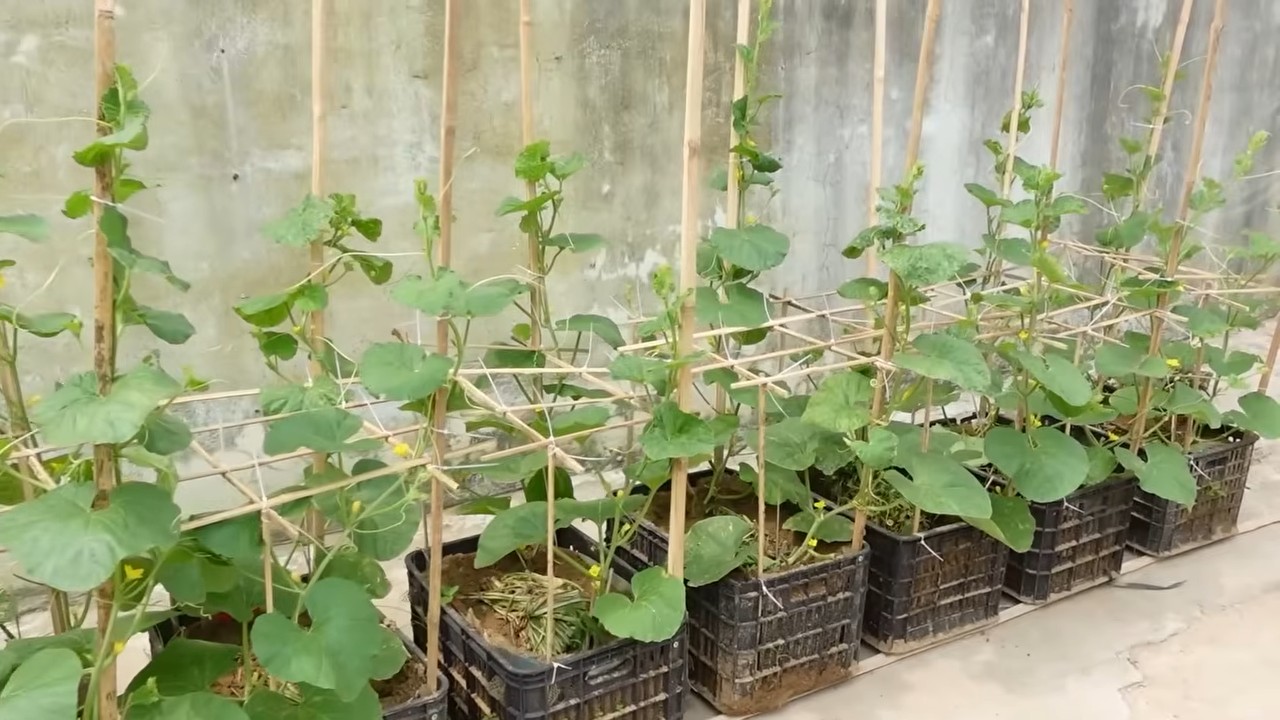
Don’t be afraid to experiment and adapt these techniques to your specific environment and preferences. For instance, if you live in a particularly hot climate, consider using shade cloth to protect your melons from scorching. If you’re short on space, try growing smaller melon varieties like cantaloupe or honeydew in containers. You can even train your melon vines to grow vertically on a trellis, saving valuable ground space and improving air circulation.
Consider adding a layer of mulch around your melon plants to help retain moisture and suppress weeds. Straw, wood chips, or even shredded leaves work wonders. You can also incorporate slow-release fertilizer into the soil at planting time to provide your melons with a steady supply of nutrients throughout the growing season.
And speaking of variations, why not try growing different types of melons? Watermelons, cantaloupes, honeydews, and even specialty varieties like Galia melons all thrive with these lazy growing techniques. Each variety offers a unique flavor and texture, adding variety to your summer meals.
The key is to observe your plants, learn from your experiences, and adjust your approach as needed. Gardening is a journey, not a destination, and there’s always something new to discover.
We wholeheartedly encourage you to give these lazy melon growing hacks a try. You’ll be amazed at how easy and rewarding it is to grow your own delicious melons. And once you’ve experienced the joy of homegrown melons, we’d love to hear about your experiences! Share your tips, tricks, and photos in the comments section below. Let’s create a community of lazy melon growers who are passionate about sharing their knowledge and inspiring others to get their hands dirty (or not, thanks to these hacks!).
Remember, the goal is to enjoy the process and reap the rewards of fresh, homegrown melons. So, embrace the lazy approach, experiment with different techniques, and most importantly, have fun! Happy growing!
Frequently Asked Questions (FAQ)
What exactly are “lazy melon growing hacks”?
Lazy melon growing hacks are simplified gardening techniques designed to minimize the time, effort, and resources required to successfully grow melons. They focus on efficiency, sustainability, and ease of implementation, making melon growing accessible to gardeners of all skill levels, especially those with limited time or experience. These hacks often involve no-dig methods, self-watering systems, companion planting, and other low-maintenance strategies.
What types of melons can I grow using these hacks?
You can grow a wide variety of melons using these lazy growing techniques. Watermelons, cantaloupes, honeydews, Galia melons, and even smaller varieties like personal-sized watermelons and Charentais melons are all suitable. The key is to choose varieties that are well-suited to your local climate and growing conditions. Consider the size of your growing space when selecting melon varieties, as some can be quite large and require ample room to spread.
How much space do I need to grow melons?
The amount of space required depends on the variety of melon you’re growing. Watermelons generally need the most space, while cantaloupes and honeydews can be grown in slightly smaller areas. As a general rule, allow at least 4-6 feet between watermelon plants and 2-3 feet between cantaloupe and honeydew plants. If you’re short on space, consider growing smaller melon varieties or training your vines to grow vertically on a trellis.
What kind of soil is best for growing melons?
Melons prefer well-drained, fertile soil that is rich in organic matter. A slightly acidic to neutral pH (between 6.0 and 7.0) is ideal. Before planting, amend your soil with compost, aged manure, or other organic materials to improve its fertility and drainage. If your soil is heavy clay, consider adding sand or perlite to improve drainage.
How often should I water my melon plants?
Melon plants need consistent moisture, especially during fruit development. Water deeply and regularly, aiming to keep the soil consistently moist but not waterlogged. The self-watering systems mentioned in the article are a great way to ensure consistent hydration. During hot, dry weather, you may need to water more frequently. Check the soil moisture regularly by sticking your finger into the soil a few inches deep. If the soil feels dry, it’s time to water.
What are some common pests and diseases that affect melons, and how can I prevent them?
Common pests that affect melons include aphids, squash bugs, cucumber beetles, and vine borers. Diseases include powdery mildew, fusarium wilt, and anthracnose. Companion planting can help deter pests and attract beneficial insects. For example, planting marigolds near your melon plants can help repel nematodes and other pests. Regularly inspect your plants for signs of pests or diseases and take action promptly. Organic pest control methods, such as insecticidal soap or neem oil, can be effective for controlling pests. Ensure good air circulation around your plants to help prevent fungal diseases.
How do I know when my melons are ripe?
Determining when a melon is ripe can be tricky, but there are a few telltale signs to look for. For watermelons, look for a dull, thumping sound when you tap the melon. The underside of the melon, where it rests on the ground, should be a creamy yellow color. For cantaloupes, the stem should slip easily from the vine when the melon is ripe. The melon should also have a sweet, fragrant aroma. For honeydews, look for a creamy yellow color and a slightly waxy feel.
Can I grow melons in containers?
Yes, you can grow melons in containers, especially smaller varieties like cantaloupe or honeydew. Choose a large container (at least 20 gallons) with good drainage. Use a high-quality potting mix and provide your plants with plenty of sunlight and water. You may also need to provide support for the vines, such as a trellis or stake.
What are some good companion plants for melons?
Good companion plants for melons include marigolds, nasturtiums, basil, oregano, and thyme. Marigolds help repel nematodes and other pests, while nasturtiums attract aphids away from your melon plants. Basil, oregano, and thyme are aromatic herbs that can help deter pests and attract beneficial insects.
How can I improve the flavor of my melons?
To improve the flavor of your melons, ensure they receive plenty of sunlight and water. Avoid over-watering, as this can dilute the flavor. Fertilize your plants regularly with a balanced fertilizer. Allow your melons to ripen fully on the vine before harvesting.


Leave a Comment