
Jackfruit Grafting at Home: Unlock the secrets to multiplying your jackfruit bounty with our ultimate DIY guide! Have you ever dreamed of having a thriving jackfruit tree right in your backyard, bursting with delicious, exotic fruit? I know I have! But the thought of waiting years for a seedling to mature can be daunting. That’s where grafting comes in – a time-tested technique that allows you to enjoy the fruits of your labor much sooner.
Grafting, an ancient practice dating back thousands of years, has been used across cultures to propagate desirable plant traits. From the orchards of ancient China to the vineyards of Rome, grafting has played a vital role in ensuring consistent fruit quality and disease resistance. It’s a bit like plant surgery, but trust me, it’s easier than it sounds!
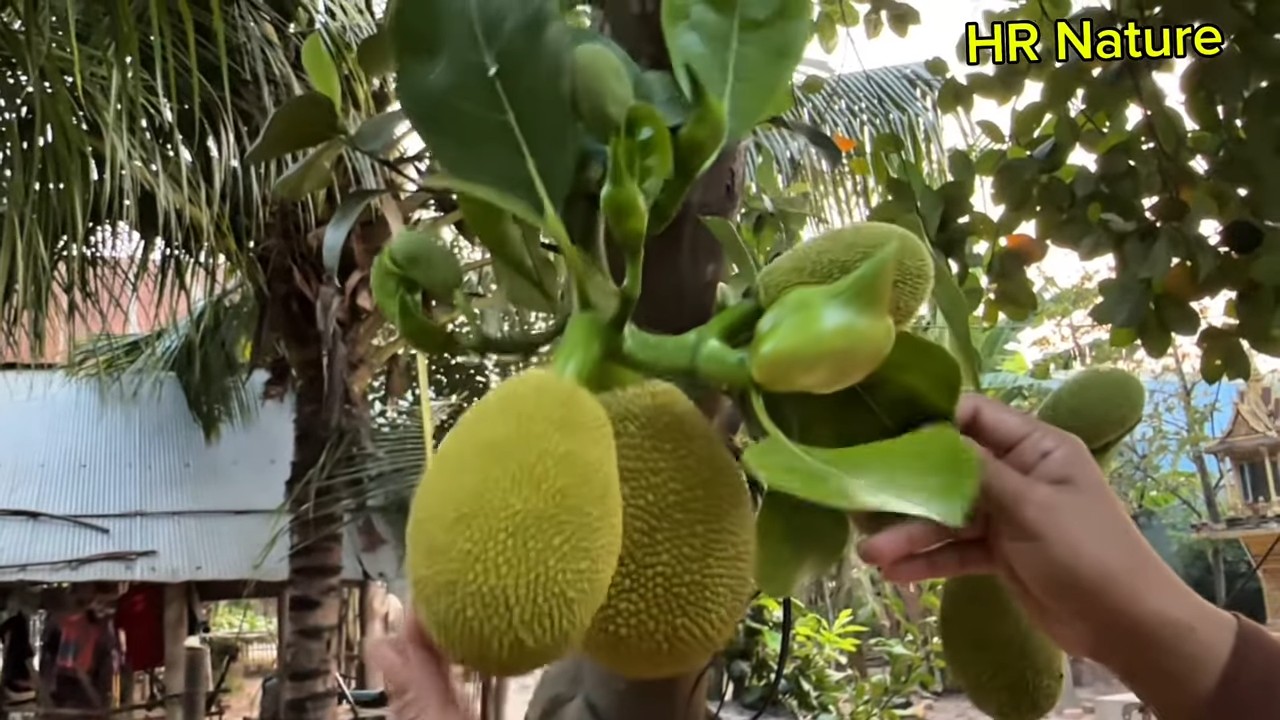
Why should you learn jackfruit grafting at home? Well, for starters, it’s a fantastic way to clone your favorite jackfruit variety. If you have a tree that produces exceptionally sweet or large fruit, grafting allows you to replicate those exact characteristics in a new tree. Plus, it’s a cost-effective way to expand your jackfruit orchard without spending a fortune on mature trees. Imagine the satisfaction of harvesting your own homegrown jackfruit, knowing you played a direct role in its creation! This DIY trick will save you time, money, and give you a deeper connection to your garden. Let’s get started!
Jackfruit-Veredelung zu Hause: Eine Schritt-für-Schritt-Anleitung
Hallo liebe Gartenfreunde! Habt ihr euch jemals gefragt, wie man die köstlichen Jackfrüchte, die man so liebt, selbst vermehren kann? Die Veredelung ist eine fantastische Methode, um genau das zu tun! Es mag anfangs etwas einschüchternd wirken, aber mit der richtigen Anleitung und etwas Geduld könnt ihr eure eigenen Jackfruchtbäume veredeln und schon bald eure eigenen Früchte ernten. Ich zeige euch heute, wie das geht.
Was ist Veredelung und warum Jackfrucht veredeln?
Die Veredelung ist im Grunde eine Art “Operation” für Pflanzen, bei der man Teile von zwei verschiedenen Pflanzen miteinander verbindet, sodass sie als eine einzige Pflanze weiterwachsen. Der Vorteil? Man kann die positiven Eigenschaften beider Pflanzen kombinieren! Bei Jackfrüchten bedeutet das, dass man einen robusten, widerstandsfähigen Wurzelstock (die untere Pflanze) mit einem Edelreis (dem oberen Teil) einer Jackfrucht-Sorte verbinden kann, die besonders leckere oder ertragreiche Früchte trägt. So erhält man einen Baum, der sowohl stark als auch produktiv ist. Außerdem ist die Veredelung oft schneller als die Vermehrung durch Samen, da man so sicherstellt, dass die neue Pflanze die gleichen Eigenschaften wie die Mutterpflanze hat.
Benötigte Materialien und Werkzeuge
Bevor wir loslegen, solltet ihr sicherstellen, dass ihr alles griffbereit habt. Hier ist eine Liste der Dinge, die ihr benötigt:
* Ein gesunder Wurzelstock: Das ist die Basis eures neuen Jackfruchtbaums. Er sollte kräftig und gesund sein. Am besten verwendet man einen Jackfrucht-Sämling, der etwa 1-2 Jahre alt ist.
* Ein Edelreis: Das ist der Teil der Pflanze, der die gewünschten Eigenschaften (z.B. leckere Früchte) trägt. Wählt einen gesunden Trieb von einem Baum, der euch gefällt. Der Trieb sollte etwa bleistiftdick sein und mehrere Knospen haben.
* Ein scharfes Veredelungsmesser oder ein Skalpell: Das ist unerlässlich für saubere Schnitte. Achtet darauf, dass es wirklich scharf ist, um die Pflanzen nicht zu quetschen.
* Veredelungsband oder -folie: Damit fixiert ihr die Veredelungsstelle und schützt sie vor dem Austrocknen.
* Baumwachs oder Wundverschlussmittel: Das dient dazu, die Schnittstellen abzudichten und vor Krankheiten zu schützen.
* Alkohol oder Desinfektionsmittel: Um eure Werkzeuge vor der Veredelung zu sterilisieren. Das verhindert die Übertragung von Krankheiten.
* Eine Sprühflasche mit Wasser: Um die Veredelungsstelle feucht zu halten.
* Handschuhe: Zum Schutz eurer Hände.
Vorbereitung ist alles: Die Vorbereitungsphase
Die richtige Vorbereitung ist entscheidend für den Erfolg eurer Veredelung. Hier sind die Schritte, die ihr beachten solltet:
1. Werkzeuge sterilisieren: Reinigt euer Veredelungsmesser oder Skalpell gründlich mit Alkohol oder Desinfektionsmittel. Das verhindert die Übertragung von Krankheiten auf die Pflanzen.
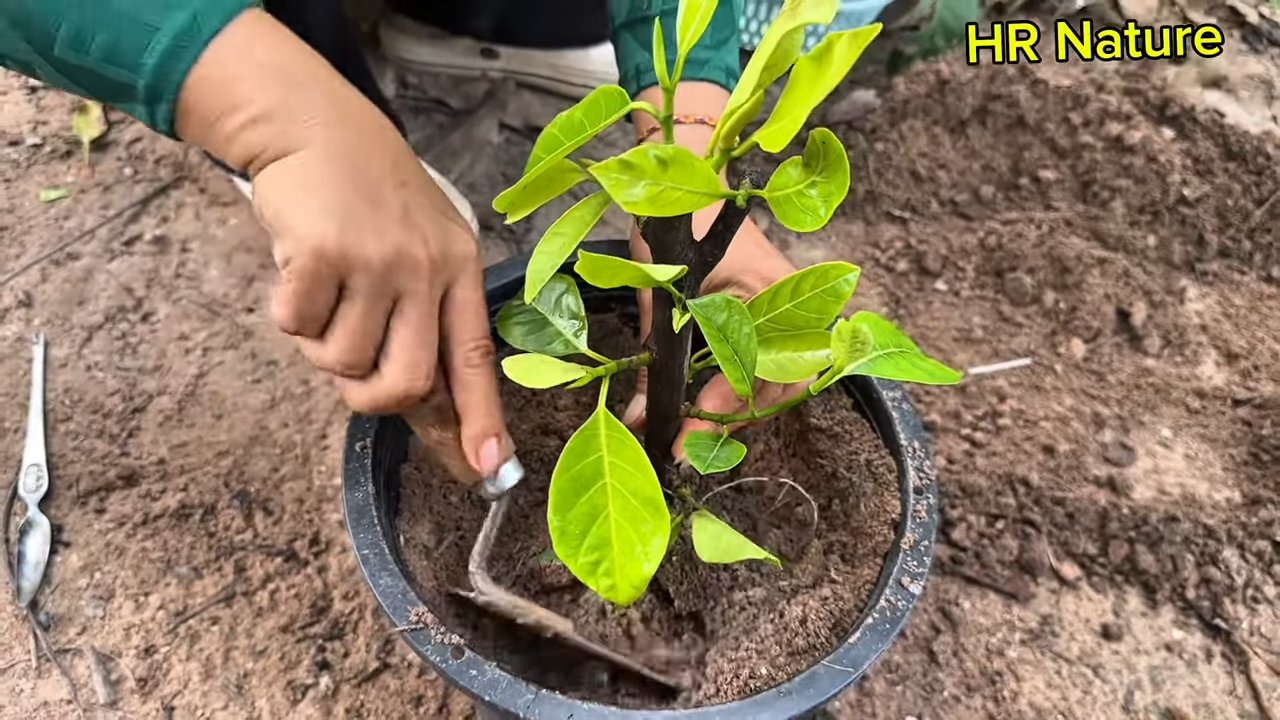
2. Den Wurzelstock vorbereiten: Wählt einen gesunden Jackfrucht-Sämling aus. Entfernt alle Blätter und Seitentriebe im unteren Bereich des Stammes, wo ihr die Veredelung durchführen wollt.
3. Das Edelreis auswählen und vorbereiten: Sucht euch einen gesunden Trieb von einem Jackfruchtbaum aus, der euch gefällt. Der Trieb sollte etwa bleistiftdick sein und mehrere Knospen haben. Schneidet den Trieb kurz vor der Veredelung ab, um ihn frisch zu halten. Entfernt die Blätter vom Edelreis, lasst aber die Blattstiele (Petiole) intakt. Diese fallen später von selbst ab und zeigen an, ob die Veredelung erfolgreich war.
Die Veredelungstechnik: Die Spaltveredelung
Es gibt verschiedene Veredelungstechniken, aber für Jackfrüchte ist die Spaltveredelung eine gute Wahl, besonders für Anfänger. Hier ist eine detaillierte Anleitung:
1. Den Wurzelstock spalten: Schneidet den Stamm des Wurzelstocks in einer Höhe von etwa 10-15 cm über dem Boden ab. Macht dann mit eurem Veredelungsmesser einen etwa 2-3 cm tiefen Spalt in die Mitte des Stammes. Achtet darauf, dass der Spalt sauber und gerade ist.
2. Das Edelreis zuschneiden: Schneidet das untere Ende des Edelreises keilförmig zu. Die beiden Seiten des Keils sollten gleichmäßig sein und etwa 2-3 cm lang. Achtet darauf, dass die Knospen am Edelreis nicht beschädigt werden.
3. Das Edelreis einsetzen: Spreizt den Spalt im Wurzelstock vorsichtig auf und setzt das Edelreis so ein, dass die Kambiumschichten (die grünen Schichten direkt unter der Rinde) von Edelreis und Wurzelstock möglichst gut aufeinander liegen. Das ist entscheidend für den Erfolg der Veredelung.
4. Die Veredelungsstelle fixieren: Wickelt die Veredelungsstelle fest mit Veredelungsband oder -folie ein. Achtet darauf, dass die gesamte Schnittfläche bedeckt ist und das Edelreis fest im Spalt sitzt.
5. Die Schnittstellen versiegeln: Tragt Baumwachs oder Wundverschlussmittel auf alle offenen Schnittflächen auf, um sie vor dem Austrocknen und vor Krankheiten zu schützen.
Nach der Veredelung: Die Pflege
Nach der Veredelung ist es wichtig, die Pflanze gut zu pflegen, damit sie anwächst. Hier sind einige Tipps:
1. Feuchtigkeit bewahren: Besprüht die Veredelungsstelle regelmäßig mit Wasser, um sie feucht zu halten. Vermeidet aber Staunässe.
2. Schatten spenden: Stellt die veredelte Pflanze an einen schattigen Ort, um sie vor direkter Sonneneinstrahlung zu schützen.
3. Geduld haben: Es kann einige Wochen dauern, bis das Edelreis anwächst. Beobachtet die Pflanze genau. Wenn die Blattstiele am Edelreis abfallen und neue Triebe erscheinen, ist die Veredelung erfolgreich.
4. Das Veredelungsband entfernen: Sobald das Edelreis gut angewachsen ist (nach etwa 6-8 Wochen), könnt ihr das Veredelungsband vorsichtig entfernen. Achtet darauf, die junge Veredelungsstelle nicht zu beschädigen.
5. Weiterhin pflegen: Gießt und düngt die Pflanze regelmäßig, um ihr Wachstum zu fördern. Schützt sie vor Schädlingen und Krankheiten.
Häufige Fehler und wie man sie vermeidet
Auch bei sorgfältiger Arbeit kann es zu Fehlern kommen. Hier sind einige häufige Fehler und wie ihr sie vermeiden könnt:
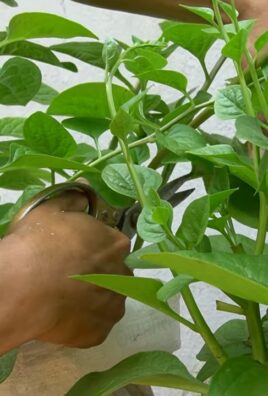
* Unsaubere Schnitte: Verwendet immer ein scharfes Veredelungsmesser oder Skalpell, um saubere Schnitte zu machen. Stumpfe Werkzeuge quetschen das Gewebe und erschweren das Anwachsen.
* Schlechter Kontakt der Kambiumschichten: Achtet darauf, dass die Kambiumschichten von Edelreis und Wurzelstock möglichst gut aufeinander liegen. Das ist entscheidend für den Erfolg der Veredelung.
* Austrocknung der Veredelungsstelle: Wickelt die Veredelungsstelle fest mit Veredelungsband oder -folie ein und versiegelt die Schnittflächen mit Baumwachs oder Wundverschlussmittel. Besprüht die Veredelungsstelle regelmäßig mit Wasser.
* Infektionen: Sterilisiert eure Werkzeuge vor der Veredelung, um die Übertragung von Krankheiten zu verhindern.
* Ungeduld: Gebt der Pflanze Zeit, um anzuwachsen. Es kann einige Wochen dauern, bis das Edelreis austreibt.
Zusätzliche Tipps für den Erfolg
* Der richtige Zeitpunkt: Die beste Zeit für die Jackfrucht-Veredelung ist in der Wachstumsperiode, also im Frühjahr oder Sommer.
* Die richtige Sorte: Informiert euch über die verschiedenen Jackfrucht-Sorten und wählt eine Sorte, die euch schmeckt und die gut an eurem Standort wächst.
* Übung macht den Meister: Scheut euch nicht, zu üben. Je öfter ihr veredelt, desto besser werdet ihr darin.
Ich hoffe, diese Anleitung hilft euch dabei, eure eigenen Jack
Conclusion
So, there you have it! Mastering jackfruit grafting at home isn’t just a fun gardening project; it’s a gateway to enjoying consistently delicious and high-quality fruit right from your own backyard. We’ve walked you through the process, highlighting the key steps and considerations to ensure your success. But why is this DIY trick a must-try?
Firstly, grafting allows you to bypass the often unpredictable nature of seed-grown jackfruit. You’re essentially cloning a tree that already produces fruit with desirable characteristics – superior taste, size, texture, and disease resistance. This means you can be confident that your new tree will inherit these qualities, saving you years of waiting and potential disappointment. Imagine biting into a perfectly ripe, sweet jackfruit that you nurtured from a small graft!
Secondly, grafting can significantly shorten the time it takes for your jackfruit tree to bear fruit. Seed-grown trees can take anywhere from five to seven years (or even longer) to produce their first crop. Grafted trees, on the other hand, often start fruiting within two to three years, allowing you to enjoy the fruits of your labor much sooner. This is a huge advantage for impatient gardeners (like many of us!).
Thirdly, grafting offers a unique opportunity to experiment and create your own custom jackfruit varieties. You can graft different scions onto a single rootstock, potentially resulting in a tree that produces a variety of jackfruit types. This is a fantastic way to diversify your harvest and impress your friends and neighbors with your horticultural skills.
But the benefits don’t stop there. Grafting can also improve the overall health and vigor of your jackfruit tree. By selecting a strong and disease-resistant rootstock, you can create a tree that is better able to withstand pests, diseases, and harsh environmental conditions. This can lead to a longer lifespan and a more productive tree overall.
Now, let’s talk about variations and suggestions. While we’ve focused on cleft grafting, other grafting techniques, such as side veneer grafting or approach grafting, can also be used for jackfruit. Experiment with different methods to see which one works best for you. You can also try grafting different jackfruit varieties onto the same rootstock to create a multi-variety tree. Consider using rootstocks that are known for their disease resistance and adaptability to your local climate.
Remember to always use clean and sharp tools to prevent the spread of diseases. Sterilize your grafting knife with alcohol before and after each use. Wrap the graft union tightly with grafting tape to ensure proper contact between the scion and the rootstock. And most importantly, be patient! Grafting takes time and practice. Don’t be discouraged if your first attempt isn’t successful. Keep trying, and you’ll eventually master the art of jackfruit grafting.
We are confident that with a little patience and practice, you can successfully perform **jackfruit grafting at home** and enjoy the rewards of your efforts. So, grab your grafting knife, select your scion and rootstock, and get ready to embark on this exciting gardening adventure.
We encourage you to try this DIY trick and share your experience with us. Post photos of your grafted jackfruit trees on social media using the hashtag #JackfruitGraftingDIY. We can’t wait to see your success stories! Happy grafting!
Frequently Asked Questions (FAQ)
What is the best time of year to graft jackfruit?
The ideal time for jackfruit grafting is typically during the late winter or early spring, just before the tree begins to actively grow. This is when the sap flow is increasing, which promotes better healing and union formation between the scion and the rootstock. Avoid grafting during periods of extreme heat or cold, as these conditions can negatively impact the success rate. In tropical climates with consistent temperatures, grafting can be attempted year-round, but monitoring weather conditions is crucial.
What type of rootstock should I use for jackfruit grafting?
The choice of rootstock is crucial for the success of jackfruit grafting. Ideally, you should use a seedling jackfruit tree that is healthy, vigorous, and disease-resistant. The rootstock should also be well-adapted to your local climate and soil conditions. Common rootstock options include seedlings of local jackfruit varieties known for their hardiness. Ensure the rootstock is compatible with the scion variety you intend to graft. Local agricultural extension offices can provide recommendations on suitable rootstocks for your region.
How do I select a good scion for jackfruit grafting?
A scion is a shoot that is taken from a desirable jackfruit tree and grafted onto the rootstock. Choose a scion that is healthy, disease-free, and from a tree that produces high-quality fruit with the characteristics you desire (e.g., sweetness, size, texture). The scion should be about the same diameter as the rootstock and should have several healthy buds. Collect scions from actively growing branches, ideally from the terminal portions. Store the scions in a cool, moist environment until you are ready to graft.
What tools do I need for jackfruit grafting?
You will need the following tools for jackfruit grafting:
* A sharp grafting knife: This is essential for making clean, precise cuts.
* Pruning shears: For trimming branches and preparing the rootstock.
* Grafting tape or budding tape: To secure the graft union and protect it from drying out.
* Rubbing alcohol or bleach solution: To sterilize your tools and prevent the spread of diseases.
* Grafting wax (optional): To seal the graft union and provide additional protection.
* A small saw (optional): For cutting larger branches.
* Gloves: To protect your hands.
How do I care for the grafted jackfruit tree after grafting?
After grafting, it is important to provide proper care to the grafted jackfruit tree to ensure its survival and growth. Keep the graft union wrapped with grafting tape until it has healed completely. Protect the grafted tree from direct sunlight and strong winds. Water the tree regularly, but avoid overwatering. Fertilize the tree with a balanced fertilizer to promote healthy growth. Monitor the tree for pests and diseases and take appropriate action if necessary. Remove any suckers that grow from the rootstock below the graft union.
How long does it take for a grafted jackfruit tree to bear fruit?
Grafted jackfruit trees typically start bearing fruit within two to three years after grafting, which is significantly faster than seed-grown trees. However, the exact time can vary depending on the variety of jackfruit, the growing conditions, and the overall health of the tree. Provide proper care and maintenance to the tree to encourage early fruiting.
What if my jackfruit graft fails?
Grafting is not always successful, and sometimes grafts can fail. If your jackfruit graft fails, don’t be discouraged. There are several reasons why a graft might fail, including incompatibility between the scion and the rootstock, improper grafting technique, disease, or unfavorable environmental conditions. You can try grafting again using a different scion or rootstock, or you can try a different grafting technique. Practice makes perfect, so keep trying until you succeed.
Can I graft different varieties of jackfruit onto the same tree?
Yes, you can graft different varieties of jackfruit onto the same tree. This is called multi-grafting and can be a great way to diversify your harvest and enjoy a variety of jackfruit types from a single tree. However, it is important to ensure that the different varieties are compatible with each other and with the rootstock. Choose varieties that have similar growth habits and disease resistance.
How do I protect my grafted jackfruit tree from pests and diseases?
Protecting your grafted jackfruit tree from pests and diseases is essential for its long-term health and productivity. Regularly inspect the tree for signs of pests or diseases, such as leaf spots, fruit rot, or insect infestations. Take appropriate action to control pests and diseases, such as spraying with organic pesticides or fungicides. Provide proper nutrition and water to the tree to strengthen its natural defenses. Prune the tree regularly to improve air circulation and reduce the risk of disease.
Where can I find more information about jackfruit grafting?
There are many resources available online and in print that can provide more information about jackfruit grafting. Consult with your local agricultural extension office, university extension program, or gardening club for advice and guidance. You can also find helpful information on websites and in books dedicated to fruit tree grafting and propagation. Don’t hesitate to ask experienced gardeners or fruit growers for tips and advice.

Leave a Comment