
Indoor Snap Pea Harvest: Imagine plucking crisp, sweet snap peas right from your living room, even when the snow is falling outside! Sounds like a dream, right? Well, it doesn’t have to be! For centuries, humans have cultivated food in innovative ways, from ancient rooftop gardens in Babylon to the modern-day vertical farms. But you don’t need to be an ancient king or a tech mogul to enjoy fresh, homegrown produce year-round.
This DIY guide is your passport to a bountiful indoor snap pea harvest. Forget those bland, store-bought snap peas that lack that satisfying crunch and burst of flavor. I’m going to show you simple, effective tricks and hacks to successfully grow and harvest your own delicious snap peas indoors. Whether you’re a seasoned gardener or a complete newbie, this article will equip you with the knowledge and confidence to create your own miniature edible oasis.
Why is this so important? Because access to fresh, healthy food shouldn’t be limited by the seasons or your location. Plus, there’s something incredibly rewarding about nurturing a plant from seed to table. So, let’s ditch the winter blues and get our hands dirty (or, well, potting mix-y) and embark on this exciting indoor gardening adventure together!
Growing Snap Peas Indoors: A Bountiful Harvest Year-Round!
Hey there, fellow gardening enthusiasts! Ever dreamt of enjoying fresh, crisp snap peas even when the snow is falling outside? Well, dream no more! I’m going to walk you through the process of growing snap peas indoors, so you can have a delicious harvest right at your fingertips, no matter the season. It’s easier than you might think, and the reward of popping those sweet pods straight from the vine is absolutely worth it.
Choosing the Right Snap Pea Variety
First things first, not all snap pea varieties are created equal when it comes to indoor growing. We need to pick ones that are compact and don’t require a massive trellis. Here are a few of my favorites:
* ‘Sugar Ann’: This is a bush variety, meaning it stays relatively short and doesn’t need a huge amount of support. It’s also super early, so you’ll be munching on peas in no time!
* ‘Sugar Baby’: Another great bush variety, ‘Sugar Baby’ produces sweet, plump pods. It’s known for its disease resistance, which is always a plus when growing indoors.
* ‘Tom Thumb’: This is a dwarf variety, perfect for small spaces. It only grows about 8 inches tall, so it’s ideal for containers on a windowsill.
Gathering Your Supplies
Okay, now that we’ve got our variety sorted, let’s gather the tools and materials we’ll need. Here’s a checklist:
* Snap Pea Seeds: Obviously! Make sure they’re fresh for the best germination rate.
* Containers: Choose pots that are at least 6 inches deep and wide. Good drainage is crucial, so make sure they have drainage holes. I prefer using fabric pots, as they allow for better aeration and prevent root circling.
* Potting Mix: Use a high-quality, well-draining potting mix. Avoid using garden soil, as it can compact and not drain well in containers.
* Grow Lights (Optional but Recommended): While snap peas can grow indoors with natural light, they’ll thrive with supplemental grow lights, especially during the shorter days of winter.
* Trellis or Support System: Even bush varieties benefit from some support. You can use small trellises, bamboo stakes, or even just some string tied to the top of the container.
* Watering Can or Spray Bottle: For gentle watering.
* Fertilizer: A balanced liquid fertilizer formulated for vegetables.
* Seed Starting Tray (Optional): For starting seeds indoors before transplanting.
Planting Your Snap Pea Seeds
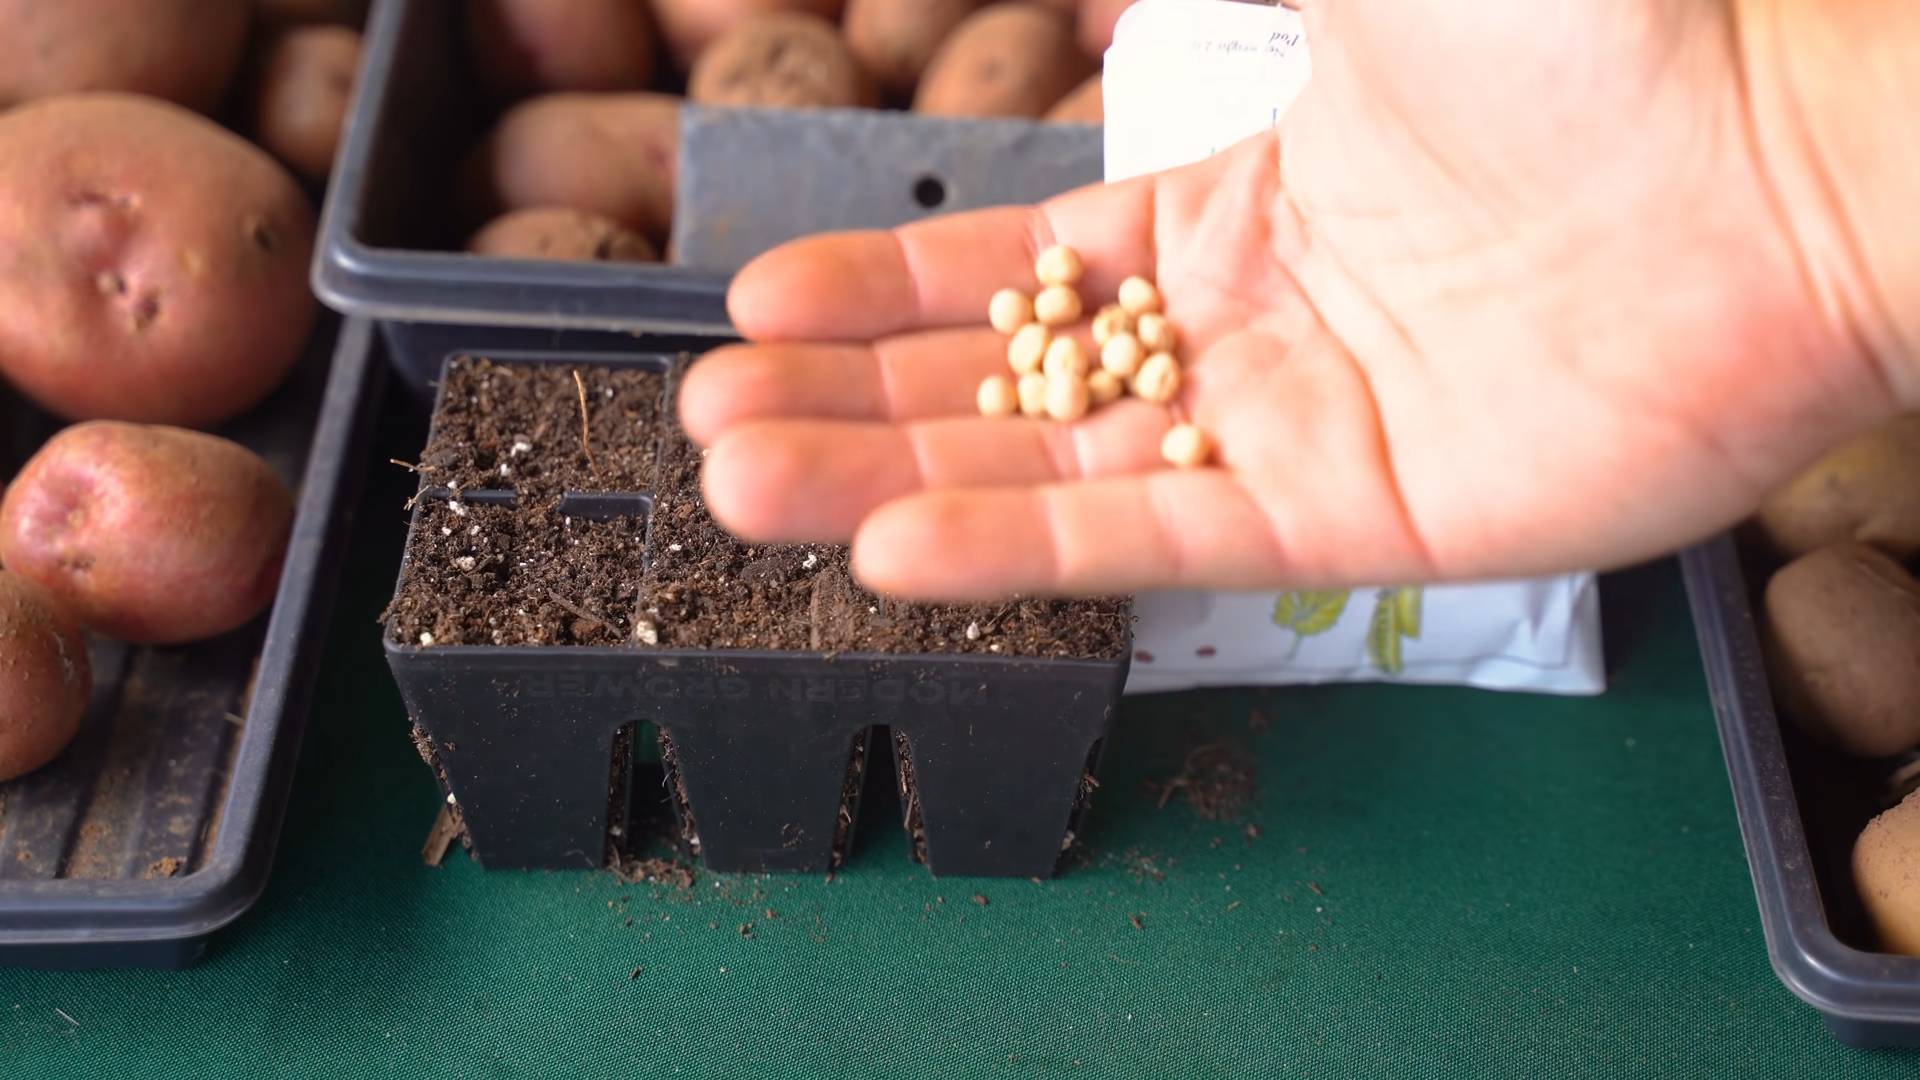
Now for the fun part – planting! You can either direct sow your seeds into the containers or start them in a seed starting tray. I usually prefer starting them in a tray, as it gives them a head start and allows me to select the strongest seedlings.
Starting Seeds in a Seed Starting Tray (Optional)
1. Fill the Tray: Fill your seed starting tray with potting mix, leaving about half an inch of space at the top.
2. Moisten the Soil: Gently water the soil until it’s evenly moist but not soggy.
3. Sow the Seeds: Plant 2-3 seeds per cell, about 1 inch deep.
4. Cover the Seeds: Lightly cover the seeds with potting mix.
5. Water Again: Gently water the soil again.
6. Provide Light: Place the tray under grow lights or in a sunny window.
7. Keep Moist: Keep the soil consistently moist but not waterlogged.
8. Wait for Germination: Germination usually takes 7-14 days.
Direct Sowing into Containers
1. Fill the Container: Fill your container with potting mix, leaving about an inch of space at the top.
2. Moisten the Soil: Gently water the soil until it’s evenly moist but not soggy.
3. Sow the Seeds: Plant 4-5 seeds per container, about 1 inch deep and spaced evenly apart.
4. Cover the Seeds: Lightly cover the seeds with potting mix.
5. Water Again: Gently water the soil again.
6. Provide Light: Place the container under grow lights or in a sunny window.
7. Keep Moist: Keep the soil consistently moist but not waterlogged.
8. Thin Seedlings: Once the seedlings emerge, thin them to 2-3 plants per container, selecting the strongest ones.
Caring for Your Indoor Snap Peas
Once your snap peas have sprouted, it’s time to provide them with the care they need to thrive.
1. Light: Snap peas need at least 6-8 hours of sunlight per day. If you’re not getting enough natural light, supplement with grow lights. Position the lights a few inches above the plants and adjust as they grow.
2. Watering: Water your snap peas regularly, keeping the soil consistently moist but not soggy. Check the soil moisture by sticking your finger about an inch into the soil. If it feels dry, it’s time to water. Avoid overwatering, as this can lead to root rot.
3. Fertilizing: Feed your snap peas with a balanced liquid fertilizer every 2-3 weeks. Follow the instructions on the fertilizer label.
4. Support: As your snap peas grow, they’ll need support. Install a small trellis, bamboo stakes, or string to help them climb. Gently guide the vines onto the support system.
5. Temperature: Snap peas prefer cooler temperatures, ideally between 60-70°F (15-21°C). Avoid placing them near heat sources, such as radiators.
6. Air Circulation: Good air circulation is important to prevent fungal diseases. Make sure your plants have enough space between them and consider using a small fan to circulate the air.
7. Pest Control: Keep an eye out for pests, such as aphids and spider mites. If you spot any, treat them with insecticidal soap or neem oil.
Pollinating Your Snap Peas
Snap peas are self-pollinating, meaning they don’t need bees or other insects to pollinate them. However, indoor plants may benefit from a little help.
1. Hand Pollination: Use a small paintbrush or cotton swab to gently transfer pollen from one flower to another. Do this in the morning when the pollen is dry.
2. Shake the Plants: Gently shake the plants to release pollen.
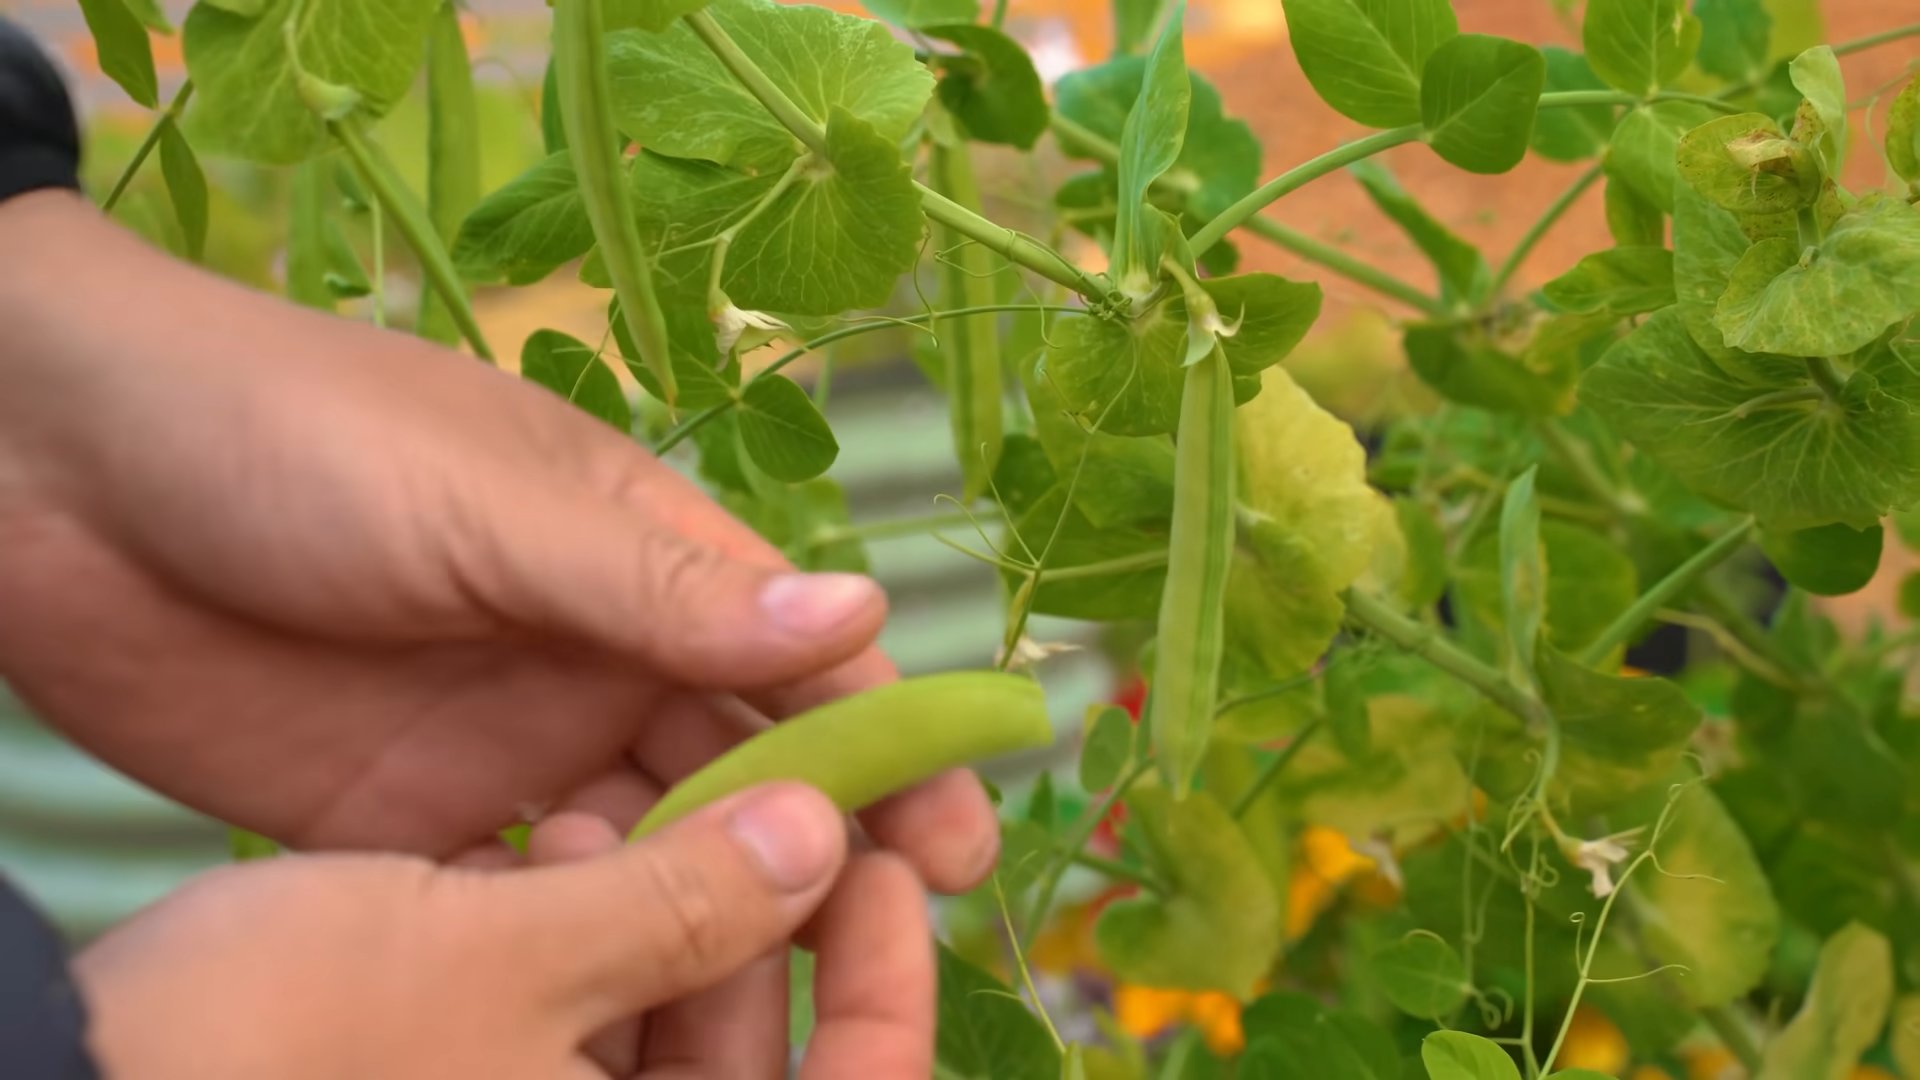
Harvesting Your Snap Peas
The moment we’ve all been waiting for – harvesting! Snap peas are usually ready to harvest about 60-70 days after planting.
1. Check for Readiness: The pods should be plump and filled with peas, but still tender.
2. Harvest Regularly: Harvest your snap peas regularly to encourage more production.
3. Pick Carefully: Use scissors or your fingers to gently snap the pods off the vine.
4. Enjoy Fresh: Eat your snap peas fresh, or store them in the refrigerator for a few days.
Troubleshooting Common Problems
Even with the best care, you might encounter some problems while growing snap peas indoors. Here are a few common issues and how to address them:
* Yellowing Leaves: This could be a sign of overwatering, underwatering, or nutrient deficiency. Check the soil moisture and adjust your watering accordingly. Fertilize your plants with a balanced liquid fertilizer.
* Lack of Flowers: This could be due to insufficient light or temperature stress. Make sure your plants are getting enough light and that the temperature is within the ideal range.
* Powdery Mildew: This is a fungal disease that appears as a white, powdery coating on the leaves. Improve air circulation and treat with a fungicide.
* Aphids: These small, sap-sucking insects can weaken your plants. Treat with insecticidal soap or neem oil.
Extending Your Harvest
Want to keep the snap pea party going? Here are a few tips for extending your harvest:
* Succession Planting: Plant new seeds every few weeks to ensure a continuous supply of snap peas.
* Choose Early Varieties: As mentioned earlier, early varieties like ‘Sugar Ann’ will give you a head start on the harvest.
* Provide Optimal Conditions: Make sure your plants are getting enough light, water, and nutrients.
* Harvest Regularly: Regular harvesting encourages more production.
Enjoying Your Homegrown Snap Peas
Now that you’ve successfully grown and harvested your own snap peas indoors, it’s time to enjoy the fruits (or rather, vegetables) of your labor! Here are a few ideas:
* Eat them fresh: Snap peas are delicious eaten straight from the vine.
* Add them to salads: They add a crunchy and sweet element to salads.
*
Conclusion
So, there you have it! Cultivating your own indoor snap pea harvest is not just a fun project; it’s a gateway to fresh, crisp, and utterly delicious snap peas right at your fingertips, regardless of the season. Forget those limp, flavorless snap peas from the grocery store – imagine the vibrant sweetness of homegrown, organically nurtured pods bursting in your mouth. This DIY trick is a must-try for anyone seeking a sustainable, rewarding, and incredibly tasty addition to their kitchen garden.
But why is this method so compelling? It’s about more than just convenience. It’s about control. You control the soil, the light, the water, and ultimately, the quality of your harvest. You know exactly what’s going into your food, ensuring a healthy and wholesome treat for you and your family. Plus, the sheer joy of watching those tiny seeds sprout and transform into a thriving vine laden with edible treasures is an experience that’s hard to beat.
Don’t be afraid to experiment! Consider different varieties of snap peas to find your favorite flavor profile. Some are sweeter, some are crunchier, and some are more prolific than others. You can also play around with different support structures for your vines. While a simple trellis works wonders, you might explore creating a more elaborate vertical garden for a stunning visual display.
Another variation to consider is companion planting. Try planting herbs like basil or mint alongside your snap peas. These herbs can help deter pests and even enhance the flavor of your peas. Marigolds are also a great addition, known for their pest-repelling properties.
And if you’re feeling adventurous, why not try succession planting? Start a new batch of seeds every few weeks to ensure a continuous harvest throughout the growing season. This way, you’ll always have a supply of fresh snap peas on hand for salads, stir-fries, or simply snacking.
We wholeheartedly encourage you to embark on this indoor gardening adventure. It’s easier than you might think, and the rewards are immeasurable. The satisfaction of harvesting your own food, the delicious taste of fresh snap peas, and the knowledge that you’re contributing to a more sustainable lifestyle – it all adds up to a truly worthwhile experience.
So, grab your seeds, prepare your soil, and get ready to witness the magic of indoor snap pea cultivation. And most importantly, don’t forget to share your experiences with us! We’d love to hear about your successes, your challenges, and any tips or tricks you discover along the way. Share your photos, your stories, and your delicious snap pea recipes. Let’s create a community of indoor gardeners and inspire others to embrace the joy of growing their own food. Your journey to a bountiful indoor snap pea harvest starts now!
Frequently Asked Questions (FAQ)
What is the best time of year to start growing snap peas indoors?
The beauty of indoor gardening is that you’re not limited by the seasons! You can start growing snap peas indoors any time of year. However, keep in mind that snap peas need adequate light to thrive. If you’re starting them during the darker months, you’ll likely need to supplement with grow lights to ensure they get enough energy for healthy growth and pod production. Aim for at least 6-8 hours of light per day.
What kind of soil should I use for growing snap peas indoors?
Snap peas prefer well-draining soil that is rich in organic matter. A good potting mix specifically formulated for vegetables is ideal. You can also create your own mix by combining equal parts of potting soil, compost, and perlite or vermiculite. The compost will provide essential nutrients, while the perlite or vermiculite will improve drainage and aeration. Avoid using garden soil, as it can be too heavy and may contain pests or diseases.
How often should I water my indoor snap peas?
Water your snap peas regularly, keeping the soil consistently moist but not waterlogged. Check the soil moisture by sticking your finger about an inch deep. If it feels dry, it’s time to water. Avoid overwatering, as this can lead to root rot. The frequency of watering will depend on factors such as the size of your container, the temperature, and the humidity levels in your home.
What kind of support system do snap peas need?
Snap peas are climbing plants, so they need a support system to grow vertically. A simple trellis, made of bamboo stakes or netting, works well. You can also use a tomato cage or create your own support structure using wire or twine. The key is to provide something for the vines to grab onto as they grow. Make sure the support system is sturdy enough to support the weight of the mature vines and the developing pods.
How long does it take for snap peas to mature and produce pods?
Snap peas typically take about 60-70 days to mature and produce pods. However, this can vary depending on the variety of snap pea, the growing conditions, and the amount of light they receive. You can start harvesting the pods when they are plump and the peas inside are well-developed but not too large. Regular harvesting will encourage the plant to produce more pods.
What are some common pests and diseases that affect snap peas?
Common pests that can affect snap peas include aphids, spider mites, and pea weevils. Aphids and spider mites can be controlled with insecticidal soap or neem oil. Pea weevils can be more challenging to manage, but you can try hand-picking them off the plants or using a pyrethrin-based insecticide. Common diseases that can affect snap peas include powdery mildew and root rot. Powdery mildew can be prevented by ensuring good air circulation and avoiding overhead watering. Root rot can be prevented by using well-draining soil and avoiding overwatering.
Can I grow snap peas in containers? What size container is best?
Yes, snap peas are well-suited for container gardening. Choose a container that is at least 6-8 inches deep and wide to allow for adequate root growth. Make sure the container has drainage holes to prevent waterlogging. You can grow multiple snap pea plants in a larger container, but be sure to space them adequately to allow for good air circulation.
How do I know when my snap peas are ready to harvest?
Snap peas are ready to harvest when the pods are plump and the peas inside are well-developed but not too large. The pods should be firm and crisp, not soft or mushy. You can also taste a pod to see if it’s ready. It should be sweet and crunchy. Harvest the pods regularly to encourage the plant to produce more.
Can I save seeds from my indoor snap pea harvest?
Yes, you can save seeds from your indoor snap pea harvest, but keep in mind that the resulting plants may not be true to type, especially if you’re growing hybrid varieties. To save seeds, allow some of the pods to mature fully on the vine until they are dry and brown. Then, shell the pods and collect the seeds. Store the seeds in a cool, dry place until you’re ready to plant them.
My snap peas are flowering but not producing pods. What could be the problem?
There are several reasons why your snap peas might be flowering but not producing pods. One common reason is lack of pollination. While snap peas are self-pollinating, they may need some help, especially indoors. Try gently shaking the plants or using a small brush to transfer pollen from one flower to another. Another reason could be nutrient deficiencies. Make sure your plants are getting enough phosphorus and potassium, which are essential for flower and pod development. Finally, extreme temperatures can also affect pod production. Snap peas prefer cooler temperatures, so if your home is too hot, it could inhibit pod formation.

Leave a Comment