
Indoor Mushroom Bucket Growing: Sounds like something out of a sci-fi movie, right? But trust me, it’s a surprisingly simple and rewarding DIY project that can bring the earthy goodness of fresh mushrooms right into your home! Forget those bland, store-bought fungi – imagine harvesting your own flavorful, organic mushrooms just steps from your kitchen.
Mushrooms have been revered for centuries across various cultures, not just for their culinary uses but also for their medicinal properties. From ancient Chinese remedies to traditional European cuisine, mushrooms hold a special place in human history. Now, you can tap into that rich heritage and cultivate your own little mushroom kingdom.
Why should you try indoor mushroom bucket growing? Well, for starters, it’s incredibly satisfying to nurture something from start to finish. Plus, it’s a fantastic way to reduce your grocery bill and enjoy fresh, healthy food. But perhaps the biggest reason is the sheer joy of witnessing the magic of mushroom growth – it’s a fascinating process that will captivate you from the moment you inoculate your bucket. I’m excited to share some easy-to-follow steps and tips that will help you successfully grow mushrooms in a bucket, even if you’ve never gardened before. Let’s get started!
Grow Your Own Gourmet Mushrooms Indoors: A Bucket Bonanza!
Hey there, fellow fungi fanatics! Ever dreamt of harvesting your own delicious mushrooms right in your home? Well, stop dreaming and start doing! This guide will walk you through the surprisingly simple process of growing mushrooms in a bucket. It’s a fun, rewarding, and space-saving project that will have you enjoying fresh, homegrown mushrooms in no time. Let’s get started!
What You’ll Need: The Mushroom Grower’s Toolkit
Before we dive in, let’s gather our supplies. Don’t worry, you probably have a lot of this stuff already!
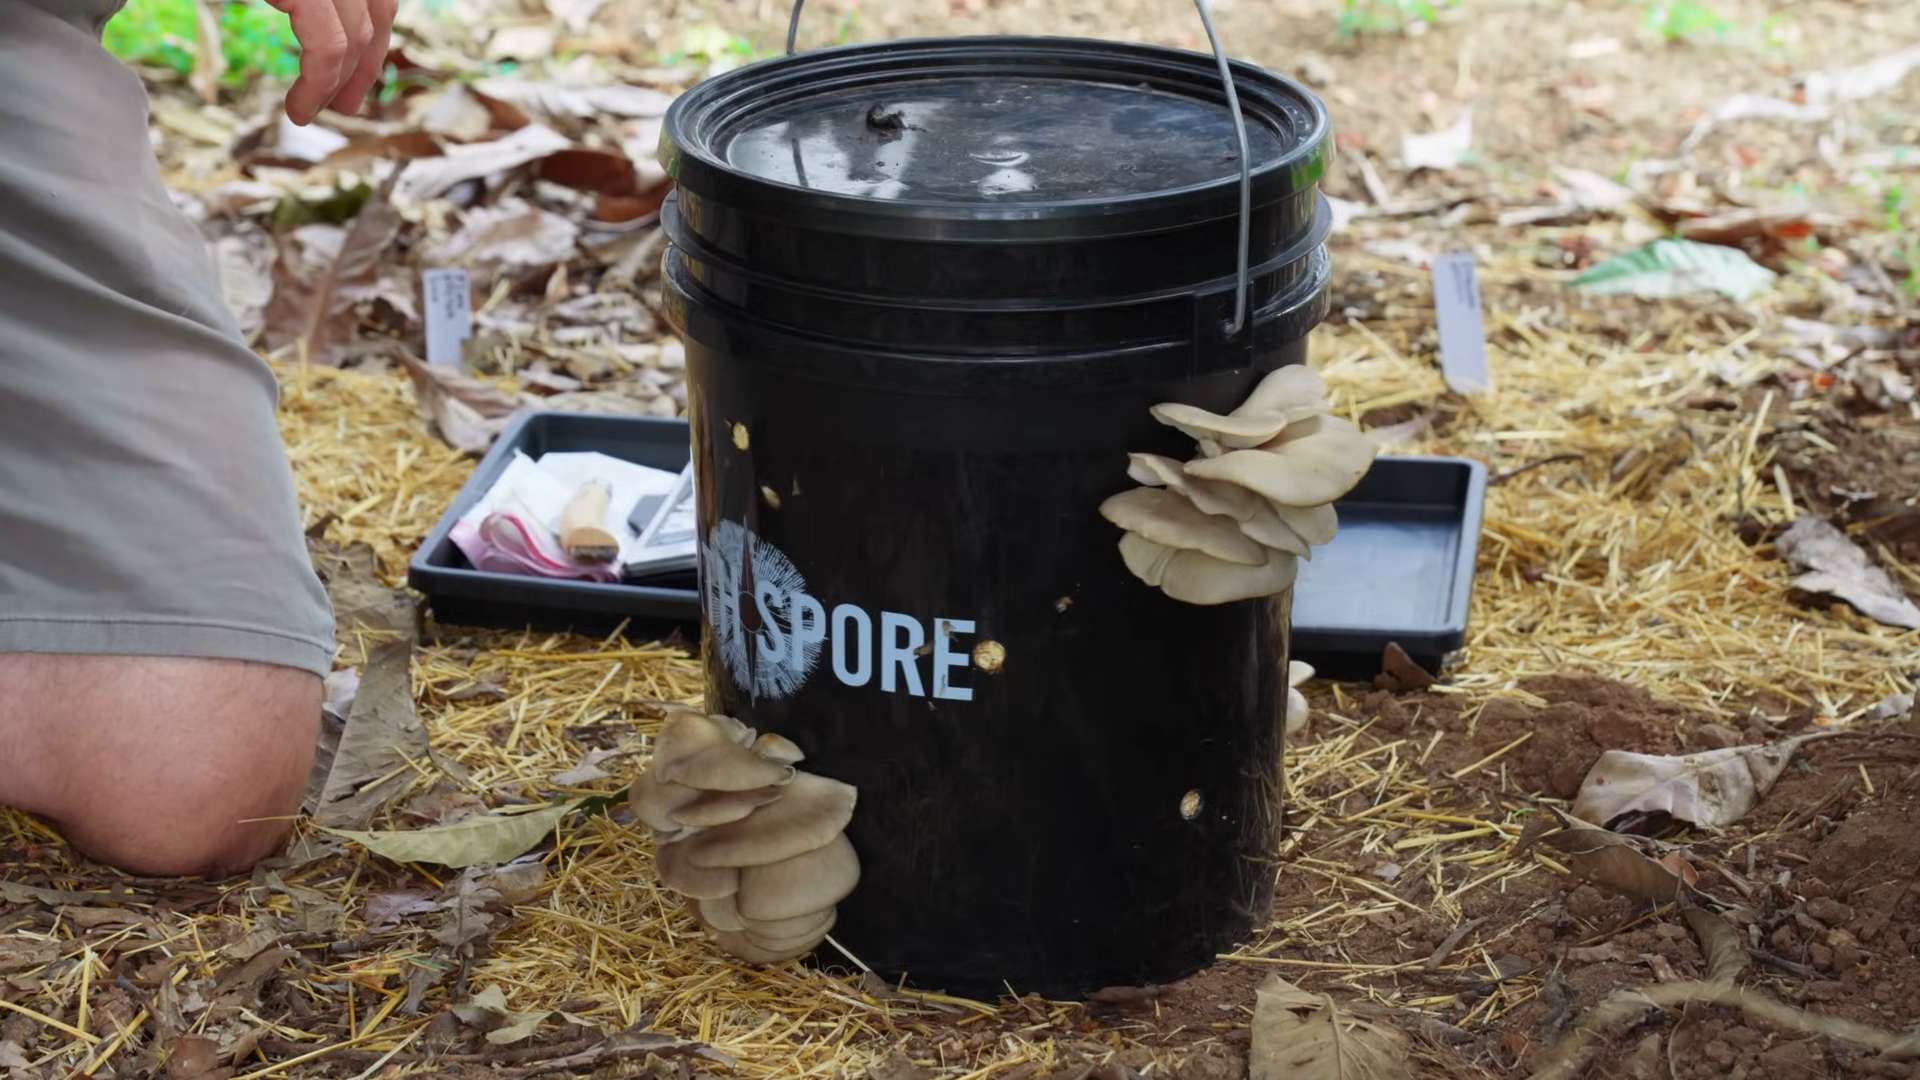
* A 5-Gallon Bucket: This is your mushroom kingdom! Make sure it’s clean and food-grade.
* Mushroom Spawn: This is the “seed” of your mushrooms. Oyster mushrooms are a great choice for beginners because they’re relatively easy to grow and tolerate a wider range of conditions. You can find spawn online or at your local garden center.
* Substrate: This is the food source for your mushrooms. Straw is a popular and readily available option. You can also use hardwood sawdust, but straw is generally easier to work with for beginners.
* Lime: This helps to pasteurize the straw and prevent contamination. Hydrated lime (also known as builder’s lime) is what you need.
* Large Pot or Tub: For pasteurizing the straw.
* Drill with a 1/4-inch Drill Bit: To create drainage and fruiting holes in the bucket.
* Spray Bottle: For misting the mushrooms.
* Gloves: To keep things sanitary.
* Measuring Cup or Scale: For accurate measurements.
* Thermometer: To monitor the temperature of the pasteurization process.
* Optional: A clear plastic bag or humidity tent to help maintain moisture.
Phase 1: Preparing the Substrate – Straw Pasteurization
This is arguably the most crucial step. Pasteurization kills off competing organisms that could prevent your mushrooms from growing. We’re not sterilizing (which would kill everything, including beneficial microbes), just reducing the competition.
1. Chop the Straw: Cut the straw into smaller pieces, about 2-4 inches long. This makes it easier to pack into the bucket and allows the mushroom mycelium to colonize it more effectively. I like to use garden shears or even a lawnmower (carefully!) to chop the straw.
2. Lime Bath Preparation: In your large pot or tub, mix water and hydrated lime. The ratio is typically 1 tablespoon of hydrated lime per gallon of water. For a 5-gallon bucket, I usually use about 3-4 gallons of water. Stir well to dissolve the lime. Safety First! Wear gloves and eye protection when handling hydrated lime, as it can be irritating to the skin and eyes.
3. Soak the Straw: Submerge the chopped straw in the lime water. Make sure all the straw is completely covered. You might need to weigh it down with a brick or a heavy object to keep it submerged.
4. Pasteurization Time: Let the straw soak in the lime water for 12-18 hours. This allows the lime to raise the pH of the straw, killing off unwanted microorganisms. I usually do this overnight.
5. Drain the Straw: After soaking, drain the straw thoroughly. You want it to be moist but not dripping wet. I usually spread it out on a clean surface (like a tarp or a clean concrete floor) and let it air dry for a few hours. The straw should feel like a wrung-out sponge.
Phase 2: Preparing the Bucket – Drilling for Success
Now, let’s get our bucket ready for its mushroom-growing duties.
1. Drill Drainage Holes: Using your drill and 1/4-inch drill bit, drill drainage holes in the bottom of the bucket. Space them about 2-3 inches apart. These holes will prevent the substrate from becoming waterlogged.
2. Drill Fruiting Holes: Drill fruiting holes around the sides of the bucket. These are where the mushrooms will eventually emerge. Space them about 4-6 inches apart, in a staggered pattern. I usually drill about 10-15 fruiting holes per bucket.
Phase 3: Layering and Inoculating – Building Your Mushroom Kingdom
This is where the magic happens! We’ll be layering the pasteurized straw and mushroom spawn in the bucket, creating the perfect environment for mushroom growth.
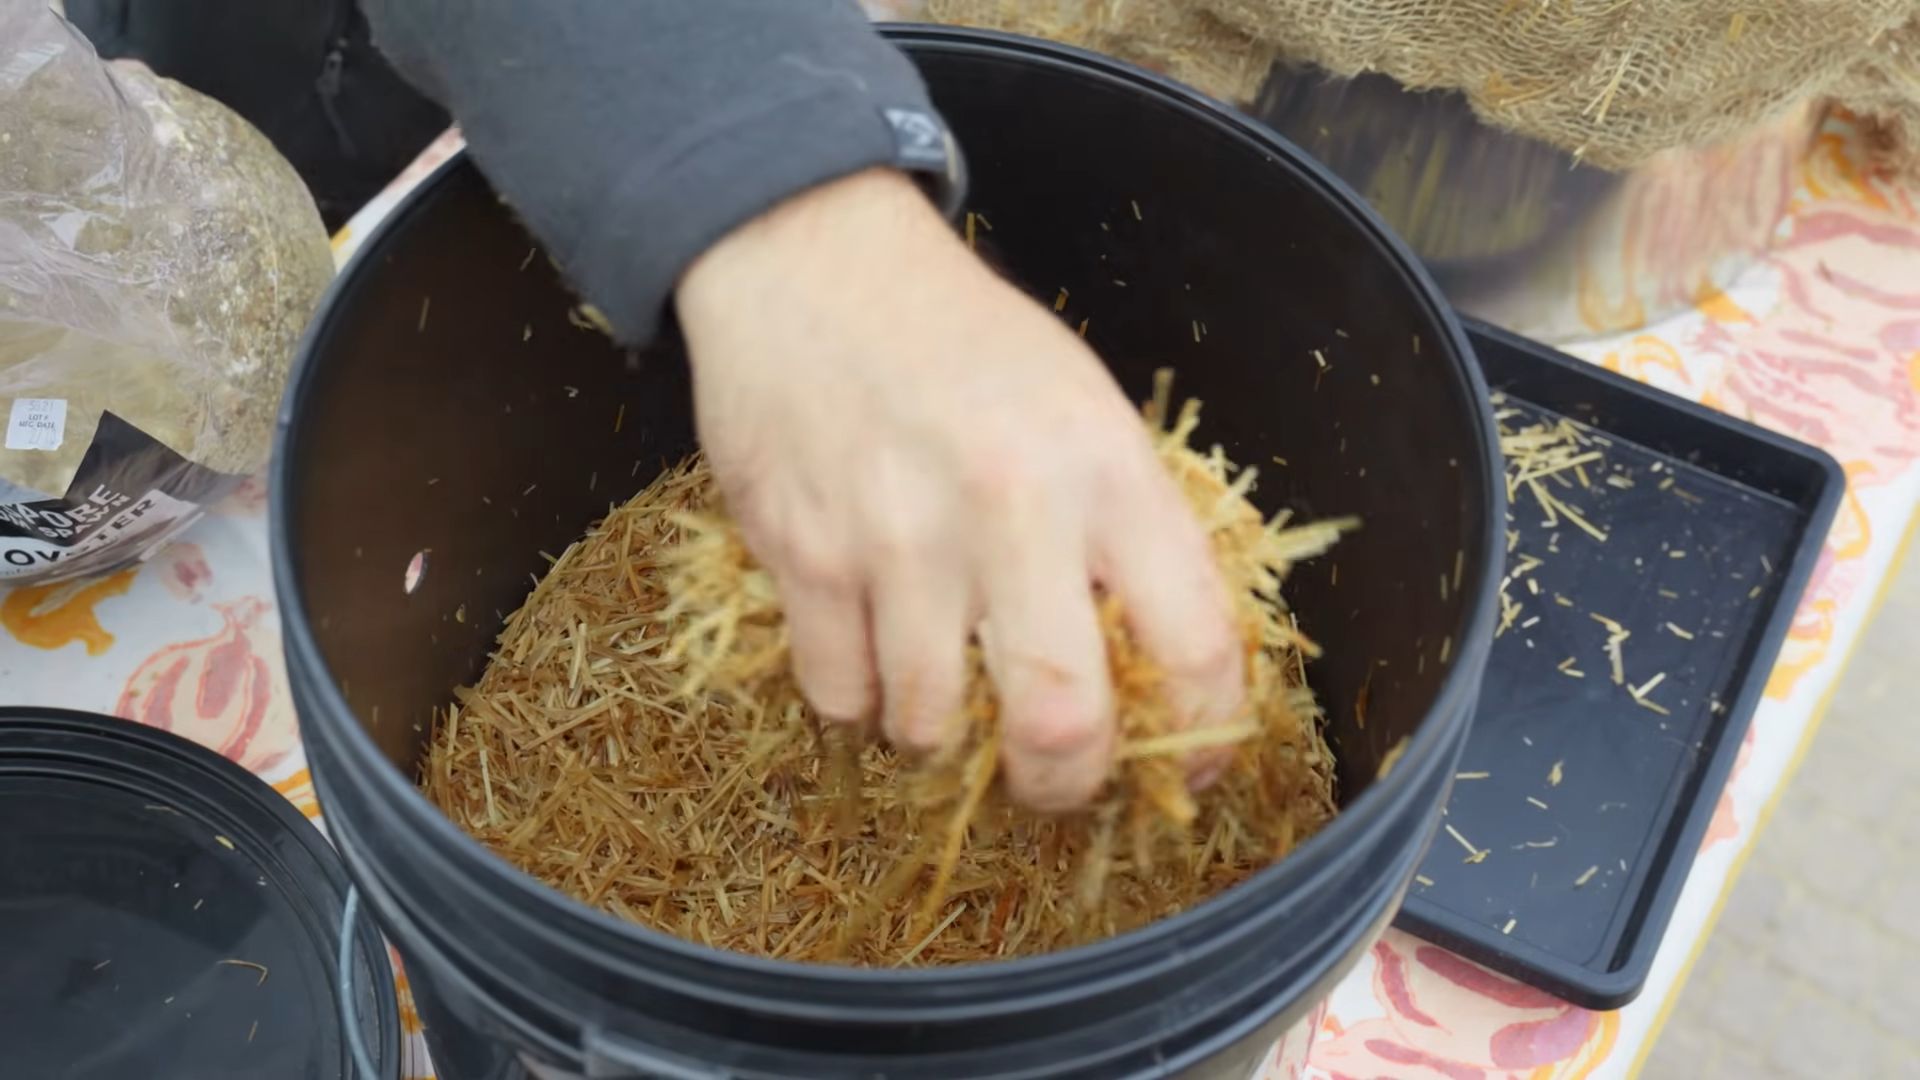
1. Start with a Base Layer: Place a layer of pasteurized straw at the bottom of the bucket, about 2-3 inches thick. Gently pack it down.
2. Add a Spawn Layer: Sprinkle a generous layer of mushroom spawn over the straw. Use about 1/4 to 1/3 of your spawn for this first layer.
3. Repeat Layers: Continue layering straw and spawn, alternating between the two. Each straw layer should be about 2-3 inches thick, and each spawn layer should be a generous sprinkling.
4. Top it Off: Finish with a final layer of straw on top. Gently pack it down.
5. Label Your Bucket: Use a permanent marker to label your bucket with the date and the type of mushroom you’re growing. This will help you keep track of your progress.
Phase 4: Incubation – The Waiting Game
Now comes the hardest part: waiting! During this phase, the mushroom mycelium will colonize the straw.
1. Find the Right Spot: Place your inoculated bucket in a dark, humid, and well-ventilated location. A basement, closet, or spare room works well. The ideal temperature for oyster mushroom incubation is between 65-75°F (18-24°C).
2. Maintain Humidity: Keep the humidity high. You can do this by placing a clear plastic bag loosely over the bucket (creating a humidity tent) or by misting the inside of the bucket with water every day or two. Be careful not to overwater! The straw should be moist, not soaking wet.
3. Patience is Key: The incubation period typically lasts 2-3 weeks. During this time, you should see white, fuzzy mycelium spreading throughout the straw. This is a good sign! It means the mushrooms are colonizing the substrate.
4. Check for Contamination: Keep an eye out for any signs of contamination, such as green, black, or moldy spots. If you see any contamination, remove the affected area immediately.
Phase 5: Fruiting – Time to Harvest!
Once the straw is fully colonized (covered in white mycelium), it’s time to initiate fruiting.
1. Increase Light: Move the bucket to a location with more light. Indirect sunlight is ideal.
2. Increase Ventilation: Remove the plastic bag (if you were using one) to increase ventilation.
3. Maintain Humidity: Continue to mist the fruiting holes with water regularly to maintain high humidity. You can also mist the surrounding area.
4. Lower the Temperature (Slightly): A slight drop in temperature can help trigger fruiting.
5. Watch for Pinheads: After a few days, you should start to see small mushroom “pinheads” forming around the fruiting holes.
6. Harvest Time: The mushrooms will grow rapidly. Harvest them when the caps are fully developed but before they start to release spores (you’ll see a powdery substance). To harvest, gently twist and pull the mushrooms from the bucket.
7. Enjoy Your Harvest! Sauté them, grill them, add them to soups and stews – the possibilities are endless!
Phase 6: Subsequent Flushes – More Mushrooms to Come!
After your first harvest, don’t throw away the bucket! You can usually get several more flushes of mushrooms from the same bucket.
1. Soak the Substrate: After harvesting, soak the substrate in water for 12-24 hours. This rehydrates the straw and encourages new growth.
2. Drain and Repeat: Drain the bucket thoroughly and return it to its fruiting location. Continue to mist and maintain humidity.
3. Expect Smaller Flushes: Subsequent flushes may be smaller than the first, but you can still get a good harvest.
4. Eventually, the substrate will become depleted of nutrients. At this point, you can compost the spent substrate and start a new bucket.
Troubleshooting Tips:
* Mushrooms Not Growing? Make sure the humidity is high enough, the temperature is within the ideal range, and the substrate is fully colonized.
* Contamination? Ensure you pasteurize the straw properly. Maintain good hygiene throughout the process.
* Small Mushrooms? This could be due to low humidity or insufficient nutrients. Try misting more frequently and consider adding a small
Conclusion
So, there you have it! Transforming a simple bucket into a thriving indoor mushroom farm is not just a fun project; it’s a gateway to fresh, flavorful fungi right at your fingertips. We’ve walked through the process, highlighting the ease and accessibility of this method. Why spend a fortune on store-bought mushrooms when you can cultivate your own, bursting with flavor and free from unwanted chemicals? This DIY approach to mushroom cultivation offers a sustainable and rewarding experience, connecting you directly to the food you consume.
The beauty of this indoor mushroom bucket growing method lies in its adaptability. Feel free to experiment with different mushroom varieties. Oyster mushrooms are a fantastic starting point due to their resilience and rapid growth, but don’t be afraid to branch out! Lion’s Mane, Shiitake, or even Wine Cap mushrooms can be successfully grown using this technique, though they may require slightly different substrates and environmental conditions. Research the specific needs of your chosen mushroom variety to ensure optimal growth.
Consider experimenting with your substrate mix as well. While the straw and coffee grounds combination is a proven winner, you can incorporate other organic materials like shredded cardboard, wood chips, or even spent grain from home brewing. Just remember to pasteurize any new materials thoroughly to eliminate competing organisms.
This is more than just a recipe; it’s an invitation to explore the fascinating world of mycology. Imagine the satisfaction of harvesting your own mushrooms, knowing you nurtured them from spore to fruiting body. Picture the delicious meals you can create, showcasing the unique flavors and textures of your homegrown bounty.
We wholeheartedly encourage you to embark on this indoor mushroom bucket growing adventure. It’s a surprisingly simple and incredibly rewarding experience. Don’t be intimidated by the process; even if you’re a complete beginner, you can achieve success with a little patience and attention to detail.
Once you’ve harvested your first flush of mushrooms, we’d love to hear about your experience! Share your photos, tips, and any variations you’ve tried in the comments below. Let’s build a community of indoor mushroom growers, sharing our knowledge and inspiring others to embrace the magic of fungi. Happy growing!
Frequently Asked Questions
What kind of bucket should I use?
Ideally, you should use a food-grade plastic bucket. These are typically made of HDPE (high-density polyethylene) and are safe for growing food. Avoid using buckets that previously contained chemicals or other potentially harmful substances. A 5-gallon bucket is a good size to start with, but you can use larger or smaller buckets depending on your space and desired yield. Make sure the bucket is clean and has drainage holes drilled in the bottom.
How do I pasteurize the straw?
Pasteurization is crucial to kill off any competing organisms in the straw that could hinder mushroom growth. The easiest way to pasteurize straw is to submerge it in hot water (around 160-180°F or 71-82°C) for about an hour. You can use a large pot or even a bathtub for this purpose. After an hour, drain the straw and let it cool down before mixing it with the coffee grounds and mushroom spawn. Be careful when handling hot water and straw.
Where can I get mushroom spawn?
Mushroom spawn can be purchased online from reputable mushroom suppliers. You can also find it at some garden centers or specialty stores. Make sure to buy spawn that is specifically suited for the mushroom variety you want to grow. Oyster mushroom spawn is readily available and a good choice for beginners.
How much light do the mushrooms need?
Mushrooms don’t need direct sunlight, but they do need some light to fruit properly. Indirect sunlight or artificial light is sufficient. A location near a window or under a fluorescent light is ideal. The amount of light needed will vary depending on the mushroom variety, so research the specific needs of your chosen species.
How long does it take for the mushrooms to grow?
The time it takes for mushrooms to grow depends on several factors, including the mushroom variety, the temperature, and the humidity. Oyster mushrooms typically start to fruit within a few weeks of inoculation. Keep an eye on your bucket and mist it regularly to maintain humidity.
How do I know when the mushrooms are ready to harvest?
Mushrooms are ready to harvest when the caps have fully formed and are starting to flatten out. The edges of the caps may also start to curl upwards slightly. Gently twist or cut the mushrooms off the substrate.
How many times can I harvest mushrooms from the same bucket?
You can typically harvest several flushes of mushrooms from the same bucket. After the first harvest, mist the substrate regularly and wait for the next flush to appear. Each subsequent flush may produce fewer mushrooms than the first.
What do I do with the spent substrate after harvesting?
The spent substrate is a valuable resource! It’s rich in nutrients and makes excellent compost for your garden. You can also use it as mulch around plants.
Can I grow different types of mushrooms in the same bucket?
It’s generally not recommended to grow different types of mushrooms in the same bucket. Each mushroom variety has its own specific needs and may compete with each other for resources.
What if my mushrooms don’t grow?
If your mushrooms don’t grow, there could be several reasons. The substrate may not be properly pasteurized, the temperature or humidity may not be optimal, or the spawn may be old or contaminated. Review the steps in the recipe and make sure you’re following them correctly. If you’re still having trouble, try contacting a mushroom expert for advice.
Is indoor mushroom bucket growing safe?
Yes, indoor mushroom bucket growing is generally safe, as long as you follow proper hygiene practices. Always wash your hands before and after handling the substrate and mushrooms. Avoid eating any mushrooms that you are not sure are safe to eat. If you have any concerns, consult with a mushroom expert.
What is the ideal temperature for growing mushrooms?
The ideal temperature for growing mushrooms varies depending on the species. Oyster mushrooms generally prefer temperatures between 60-75°F (15-24°C). Research the specific temperature requirements of your chosen mushroom variety for best results.
How do I maintain the humidity in the bucket?
Maintaining humidity is crucial for successful mushroom growth. You can mist the inside of the bucket regularly with water. You can also cover the bucket with a plastic bag or lid to help retain moisture, but make sure to provide adequate ventilation to prevent mold growth.
Can I use tap water to mist the mushrooms?
Tap water is generally fine to use for misting mushrooms, but if your tap water is heavily chlorinated, it’s best to use filtered or distilled water. Chlorine can inhibit mushroom growth.
What are the benefits of growing my own mushrooms?
Growing your own mushrooms offers numerous benefits, including:
* Fresh, flavorful mushrooms that are free from chemicals
* A sustainable and rewarding gardening experience
* A cost-effective way to enjoy gourmet mushrooms
* The satisfaction of growing your own food
* A fun and educational hobby
How can I prevent contamination in my mushroom bucket?
Preventing contamination is key to successful mushroom growing. Here are some tips:
* Pasteurize the substrate thoroughly.
* Use sterile tools and equipment.
* Work in a clean environment.
* Avoid introducing contaminants into the bucket.
* Monitor the bucket regularly for signs of mold or other contamination.
By following these tips, you can minimize the risk of contamination and enjoy a bountiful harvest of homegrown mushrooms. Remember, patience and attention to detail are key to success with indoor mushroom bucket growing.

Leave a Comment