
Hanging sweet potato growing – it’s not just a gardening trend; it’s a revolution in how we think about space, sustainability, and delicious homegrown food! Imagine vibrant vines cascading from hanging baskets, adorned with lush green leaves and, hidden beneath, the promise of sweet, earthy treasures. Forget sprawling gardens and back-breaking labor; this DIY project brings the joy of harvesting your own sweet potatoes right to your patio, balcony, or even indoors!
The practice of growing sweet potatoes, a staple in many cultures, dates back thousands of years. Originating in Central and South America, these nutritious tubers have journeyed across continents, becoming a beloved ingredient in cuisines worldwide. While traditionally grown in the ground, the ingenuity of gardeners has led to innovative methods like hanging sweet potato growing, adapting this ancient crop to modern lifestyles.
Why should you embrace this DIY trick? Well, for starters, it’s incredibly space-saving, perfect for urban dwellers or anyone with limited garden space. Plus, it’s a fantastic way to deter pests and diseases that often plague ground-grown sweet potatoes. But perhaps the most compelling reason is the sheer satisfaction of nurturing your own food from start to finish. I’m excited to share some simple yet effective techniques that will empower you to create your own stunning hanging sweet potato garden. Get ready to transform your space into a thriving oasis and enjoy the unparalleled taste of homegrown goodness!
DIY: Süßkartoffeln hängend anbauen – So geht’s!
Ich liebe es, Gemüse anzubauen, und Süßkartoffeln gehören zu meinen absoluten Favoriten. Sie sind nicht nur lecker und vielseitig, sondern auch relativ einfach anzubauen. Aber wusstest du, dass du Süßkartoffeln auch hängend anbauen kannst? Das spart Platz, sieht super aus und ist ein echter Hingucker! In diesem Artikel zeige ich dir, wie du deine eigenen hängenden Süßkartoffeln anbauen kannst.
Was du brauchst:
* Eine gesunde Süßkartoffel (am besten Bio, damit sie nicht behandelt wurde)
* Ein großes Glas oder eine Vase
* Zahnstocher
* Wasser
* Einen Eimer oder Topf (mindestens 20 Liter Fassungsvermögen)
* Erde (am besten eine Mischung aus Gartenerde und Kompost)
* Eine Schere oder ein Messer
* Eine Rankhilfe (optional, aber empfehlenswert)
* Einen sonnigen Standort
Süßkartoffel zum Austreiben bringen:
Bevor wir die Süßkartoffel in den Eimer pflanzen können, müssen wir sie zum Austreiben bringen. Das ist der wichtigste Schritt, denn ohne Triebe gibt es keine Blätter und keine neuen Süßkartoffeln.
1. Vorbereitung der Süßkartoffel: Wähle eine gesunde Süßkartoffel aus. Sie sollte fest sein und keine weichen Stellen oder Beschädigungen aufweisen. Wasche die Süßkartoffel gründlich ab, um Erde oder Schmutz zu entfernen.
2. Zahnstocher anbringen: Stecke vier Zahnstocher gleichmäßig verteilt in die Mitte der Süßkartoffel. Die Zahnstocher dienen dazu, die Süßkartoffel im Glas zu stabilisieren und zu verhindern, dass sie komplett im Wasser versinkt.
3. Glas mit Wasser füllen: Fülle das Glas oder die Vase mit Wasser. Achte darauf, dass nur die untere Hälfte der Süßkartoffel im Wasser ist. Die obere Hälfte sollte trocken bleiben.
4. Süßkartoffel ins Glas setzen: Platziere die Süßkartoffel mit den Zahnstochern auf dem Rand des Glases, sodass die untere Hälfte im Wasser hängt.
5. Standort wählen: Stelle das Glas mit der Süßkartoffel an einen hellen, warmen Ort, aber nicht in die pralle Sonne. Ein Fensterbrett ist ideal.
6. Wasserstand kontrollieren: Überprüfe regelmäßig den Wasserstand und fülle bei Bedarf Wasser nach. Das Wasser sollte immer die untere Hälfte der Süßkartoffel bedecken.
7. Geduld haben: Es kann einige Wochen dauern, bis die Süßkartoffel Triebe bildet. Hab Geduld und wechsle das Wasser alle paar Tage, um Schimmelbildung zu vermeiden.
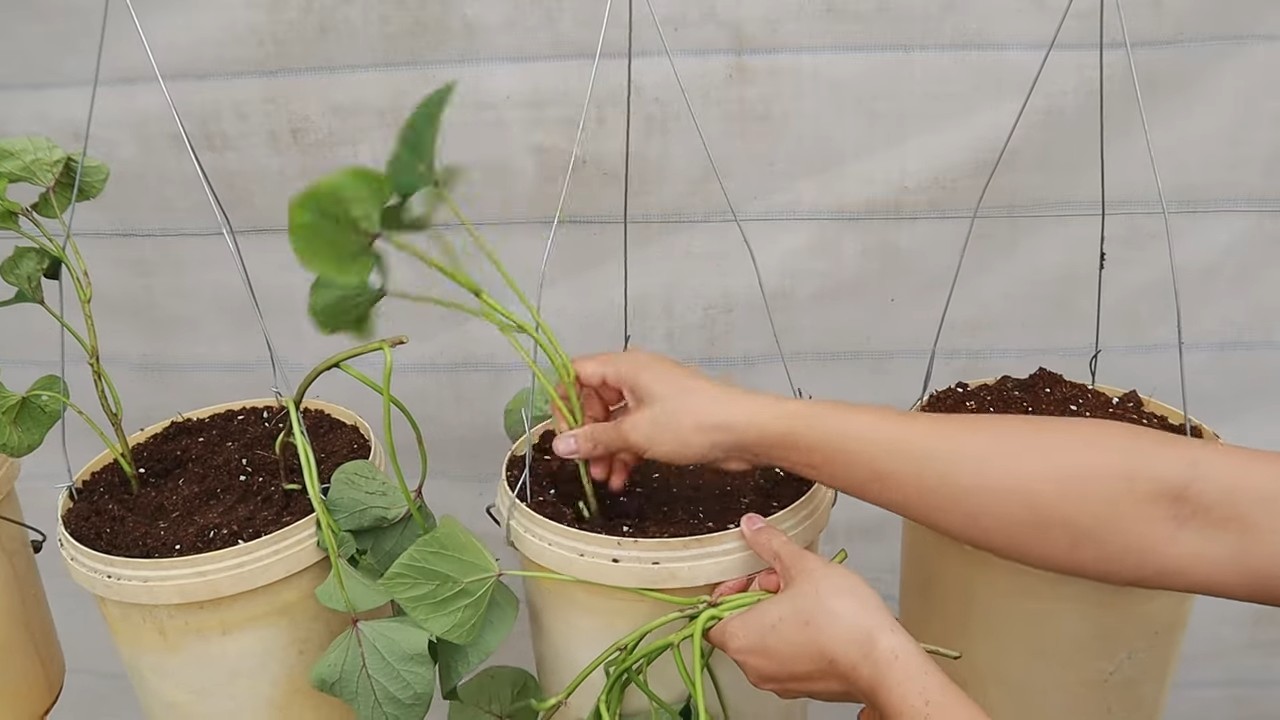
Die Süßkartoffel einpflanzen:
Sobald die Süßkartoffel ausreichend Triebe und Wurzeln gebildet hat, können wir sie in den Eimer oder Topf pflanzen.
1. Eimer vorbereiten: Bohre Löcher in den Boden des Eimers oder Topfes, damit das Wasser ablaufen kann. Fülle den Eimer mit Erde. Lass oben etwa 5-10 cm Platz.
2. Triebe abschneiden: Wenn die Triebe etwa 15-20 cm lang sind, kannst du sie vorsichtig von der Süßkartoffel abschneiden. Achte darauf, dass jeder Trieb einige Wurzeln hat. Wenn die Triebe noch keine Wurzeln haben, kannst du sie in einem Glas Wasser bewurzeln lassen, bevor du sie einpflanzt.
3. Triebe einpflanzen: Mach kleine Löcher in die Erde und setze die Triebe hinein. Bedecke die Wurzeln mit Erde und drücke sie leicht an. Pflanze mehrere Triebe in den Eimer, um eine üppige Pflanze zu erhalten.
4. Angießen: Gieße die frisch gepflanzten Triebe gründlich an.
5. Standort wählen: Stelle den Eimer an einen sonnigen Standort. Süßkartoffeln lieben die Sonne!
Pflege der hängenden Süßkartoffel:
Die Pflege der hängenden Süßkartoffel ist relativ einfach. Hier sind ein paar Tipps, damit deine Pflanze gut gedeiht:
* Gießen: Gieße die Süßkartoffel regelmäßig, besonders an heißen Tagen. Die Erde sollte immer leicht feucht sein, aber nicht nass. Vermeide Staunässe, da dies zu Wurzelfäule führen kann.
* Düngen: Dünge die Süßkartoffel alle paar Wochen mit einem organischen Dünger. Das fördert das Wachstum und die Bildung von Knollen.
* Rankhilfe: Süßkartoffeln sind Kletterpflanzen. Eine Rankhilfe hilft ihnen, sich auszubreiten und zu wachsen. Du kannst eine einfache Rankhilfe aus Bambusstäben oder Draht bauen.
* Schneiden: Schneide die Triebe regelmäßig zurück, um die Pflanze in Form zu halten und das Wachstum neuer Triebe zu fördern.
* Schädlinge: Achte auf Schädlinge wie Blattläuse oder Spinnmilben. Bei Befall kannst du die Pflanze mit einem natürlichen Insektizid behandeln.
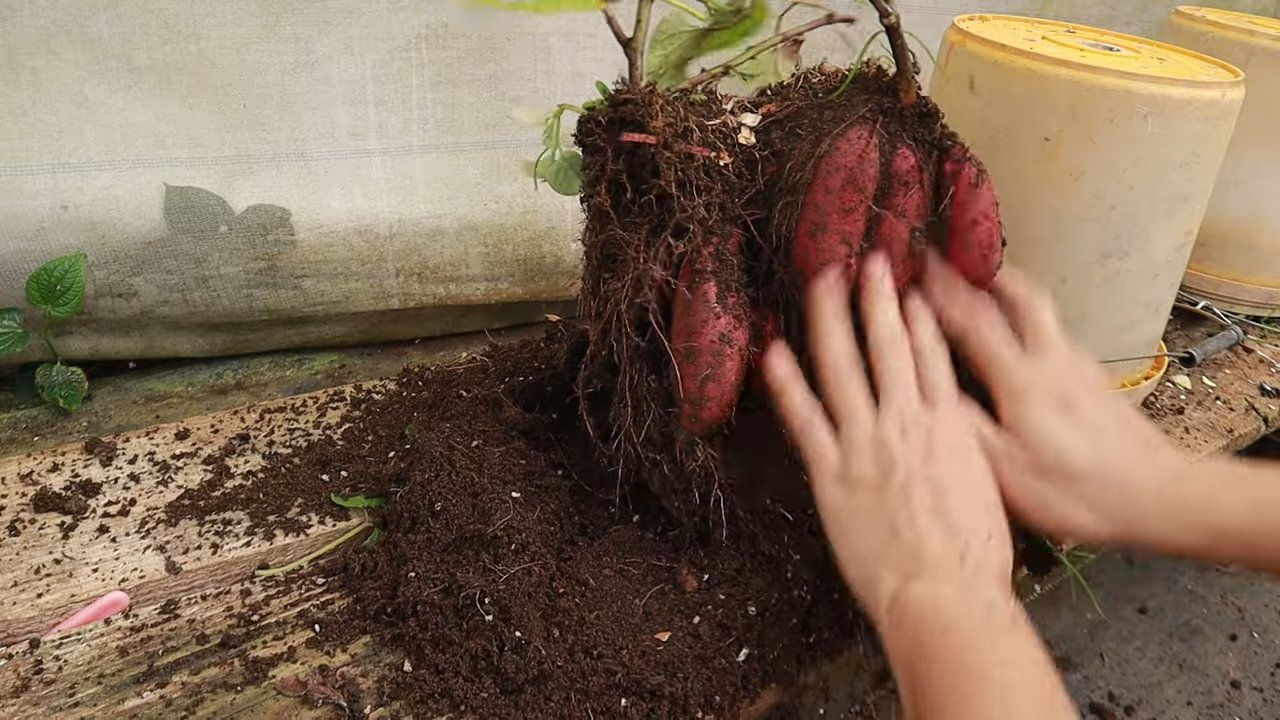
Ernte der Süßkartoffeln:
Die Erntezeit für Süßkartoffeln ist im Herbst, kurz vor dem ersten Frost.
1. Anzeichen der Reife: Die Blätter der Süßkartoffel werden gelb und beginnen abzusterben. Das ist ein Zeichen dafür, dass die Knollen reif sind.
2. Ernte vorbereiten: Gieße die Pflanze ein paar Tage vor der Ernte nicht mehr, damit die Erde etwas trockener ist.
3. Ernte durchführen: Kippe den Eimer vorsichtig aus und suche nach den Süßkartoffeln. Sie sollten sich leicht aus der Erde lösen lassen.
4. Süßkartoffeln trocknen: Lasse die geernteten Süßkartoffeln ein paar Tage an einem trockenen, luftigen Ort trocknen. Das härtet die Schale und verlängert die Haltbarkeit.
5. Lagern: Lagere die getrockneten Süßkartoffeln an einem kühlen, dunklen und trockenen Ort. Sie halten sich so mehrere Monate.
Zusätzliche Tipps und Tricks:
* Sortenwahl: Es gibt viele verschiedene Süßkartoffelsorten. Wähle eine Sorte, die für dein Klima geeignet ist.
* Sonneneinstrahlung: Süßkartoffeln brauchen mindestens 6 Stunden Sonne pro Tag.
* Bodenqualität: Süßkartoffeln bevorzugen einen lockeren, gut durchlässigen Boden.
* Bewässerung: Achte darauf, dass die Erde nicht zu nass ist. Staunässe kann zu Wurzelfäule führen.
* Schädlinge: Kontrolliere die Pflanze regelmäßig auf Schädlinge und behandle sie bei Bedarf.
* Überwinterung: In kälteren Regionen kannst du die Süßkartoffel im Haus überwintern. Schneide die Triebe zurück und stelle den Eimer an einen kühlen, hellen Ort. Gieße die Pflanze nur sparsam.
Häufige Probleme und Lösungen:
* Gelbe Blätter: Gelbe Blätter können ein Zeichen für Nährstoffmangel, Überwässerung oder Schädlingsbefall sein. Überprüfe die Pflanze und passe die Pflege entsprechend an.
* Keine Knollenbildung: Wenn die Süßkartoffel keine Knollen bildet, kann das an zu wenig Sonne, zu viel Stickstoff im Boden oder einer zu kurzen Wachstumsperiode liegen. Stelle sicher, dass die Pflanze ausreichend Sonne bekommt und dünge sie mit einem Dünger, der reich an Phosphor und Kalium ist.
* Wurzelfäule: Wurzelfäule wird durch Staunässe verursacht. Achte darauf, dass die Erde gut durchlässig ist und gieße die Pflanze nicht zu viel.
Fazit:
Das Anbauen von Süßkartoffeln in hängenden Töpfen ist ein tolles Projekt für jeden Gärtner, egal ob Anfänger oder Fortgeschrittener. Es ist nicht nur platzsparend, sondern auch eine wunderschöne Dekoration für deinen Garten oder Balkon. Mit ein wenig Geduld und Pflege kannst du deine eigenen leckeren Süßkartoffeln ernten. Ich hoffe, diese Anleitung hat dir geholfen und inspiriert, deine eigenen hängenden Süßkartoffeln anzubauen. Viel Spaß dabei!
Conclusion
So, there you have it! Transforming a humble sweet potato into a stunning, cascading vine is not only surprisingly simple but also incredibly rewarding. This DIY hanging sweet potato growing project offers a unique blend of aesthetics and practicality. Imagine the lush greenery adorning your porch, balcony, or even a sunny indoor space, a living testament to your green thumb. Beyond the visual appeal, you’re also creating a conversation starter, a piece of living art that sparks curiosity and admiration.
But the benefits extend beyond mere aesthetics. This method of growing sweet potatoes is space-saving, making it ideal for those with limited garden space. It’s also a fantastic way to recycle sweet potatoes that might be sprouting in your pantry, turning potential food waste into something beautiful and productive. Plus, watching the roots develop and the vines unfurl is a fascinating educational experience, especially for children.
Don’t be afraid to experiment with different varieties of sweet potatoes. While the orange-fleshed varieties are most common, you can also try white, purple, or even Japanese sweet potatoes for a unique visual effect. Consider using different types of containers as well. A rustic burlap sack can add a charming, farmhouse touch, while a sleek, modern ceramic pot can create a more contemporary look. You can also add companion plants like trailing herbs or flowers to the container for added visual interest and to attract beneficial insects.
For a truly unique twist, try training the vines to grow in a specific direction or around a trellis. This allows you to create living sculptures or green walls, adding a touch of whimsy and personality to your space. Remember to provide adequate support for the vines as they grow, using twine, wire, or even repurposed materials like old clothing hangers.
This DIY hanging sweet potato growing trick is more than just a gardening project; it’s an opportunity to connect with nature, express your creativity, and add a touch of beauty to your surroundings. It’s a chance to witness the magic of growth firsthand and to appreciate the simple wonders of the natural world.
We wholeheartedly encourage you to give this project a try. It’s a fun, easy, and rewarding way to add a touch of green to your life. And once you’ve experienced the joy of growing your own hanging sweet potato vine, we’d love to hear about it! Share your photos, tips, and experiences with us in the comments below. Let’s create a community of sweet potato enthusiasts and inspire others to embrace the beauty of DIY gardening. Let us know what worked for you, what challenges you faced, and any creative variations you came up with. Your insights can help others succeed and make this project even more accessible and enjoyable for everyone. Happy growing!
Frequently Asked Questions (FAQ)
What kind of sweet potato should I use?
You can use any variety of sweet potato for this project, but the orange-fleshed varieties tend to be the most readily available and produce vigorous vines. Experiment with different varieties like Japanese sweet potatoes (with purple skin and white flesh) or Beauregard sweet potatoes for a unique look. Older sweet potatoes that have already started to sprout are ideal, as they will root more quickly.
How long does it take for the sweet potato to sprout roots?
The time it takes for roots to appear can vary depending on the temperature, humidity, and the variety of sweet potato. Generally, you should start to see roots emerging within 1-3 weeks. Keep the bottom half of the sweet potato consistently submerged in water and place it in a warm, bright location to encourage faster root growth.
What kind of container should I use?
Almost any container that can hold water and suspend the sweet potato will work. Glass jars, vases, and even repurposed plastic containers are all suitable options. The size of the container isn’t critical at this stage, as the focus is on root development. Once the roots are well-established and the vines start to grow, you can transplant the sweet potato to a larger hanging basket or pot filled with soil.
How often should I change the water?
It’s important to change the water every 2-3 days to prevent the growth of algae and bacteria. This will also ensure that the sweet potato has access to fresh, oxygenated water, which is essential for healthy root development.
How much sunlight does the sweet potato vine need?
Sweet potato vines thrive in bright, indirect sunlight. Avoid placing the sweet potato in direct sunlight, especially during the hottest part of the day, as this can scorch the leaves. A location near an east- or west-facing window is ideal. If you’re growing the sweet potato outdoors, choose a spot that receives morning sun and afternoon shade.
When should I transplant the sweet potato to soil?
Once the roots are several inches long and the vines have started to develop, it’s time to transplant the sweet potato to a larger container filled with potting soil. Choose a well-draining potting mix and a hanging basket or pot that is at least 12 inches in diameter. Gently remove the sweet potato from the water, being careful not to damage the roots. Plant the sweet potato so that the top half is exposed above the soil line.
How often should I water the sweet potato plant in soil?
Water the sweet potato plant regularly, keeping the soil consistently moist but not waterlogged. Check the soil moisture by sticking your finger into the soil. If the top inch feels dry, it’s time to water. Avoid overwatering, as this can lead to root rot.
Do I need to fertilize the sweet potato plant?
Yes, fertilizing the sweet potato plant will help to promote healthy growth and abundant foliage. Use a balanced liquid fertilizer diluted to half strength every 2-3 weeks during the growing season (spring and summer).
Can I harvest sweet potatoes from the hanging vine?
While it’s possible to harvest small sweet potatoes from the hanging vine, it’s not the primary purpose of this project. The focus is on the ornamental value of the foliage. However, if you want to try harvesting sweet potatoes, you’ll need to provide a very large container and ensure that the plant receives adequate nutrients and water.
Are sweet potato vines poisonous to pets?
Sweet potato vines are generally considered non-toxic to pets, but it’s always best to prevent them from consuming large quantities of the foliage. The vines contain compounds that can cause mild stomach upset if ingested in large amounts.
How do I deal with pests on my sweet potato vine?
Common pests that may affect sweet potato vines include aphids, spider mites, and whiteflies. You can control these pests by spraying the foliage with insecticidal soap or neem oil. Regularly inspect the plant for signs of infestation and take action promptly to prevent the pests from spreading.
Can I grow sweet potato vines indoors year-round?
Yes, you can grow sweet potato vines indoors year-round, provided you provide them with adequate light, water, and nutrients. Place the plant near a sunny window and supplement with artificial light if necessary.
My sweet potato vine is not growing well. What could be the problem?
Several factors can contribute to poor growth in sweet potato vines. These include insufficient light, overwatering or underwatering, nutrient deficiencies, and pest infestations. Assess the plant’s growing conditions and address any issues accordingly.
Can I propagate sweet potato vines from cuttings?
Yes, you can easily propagate sweet potato vines from cuttings. Simply take a cutting from a healthy vine, remove the lower leaves, and place the cutting in water. Roots will typically develop within a few weeks. Once the roots are well-established, you can transplant the cutting to a pot filled with potting soil.

Leave a Comment