
Hanging Sweet Melon Growing: Imagine plucking a perfectly ripe, juicy sweet melon right from a vine dangling gracefully on your patio! Sounds like a dream, right? Well, it doesn’t have to be! For centuries, gardeners have been experimenting with innovative ways to maximize their yields, and vertical gardening, including hanging melons, is a testament to that ingenuity. From ancient civilizations training vines along walls to modern urban dwellers seeking space-saving solutions, the desire to cultivate our own food has always been strong.
But why should you consider hanging sweet melon growing? Let’s face it, traditional melon cultivation can be tricky. These sprawling plants require a lot of ground space, and their heavy fruits are prone to rotting if they sit directly on the soil. Plus, pests love to feast on them! By suspending your sweet melons, you’re not only saving valuable garden real estate, but also improving air circulation, reducing the risk of disease, and making it harder for those pesky critters to reach your precious harvest. I’m excited to share some simple, yet effective DIY tricks and hacks that will guide you through the process, ensuring you enjoy a bountiful crop of delicious, homegrown sweet melons, even if you only have a small balcony or patio. Get ready to elevate your gardening game – literally!
Hängende Zuckermelonen: Dein DIY-Guide für eine vertikale Ernte
Ich liebe es, neue Wege zu finden, um meinen Garten zu optimieren, und dieses Projekt ist einer meiner Favoriten! Zuckermelonen sind köstlich, aber sie brauchen viel Platz. Mit dieser DIY-Methode kannst du sie vertikal anbauen und so Platz sparen und gleichzeitig eine tolle Ernte erzielen. Keine Sorge, es ist einfacher als du denkst!
Was du brauchst:
* Zuckermelonensamen (am besten eignen sich kleinere Sorten wie Sugar Baby oder Honey Dew)
* Anzuchterde
* Anzuchttöpfe oder Eierkartons
* Größere Töpfe (mindestens 30 cm Durchmesser)
* Hochwertige Blumenerde
* Kompost oder organischen Dünger
* Stabile Rankhilfen (z.B. Bambusstäbe, ein Spalier oder ein stabiles Netz)
* Weiche Stoffstreifen, alte Strumpfhosen oder Juteschnur
* Gießkanne oder Gartenschlauch
* Geduld und Liebe!
Aussaat und Vorbereitung:
1. Samen vorziehen: Fülle deine Anzuchttöpfe mit Anzuchterde. Lege in jeden Topf 2-3 Samen und bedecke sie leicht mit Erde. Befeuchte die Erde vorsichtig mit einer Sprühflasche. Stelle die Töpfe an einen warmen, hellen Ort (z.B. auf eine Fensterbank oder in ein Gewächshaus). Die Keimung dauert in der Regel 7-14 Tage.
2. Pikieren: Sobald die Sämlinge 2-3 echte Blätter haben, kannst du sie pikieren. Wähle den stärksten Sämling pro Topf aus und entferne die anderen vorsichtig.
3. Töpfe vorbereiten: Fülle die größeren Töpfe mit einer Mischung aus Blumenerde und Kompost (Verhältnis 2:1). Das sorgt für eine gute Drainage und ausreichend Nährstoffe.
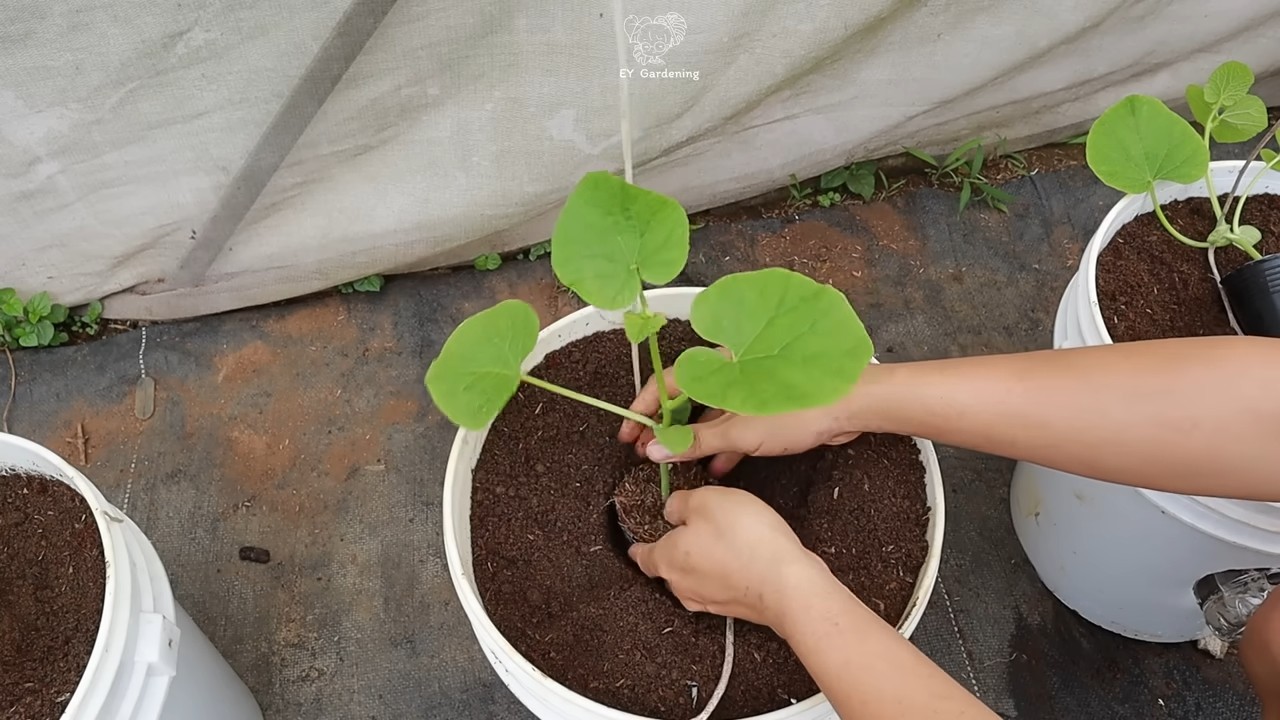
4. Rankhilfe installieren: Bevor du die Melonen einpflanzt, installiere die Rankhilfe. Sie muss stabil genug sein, um das Gewicht der wachsenden Pflanze und der Früchte zu tragen. Bambusstäbe, die du zu einem Tipi zusammenbindest, sind eine einfache und kostengünstige Lösung. Ein Spalier oder ein stabiles Netz funktionieren aber auch super.
Einpflanzen und Pflegen:
1. Einpflanzen: Sobald die Sämlinge groß genug sind (ca. 10-15 cm hoch) und keine Frostgefahr mehr besteht, kannst du sie in die vorbereiteten Töpfe umpflanzen. Grabe ein Loch, das groß genug für den Wurzelballen ist, setze die Pflanze hinein und fülle das Loch mit Erde auf. Drücke die Erde leicht an und gieße die Pflanze gründlich.
2. Gießen: Zuckermelonen brauchen viel Wasser, besonders während der Fruchtbildung. Gieße regelmäßig, aber vermeide Staunässe. Am besten gießt du am Morgen, damit die Blätter über den Tag abtrocknen können.
3. Düngen: Dünge die Pflanzen alle 2-3 Wochen mit einem organischen Dünger oder Komposttee. Das sorgt für eine reiche Ernte.
4. Rankhilfe nutzen: Leite die Triebe der Melonenpflanze an der Rankhilfe entlang. Du kannst sie mit weichen Stoffstreifen oder Juteschnur befestigen. Achte darauf, die Triebe nicht zu beschädigen.
5. Ausgeizen: Entferne regelmäßig Seitentriebe, die keine Blüten oder Früchte tragen. Das fördert das Wachstum der Haupttriebe und die Fruchtbildung.
6. Bestäubung: Zuckermelonen sind auf Bestäubung angewiesen. Wenn du keine Bienen oder andere Bestäuber in deinem Garten hast, kannst du die Blüten von Hand bestäuben. Übertrage dazu mit einem kleinen Pinsel Pollen von den männlichen auf die weiblichen Blüten. Die weiblichen Blüten erkennst du an dem kleinen Fruchtansatz direkt unter der Blüte.
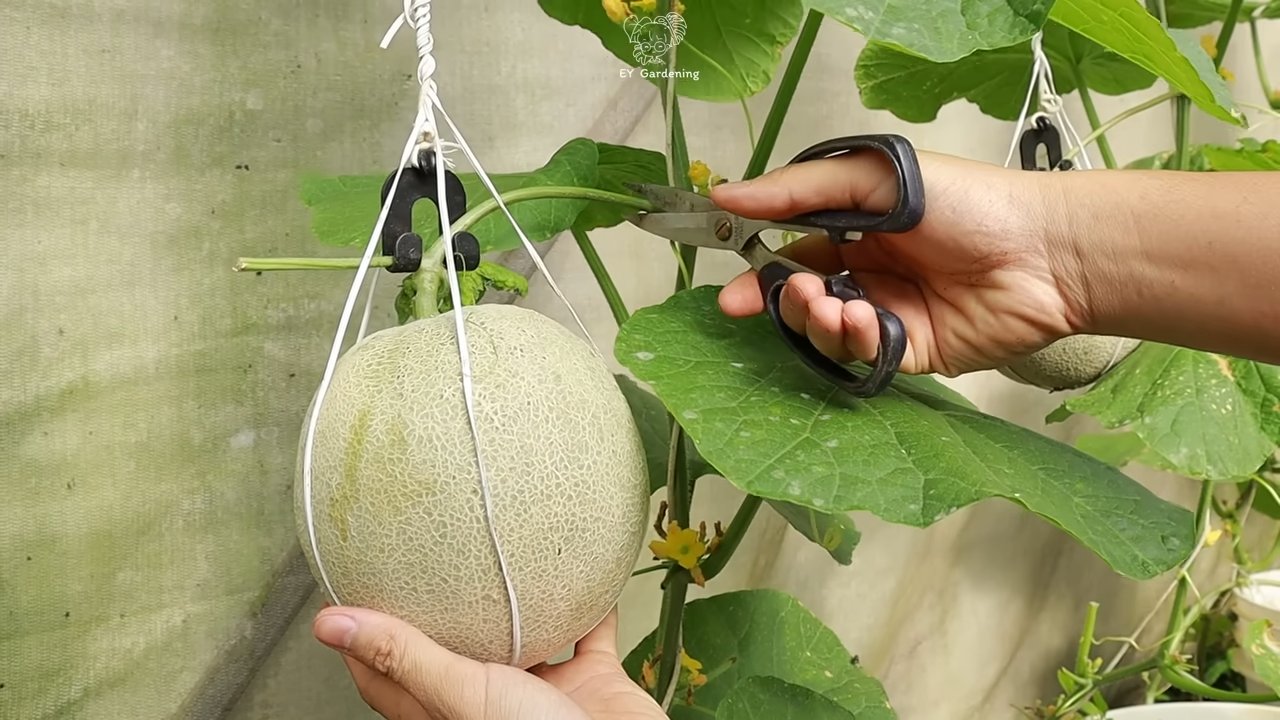
Die hängenden Melonen unterstützen:
Hier kommt der Clou des Ganzen! Zuckermelonen werden schwer, und die Triebe können das Gewicht nicht alleine tragen. Deshalb müssen wir die Früchte unterstützen.
1. Stoffstreifen vorbereiten: Schneide weiche Stoffstreifen, alte Strumpfhosen oder Juteschnur in ca. 50-60 cm lange Stücke.
2. Hängematten basteln: Wenn die Melonen etwa die Größe einer Faust haben, binde die Stoffstreifen oder die Juteschnur um die Rankhilfe, so dass eine Art Hängematte entsteht. Die Melone sollte bequem darin liegen können.
3. Melonen einlegen: Lege die Melonen vorsichtig in die Hängematten. Achte darauf, dass sie gut gestützt sind und nicht herunterfallen können.
4. Anpassen: Wenn die Melonen wachsen, musst du die Hängematten eventuell anpassen, damit sie weiterhin ausreichend Halt bieten.
Erntezeit:
1. Reife erkennen: Die Reife einer Zuckermelone erkennst du an verschiedenen Faktoren: Die Schale verfärbt sich (je nach Sorte), die Ranke, die direkt an der Frucht sitzt, wird trocken und braun, und die Melone duftet aromatisch.
2. Ernten: Schneide die Melone vorsichtig mit einem scharfen Messer von der Pflanze ab. Lasse dabei einen kleinen Stiel an der Frucht.
Zusätzliche Tipps und Tricks:
* Sonniger Standort: Zuckermelonen lieben die Sonne. Wähle einen Standort, der mindestens 6 Stunden Sonne pro Tag bekommt.
* Windschutz: Schütze die Pflanzen vor starkem Wind, da dieser die Triebe beschädigen kann.
* Schädlinge und Krankheiten: Achte auf Schädlinge wie Blattläuse oder Mehltau. Bei Bedarf kannst du biologische Schädlingsbekämpfungsmittel einsetzen.
* Sortenwahl: Wähle kleinere Melonensorten, da diese leichter zu handhaben sind und weniger Gewicht haben. Sugar Baby, Honey Dew oder Charentais sind gute Optionen.
* Geduld: Zuckermelonen brauchen Zeit, um zu reifen. Sei geduldig und lass dich nicht entmutigen, wenn es etwas dauert.
Häufige Probleme und Lösungen:
* Gelbe Blätter: Gelbe Blätter können ein Zeichen für Nährstoffmangel sein. Dünge die Pflanzen mit einem organischen Dünger.
* Faule Früchte: Faule Früchte können durch Staunässe oder Pilzbefall verursacht werden. Sorge für eine gute Drainage und entferne befallene Früchte sofort.
* Keine Früchte: Wenn die Pflanzen blühen, aber keine Früchte bilden, kann das an mangelnder Bestäubung liegen. Bestäube die Blüten von Hand oder locke Bestäuber in deinen Garten.
Warum diese Methode so toll ist:
* Platzsparend: Ideal für kleine Gärten, Balkone oder Terrassen.
* Weniger Schädlinge: Durch die vertikale Anordnung sind die Pflanzen weniger anfällig für Schädlinge und Krankheiten.
* Bessere Belüftung: Die Blätter trocknen schneller ab, was das Risiko von Pilzbefall reduziert.
* Einfache Ernte: Die Früchte sind leicht zugänglich und können bequem geerntet werden.
* Ein echter Hingucker: Hängende Zuckermelonen sind ein echter Blickfang in jedem Garten!
Noch ein paar persönliche Anmerkungen:
Ich habe mit dieser Methode schon tolle Erfolge erzielt und kann sie dir nur wärmstens empfehlen. Es ist wirklich befriedigend, die Melonen wachsen zu sehen und sie dann selbst zu ernten. Denk daran, dass es wichtig ist, die Pflanzen regelmäßig zu kontrollieren und auf ihre Bedürfnisse einzugehen. Mit ein bisschen Geduld und Liebe wirst du mit einer reichen Ernte belohnt! Und vergiss nicht, die Hängematten sind wirklich wichtig, sonst fallen dir die leckeren Melonen runter! Viel Spaß beim Gärtnern!
Conclusion
So, there you have it! Transforming your melon patch into a vertical oasis with our simple hanging sweet melon growing trick is more than just a gardening experiment; it’s a game-changer. We’ve shown you how to bypass the common pitfalls of ground-bound melons – the rot, the pests, and the wasted space – and unlock a world of healthier, more abundant harvests. Imagine plump, juicy sweet melons dangling like ornaments, a testament to your ingenuity and a feast for your senses.
But why is this DIY method a must-try? It’s about efficiency, health, and aesthetics. By lifting your melons off the ground, you drastically reduce their exposure to soilborne diseases and pests. This means less need for pesticides and healthier, more vibrant fruit. Furthermore, hanging your melons allows for better air circulation and sunlight exposure, leading to more even ripening and intensified sweetness. And let’s not forget the sheer visual appeal of a vertical melon garden – it’s a conversation starter, a source of pride, and a beautiful addition to any outdoor space.
Don’t think you’re limited to just one type of melon either! While this method works exceptionally well for smaller varieties like cantaloupe, honeydew, and even some smaller watermelons, feel free to experiment. Consider using different types of support systems – perhaps repurposing old t-shirts into slings or crafting macrame hangers for a bohemian touch. You could even try training your melon vines to climb a trellis, providing additional support and creating a stunning green wall. For smaller melon varieties, consider using repurposed plastic containers with drainage holes as hanging baskets. Just ensure the container is sturdy enough to support the weight of the mature melon.
Another variation to consider is the type of fertilizer you use. While a general-purpose fertilizer will work, a fertilizer specifically formulated for fruiting plants will provide the necessary nutrients for optimal melon development. Look for a fertilizer with a higher potassium content, as this nutrient is crucial for fruit production. You can also supplement with compost tea or other organic fertilizers to boost soil health and provide a slow-release source of nutrients.
Remember to monitor your melons closely as they grow. Adjust the support slings as needed to accommodate their increasing weight. Prune away any excess foliage to improve air circulation and sunlight penetration. And most importantly, be patient! Growing sweet melons takes time and effort, but the rewards are well worth it.
We’re confident that this hanging sweet melon growing technique will revolutionize your gardening experience. It’s a simple, effective, and visually stunning way to grow healthier, more delicious melons. So, grab your seeds, gather your supplies, and get ready to elevate your melon game!
We can’t wait to hear about your experiences. Share your photos, tips, and tricks in the comments below. Let’s build a community of vertical melon growers and inspire others to embrace this innovative gardening method. Happy growing!
Frequently Asked Questions (FAQ)
What types of melons are best suited for hanging?
Smaller to medium-sized melons are ideal for hanging. Cantaloupe, honeydew, and smaller watermelon varieties (like Sugar Baby) are excellent choices. Larger watermelons can become too heavy and may require more robust support systems, potentially making the process more challenging for beginners. Consider the mature weight of the melon variety when selecting which ones to hang. If you’re unsure, start with smaller varieties and gradually experiment with larger ones as you gain experience. Also, consider the vine structure. Some melon varieties have more robust vines that can better support the weight of the fruit.
How do I create a support sling for my melons?
There are several ways to create a support sling. You can use old t-shirts, pantyhose, burlap sacks, or even commercially available fruit hammocks. The key is to choose a material that is strong, breathable, and gentle on the melon’s skin. Cut the material into a square or rectangular shape, then create a pouch or hammock to cradle the melon. Secure the sling to a sturdy support structure, such as a trellis, fence, or overhead beam. Ensure the sling is positioned so that the melon is evenly supported and doesn’t rub against any rough surfaces. Regularly inspect the sling for wear and tear and replace it as needed.
How high should I hang my melons?
The ideal height for hanging your melons depends on several factors, including the type of melon, the height of your support structure, and your personal preference. Generally, you want to hang the melons high enough to keep them off the ground and allow for good air circulation, but low enough that you can easily monitor and harvest them. A good starting point is about 1-2 feet above the ground. Adjust the height as needed based on the growth of the melon and the available space.
How often should I water and fertilize my hanging melons?
Hanging melons tend to dry out more quickly than those grown on the ground, so regular watering is essential. Check the soil moisture daily and water when the top inch feels dry to the touch. Avoid overwatering, as this can lead to root rot. Fertilize your melons regularly with a balanced fertilizer, following the instructions on the package. During the fruiting stage, switch to a fertilizer with a higher potassium content to promote fruit development. Consider using a slow-release fertilizer or compost tea to provide a steady supply of nutrients.
What are some common problems I might encounter when hanging melons, and how can I prevent them?
Some common problems include fruit rot, pest infestations, and vine breakage. To prevent fruit rot, ensure good air circulation around the melons and avoid overwatering. Regularly inspect the melons for signs of disease and remove any affected fruit promptly. To prevent pest infestations, monitor your plants regularly and take action at the first sign of pests. Use organic pest control methods, such as insecticidal soap or neem oil. To prevent vine breakage, provide adequate support for the vines and melons. Use sturdy support structures and adjust the slings as needed to accommodate the growing weight of the fruit.
Can I use this method for other types of fruits and vegetables?
Yes, the hanging method can be adapted for other types of fruits and vegetables, such as cucumbers, squash, and even tomatoes. The key is to choose varieties that are well-suited for vertical growing and provide adequate support for the plants and fruits. Consider the mature size and weight of the fruit when selecting which varieties to hang. You may need to adjust the support systems and watering schedules based on the specific needs of each plant.
How do I know when my hanging sweet melon is ripe?
Knowing when a sweet melon is ripe is crucial for enjoying its full flavor and sweetness. Several indicators can help you determine ripeness. For cantaloupe, look for a change in skin color from green to tan or yellow. The stem should also slip easily from the fruit with gentle pressure. For honeydew, the skin should feel slightly waxy and have a subtle aroma. The blossom end (opposite the stem) should yield slightly to pressure. For watermelons, look for a dull thud when you tap the melon. The underside of the melon (where it rests on the ground or in the sling) should also turn from white to yellow. Trust your senses and don’t be afraid to experiment to find the perfect ripeness for your taste.
What if my melon is too heavy for the sling?
If your melon is becoming too heavy for the sling, you have a few options. First, reinforce the sling with stronger materials or add additional support straps. You can also try redistributing the weight of the melon by adjusting the position of the sling. If the melon is still too heavy, consider harvesting it early, even if it’s not fully ripe. You can allow it to ripen further off the vine. Alternatively, you could add a secondary support system, such as a platform or shelf, to help bear the weight of the melon.

Leave a Comment