
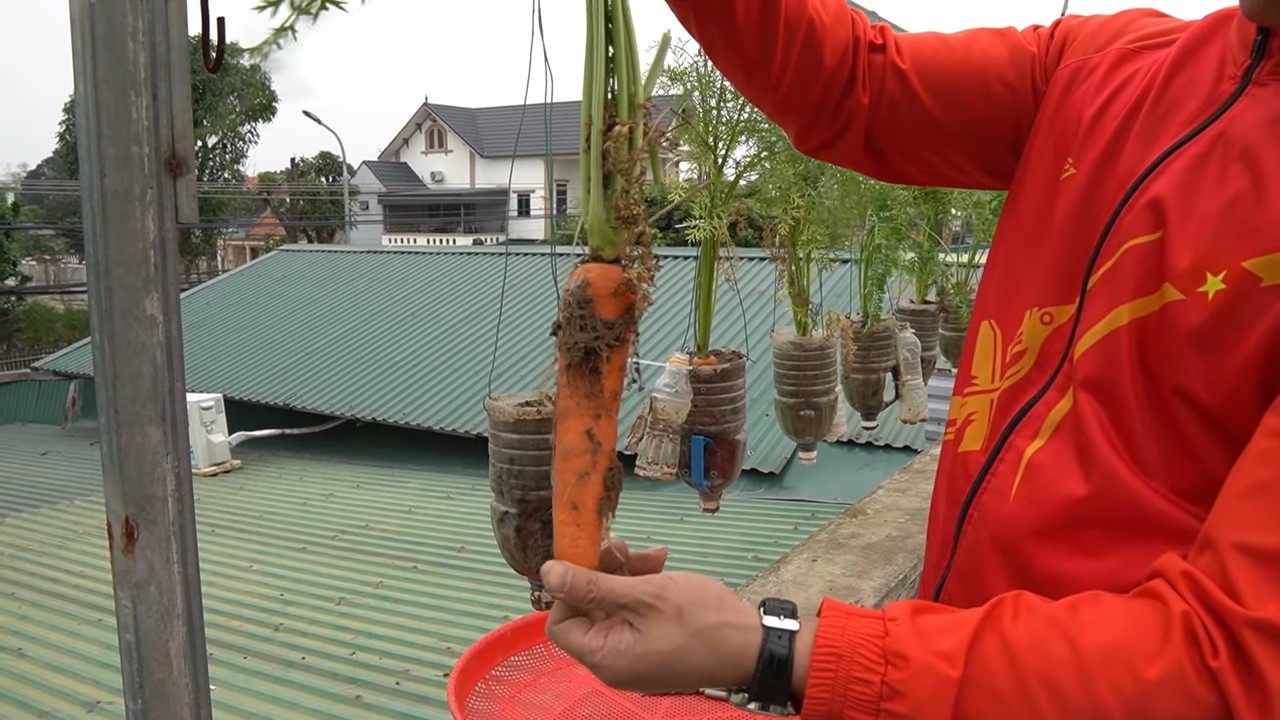
Hanging Bottle Carrot Gardening: Imagine a world where fresh, vibrant carrots dangle gracefully from your balcony, patio, or even your kitchen window! Sounds like something out of a fairytale, right? Well, it doesn’t have to be! In this DIY guide, I’m going to show you how to create your very own hanging carrot garden using recycled plastic bottles. It’s a fun, eco-friendly, and surprisingly effective way to grow these root vegetables, even if you’re short on space.
Carrots, believe it or not, have a rich history dating back thousands of years. Originally cultivated for their aromatic leaves and seeds, the vibrant orange root we know and love today is a relatively modern development. Throughout history, carrots have been a staple in various cultures, prized for their nutritional value and versatility in cooking. Now, we’re taking carrot cultivation to new heights – literally!
Why should you try this hanging bottle carrot gardening trick? Well, for starters, it’s a fantastic solution for urban dwellers with limited garden space. It’s also a great way to recycle plastic bottles, reducing waste and giving them a new purpose. Plus, it’s incredibly satisfying to harvest your own homegrown carrots, knowing you nurtured them from seed to table. Let’s dive in and discover how easy it is to create your own vertical carrot oasis!
Hängende Karotten-Gärten aus Plastikflaschen: Eine DIY-Anleitung
Hallo liebe Gartenfreunde! Habt ihr auch so wenig Platz im Garten oder auf dem Balkon, aber trotzdem Lust auf frische, selbstangebaute Karotten? Dann habe ich genau das Richtige für euch: Hängende Karotten-Gärten aus Plastikflaschen! Das ist nicht nur super platzsparend, sondern auch ein tolles Upcycling-Projekt. Lasst uns gemeinsam loslegen!
Was du brauchst:
* Plastikflaschen: Am besten eignen sich große PET-Flaschen (z.B. 1,5 oder 2 Liter). Je größer die Flasche, desto mehr Platz haben die Karotten zum Wachsen.
* Bohrmaschine oder Cutter-Messer: Zum Anbringen der Löcher und zum Schneiden der Flaschen.
* Erde: Hochwertige Pflanzerde ist wichtig für das Wachstum der Karotten.
* Karottensamen: Wähle am besten eine Sorte, die für den Anbau in Töpfen geeignet ist (z.B. Mini-Karotten).
* Schnur oder Draht: Zum Aufhängen der Flaschen.
* Gießkanne oder Sprühflasche: Zum Bewässern der Karotten.
* Optional: Vlies oder Jute zum Auskleiden der Flaschen (verhindert das Austrocknen der Erde).
* Optional: Kleine Steine oder Tonscherben für die Drainage.
* Handschuhe: Um deine Hände sauber zu halten.
* Messbecher oder Waage: Zum Abmessen der Erde und des Wassers.
* Markierstift: Zum Anzeichnen der Schnittlinien.
Vorbereitung der Plastikflaschen
1. Reinigung: Zuerst müssen die Plastikflaschen gründlich gereinigt werden. Entferne alle Etiketten und spüle sie mit warmem Wasser und Spülmittel aus. Achte darauf, dass keine Rückstände zurückbleiben.
2. Schneiden: Jetzt kommt der spannende Teil: das Schneiden der Flaschen. Es gibt verschiedene Möglichkeiten, wie du das machen kannst. Ich zeige dir zwei Varianten:
* Variante 1: Horizontales Schneiden:
* Markiere mit dem Stift eine Linie um die Flasche herum, etwa 10-15 cm unterhalb des Flaschenhalses.
* Schneide die Flasche entlang der Linie mit dem Cutter-Messer oder der Schere durch.
* Du erhältst zwei Teile: einen oberen Teil mit dem Flaschenhals und einen unteren Teil. Der untere Teil wird später mit Erde befüllt.
* Variante 2: Seitliche Öffnungen:
* Markiere mehrere rechteckige oder ovale Öffnungen an den Seiten der Flasche. Die Öffnungen sollten groß genug sein, damit die Karotten später herauswachsen können (ca. 5-8 cm breit und 10-12 cm hoch).
* Schneide die Öffnungen vorsichtig mit dem Cutter-Messer aus. Achte darauf, dass du dich nicht verletzt!
3. Drainagelöcher: Unabhängig davon, welche Variante du gewählt hast, solltest du unbedingt Drainagelöcher in den Boden der Flasche bohren oder schneiden. Diese Löcher sorgen dafür, dass überschüssiges Wasser ablaufen kann und die Wurzeln der Karotten nicht faulen.
4. Optional: Auskleiden: Um die Erde vor dem Austrocknen zu schützen, kannst du die Innenseite der Flasche mit Vlies oder Jute auskleiden. Schneide das Material passend zu und klebe es mit etwas Kleber oder doppelseitigem Klebeband fest.
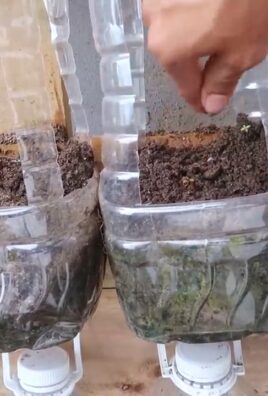
Befüllen der Flaschen und Aussaat der Karotten
1. Drainage: Fülle den Boden der Flasche mit einer Schicht kleiner Steine oder Tonscherben. Diese Schicht dient als Drainage und verhindert Staunässe.
2. Erde: Fülle die Flasche mit hochwertiger Pflanzerde. Achte darauf, dass die Erde locker und luftig ist, damit die Wurzeln der Karotten gut wachsen können. Lass etwa 2-3 cm Platz bis zum Rand der Flasche.
3. Aussaat: Verteile die Karottensamen gleichmäßig auf der Erde. Beachte dabei die Angaben auf der Samenpackung bezüglich des Abstands zwischen den Samen. Drücke die Samen leicht in die Erde und bedecke sie mit einer dünnen Schicht Erde.
4. Bewässerung: Gieße die Erde vorsichtig mit einer Gießkanne oder Sprühflasche an. Die Erde sollte feucht, aber nicht nass sein.
Aufhängen der Flaschen
1. Löcher bohren: Bohre mit der Bohrmaschine oder dem Cutter-Messer Löcher in den oberen Rand der Flasche. Die Anzahl der Löcher hängt davon ab, wie du die Flasche aufhängen möchtest.
2. Schnur oder Draht befestigen: Fädle die Schnur oder den Draht durch die Löcher und verknote sie fest. Achte darauf, dass die Schnur oder der Draht stabil genug ist, um das Gewicht der befüllten Flasche zu tragen.
3. Aufhängen: Hänge die Flaschen an einem sonnigen Ort auf. Ideal ist ein Platz, an dem die Karotten mindestens 6 Stunden Sonne pro Tag bekommen. Achte darauf, dass die Flaschen vor starkem Wind geschützt sind.
Pflege der Karotten
1. Bewässerung: Gieße die Karotten regelmäßig, besonders an heißen Tagen. Die Erde sollte immer leicht feucht sein. Vermeide Staunässe.
2. Düngen: Dünge die Karotten alle 2-3 Wochen mit einem organischen Dünger. Achte dabei auf die Dosierungsanleitung des Herstellers.
3. Unkraut entfernen: Entferne regelmäßig Unkraut, das in den Flaschen wächst.
4. Ausdünnen: Wenn die Karotten zu dicht beieinander wachsen, solltest du sie ausdünnen. Entferne die schwächsten Pflanzen, damit die übrigen Pflanzen genügend Platz zum Wachsen haben.
Ernte der Karotten
Die Erntezeit hängt von der Sorte der Karotten ab. In der Regel sind Karotten nach etwa 60-80 Tagen erntereif. Du erkennst, dass die Karotten reif sind, wenn sie eine kräftige Farbe haben und aus der Erde herausragen. Ziehe die Karotten vorsichtig aus der Erde.
Zusätzliche Tipps und Tricks
* Verschiedene Sorten: Probiere verschiedene Karottensorten aus, um herauszufinden, welche dir am besten schmecken und am besten in den Flaschen wachsen.
* Mischkultur: Pflanze neben den Karotten auch andere Pflanzen in die Flaschen, z.B. Radieschen oder Salat. Diese Pflanzen können die Karotten vor Schädlingen schützen und den Boden verbessern.
* Schutz vor Schädlingen: Schütze die Karotten vor Schädlingen, z.B. mit einem Netz oder Vlies.
* Winterharte Sorten: Wenn du auch im Winter Karotten ernten möchtest, wähle winterharte Sorten.
* Kreative Gestaltung: Bemal die Plastikflaschen mit bunten Farben oder Mustern, um deinen hängenden Garten noch individueller zu gestalten.
* Upcycling: Nutze alte T-Shirts oder Stoffreste, um die Flaschen zu umwickeln und ihnen einen neuen Look zu verleihen.
* Vertikale Gärten: Kombiniere mehrere hängende Karotten-Gärten zu einem vertikalen Garten. Das spart noch mehr Platz und sieht toll aus!
* Beschriftung: Beschrifte die Flaschen mit den Namen der Karottensorten, damit du den Überblick behältst.
* Dokumentation: Mache Fotos von deinem hängenden Karotten-Garten, um den Fortschritt zu dokumentieren und deine Erfahrungen mit anderen zu teilen.
Häufige Probleme und Lösungen
* Gelbe Blätter: Gelbe Blätter können ein Zeichen für Nährstoffmangel sein. Dünge die Karotten mit einem organischen Dünger.
* Kleine Karotten: Kleine Karotten können ein Zeichen für zu wenig Platz oder zu wenig Sonne sein. Wähle größere Flaschen oder hänge die Flaschen an einen sonnigeren Ort.
* Schädlinge: Schütze die Karotten vor Schädlingen mit einem Netz oder Vlies.

Conclusion
So, there you have it! Transforming discarded plastic bottles into a vertical carrot garden is not just a quirky DIY project; it’s a sustainable, space-saving, and surprisingly effective way to cultivate delicious, homegrown carrots. This method offers a multitude of benefits, from maximizing your yield in limited spaces to reducing plastic waste and adding a touch of green to your balcony, patio, or even a sunny windowsill.
Why is this hanging bottle carrot gardening trick a must-try? Because it empowers you to take control of your food source, even if you don’t have a traditional garden. Imagine the satisfaction of harvesting vibrant, sweet carrots that you nurtured from seed to table, all within the confines of repurposed plastic bottles. It’s a rewarding experience that connects you to the natural world and promotes a more eco-conscious lifestyle.
Beyond the practical advantages, this project is incredibly versatile. Feel free to experiment with different carrot varieties, from the classic Nantes to the colorful rainbow carrots. You can also adjust the size and number of bottles to suit your available space and desired yield. Consider adding companion plants like marigolds or basil to deter pests and enhance the flavor of your carrots.
Don’t be afraid to get creative! You can paint the bottles to add a splash of color, decorate them with stencils, or even create a tiered system for a more visually appealing display. The possibilities are endless, and the only limit is your imagination.
We wholeheartedly encourage you to embark on this exciting DIY adventure. Gather your empty plastic bottles, prepare your potting mix, and sow those carrot seeds with anticipation. Witness the magic of nature unfold as your tiny seeds sprout and grow into vibrant, delicious carrots, all within the confines of your upcycled vertical garden.
Once you’ve experienced the joy of hanging bottle carrot gardening, we’d love to hear about your journey! Share your photos, tips, and experiences with us in the comments below. Let’s inspire each other to embrace sustainable gardening practices and create a greener, more bountiful world, one carrot at a time. We are confident that you will find this method to be a fun, rewarding, and ultimately delicious way to grow your own food. So, get started today and enjoy the fruits (or rather, vegetables) of your labor!
Frequently Asked Questions (FAQ)
What type of plastic bottles are best for hanging bottle carrot gardening?
Ideally, you should use sturdy, food-grade plastic bottles. Two-liter soda bottles or larger water bottles work well. Avoid bottles that have contained harsh chemicals or cleaning products, as these could contaminate your soil and affect the growth of your carrots. Make sure to thoroughly clean the bottles with soap and water before using them. Clear or translucent bottles are preferable as they allow you to monitor the soil moisture levels and root development.
What kind of soil should I use for growing carrots in hanging bottles?
Carrots need well-draining, loose soil to thrive. A mixture of potting soil, compost, and perlite or vermiculite is ideal. The compost provides essential nutrients, while the perlite or vermiculite improves drainage and aeration. Avoid using heavy clay soil, as it can compact and hinder root growth. You can also purchase a pre-mixed potting mix specifically formulated for vegetables. Ensure the soil is slightly acidic to neutral (pH 6.0-7.0) for optimal carrot growth.
How often should I water my hanging bottle carrot garden?
The frequency of watering depends on the climate, the type of soil you’re using, and the size of the bottles. Generally, you should water your carrots when the top inch of soil feels dry to the touch. Avoid overwatering, as this can lead to root rot. Ensure the bottles have drainage holes to prevent water from accumulating at the bottom. During hot, dry weather, you may need to water more frequently. Check the soil moisture levels regularly and adjust your watering schedule accordingly.
How much sunlight do carrots need when grown in hanging bottles?
Carrots need at least 6-8 hours of direct sunlight per day to grow properly. Choose a location that receives ample sunlight, such as a south-facing balcony or patio. If you don’t have enough natural sunlight, you can supplement with grow lights. Rotate the bottles regularly to ensure that all sides of the plants receive equal exposure to sunlight. Insufficient sunlight can result in leggy growth and poor carrot development.
How do I prevent pests and diseases from affecting my carrot plants in hanging bottles?
Several measures can be taken to prevent pests and diseases. Start by using healthy, disease-free seeds. Ensure good air circulation around the plants to prevent fungal diseases. Companion planting with marigolds or basil can help deter pests. Regularly inspect your plants for signs of pests or diseases, such as aphids, carrot rust flies, or leaf spot. If you detect any problems, treat them promptly with organic pest control methods, such as insecticidal soap or neem oil. Avoid overwatering, as this can create a favorable environment for fungal diseases.
When is the best time to harvest my carrots from hanging bottles?
The time it takes for carrots to mature depends on the variety and growing conditions. Generally, carrots are ready to harvest 60-80 days after planting. Check the seed packet for specific maturity dates. You can tell when carrots are ready to harvest by gently pulling back the soil around the top of the carrot to check its size. The carrots should be at least ½ inch in diameter. To harvest, gently pull the carrot from the soil, twisting it slightly if necessary. Water the soil before harvesting to make it easier to pull the carrots.
Can I reuse the soil from my hanging bottle carrot garden?
You can reuse the soil, but it’s important to replenish the nutrients and improve its structure. After harvesting your carrots, remove any remaining plant debris and roots from the soil. Amend the soil with fresh compost and organic fertilizer to replenish the nutrients that were used by the carrots. You can also add perlite or vermiculite to improve drainage and aeration. If you suspect that the soil is contaminated with pests or diseases, it’s best to sterilize it before reusing it. You can do this by baking the soil in the oven at 200°F for 30 minutes or by solarizing it in a black plastic bag for several weeks.
What are some other vegetables I can grow in hanging bottles?
Besides carrots, you can grow a variety of other vegetables in hanging bottles, including lettuce, spinach, herbs (such as basil, parsley, and thyme), strawberries, and even small varieties of tomatoes and peppers. Choose vegetables that have shallow root systems and don’t require a lot of space. Ensure that the bottles are large enough to accommodate the root systems of the plants you choose. Provide adequate sunlight, water, and nutrients for each type of vegetable.
How do I prevent the hanging bottles from falling or breaking?
Use strong, durable rope or wire to hang the bottles. Ensure that the hanging mechanism is securely attached to both the bottle and the support structure. Distribute the weight evenly to prevent the bottles from tipping or breaking. Avoid hanging the bottles in windy areas, as this can put extra stress on the hanging mechanism. Regularly inspect the hanging mechanism for signs of wear and tear and replace it if necessary. Consider using a support structure, such as a trellis or fence, to provide additional stability.
Can I grow carrots in hanging bottles during the winter?
Whether you can grow carrots in hanging bottles during the winter depends on your climate. Carrots are relatively cold-hardy and can tolerate light frosts. In mild climates, you may be able to grow carrots outdoors throughout the winter. In colder climates, you may need to protect the plants from freezing temperatures by moving them indoors or covering them with a frost blanket. Choose a carrot variety that is known for its cold tolerance. Provide adequate sunlight and water, even during the winter months.
Leave a Comment