
Growing Winged Beans can seem daunting, but trust me, it’s a rewarding experience that brings a unique and delicious addition to your garden and your plate! Have you ever dreamt of harvesting vibrant, four-sided beans right from your backyard, adding an exotic touch to your meals? This DIY guide will unlock the secrets to successfully cultivating these fascinating legumes, even if you’re a beginner gardener.
Winged beans, also known as asparagus peas or Goa beans, boast a rich history, particularly in Southeast Asia and Papua New Guinea, where they’ve been cultivated for centuries. They’re not just a tasty vegetable; they’re a nutritional powerhouse, packed with protein, vitamins, and minerals. Historically, they’ve been a vital food source in these regions, showcasing their resilience and adaptability.
But why should *you* consider growing winged beans? In today’s world, where we’re increasingly conscious of food security and sustainable practices, cultivating your own food is more important than ever. Plus, winged beans are incredibly versatile – you can eat the pods, leaves, flowers, and even the roots! Imagine the satisfaction of harvesting your own fresh, organic produce and knowing exactly where your food comes from. This DIY guide will provide you with the essential tips and tricks to successfully cultivate these unique beans, ensuring a bountiful harvest and a delightful culinary adventure. Let’s get started!
Growing Winged Beans: A Comprehensive DIY Guide
Hey there, fellow gardening enthusiasts! I’m so excited to share my experience with growing winged beans (Psophocarpus tetragonolobus). These fascinating legumes are not only beautiful climbers but also incredibly nutritious, offering edible pods, leaves, flowers, seeds, and even tubers! It might seem daunting at first, but trust me, with a little patience and this guide, you’ll be harvesting your own winged bean bounty in no time.
Choosing the Right Variety and Location
Before we dive into the nitty-gritty, let’s talk about variety and location. While there aren’t a ton of commercially available winged bean varieties, you might find some regional differences or specific cultivars at local nurseries or seed exchanges. Look for varieties that are well-suited to your climate and growing season.
* Climate: Winged beans thrive in warm, humid climates. They need a long growing season of at least 120-150 days with temperatures consistently above 70°F (21°C). If you live in a cooler area, you can start seeds indoors to get a head start.
* Sunlight: These beans are sun-worshippers! They need at least 6-8 hours of direct sunlight each day to produce a good yield.
* Soil: Winged beans prefer well-drained, fertile soil with a slightly acidic to neutral pH (6.0-7.0). Amend your soil with compost or well-rotted manure to improve drainage and fertility.
* Support: Winged beans are climbers, so they need a strong trellis, fence, or other support structure to grow on. Plan for something that can handle a lot of weight, as these vines can get quite large.
Preparing the Soil and Planting
Okay, now that we’ve covered the basics, let’s get our hands dirty!
1. Soil Preparation: Start by clearing the area where you plan to plant your winged beans. Remove any weeds, rocks, or debris. Then, dig in plenty of compost or well-rotted manure to enrich the soil. This will provide the beans with the nutrients they need to grow strong and healthy. I usually aim for a depth of at least 6-8 inches when amending the soil.
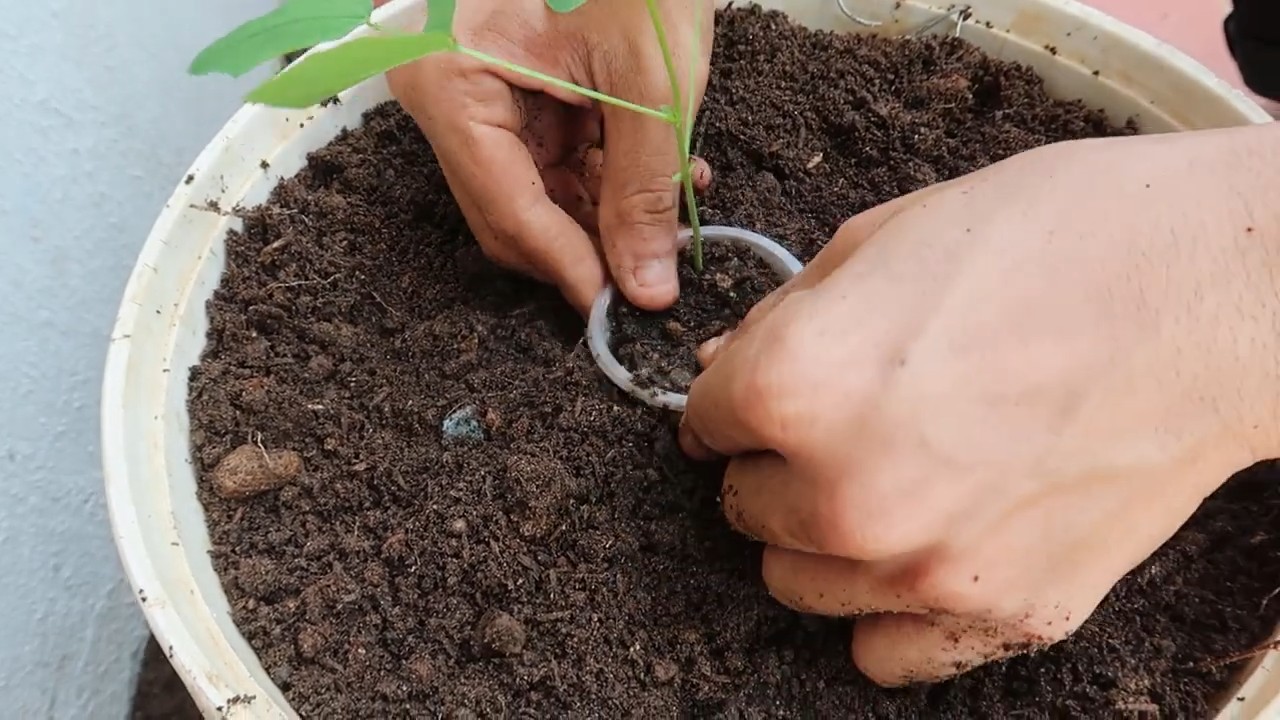
2. Seed Scarification (Optional but Recommended): Winged bean seeds have a hard outer coating, which can sometimes make it difficult for them to germinate. To improve germination rates, you can scarify the seeds. This involves gently nicking or scratching the seed coat to allow water to penetrate more easily. You can use a nail file, sandpaper, or even carefully nick the seed with a knife. Be careful not to damage the inside of the seed!
3. Soaking the Seeds: After scarifying (or even if you skip that step), soak the seeds in warm water for 12-24 hours. This will further soften the seed coat and encourage germination.
4. Planting the Seeds: Plant the seeds directly in the ground after the last frost, when the soil has warmed up to at least 65°F (18°C). Sow the seeds about 1 inch deep and 4-6 inches apart. If you’re planting in rows, space the rows about 3-4 feet apart.
5. Watering: Water the seeds gently after planting to keep the soil moist but not waterlogged.
Starting Seeds Indoors (For Cooler Climates)
If you live in a cooler climate with a shorter growing season, starting seeds indoors is a great way to get a head start.
1. Timing: Start the seeds indoors about 4-6 weeks before the last expected frost.
2. Containers: Use small pots or seedling trays filled with a well-draining potting mix.
3. Planting: Plant the seeds about 1 inch deep in the potting mix.
4. Watering: Keep the potting mix moist but not waterlogged.
5. Light: Place the seedlings under grow lights or in a sunny window.
6. Hardening Off: Before transplanting the seedlings outdoors, you’ll need to harden them off. This involves gradually exposing them to outdoor conditions over a period of 7-10 days. Start by placing them in a sheltered spot for a few hours each day, gradually increasing the amount of time they spend outdoors.
7. Transplanting: Once the seedlings have been hardened off and the weather is warm enough, transplant them into the garden, spacing them 4-6 inches apart.
Providing Support and Training the Vines
As your winged beans grow, they’ll need support to climb. This is where your trellis, fence, or other support structure comes in handy.
1. Installing the Support: Make sure your support structure is sturdy and well-anchored in the ground. Winged bean vines can get quite heavy, especially when they’re loaded with pods.
2. Training the Vines: As the vines grow, gently guide them onto the support structure. You may need to tie them to the support with twine or plant ties.
3. Pruning (Optional): While not strictly necessary, you can prune the vines to encourage bushier growth and better pod production. Simply pinch off the tips of the vines to promote branching.
Watering, Fertilizing, and Pest Control
Like all plants, winged beans need regular watering, fertilizing, and pest control to thrive.
1. Watering: Water the beans regularly, especially during dry periods. Aim to keep the soil consistently moist but not waterlogged.
2. Fertilizing: Winged beans are legumes, which means they can fix nitrogen from the air. However, they still benefit from regular fertilization. Use a balanced fertilizer or a fertilizer specifically formulated for beans. I like to use a liquid seaweed fertilizer every few weeks.
3. Pest Control: Winged beans are relatively pest-resistant, but they can sometimes be attacked by aphids, spider mites, or bean beetles. Inspect your plants regularly for signs of pests and take action promptly. You can use insecticidal soap, neem oil, or other organic pest control methods.
Harvesting and Using Winged Beans
The best part of growing winged beans is, of course, harvesting and enjoying the fruits (or rather, the pods!) of your labor.
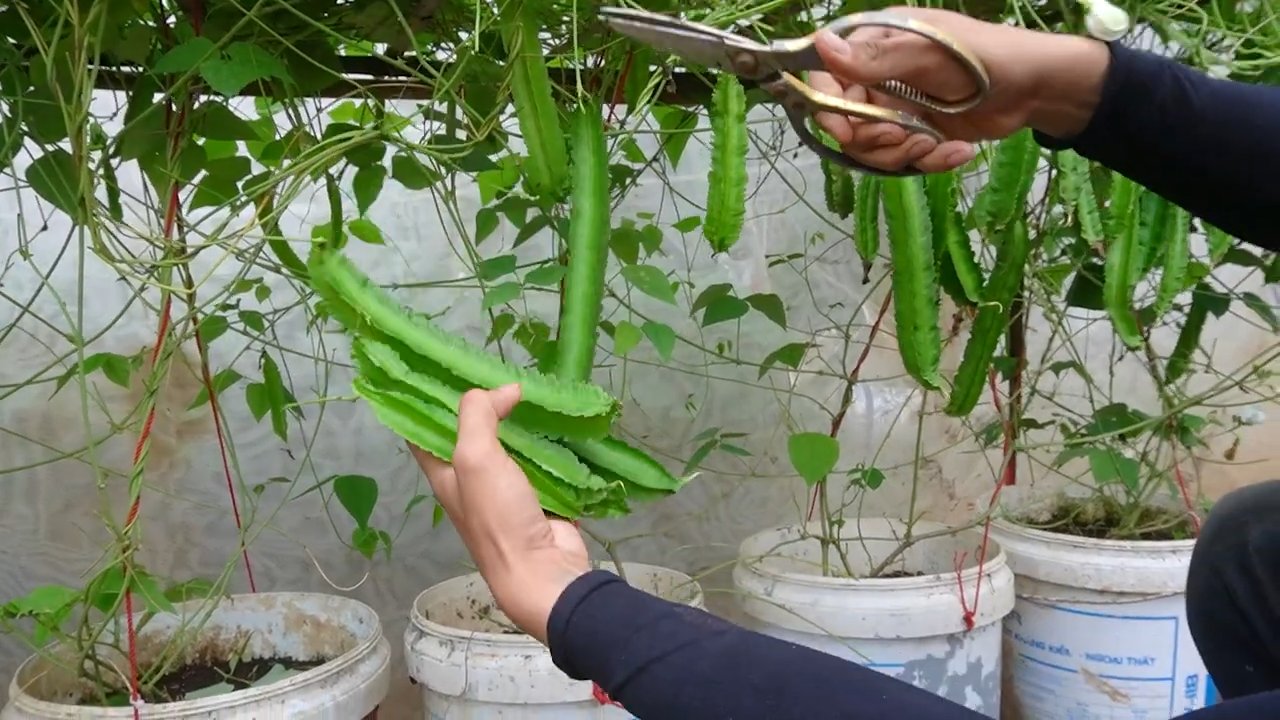
1. Harvesting the Pods: The pods are typically ready to harvest about 2-3 months after planting. Harvest them when they are young and tender, about 6-8 inches long. The pods should be bright green and snap easily when bent.
2. Harvesting the Leaves: The leaves can be harvested at any time during the growing season. They can be used in salads, soups, or stir-fries.
3. Harvesting the Flowers: The flowers are also edible and can be used in salads or as a garnish.
4. Harvesting the Seeds: If you want to save seeds for next year, allow some of the pods to mature and dry on the vine. Once the pods are dry and brown, harvest them and extract the seeds.
5. Harvesting the Tubers: The tubers can be harvested in the fall, after the vines have died back. They can be eaten raw or cooked.
Culinary Uses of Winged Beans
Winged beans are incredibly versatile in the kitchen. Here are just a few ideas:
* Pods: The young, tender pods can be eaten raw in salads or stir-fries. They can also be steamed, boiled, or fried.
* Leaves: The leaves can be used in salads, soups, or stir-fries.
* Flowers: The flowers can be used in salads or as a garnish.
* Seeds: The seeds can be roasted and eaten as a snack, or ground into flour.
* Tubers: The tubers can be eaten raw or cooked. They have a nutty flavor and a crunchy texture.
Troubleshooting
Even with the best care, you might encounter some problems while growing winged beans. Here are a few common issues and how to address them:
* Poor Germination: If your seeds aren’t germinating, make sure the soil is warm enough and that you’ve scarified and soaked the seeds.
* Yellowing Leaves: Yellowing leaves can be a sign of nutrient deficiency. Fertilize your plants with a balanced fertilizer.
* Pest Infestations: Inspect your plants regularly for signs of pests and take action promptly.
* Lack of Pod Production: Lack of pod production can be caused by insufficient sunlight, poor soil, or lack of pollination. Make sure your plants are getting enough sunlight, amend the soil with compost, and consider hand-pollinating the flowers.
Saving Seeds for Next Year
Saving seeds from your winged beans is a great way to ensure you have a supply of seeds for next year.
1. Select Healthy Plants: Choose plants that are healthy and productive to save seeds from.
2. Allow Pods to Mature: Allow some of the pods
Conclusion
So, there you have it! Growing winged beans at home is not just a gardening project; it’s an adventure in flavor, sustainability, and self-sufficiency. We’ve explored the ins and outs of cultivating this remarkable legume, from selecting the right seeds to providing the necessary support for its vigorous growth. The benefits extend far beyond the plate, offering a beautiful, nitrogen-fixing addition to your garden and a conversation starter for anyone who appreciates unique and nutritious foods.
Why is this DIY trick a must-try? Because it empowers you to take control of your food source, reduce your reliance on commercially grown produce, and experience the unparalleled freshness of homegrown vegetables. Winged beans are not commonly found in supermarkets, making this a truly unique opportunity to enjoy a culinary delicacy that you’ve nurtured yourself. Plus, the entire plant is edible, offering a diverse range of culinary possibilities.
Consider these suggestions and variations to personalize your winged bean growing experience:
* **Vertical Gardening:** If you’re short on space, embrace vertical gardening techniques. Winged beans thrive on trellises, fences, or even repurposed structures like old ladders. This maximizes your yield while adding visual appeal to your garden.
* **Companion Planting:** Enhance your winged bean patch by incorporating companion plants like basil, marigolds, or rosemary. These herbs can deter pests and attract beneficial insects, creating a healthier and more productive environment.
* **Seed Saving:** Once your winged beans mature, save some of the seeds for future planting. This ensures a continuous supply of this delicious legume and allows you to adapt the variety to your specific climate and growing conditions.
* **Culinary Experimentation:** Don’t limit yourself to just one way of preparing winged beans. Experiment with different recipes, from stir-fries and salads to soups and stews. The possibilities are endless! You can even try pickling the young pods for a tangy treat.
* **Different Varieties:** Explore different varieties of winged beans. Some have different colored flowers or pods, and some are more suited to certain climates. Experiment to find the variety that thrives best in your garden.
We wholeheartedly encourage you to embark on this rewarding journey of growing winged beans. It’s a chance to connect with nature, learn new skills, and savor the fruits (or rather, the beans!) of your labor.
Don’t be intimidated if you’re a beginner gardener. Winged beans are relatively easy to grow, and the satisfaction of harvesting your own fresh produce is well worth the effort. Remember to provide them with plenty of sunlight, well-drained soil, and a sturdy support structure, and you’ll be well on your way to enjoying a bountiful harvest.
We’re eager to hear about your experiences! Share your tips, successes, and challenges in the comments below. Let’s create a community of winged bean enthusiasts and learn from each other. Did you discover a particularly delicious recipe? Did you find a unique way to support your plants? We want to know! Your insights can help other gardeners succeed and inspire even more people to try growing winged beans at home. So, get your hands dirty, embrace the challenge, and let’s cultivate a world of flavor, one winged bean at a time.
Frequently Asked Questions (FAQ)
What are winged beans, and why should I grow them?
Winged beans (Psophocarpus tetragonolobus) are a tropical legume known for their unique four-sided pods, which are entirely edible, along with the leaves, flowers, seeds, and roots. They are a nutritional powerhouse, packed with protein, vitamins, and minerals. Growing them offers a sustainable and rewarding way to access a food source rarely found in commercial markets. They also fix nitrogen in the soil, improving soil health for other plants. Plus, the beautiful flowers and climbing vines add an aesthetic appeal to your garden.
How do I start growing winged beans?
You can start winged beans from seeds or seedlings. Soaking the seeds in warm water for 24 hours before planting can improve germination rates. Plant the seeds directly in the ground after the last frost, or start them indoors 4-6 weeks before the last frost. Ensure the soil is well-drained and rich in organic matter. Provide a sturdy trellis or support structure for the vines to climb.
What kind of soil and sunlight do winged beans need?
Winged beans thrive in well-drained soil with a pH between 6.0 and 7.5. They prefer full sun, requiring at least 6-8 hours of direct sunlight per day. Amend the soil with compost or other organic matter to improve drainage and fertility. Avoid heavy clay soils, as they can lead to root rot.
How often should I water winged beans?
Water winged beans regularly, especially during dry periods. Keep the soil consistently moist but not waterlogged. Water deeply at the base of the plant to encourage strong root growth. Mulching around the base of the plant can help retain moisture and suppress weeds.
What kind of support structure do winged beans need?
Winged beans are vigorous climbers and require a strong support structure to grow properly. A trellis, fence, or even a sturdy pole can be used. The support should be at least 6-8 feet tall to accommodate the plant’s growth. Ensure the structure is strong enough to support the weight of the mature vines and pods.
How long does it take for winged beans to mature?
Winged beans typically take 120-180 days to mature, depending on the variety and growing conditions. You can start harvesting the young pods when they are about 6-8 inches long and still tender. Regular harvesting encourages continued pod production.
Are there any common pests or diseases that affect winged beans?
Winged beans are generally resistant to pests and diseases, but they can be susceptible to aphids, spider mites, and fungal diseases in humid conditions. Inspect your plants regularly and take action promptly if you notice any signs of infestation or disease. Use organic pest control methods, such as insecticidal soap or neem oil, to control pests. Ensure good air circulation to prevent fungal diseases.
Can I eat the entire winged bean plant?
Yes, the entire winged bean plant is edible! The young pods are the most commonly consumed part, but the leaves, flowers, seeds, and roots can also be eaten. The leaves can be used in salads or cooked like spinach. The flowers can be added to salads or used as a garnish. The seeds can be roasted or boiled and eaten like beans. The roots can be cooked and eaten like potatoes.
How do I harvest and store winged beans?
Harvest the young pods when they are about 6-8 inches long and still tender. Use a sharp knife or scissors to cut the pods from the vine. Store the harvested pods in the refrigerator for up to a week. You can also freeze the pods for longer storage. To freeze, blanch the pods in boiling water for 2-3 minutes, then transfer them to an ice bath to stop the cooking process. Drain the pods and store them in freezer bags or containers.
Can I save seeds from my winged bean plants?
Yes, you can save seeds from your winged bean plants. Allow some of the pods to mature fully on the vine until they turn brown and dry. Harvest the pods and remove the seeds. Dry the seeds thoroughly before storing them in an airtight container in a cool, dark place.
What are some ways to cook winged beans?
Winged beans can be cooked in a variety of ways. They can be stir-fried, steamed, boiled, grilled, or added to soups and stews. They have a slightly nutty flavor and a crisp texture. Try them in stir-fries with garlic, ginger, and soy sauce, or add them to salads with a vinaigrette dressing. They are also delicious in curries and stews.
Are winged beans a good source of protein?
Yes, winged beans are an excellent source of protein. They contain a higher protein content than many other legumes. They are also a good source of fiber, vitamins, and minerals. Including winged beans in your diet can contribute to a healthy and balanced eating plan.
Can winged beans be grown in containers?
Yes, winged beans can be grown in containers, but you will need a large container (at least 10 gallons) to accommodate the plant’s root system. Use a well-draining potting mix and provide a sturdy trellis or support structure for the vines to climb. Water and fertilize regularly.
How do I deal with aphids on my winged bean plants?
Aphids are small, sap-sucking insects that can infest winged bean plants. They can be controlled with insecticidal soap or neem oil. Spray the plants thoroughly, making sure to reach all parts of the plant, including the undersides of the leaves. Repeat the treatment every few days until the aphids are gone. You can also attract beneficial insects, such as ladybugs and lacewings, to your garden to help control aphids.
What are the benefits of companion planting with winged beans?
Companion planting can benefit winged beans by deterring pests, attracting beneficial insects, and improving soil health. Good companion plants for winged beans include basil, marigolds, rosemary, and nasturtiums. Basil repels aphids and other pests. Marigolds attract beneficial insects. Rosemary deters cabbage moths. Nasturtiums attract aphids away from other plants.
Leave a Comment