
Growing Roma Tomatoes can feel like a daunting task, especially if you’re new to home gardening. But what if I told you that with a few simple tricks and DIY hacks, you could be harvesting baskets full of juicy, flavorful Roma tomatoes right from your own backyard? Forget those bland, store-bought tomatoes – imagine the taste of sun-ripened goodness in your salads, sauces, and sandwiches!
The Roma tomato, with its rich history rooted in Italy, is a culinary staple. These tomatoes are prized for their meaty texture, low water content, and exceptional flavor, making them perfect for canning, sauces, and pastes. For generations, Italian families have passed down secrets for cultivating the perfect Roma, and now, I’m excited to share some of those time-tested techniques with you.
Why do you need these DIY tricks? Because growing Roma Tomatoes successfully isn’t just about throwing some seeds in the ground and hoping for the best. It’s about understanding their specific needs, providing the right environment, and employing a few clever strategies to maximize your yield and protect your plants from pests and diseases. In this article, I’ll walk you through everything you need to know, from selecting the right seedlings to creating the perfect soil mix, ensuring you have a bountiful harvest of delicious Roma tomatoes all season long. Let’s get started!
Growing Roma Tomatoes Yourself: Your Comprehensive DIY Guide
Hey garden friends! I love harvesting fresh Roma tomatoes directly from my garden. Their firmer flesh and low juice content make them perfect for sauces, soups, and canning. And the best part? It’s not hard at all to grow them yourself! In this article, I’ll show you step by step how you can grow your own Roma tomatoes – from sowing to harvest. Let’s get started!
What You Need for Growing Roma Tomatoes
Before we begin, here is a list of the things you’ll need:
-
Roma tomato seeds: Choose a variety that you like. There are different Roma varieties that vary slightly in size and taste.
-
Seed starting mix: This is low in nutrients and specially suited for starting seedlings.
-
Seedling containers: Small pots, seed trays, or egg cartons work great.
-
Dibber/Pricking tool: A small stick to carefully transplant the seedlings.
-
Watering can with a fine rose: To avoid damaging the young plants.
-
Potting soil: Nutrient-rich soil for planting in a garden bed or larger pots.
-
Tomato fertilizer: Special fertilizer for tomato plants to ensure a bountiful harvest.
-
Plant stakes or tomato cages: Roma tomato plants grow quite large and need support.
-
Pruning shears: For pruning side shoots (suckers).
-
Gardening gloves: To protect your hands.
-
A sunny location: Tomatoes love the sun!
-
Patience: Rome wasn’t built in a day!
Sowing Roma Tomato Seeds
Sowing is the first step to your own Roma tomatoes. I usually start this in March or April so the plants have enough time to grow big and strong before being planted out.
-
Prepare the seedling containers: Fill your seedling containers with seed starting mix. Press the soil down lightly.
-
Sow the seeds: Place 2-3 seeds in each container. Cover them with a thin layer of soil (approx. 0.5 cm).
-
Water: Moisten the soil carefully with a watering can with a fine rose. The soil should be damp, but not wet.
-
Cover: Cover the seedling containers with a clear film or a lid to increase humidity. This promotes germination.
-
Location: Place the seedling containers in a warm and bright place. A temperature of 20-25°C is ideal.
-
Regular checks: Check the soil regularly and keep it moist. Briefly air out the containers daily to prevent mold.
-
Germination: After about 7-14 days, the first seedlings should be visible. Remove the film or lid as soon as the seedlings appear.
Pricking Out Roma Tomatoes
Once the seedlings have developed their first true leaves (besides the seed leaves), it’s time to prick them out. This means you transplant the small plants into larger pots so they have more space to grow.
-
Prepare the pots: Fill small pots (approx. 8-10 cm in diameter) with potting soil.
-
Water the seedling containers: Water the containers before pricking out to make it easier to remove the seedlings from the soil.
-
Remove the seedlings: Carefully loosen the seedlings from the soil with a dibber or a spoon. Try to damage the roots as little as possible.
-
Plant in pots: Place each seedling in its own pot. Make sure the roots are not bent. The plant can be set a little deeper than before, up to just below the first leaves.
-
Press the soil: Press the soil lightly around the plant.
-
Water: Water the plants carefully.
-
Location: Place the pots in a bright, but not too sunny spot. Avoid direct midday sun for the first few days after pricking out.
Preparing for Planting Out
Before you plant your Roma tomatoes outdoors, you should acclimate them to the outdoor conditions. This process is called hardening off.
-
Hardening off: Place the plants outdoors for a few hours a day in a sheltered spot. Start with one hour and increase the time daily. Avoid direct sunlight and wind in the first few days.
-
Check the weather forecast: Pay attention to the weather forecast. Tomatoes are sensitive to frost. Wait to plant them out until there is no more danger of frost. This is usually after the “Ice Saints” (mid-May).
Planting Out Roma Tomatoes
Finally, the time has come! Your Roma tomatoes can go outdoors.
-
Prepare the bed or pots: Choose a sunny location for your tomatoes. The soil should be loose and rich in nutrients. If you are planting the tomatoes in pots, use large pots (at least 10 liters in volume) with good drainage.
-
Soil improvement: Improve the soil with compost or other organic material.
-
Planting distance: Maintain a planting distance of approx. 60-80 cm between plants.
-
Planting holes: Dig planting holes that are slightly larger than the pots the tomatoes are in.
-
Planting: Carefully remove the tomatoes from their pots and place them in the planting holes. The plants can be set a little deeper than before, up to just below the lowest leaves. This promotes root formation.
-
Press the soil: Press the soil lightly around the plants.
-
Water: Water the plants thoroughly.
-
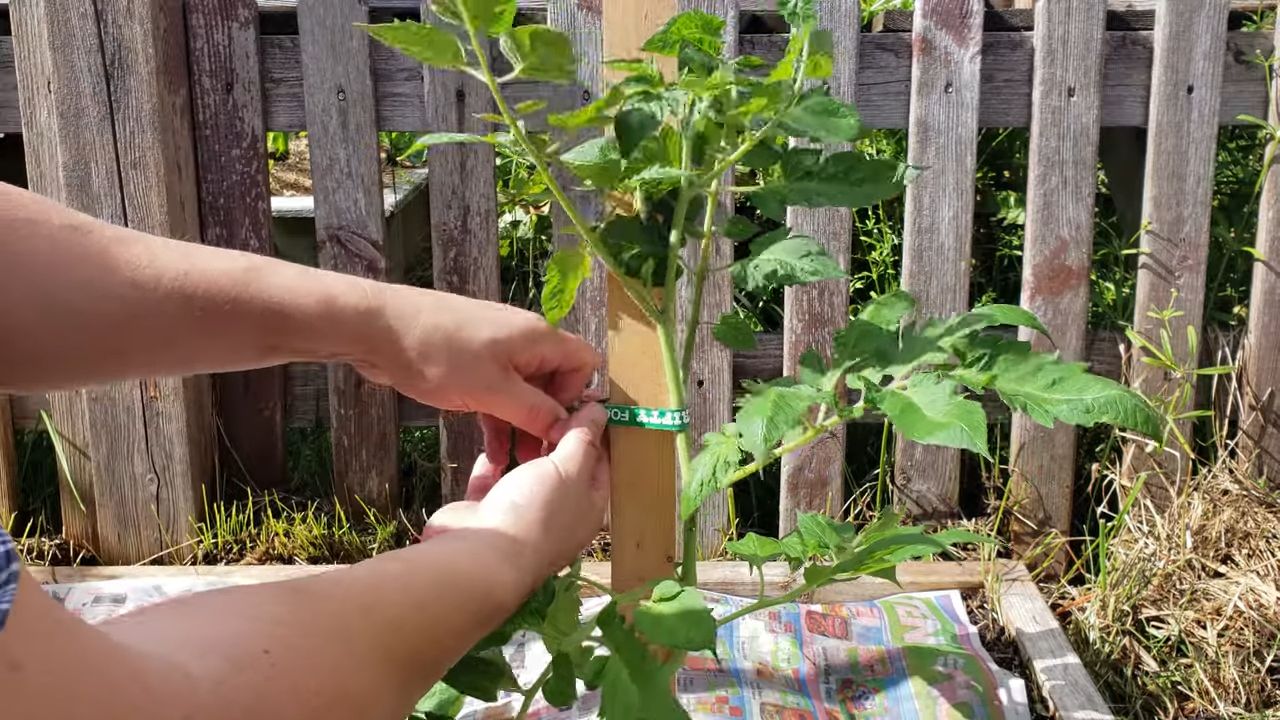
Add supports: Place plant stakes next to the plants or use tomato cages. Roma tomato plants grow quite large and need support to keep from toppling over.
Caring for Roma Tomatoes
Proper care is crucial for a bountiful harvest.
-
Watering: Water the tomatoes regularly, especially during dry weather. Avoid waterlogging. It’s best to water in the morning so the leaves can dry off during the day.
-
Fertilizing: Fertilize the tomatoes regularly with tomato fertilizer. Start about 2-3 weeks after planting out. Follow the instructions on the fertilizer package.
-
Pruning suckers: Regularly remove the side shoots (suckers) that form in the leaf axils. This promotes the growth of the main stems and the formation of fruit. It’s best to break off the suckers early when they are still small.
-
Mulching: Cover the soil around the tomato plants with mulch (e.g., straw or grass clippings). This keeps the soil moist, suppresses weeds, and protects the fruit from splashing water.
-
Disease control: Watch for signs of diseases or pests. Remove affected leaves or plants immediately. If necessary, you can…
Conclusion
So, there you have it! Growing Roma tomatoes doesn’t have to be a daunting task. By implementing these simple yet effective DIY tricks, you’re well on your way to harvesting a bountiful crop of these versatile and delicious fruits. We’ve covered everything from seed starting and soil preparation to staking and pest control, all with a focus on maximizing your yield and minimizing common problems.
But why is this DIY approach a must-try? Because it empowers you to take control of your garden and your food. You’ll know exactly what goes into growing your Roma tomatoes, avoiding potentially harmful chemicals and supporting sustainable practices. Plus, there’s an undeniable satisfaction in nurturing a plant from seed to table, knowing you played a direct role in its success.
Don’t be afraid to experiment and adapt these techniques to your specific environment and preferences. For example, if you live in a particularly hot climate, consider providing your Roma tomatoes with some afternoon shade to prevent sunscald. If space is limited, try growing them in containers on a patio or balcony. You can even explore different varieties of Roma tomatoes, each with its own unique flavor profile and growth habits. Some popular variations include San Marzano, known for its rich flavor and meaty texture, and Amish Paste, a larger, heirloom variety perfect for sauces.
Consider companion planting to further enhance your Roma tomato growing experience. Basil is a classic companion, known to improve the flavor of tomatoes and repel pests. Marigolds are another excellent choice, as they deter nematodes and other harmful insects.
The key is to be observant and responsive to your plants’ needs. Check them regularly for signs of pests or diseases, and adjust your watering and fertilizing schedule as needed. Remember, gardening is a learning process, and even experienced gardeners encounter challenges along the way.
We are confident that with a little effort and these DIY tricks, you’ll be enjoying homegrown Roma tomatoes in no time. Imagine the delicious sauces, salsas, and salads you can create with your own freshly picked produce!
Now it’s your turn! We encourage you to try these DIY tricks for growing Roma tomatoes and share your experiences with us. Let us know what worked well for you, what challenges you faced, and any tips or variations you discovered along the way. Your feedback will help us improve this guide and empower other gardeners to achieve success. Share your photos and stories in the comments section below – we can’t wait to see your thriving Roma tomato plants! This is more than just growing food; it’s about connecting with nature, learning new skills, and enjoying the fruits (or vegetables!) of your labor. Happy gardening!
Frequently Asked Questions (FAQ)
What is the best time to start Roma tomato seeds indoors?
The ideal time to start Roma tomato seeds indoors is typically 6-8 weeks before the last expected frost in your area. This allows the seedlings to develop a strong root system before being transplanted outdoors. Check your local weather forecasts and gardening resources to determine the average last frost date for your region. Starting too early can result in leggy, weak seedlings, while starting too late may delay your harvest.
What type of soil is best for growing Roma tomatoes?
Roma tomatoes thrive in well-draining soil that is rich in organic matter. A slightly acidic soil pH of 6.0 to 6.8 is ideal. Before planting, amend your soil with compost, aged manure, or other organic materials to improve its fertility and drainage. Avoid heavy clay soils, as they can become waterlogged and inhibit root growth. If you have clay soil, consider adding sand or perlite to improve drainage. You can also perform a soil test to determine the pH and nutrient levels of your soil and make necessary adjustments.
How often should I water my Roma tomato plants?
Water Roma tomato plants deeply and regularly, especially during hot, dry weather. Aim to water at the base of the plant to avoid wetting the foliage, which can increase the risk of fungal diseases. The frequency of watering will depend on factors such as the weather, soil type, and plant size. As a general rule, water when the top inch of soil feels dry to the touch. Avoid overwatering, as this can lead to root rot. Mulching around the plants can help retain moisture in the soil and reduce the need for frequent watering.
Why are my Roma tomato plants not producing fruit?
There are several reasons why your Roma tomato plants may not be producing fruit. One common cause is lack of pollination. Tomatoes are self-pollinating, but they often require wind or insect activity to transfer pollen from the male to the female parts of the flower. If you’re growing tomatoes indoors or in a sheltered location, you may need to hand-pollinate them by gently shaking the plants or using a small brush to transfer pollen. Other potential causes of fruitlessness include insufficient sunlight, extreme temperatures, nutrient deficiencies, and pest infestations. Ensure your plants are receiving at least 6-8 hours of sunlight per day, and fertilize them regularly with a balanced tomato fertilizer.
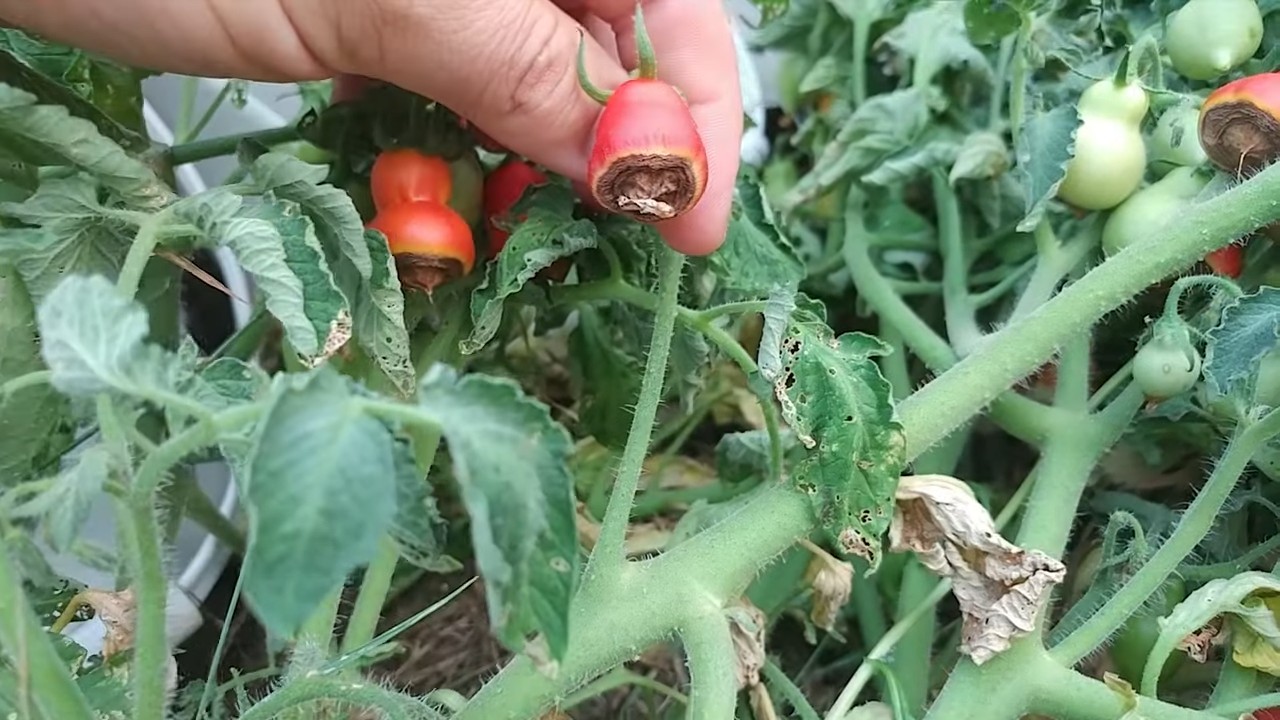
How do I prevent blossom end rot on my Roma tomatoes?
Blossom end rot is a common problem that affects tomatoes, causing a dark, leathery spot to develop on the bottom of the fruit. It is typically caused by a calcium deficiency, which can be exacerbated by inconsistent watering. To prevent blossom end rot, ensure your soil is rich in calcium and maintain consistent soil moisture. You can add lime or bone meal to the soil before planting to increase calcium levels. Water deeply and regularly, especially during hot, dry weather. Avoid over-fertilizing with nitrogen, as this can interfere with calcium uptake. Mulching around the plants can also help retain moisture in the soil and prevent fluctuations in soil moisture levels.
What are some common pests and diseases that affect Roma tomatoes?
Roma tomatoes are susceptible to a variety of pests and diseases, including aphids, whiteflies, tomato hornworms, spider mites, early blight, late blight, and fusarium wilt. Regularly inspect your plants for signs of pests or diseases, and take action promptly to prevent them from spreading. You can use organic pest control methods such as insecticidal soap, neem oil, or Bacillus thuringiensis (Bt) to control pests. For diseases, ensure good air circulation around the plants, avoid overhead watering, and remove any infected leaves or plants. Consider using disease-resistant varieties of Roma tomatoes to minimize the risk of disease problems.
How do I stake or cage my Roma tomato plants?
Staking or caging Roma tomato plants is essential for providing support and preventing the plants from sprawling on the ground. This helps improve air circulation, reduce the risk of disease, and make it easier to harvest the fruit. You can use wooden stakes, metal cages, or a combination of both. Insert the stakes or cages into the ground shortly after transplanting the seedlings, and tie the plants to the supports as they grow. Ensure the supports are sturdy enough to withstand the weight of the mature plants and their fruit.
When is the best time to harvest Roma tomatoes?
Roma tomatoes are typically ready to harvest when they are fully colored, slightly soft to the touch, and easily detach from the vine. The exact timing will depend on the variety and growing conditions. Gently squeeze the tomato to check for ripeness. If it gives slightly, it’s ready to pick. Avoid harvesting tomatoes that are still green or hard, as they will not ripen properly off the vine. Harvest regularly to encourage continued fruit production.

Leave a Comment