
Growing pumpkins in soil bags? Absolutely! Forget sprawling vines taking over your entire yard. I’m about to let you in on a little secret that will revolutionize your pumpkin patch dreams, even if you only have a tiny balcony. Have you ever imagined harvesting plump, vibrant pumpkins without dedicating half your garden to them? Well, get ready to turn that dream into a reality!
For centuries, pumpkins have been a symbol of abundance, harvest, and community. From ancient indigenous traditions to modern-day Halloween celebrations, these gourds hold a special place in our hearts. But let’s face it, traditional pumpkin growing can be a space hog. That’s where this ingenious DIY trick comes in.
In today’s world, where space is a premium and time is precious, this method of growing pumpkins in soil bags is a game-changer. Imagine the satisfaction of nurturing your own pumpkins from seed to harvest, all within the confines of a simple soil bag. No more wrestling with sprawling vines, no more battling weeds in a massive patch. This method is perfect for apartment dwellers, balcony gardeners, or anyone looking for a more manageable and efficient way to enjoy the magic of homegrown pumpkins. I’m so excited to share this easy and effective technique with you, so let’s get started!
Kürbisse im Pflanzsack ziehen: Eine einfache DIY-Anleitung
Hallo Kürbisfreunde! Habt ihr wenig Platz im Garten, aber trotzdem Lust, eure eigenen Kürbisse zu ziehen? Dann ist diese DIY-Anleitung genau das Richtige für euch! Ich zeige euch, wie ihr Kürbisse erfolgreich in Pflanzsäcken anbauen könnt. Das ist nicht nur platzsparend, sondern auch super praktisch und macht richtig Spaß. Los geht’s!
Was ihr für den Kürbisanbau im Pflanzsack braucht:
* Kürbissamen: Wählt eure Lieblingssorte! Ob Hokkaido, Butternut oder ein riesiger Halloween-Kürbis – die Entscheidung liegt bei euch. Achtet auf eine gute Qualität der Samen.
* Pflanzsäcke: Stabile Pflanzsäcke mit einem Volumen von mindestens 75 Litern sind ideal. Je größer der Kürbis werden soll, desto größer sollte auch der Pflanzsack sein.
* Hochwertige Pflanzerde: Eine nährstoffreiche Erde ist das A und O für gesunde Kürbispflanzen. Ich empfehle eine spezielle Gemüseerde oder eine Mischung aus Blumenerde, Kompost und Hornspänen.
* Kompost oder organischer Dünger: Kürbisse sind Starkzehrer und brauchen viel Nahrung. Kompost oder organischer Dünger versorgen sie mit den nötigen Nährstoffen.
* Gießkanne oder Gartenschlauch: Regelmäßiges Gießen ist wichtig, besonders während der Wachstums- und Fruchtbildungsphase.
* Mulchmaterial: Stroh, Holzhackschnitzel oder Rasenschnitt helfen, die Feuchtigkeit im Boden zu halten und Unkraut zu unterdrücken.
* Pflanzstäbe oder Rankhilfe: Je nach Kürbissorte können Pflanzstäbe oder eine Rankhilfe sinnvoll sein, um die Triebe zu stützen.
* Schere oder Messer: Zum Ausdünnen der Triebe und Entfernen von beschädigten Blättern.
* Geduld und Liebe: Das Wichtigste! Kürbisse brauchen Zeit und Zuwendung, um zu gedeihen.
Schritt-für-Schritt-Anleitung: Kürbisse im Pflanzsack pflanzen
1. Vorbereitung der Pflanzsäcke:
* Zuerst solltet ihr die Pflanzsäcke an den Ort stellen, wo die Kürbisse wachsen sollen. Bedenkt, dass die Säcke später sehr schwer werden, wenn sie mit Erde und Pflanzen gefüllt sind. Ein sonniger Standort mit mindestens 6 Stunden direkter Sonneneinstrahlung pro Tag ist ideal.
* Füllt die Pflanzsäcke mit der Pflanzerde. Lasst oben etwa 5-10 cm Platz.
* Mischt Kompost oder organischen Dünger unter die Erde. Das sorgt für eine gute Nährstoffversorgung von Anfang an.
* Gießt die Erde gründlich an, sodass sie gut durchfeuchtet ist.
2. Aussaat oder Vorziehen der Kürbispflanzen:
* Direktsaat: Ihr könnt die Kürbissamen direkt in die Pflanzsäcke säen. Legt pro Sack 2-3 Samen etwa 2-3 cm tief in die Erde. Haltet die Erde feucht, aber nicht nass. Nach etwa einer Woche sollten die ersten Keimlinge zu sehen sein. Wenn die Pflanzen etwas größer sind, könnt ihr die schwächste Pflanze entfernen, sodass nur noch eine kräftige Pflanze pro Sack übrig bleibt.
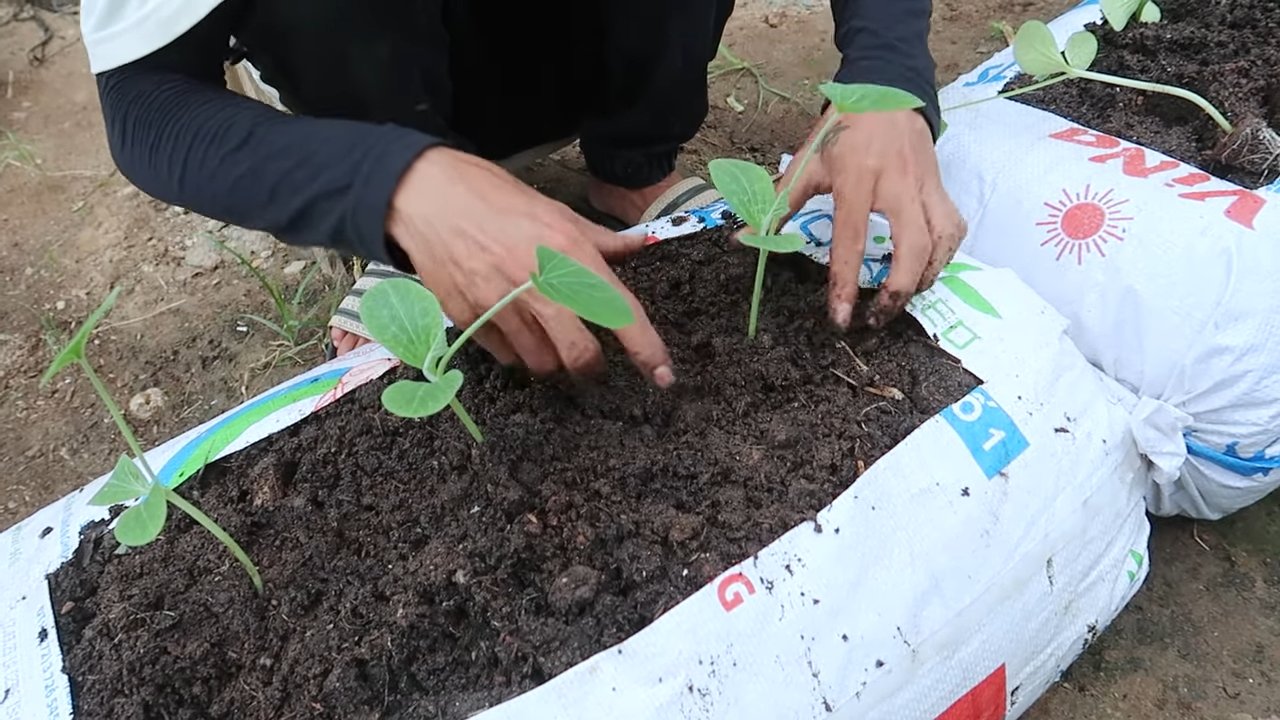
* Vorziehen: Ich persönlich ziehe meine Kürbispflanzen gerne vor, da sie dann einen Wachstumsvorsprung haben. Dafür säe ich die Samen etwa 3-4 Wochen vor dem letzten Frost in kleinen Töpfen oder Anzuchtschalen aus. Sobald die Pflanzen kräftig genug sind (etwa 10-15 cm hoch), können sie in die Pflanzsäcke umgepflanzt werden. Achtet darauf, die Wurzeln beim Umpflanzen nicht zu beschädigen.
3. Pflanzen der Kürbispflanzen in die Pflanzsäcke:
* Wenn ihr vorgezogene Pflanzen habt, grabt in der Mitte des Pflanzsacks ein Loch, das groß genug für den Wurzelballen ist.
* Setzt die Pflanze vorsichtig in das Loch und füllt es mit Erde auf. Drückt die Erde leicht an.
* Gießt die Pflanze gründlich an.
4. Pflege der Kürbispflanzen:
* Gießen: Kürbisse brauchen viel Wasser, besonders während der Wachstums- und Fruchtbildungsphase. Gießt regelmäßig, am besten morgens oder abends, damit das Wasser nicht so schnell verdunstet. Achtet darauf, dass die Erde immer leicht feucht ist, aber nicht nass. Vermeidet Staunässe, da dies zu Wurzelfäule führen kann.
* Düngen: Kürbisse sind Starkzehrer und brauchen regelmäßige Düngergaben. Düngt alle 2-3 Wochen mit einem organischen Dünger oder Komposttee. Ihr könnt auch einen speziellen Kürbisdünger verwenden.
* Mulchen: Eine Mulchschicht aus Stroh, Holzhackschnitzeln oder Rasenschnitt hilft, die Feuchtigkeit im Boden zu halten, Unkraut zu unterdrücken und den Boden vor Austrocknung zu schützen.
* Ausdünnen: Wenn die Kürbispflanze zu viele Triebe bildet, könnt ihr einige davon entfernen, um die Pflanze zu entlasten und die Fruchtbildung zu fördern. Entfernt auch beschädigte oder kranke Blätter.
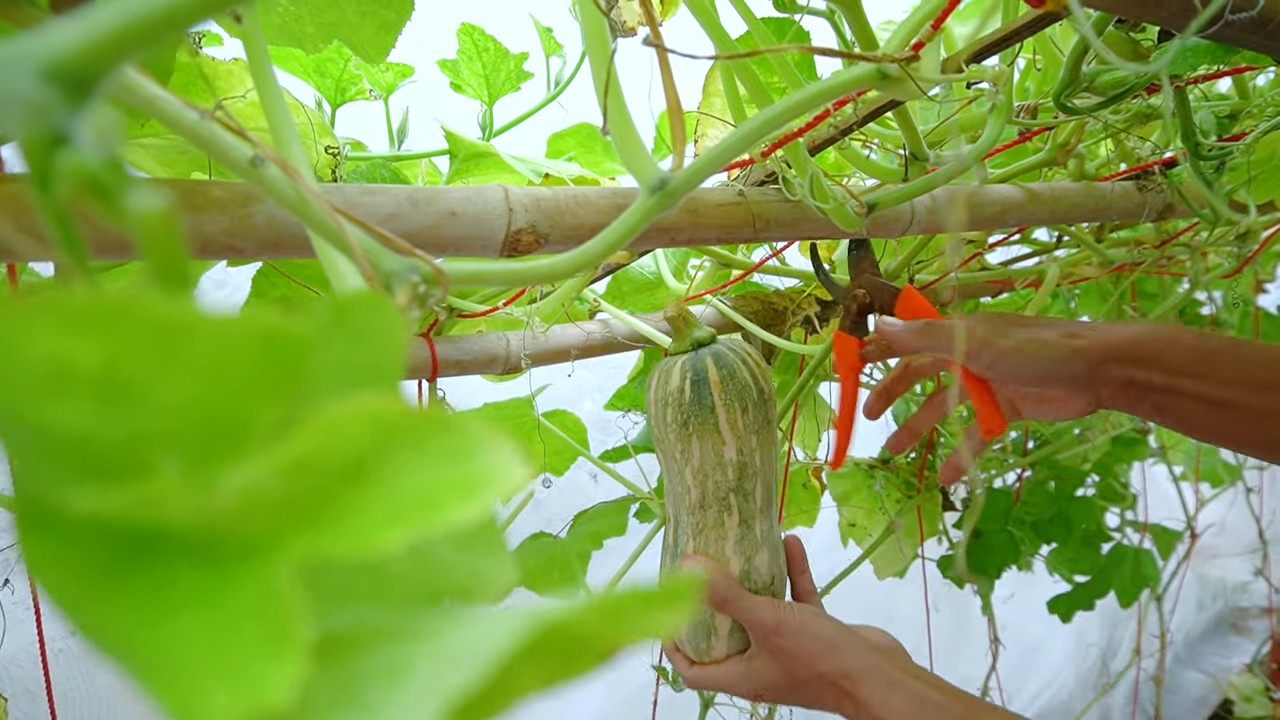
* Bestäubung: Kürbisse sind auf die Bestäubung durch Bienen und andere Insekten angewiesen. Wenn die Bestäubung nicht ausreichend ist, könnt ihr die Blüten auch von Hand bestäuben. Dafür nehmt ihr den Pollen einer männlichen Blüte (erkennbar am langen Stiel ohne Fruchtansatz) und übertragt ihn auf die Narbe einer weiblichen Blüte (erkennbar am Fruchtansatz unterhalb der Blüte).
* Rankhilfe: Je nach Kürbissorte kann eine Rankhilfe sinnvoll sein, um die Triebe zu stützen und die Früchte vor dem direkten Kontakt mit dem Boden zu schützen. Ihr könnt dafür Pflanzstäbe, ein Rankgitter oder ein selbstgebautes Gerüst verwenden.
Spezielle Tipps für den Kürbisanbau im Pflanzsack
* Sortenwahl: Nicht alle Kürbissorten eignen sich gleichermaßen für den Anbau im Pflanzsack. Kleinere Sorten wie Hokkaido oder Butternut sind in der Regel besser geeignet als riesige Halloween-Kürbisse. Informiert euch vor dem Kauf der Samen über die Größe und die Ansprüche der jeweiligen Sorte.
* Bewässerung: Im Pflanzsack trocknet die Erde schneller aus als im Beet. Achtet daher auf eine ausreichende Bewässerung, besonders an heißen Tagen. Ein Tropfschlauch oder ein Bewässerungssystem kann hier sehr hilfreich sein.
* Nährstoffversorgung: Kürbisse im Pflanzsack sind auf eine gute Nährstoffversorgung angewiesen. Düngt regelmäßig und achtet auf eine ausgewogene Zusammensetzung der Nährstoffe.
* Gewicht: Bedenkt, dass ein Pflanzsack mit Erde und Kürbispflanze sehr schwer werden kann. Stellt den Sack daher an einen stabilen Ort, der das Gewicht tragen kann.
* Schutz vor Schädlingen und Krankheiten: Kontrolliert eure Kürbispflanzen regelmäßig auf Schädlinge und Krankheiten. Bei Bedarf könnt ihr biologische Pflanzenschutzmittel einsetzen.
Häufige Probleme und Lösungen
* Gelbe Blätter: Gelbe Blätter können verschiedene Ursachen haben, z.B. Nährstoffmangel, Wassermangel oder eine Krankheit. Überprüft die Bodenfeuchtigkeit und düngt bei Bedarf.
* Keine Früchte: Wenn eure Kürbispflanze blüht, aber keine Früchte bildet, kann das an einer mangelnden Bestäubung liegen. Helft mit der Handbestäubung nach oder lockt Bienen und andere Insekten in euren Garten.
* Wurzelfäule: Wurzelfäule entsteht durch Staunässe. Achtet auf eine gute Drainage und vermeidet übermäßiges Gießen.
* Mehltau: Mehltau ist eine Pilzkrankheit, die sich durch einen weißen Belag auf den Blättern äußert. Entfernt befallene Blätter und behandelt die Pflanze mit einem biologischen Fungizid.
Erntezeit und Lagerung
* Erntezeitpunkt: Kürbisse sind reif, wenn die
Conclusion
So, there you have it! Growing pumpkins in soil bags isn’t just a quirky gardening experiment; it’s a game-changer for anyone with limited space, poor soil, or simply a desire for a more controlled growing environment. We’ve walked you through the process, from selecting the right bag and soil to nurturing your pumpkin vines to their glorious, gourd-geous potential.
Why is this DIY trick a must-try? Because it democratizes pumpkin growing! No longer are sprawling acres a prerequisite for harvesting your own Halloween decorations or Thanksgiving pies. Soil bags offer a contained, portable ecosystem that allows you to optimize conditions for your pumpkin plants. You can easily move them to chase the sun, protect them from unexpected frosts, and precisely manage their water and nutrient intake. This method also significantly reduces the risk of soilborne diseases and pests, giving your pumpkins a healthier start and a better chance of reaching their full potential.
But the beauty of this method lies in its adaptability. Feel free to experiment! Consider trying different varieties of pumpkins. Smaller pie pumpkins, like ‘Sugar Pie’ or ‘Baby Boo,’ are particularly well-suited for soil bag cultivation. You could also explore companion planting. Marigolds, for example, can help deter pests, while nasturtiums attract beneficial insects. Think about adding a trellis or support system as your pumpkin vines grow. This will help keep the pumpkins off the ground, preventing rot and maximizing air circulation.
And don’t limit yourself to just pumpkins! This technique can be adapted for other vining crops like zucchini, squash, and even melons. The principles remain the same: provide a well-draining, nutrient-rich growing medium in a contained environment, and watch your plants thrive.
Ultimately, growing pumpkins in soil bags is about more than just harvesting a vegetable; it’s about connecting with nature, learning about the growing process, and experiencing the satisfaction of nurturing something from seed to fruition. It’s a rewarding project for gardeners of all skill levels, and it’s a fantastic way to involve children in the magic of gardening.
We wholeheartedly encourage you to give this DIY trick a try. Embrace the challenge, get your hands dirty, and witness the incredible transformation of a tiny seed into a magnificent pumpkin. And most importantly, share your experience with us! We’d love to hear about your successes, your challenges, and any variations you’ve discovered along the way. Post photos of your soil bag pumpkins on social media using #SoilBagPumpkins and tag us so we can celebrate your harvest with you. Let’s create a community of soil bag pumpkin growers and inspire others to discover the joys of this innovative gardening technique. Happy growing!
Frequently Asked Questions (FAQ)
What size soil bag is best for growing pumpkins?
The ideal size for a soil bag depends on the pumpkin variety you intend to grow. For smaller pie pumpkins or decorative gourds, a 20-30 gallon bag is usually sufficient. However, for larger pumpkin varieties, such as ‘Jack O’Lantern’ or ‘Big Max,’ you’ll need a larger bag, ideally 40-50 gallons or even larger. The key is to provide enough space for the roots to develop and support the growing plant. Remember, the bigger the pumpkin you want to grow, the bigger the bag you’ll need. Insufficient space can lead to stunted growth and smaller pumpkins.
What type of soil should I use in my soil bag?
The best soil mix for growing pumpkins in soil bags is a well-draining, nutrient-rich blend. A good starting point is a mix of equal parts compost, potting soil, and perlite or vermiculite. Compost provides essential nutrients, potting soil offers a good base for root growth, and perlite or vermiculite improves drainage and aeration. Avoid using garden soil directly in the bag, as it can be too heavy and compact, hindering root development. You can also amend the soil with slow-release fertilizer to provide a steady supply of nutrients throughout the growing season. Consider adding bone meal for phosphorus, which promotes strong root growth and flowering.
How often should I water my soil bag pumpkins?
Watering frequency depends on several factors, including the weather, the size of the plant, and the drainage of your soil mix. Generally, you should water deeply whenever the top inch of soil feels dry to the touch. During hot, dry weather, you may need to water daily, while during cooler, wetter periods, you can reduce the frequency. Avoid overwatering, as this can lead to root rot. Ensure the soil bag has adequate drainage holes to prevent waterlogging. A good way to check if your pumpkin plant needs water is to observe the leaves. If they are wilting or drooping, it’s a sign that the plant is thirsty.
Do I need to fertilize my soil bag pumpkins?
Yes, pumpkins are heavy feeders and require regular fertilization to thrive. Start with a slow-release fertilizer incorporated into the soil mix at planting time. Then, supplement with liquid fertilizer every 2-3 weeks throughout the growing season. Use a balanced fertilizer (e.g., 10-10-10) early in the season to promote overall growth, and then switch to a fertilizer higher in phosphorus (e.g., 10-20-10) as the plants begin to flower and set fruit. Avoid over-fertilizing, as this can burn the roots and harm the plant. Follow the instructions on the fertilizer packaging carefully.
How do I protect my soil bag pumpkins from pests and diseases?
Prevention is key when it comes to pests and diseases. Start by selecting disease-resistant pumpkin varieties. Regularly inspect your plants for signs of pests, such as squash bugs, squash vine borers, and aphids. Handpick pests whenever possible, or use insecticidal soap or neem oil as needed. To prevent fungal diseases, ensure good air circulation around the plants and avoid overhead watering. If you notice signs of powdery mildew or other fungal infections, treat with a fungicide specifically labeled for pumpkins. Consider using row covers early in the season to protect young plants from pests.
Can I grow multiple pumpkin plants in one soil bag?
While it’s technically possible to grow multiple pumpkin plants in one large soil bag, it’s generally not recommended. Pumpkins require a significant amount of space and resources to thrive, and overcrowding can lead to stunted growth, smaller pumpkins, and increased susceptibility to pests and diseases. For best results, grow one pumpkin plant per soil bag. If you’re growing smaller pumpkin varieties, you might be able to get away with two plants in a very large bag (50+ gallons), but be prepared to provide extra water and fertilizer.
How do I support the pumpkin vines as they grow?
As pumpkin vines grow, they can become quite heavy and sprawling. Providing support can help prevent the pumpkins from rotting on the ground and improve air circulation. You can use a trellis, a tomato cage, or even a simple wooden frame to support the vines. Gently train the vines to grow along the support structure, and tie them in place with soft twine or plant ties. For larger pumpkins, you may also need to provide additional support for the fruit itself. You can use slings made from old t-shirts or pantyhose to cradle the pumpkins and prevent them from breaking off the vine.
What do I do if my pumpkin plant isn’t producing any pumpkins?
There are several reasons why your pumpkin plant might not be producing pumpkins. One common cause is a lack of pollination. Pumpkins require pollination to set fruit, and if there aren’t enough bees or other pollinators in your area, you may need to hand-pollinate the flowers. To hand-pollinate, use a small paintbrush to transfer pollen from the male flowers (which have a long, thin stem) to the female flowers (which have a small, immature pumpkin at the base). Other potential causes of poor fruit set include insufficient sunlight, lack of nutrients, and extreme temperatures. Ensure your pumpkin plant is getting at least 6-8 hours of sunlight per day, fertilize regularly, and protect the plants from frost or excessive heat.

Leave a Comment