
Growing Potatoes Indoors might sound like a quirky experiment relegated to science classrooms, but trust me, it’s a surprisingly rewarding and practical way to enjoy fresh, homegrown potatoes year-round! Forget battling unpredictable weather and limited garden space; with a few simple tricks, you can cultivate a thriving potato patch right inside your home.
The history of indoor gardening stretches back centuries, with evidence suggesting that ancient civilizations like the Romans and Egyptians cultivated plants indoors for both sustenance and aesthetic pleasure. While they might not have been growing potatoes specifically, the underlying principle of controlling the environment to nurture plant life remains the same. Today, the resurgence of interest in indoor gardening reflects a desire for greater self-sufficiency, a connection to nature, and access to fresh, healthy food, regardless of external conditions.
Why should you try growing potatoes indoors? Well, imagine harvesting your own delicious, organically grown potatoes just steps from your kitchen. No more trips to the grocery store for bland, mass-produced spuds! Plus, it’s a fantastic way to extend the growing season, especially if you live in an area with harsh winters. This DIY guide will equip you with all the essential tips and tricks to successfully grow potatoes indoors, from selecting the right varieties to mastering the art of “hilling” and harvesting your bountiful crop. Let’s get started and transform your home into a miniature potato farm!
Growing Potatoes Indoors: A Spud-tacular DIY Guide!
Hey there, fellow gardening enthusiasts! Ever thought about growing your own potatoes indoors? It’s easier than you might think, and it’s a fantastic way to enjoy fresh, homegrown spuds even if you don’t have a sprawling outdoor garden. I’m going to walk you through everything you need to know to successfully grow potatoes indoors, from choosing the right potatoes to harvesting your bounty. Let’s get started!
What You’ll Need
Before we dive into the nitty-gritty, let’s gather our supplies. Here’s a checklist of everything you’ll need to grow potatoes indoors:
* Seed Potatoes: These are potatoes specifically grown for planting. You can find them at most garden centers or online. Avoid using potatoes from the grocery store, as they may have been treated to prevent sprouting. Look for certified disease-free seed potatoes.
* Large Containers: You’ll need containers that are at least 10 gallons in size. Think large buckets, trash cans (unused, of course!), or even grow bags. The deeper the container, the better.
* Potting Mix: Use a well-draining potting mix. A mix of peat moss, perlite, and vermiculite works well. Avoid using garden soil, as it can become compacted and doesn’t drain well.
* Grow Lights (Optional but Recommended): While potatoes can grow indoors with natural light, grow lights will significantly improve your yield and the overall health of your plants.
* Watering Can or Hose: For watering your potato plants.
* Fertilizer: A balanced, slow-release fertilizer is ideal. Look for one with an NPK ratio of around 10-10-10.
* Sharp Knife: For cutting the seed potatoes (if necessary).
* Spray Bottle: For misting the plants.
* Patience: Growing potatoes takes time, so be prepared to wait!
Preparing Your Seed Potatoes
This is a crucial step, so pay close attention! Preparing your seed potatoes properly will give them the best possible start.
1. Chitting (Sprouting): This process encourages the seed potatoes to sprout before planting. Place the seed potatoes in a cool, bright location (but not direct sunlight) for about 2-3 weeks. You’ll notice small “eyes” or sprouts starting to emerge. This gives your potatoes a head start.
2. Cutting (Optional): If your seed potatoes are large (bigger than an egg), you can cut them into smaller pieces. Each piece should have at least 2-3 “eyes” or sprouts. This allows you to get more plants from a single seed potato.
* Important: After cutting, let the pieces sit for a day or two to allow the cut surfaces to callous over. This helps prevent rot.
3. Choosing the Best Sprouts: When you’re ready to plant, select the seed potato pieces with the healthiest-looking sprouts. These will be the most vigorous and will produce the best plants.
Planting Your Potatoes
Now for the fun part – getting those potatoes in the ground (or, in this case, the container!).
1. Fill the Container: Fill your container with about 4-6 inches of potting mix.
2. Plant the Seed Potatoes: Place the seed potato pieces (sprouts facing up) on top of the soil, spacing them evenly. If you’re using a large container, you can plant multiple pieces, but make sure they’re not too crowded.
3. Cover with Soil: Cover the seed potatoes with another 4-6 inches of potting mix.
4. Water Thoroughly: Water the soil well, making sure it’s evenly moist but not waterlogged.
5. Placement: Place the container in a location that receives at least 6-8 hours of sunlight per day. If you’re using grow lights, position them about 12-18 inches above the soil surface.
“Hilling” Your Potatoes
This is a key technique for maximizing your potato yield. As the potato plants grow, you’ll need to “hill” them, which means adding more soil to the container.
1. Wait for Growth: Once the potato plants have grown about 6-8 inches tall, it’s time to start hilling.
2. Add More Soil: Add another 4-6 inches of potting mix to the container, covering the lower part of the stems. Leave the top few inches of the plant exposed.
3. Repeat: Continue this process every few weeks as the plants grow, until the container is almost full. The idea is that the buried stems will produce more potatoes along their length.
4. Why Hilling Works: Potatoes form along the underground stems of the plant. By burying more of the stem, you encourage the plant to produce more potatoes.
Caring for Your Potato Plants
Proper care is essential for healthy potato plants and a good harvest.
1. Watering: Keep the soil consistently moist, but avoid overwatering. Potatoes don’t like soggy soil. Water deeply when the top inch of soil feels dry to the touch.
2. Fertilizing: Fertilize your potato plants every 2-3 weeks with a balanced, slow-release fertilizer. Follow the instructions on the fertilizer package.
3. Light: Ensure your potato plants receive adequate light. If you’re using natural light, rotate the container regularly to ensure even growth. If you’re using grow lights, keep them on for about 14-16 hours per day.
4. Temperature: Potatoes prefer temperatures between 60-70°F (15-21°C). Avoid exposing them to extreme temperatures.
5. Pest Control: Keep an eye out for pests like aphids, spider mites, and potato beetles. If you spot any pests, treat them with an appropriate insecticide or organic pest control method. Neem oil is a good option for organic pest control.
6. Air Circulation: Good air circulation is important to prevent fungal diseases. Make sure your potato plants have plenty of space around them. A small fan can help improve air circulation.
Harvesting Your Potatoes
The moment we’ve all been waiting for! Harvesting your homegrown potatoes is incredibly rewarding.
1. Timing: Potatoes are typically ready to harvest about 70-90 days after planting, depending on the variety. You’ll know they’re ready when the foliage starts to turn yellow and die back.
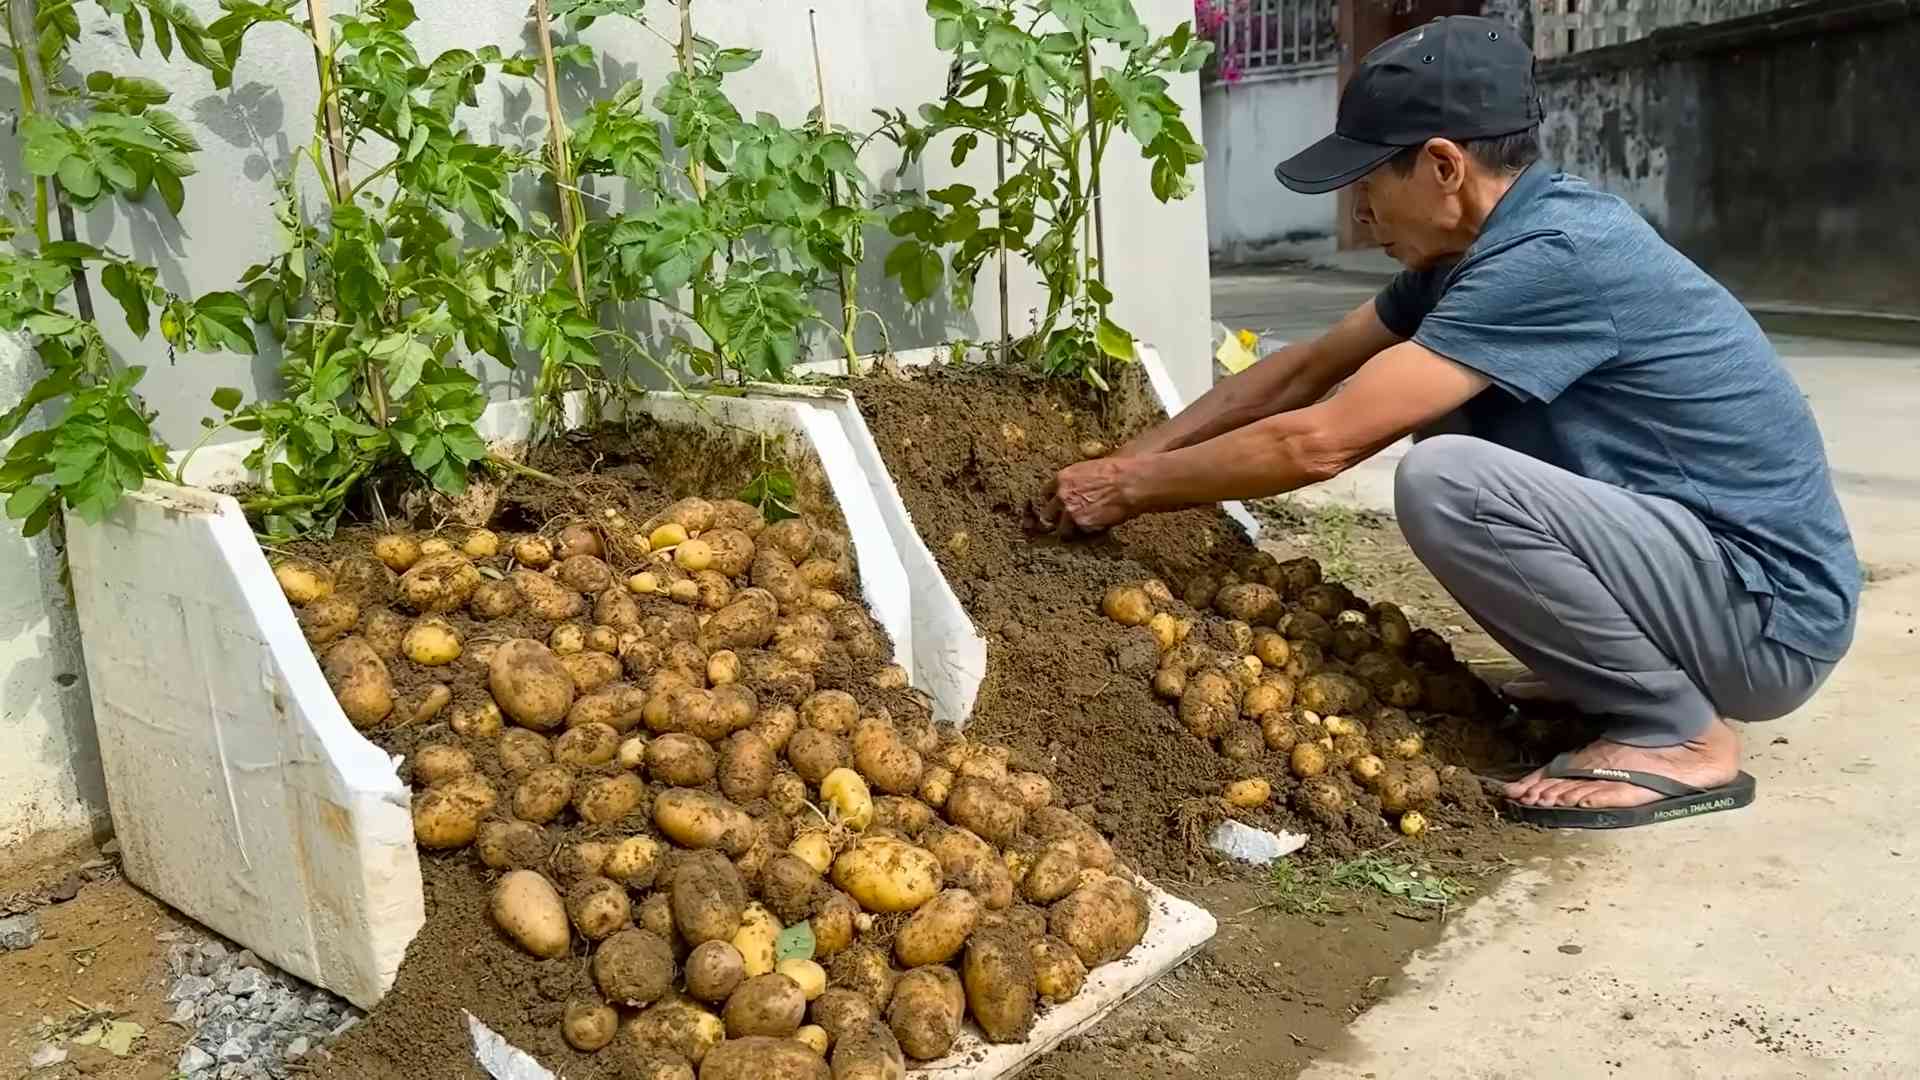
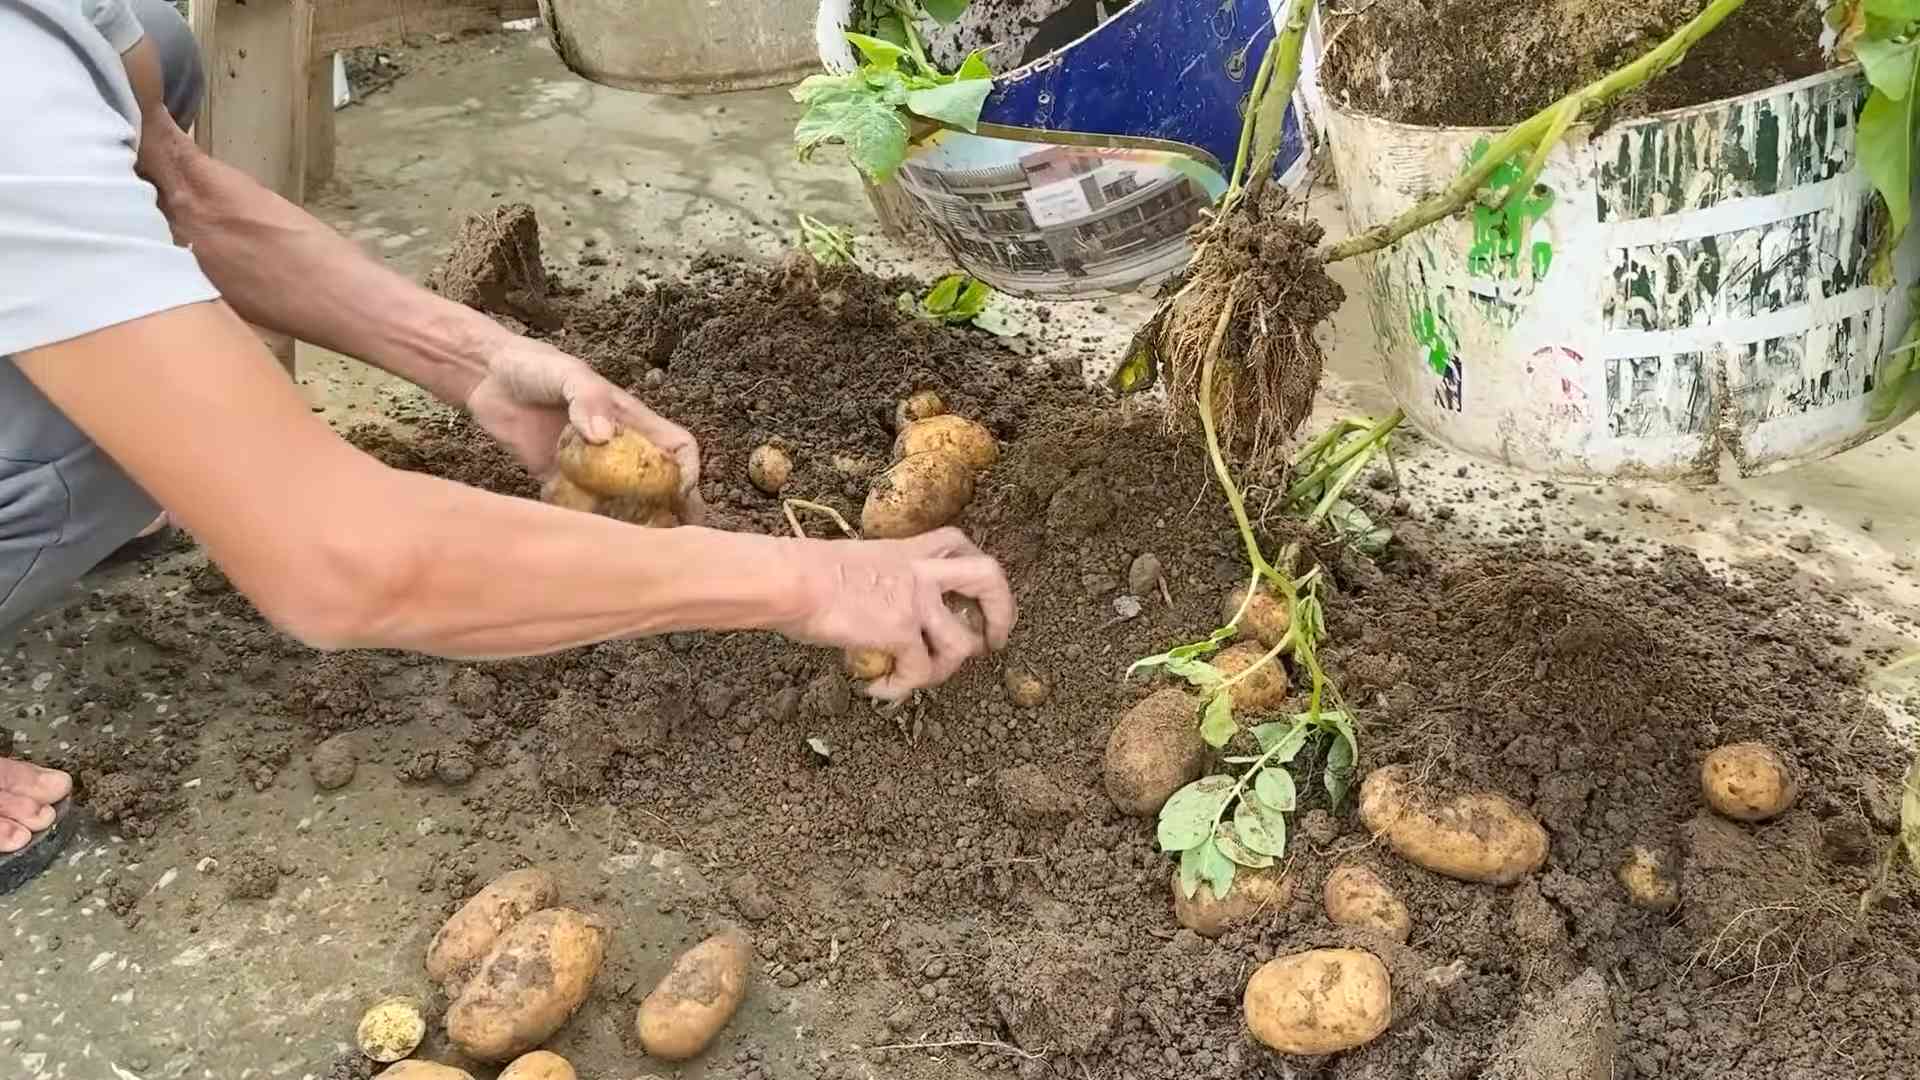
2. Gentle Digging: Carefully dig around the base of the plant, using your hands or a small trowel to loosen the soil. Be gentle to avoid damaging the potatoes.
3. Harvesting: Once you’ve loosened the soil, you should be able to pull the potatoes out easily.
4. Curing (Optional): If you plan to store your potatoes for a longer period, you can cure them by leaving them in a cool, dry, dark place for about a week. This helps to toughen the skins and prevent rot.
5. Enjoy! Now it’s time to enjoy the fruits (or rather, vegetables!) of your labor. Use your homegrown potatoes in your favorite recipes.
Troubleshooting
Even with the best care, you might encounter some challenges along the way. Here are a few common problems and how to address them:
* Yellowing Leaves: This could be a sign of overwatering, underwatering, nutrient deficiency, or disease. Check the soil moisture and adjust your watering accordingly. Fertilize your plants if they’re lacking nutrients. If you suspect a disease, treat it with an appropriate fungicide.
* Leggy Growth: This is usually caused by insufficient light. Move your plants to a brighter location or use grow lights.
* Small Potatoes: This could be due to insufficient hilling, overcrowding, or nutrient deficiency. Make sure you’re hilling your plants regularly, and thin them out if they’re too crowded. Fertilize your plants to provide them with the nutrients they need.
* Rotting Potatoes: This is usually caused by overwatering or poor drainage. Make sure your soil is well-draining and avoid overwatering.
Choosing the Right Potato Variety
The type of potato you choose to grow indoors can impact your success. Here are a few varieties that tend to do well in containers:
* Yukon Gold: These are known for their creamy texture and buttery flavor. They’re a good all-purpose potato.
* Red Pontiac: These have a red skin and white flesh. They’re good for boiling and roasting.
* Fingerling Potatoes: These are small, elongated potatoes with a firm texture. They’re great for salads and roasting.
* Irish Cobbler: An early season variety that is known for its excellent flavor.
Optimizing Your Indoor Potato Garden
Want to take your indoor potato growing to the next level? Here are
Conclusion
So, there you have it! Growing potatoes indoors might seem like a gardening experiment reserved for seasoned professionals, but as you’ve seen, it’s surprisingly accessible and rewarding for anyone with a little space and a desire for fresh, homegrown produce. The benefits extend far beyond simply having potatoes on hand. You gain a deeper connection to your food, a fascinating glimpse into the life cycle of a plant, and a sustainable way to supplement your grocery shopping.
This DIY trick is a must-try for several compelling reasons. Firstly, it allows you to enjoy fresh, flavorful potatoes even if you lack a traditional outdoor garden. Imagine the satisfaction of harvesting your own potatoes in the middle of winter! Secondly, it’s a fantastic educational opportunity, especially for children. They can witness the entire process from sprouting to harvest, learning valuable lessons about botany and food production. Thirdly, it’s a cost-effective way to grow your own food. While there’s an initial investment in supplies, the yield from even a small indoor potato garden can significantly offset the cost of buying potatoes from the store.
But the real magic lies in the versatility of this method. Feel free to experiment with different potato varieties. Russets are a classic choice for baking and frying, while Yukon Golds offer a creamy texture perfect for mashing. Red potatoes are excellent for boiling and adding to salads. You can also adjust the size of your container to suit your space. A large container will yield more potatoes, but even a smaller container can provide a satisfying harvest.
Consider adding companion plants to your potato container. Marigolds can help deter pests, while basil can improve the flavor of your potatoes. You can also experiment with different growing mediums. While a standard potting mix works well, you can also try using a mixture of compost, peat moss, and perlite for improved drainage and nutrient retention.
Don’t be afraid to get creative with your indoor potato garden. Try growing potatoes in decorative containers to add a touch of greenery to your home. You can even create a vertical potato garden using stacked containers or hanging baskets. The possibilities are endless!
We wholeheartedly encourage you to embark on this exciting gardening adventure. Growing potatoes indoors is a fulfilling and educational experience that will reward you with fresh, delicious potatoes and a newfound appreciation for the wonders of nature.
Once you’ve harvested your first crop of homegrown potatoes, we’d love to hear about your experience! Share your tips, tricks, and photos on social media using [Your Hashtag Here]. Let’s build a community of indoor potato growers and inspire others to discover the joys of homegrown food. Happy growing!
Frequently Asked Questions (FAQ)
1. What kind of potatoes are best for growing indoors?
While you can technically grow any type of potato indoors, some varieties tend to be more successful than others. Smaller, early-maturing varieties like Yukon Gold, fingerling potatoes, and red potatoes are generally recommended for indoor growing. These varieties tend to produce a good yield in a shorter amount of time, making them ideal for the limited space and growing conditions of an indoor environment. Avoid larger, late-maturing varieties like Russets, as they may require more space and a longer growing season than is practical indoors. Ultimately, the best potato variety for you will depend on your personal preferences and the specific conditions of your indoor growing space. Experimenting with different varieties is part of the fun!
2. How much sunlight do indoor potatoes need?
Potatoes need a significant amount of sunlight to thrive, ideally at least six to eight hours of direct sunlight per day. If you don’t have a sunny window that provides this much light, you’ll need to supplement with artificial grow lights. Fluorescent or LED grow lights are excellent options, as they provide the full spectrum of light that plants need to grow. Position the grow lights a few inches above the potato plants and adjust the height as the plants grow. Remember to rotate your potato plants regularly to ensure that all sides receive equal exposure to light. Insufficient light can lead to leggy, weak plants and a poor potato yield.
3. What kind of container should I use for growing potatoes indoors?
The size and type of container you use will depend on the potato variety you’re growing and the amount of space you have available. A good rule of thumb is to use a container that is at least 10-12 inches in diameter and 12-18 inches deep. This will provide enough room for the potato plants to develop a healthy root system and produce a decent yield. You can use plastic pots, terracotta pots, or even repurposed containers like buckets or trash cans. Just make sure the container has drainage holes to prevent waterlogging. Fabric grow bags are also a popular choice, as they allow for good air circulation and drainage.
4. How often should I water my indoor potato plants?
Water your potato plants regularly, keeping the soil consistently moist but not waterlogged. The frequency of watering will depend on factors like the temperature, humidity, and type of container you’re using. Check the soil moisture level regularly by sticking your finger into the soil. If the top inch of soil feels dry, it’s time to water. Water deeply, allowing the water to drain out of the drainage holes. Avoid overwatering, as this can lead to root rot. During the active growing season, you may need to water your potato plants every day or two.
5. How do I know when my indoor potatoes are ready to harvest?
The time it takes for potatoes to mature will vary depending on the variety and growing conditions. Generally, you can expect to harvest your potatoes about 70-90 days after planting. A good indicator that your potatoes are ready to harvest is when the foliage starts to turn yellow and die back. You can also gently dig around the base of the plant to check the size of the potatoes. If they are the size you desire, you can harvest them. To harvest, carefully dig around the plant and lift the potatoes out of the soil. Be gentle to avoid damaging the potatoes.
6. Can I grow potatoes indoors from store-bought potatoes?
Yes, you can grow potatoes indoors from store-bought potatoes, but it’s important to choose organic potatoes that haven’t been treated with sprout inhibitors. Look for potatoes that have already started to sprout “eyes.” If your potatoes haven’t sprouted, you can encourage them to do so by placing them in a cool, dark place for a few days. Once the potatoes have sprouted, you can cut them into pieces, making sure each piece has at least one eye. Allow the cut pieces to dry for a day or two before planting to prevent rotting.
7. What are some common problems when growing potatoes indoors, and how can I prevent them?
Some common problems when growing potatoes indoors include pests, diseases, and nutrient deficiencies. To prevent pests, inspect your plants regularly for signs of infestation and take action promptly if you spot any pests. You can use insecticidal soap or neem oil to control pests. To prevent diseases, ensure good air circulation and avoid overwatering. If you notice any signs of disease, remove the affected leaves or plants immediately. To prevent nutrient deficiencies, fertilize your potato plants regularly with a balanced fertilizer.
8. Can I grow potatoes indoors year-round?
Yes, you can grow potatoes indoors year-round, provided you have the right growing conditions. You’ll need to provide adequate light, temperature, and humidity to ensure that your potato plants thrive. You may also need to adjust your watering and fertilizing schedule depending on the season. With proper care, you can enjoy a continuous harvest of fresh, homegrown potatoes throughout the year.
Leave a Comment