
Growing pineapple in a plastic chair? Sounds crazy, right? But trust me, it’s not only possible, it’s surprisingly rewarding! For centuries, pineapples have been a symbol of hospitality and luxury, gracing tables and gardens across the globe. From their origins in South America to their widespread cultivation today, these tropical delights have captured our imaginations. But what if I told you that you don’t need a sprawling plantation to enjoy the sweet taste of homegrown pineapple?
In this DIY guide, I’m going to show you how to repurpose that old plastic chair sitting in your backyard and turn it into a mini-pineapple paradise. Why a plastic chair, you ask? Well, it provides excellent drainage and aeration, crucial for healthy pineapple growth. Plus, it’s a fantastic way to upcycle and add a unique touch to your garden.
Let’s face it, store-bought pineapples can be expensive, and sometimes, they just don’t have that same fresh, vibrant flavor as homegrown. With this simple trick, you can enjoy the satisfaction of harvesting your own juicy pineapple, all while adding a touch of tropical flair to your outdoor space. So, grab that plastic chair, and let’s get started on this exciting growing pineapple in a plastic chair adventure! I promise, you’ll be amazed at how easy and fun it is!
Growing Pineapples in a Plastic Chair: A Quirky DIY Guide
Hey there, fellow plant enthusiasts! Ever thought about growing a pineapple? And ever thought about doing it in a plastic chair? Probably not! But trust me, it’s a fun, space-saving, and surprisingly effective way to cultivate this tropical treat. I’m going to walk you through the whole process, from prepping the pineapple top to (hopefully!) harvesting your own homegrown fruit. Get ready to turn that old plastic chair into a pineapple paradise!
What You’ll Need
Before we dive in, let’s gather our supplies. This is a pretty low-cost project, which is always a win in my book!
* A fresh pineapple with a healthy-looking top (the greener, the better!). Look for one that’s ripe but not overly so.
* A plastic chair (the sturdier, the better. Avoid flimsy ones that might collapse under the weight of the soil and plant).
* A sharp knife.
* Potting soil (a well-draining mix is crucial).
* Optional: Perlite or vermiculite (for added drainage).
* Optional: Rooting hormone powder (to encourage root growth).
* A large container or pot (if your chair doesn’t have a built-in container area).
* Gloves (optional, but recommended to protect your hands).
* Watering can or hose.
* Patience (this is key!).
Preparing the Pineapple Top
This is the most crucial step. A healthy pineapple top is the foundation for your entire project.
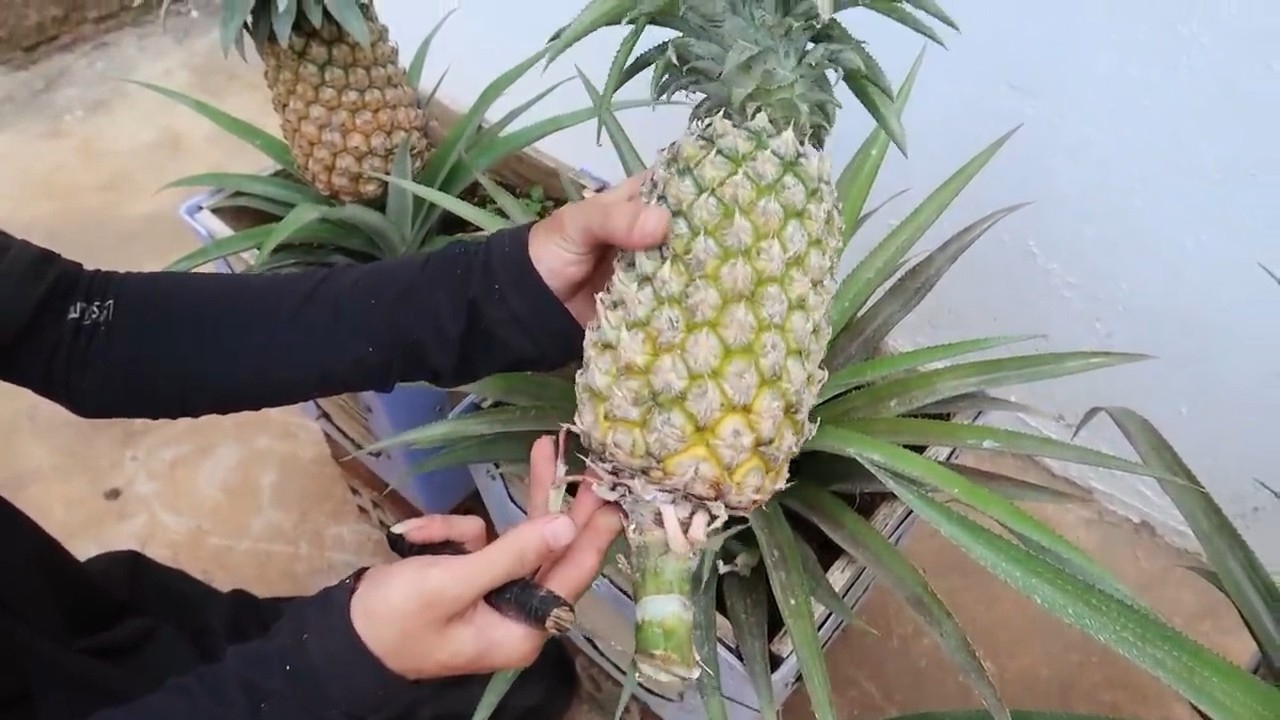
1. Twist and Shout (or Cut): There are two ways to remove the top. The first is to firmly grasp the leaves near the base and twist the top off the pineapple. If that doesn’t work, use your sharp knife to carefully cut the top off, leaving about an inch of fruit attached.
2. Remove the Fruit: This is important to prevent rotting. Carefully remove any remaining fruit from the base of the pineapple top. You can do this by gently peeling away the lower leaves until you expose the stem. Don’t be afraid to remove several layers of leaves – you want to see a good amount of stem.
3. Let it Dry: Allow the pineapple top to dry out for a few days (3-7 days is ideal). This helps to prevent rot when you plant it. Place it in a cool, dry place out of direct sunlight. You’ll notice the cut end will callous over.
4. Optional: Rooting Hormone: Dip the base of the pineapple top in rooting hormone powder. This isn’t essential, but it can help to speed up root development.
Setting Up Your Plastic Chair Pineapple Planter
Now, let’s get that plastic chair ready for its new role as a pineapple planter!
1. Choose Your Chair Wisely: Select a plastic chair that’s sturdy and can support the weight of the soil and the growing pineapple plant. Chairs with a solid seat or a built-in container area are ideal.
2. Drainage is Key: If your chair doesn’t have drainage holes, you’ll need to create some. Use a drill or a sharp object to make several holes in the bottom of the seat or container area. Good drainage is essential to prevent root rot.
3. Add Your Potting Mix: Fill the chair’s seat or container area with your well-draining potting mix. If you’re using perlite or vermiculite, mix it in with the potting soil to improve drainage. I usually go for a 2:1 ratio of potting soil to perlite.
4. Consider a Container: If your chair doesn’t have a suitable container area, you can place a large pot on the seat of the chair. Make sure the pot is stable and won’t tip over.
Planting Your Pineapple Top
The moment we’ve been waiting for! Time to get that pineapple top in the ground (or, well, in the chair).
1. Make a Hole: Create a hole in the center of the potting mix that’s large enough to accommodate the base of the pineapple top.
2. Plant Carefully: Gently place the pineapple top into the hole, making sure the base is covered with soil. Don’t bury the leaves.
3. Firm the Soil: Gently firm the soil around the base of the pineapple top to secure it in place.
4. Water Thoroughly: Water the soil thoroughly until water drains out of the drainage holes. This will help to settle the soil and encourage root growth.
Caring for Your Pineapple Plant
Now comes the waiting game. Pineapples take time to grow, so patience is key.
1. Sunlight is Essential: Pineapples need plenty of sunlight, so place your plastic chair pineapple planter in a sunny location. Aim for at least 6 hours of direct sunlight per day. A south-facing location is usually ideal.
2. Watering Wisely: Water your pineapple plant regularly, but don’t overwater. Allow the soil to dry out slightly between waterings. Overwatering can lead to root rot. I usually check the soil moisture by sticking my finger about an inch into the soil. If it feels dry, it’s time to water.
3. Fertilizing for Growth: Fertilize your pineapple plant every 2-3 months with a balanced fertilizer. Follow the instructions on the fertilizer package. I like to use a liquid fertilizer diluted to half strength.
4. Temperature Matters: Pineapples thrive in warm temperatures. Protect your plant from frost and freezing temperatures. If you live in a colder climate, you may need to bring your plastic chair pineapple planter indoors during the winter months.
5. Watch for Pests: Keep an eye out for pests such as mealybugs and scale. If you notice any pests, treat them with an appropriate insecticide or insecticidal soap.
6. Patience, Patience, Patience: Pineapples can take anywhere from 1 to 3 years to produce fruit. Don’t get discouraged if you don’t see results right away. Just keep caring for your plant, and eventually, you’ll be rewarded with a delicious homegrown pineapple!
Encouraging Fruiting (The Tricky Part!)
Okay, so you’ve been patiently caring for your pineapple plant, and it’s growing nicely. But how do you actually get it to produce a pineapple? This is where things get a little tricky.
1. Ethylene Gas: Pineapples are triggered to fruit by ethylene gas. You can try to induce fruiting by placing an apple core near the base of the plant and covering it with a plastic bag for a few days. Apples release ethylene gas as they ripen.
2. Calcium Carbide: Another method is to use calcium carbide. Dissolve a small amount of calcium carbide in water and pour it into the center of the plant where the leaves emerge. Be very careful when handling calcium carbide, as it can be irritating to the skin and eyes. Wear gloves and eye protection.
3. Wait and See: Sometimes, the plant will simply fruit on its own. Just be patient and continue to provide it with the care it needs.
Harvesting Your Pineapple
Finally! The moment you’ve been waiting for. Your pineapple is ripe and ready to be harvested.
1. Signs of Ripeness: Look for signs of ripeness such as a change in color from green to yellow or orange. The pineapple should also have a sweet aroma.
2. The Tug Test: Gently tug on one of the leaves near the top of the pineapple. If it comes off easily, the pineapple is likely ripe.
3. Cut it Off: Use a sharp knife to cut the pineapple from the plant. Leave a few inches of stem attached.
4. Enjoy! Now it’s time to enjoy the fruits (literally!) of your labor. Cut up your homegrown pineapple and savor the delicious taste.
Troubleshooting
Even with the best care, you might encounter some problems along the way. Here are a few common issues and how to address them:
* Yellowing Leaves: This could be a sign of overwatering, underwatering, or nutrient deficiency. Adjust your watering schedule and fertilize your plant if necessary.
* Root Rot: This is caused by overwatering and poor drainage. Make sure your soil is well-draining and avoid overwatering. If you suspect root rot, you may need to repot your plant in fresh soil.
* No Fruit: As mentioned earlier, pineapples can take a long time to fruit. Be patient and try the ethylene gas or calcium carbide methods to encourage fruiting.
* Pests: Inspect your plant regularly for pests and treat them promptly.
Final Thoughts
Growing a pineapple in a plastic chair might seem a little unconventional, but it’s a fun and rewarding project. With a little patience and care, you can enjoy your own homegrown pineapple. Plus, you’ll have a unique and eye-catching addition to your garden or patio. Happy growing!

Conclusion
So, there you have it! Growing a pineapple in a plastic chair might sound unconventional, but it’s a surprisingly effective and rewarding way to cultivate your own tropical treat, especially if you’re short on garden space or simply looking for a unique gardening project. This DIY trick isn’t just about the novelty; it’s about creating a microclimate that mimics the pineapple’s natural habitat, providing excellent drainage, and maximizing sunlight exposure – all crucial factors for successful pineapple cultivation.
Why is this a must-try? Because it simplifies the process, making pineapple growing accessible to even the most novice gardeners. The plastic chair acts as a readily available, self-contained growing system. The open weave of the chair allows for superior air circulation around the base of the plant, preventing root rot and other moisture-related issues that can plague pineapple plants grown directly in the ground or in traditional pots. Furthermore, the elevated position of the chair can help protect your precious pineapple from ground-dwelling pests and even curious pets.
But the beauty of this method lies in its adaptability. Feel free to experiment with different types of plastic chairs. A chair with a deeper seat might allow for a larger growing medium, accommodating a more mature pineapple top. You can also customize the growing medium itself. While a well-draining potting mix is ideal, consider adding amendments like perlite, vermiculite, or even coconut coir to further enhance drainage and aeration. For those living in cooler climates, consider using a dark-colored plastic chair to absorb more heat from the sun, creating a warmer environment for your pineapple. You could even drape clear plastic sheeting over the chair during colder months to create a mini-greenhouse effect.
Another variation to consider is the addition of slow-release fertilizer to the growing medium. Pineapples are heavy feeders, and providing them with a steady supply of nutrients will encourage healthy growth and fruit production. Look for a fertilizer specifically formulated for tropical plants or one that is high in potassium, which is essential for fruit development.
Don’t be afraid to get creative with your pineapple chair setup! You can decorate the chair with colorful paint or add decorative stones around the base of the plant to enhance its aesthetic appeal. This project is as much about the journey as it is about the destination.
We wholeheartedly encourage you to try this DIY trick for growing your own pineapple. It’s a fun, educational, and ultimately delicious experience. Imagine the satisfaction of harvesting your own homegrown pineapple, knowing that you nurtured it from a simple pineapple top to a juicy, flavorful fruit.
Once you’ve embarked on your pineapple-growing adventure, we’d love to hear about your experience! Share your photos, tips, and challenges in the comments section below. Let’s create a community of pineapple enthusiasts and learn from each other’s successes and failures. Together, we can unlock the secrets to growing the perfect pineapple, one plastic chair at a time. This unique method of growing pineapple is sure to be a conversation starter and a source of pride for any gardener. So, grab a pineapple top, find a plastic chair, and get ready to experience the joy of growing your own tropical fruit!
Frequently Asked Questions (FAQ)
What kind of pineapple top should I use?
The best pineapple tops to use are those from ripe, healthy pineapples. Look for a pineapple with vibrant green leaves and a firm, unblemished body. When removing the top, twist it off firmly from the fruit. Avoid cutting it off, as this can damage the base of the top and make it more susceptible to rot. Once you’ve removed the top, carefully peel away the lower leaves to expose the stem. This will encourage root growth. Let the top dry out for a few days before planting to allow the cut end to callous over, further reducing the risk of rot.
What type of soil is best for growing pineapples in a plastic chair?
Pineapples thrive in well-draining soil that is slightly acidic. A good potting mix specifically formulated for tropical plants is an excellent choice. You can also create your own mix by combining equal parts of potting soil, perlite, and peat moss. The perlite will improve drainage, while the peat moss will help retain moisture and provide acidity. Avoid using heavy clay soils, as they can become waterlogged and lead to root rot. Ensure the soil is loose and airy to allow for proper root development.
How often should I water my pineapple plant in a plastic chair?
Water your pineapple plant regularly, but avoid overwatering. The frequency of watering will depend on the climate and the drainage of your soil. In general, water when the top inch of soil feels dry to the touch. During hot, dry weather, you may need to water more frequently. Be sure to water thoroughly, allowing the water to drain out of the bottom of the chair. Avoid letting the plant sit in standing water, as this can lead to root rot. During the winter months, reduce watering frequency as the plant’s growth slows down.
How much sunlight does a pineapple plant need when grown in a plastic chair?
Pineapples need plenty of sunlight to thrive. Aim for at least six hours of direct sunlight per day. If you live in a climate with intense sunlight, you may need to provide some afternoon shade to prevent the leaves from scorching. A south-facing location is ideal, but an east- or west-facing location can also work. If you’re growing your pineapple indoors, place it near a sunny window or supplement with artificial grow lights. Rotate the plant regularly to ensure that all sides receive adequate sunlight.
How long does it take to grow a pineapple in a plastic chair?
Growing a pineapple from a top can take anywhere from 2 to 3 years, depending on the climate, growing conditions, and the variety of pineapple. Be patient and provide your plant with the proper care, and you will eventually be rewarded with a delicious homegrown pineapple. The first year is primarily focused on root development and vegetative growth. In the second year, you may see the emergence of a flower stalk, which will eventually develop into a pineapple. Once the pineapple starts to form, it will take several months to ripen.
How do I know when my pineapple is ripe?
There are several indicators that your pineapple is ripe. The color of the skin will change from green to yellow or golden. The pineapple will also emit a sweet, fragrant aroma. You can also gently tug on one of the leaves; if it comes off easily, the pineapple is likely ripe. Finally, the pineapple should feel slightly soft to the touch. Once your pineapple is ripe, harvest it by cutting it off the plant with a sharp knife.
What kind of fertilizer should I use for my pineapple plant?
Pineapples are heavy feeders and benefit from regular fertilization. Use a balanced fertilizer with a ratio of 10-10-10 or 14-14-14. You can also use a fertilizer specifically formulated for tropical plants. Apply the fertilizer according to the package directions, typically every 2-3 months during the growing season. Avoid over-fertilizing, as this can damage the plant. You can also supplement with organic fertilizers, such as compost or worm castings.
Can I grow a pineapple in a plastic chair indoors?
Yes, you can grow a pineapple in a plastic chair indoors, but you will need to provide it with adequate sunlight and humidity. Place the chair near a sunny window or supplement with artificial grow lights. You may also need to increase the humidity around the plant by misting it regularly or placing a tray of water nearby. Ensure the chair has good drainage to prevent waterlogging.
What are some common problems when growing pineapples, and how can I prevent them?
Some common problems when growing pineapples include root rot, mealybugs, and scale. Root rot can be prevented by using well-draining soil and avoiding overwatering. Mealybugs and scale can be controlled by spraying the plant with insecticidal soap or neem oil. Regularly inspect your plant for pests and diseases to catch them early. Good air circulation can also help prevent fungal diseases.
What if my pineapple plant doesn’t produce fruit?
If your pineapple plant doesn’t produce fruit after several years, there are a few things you can try. First, ensure that it is receiving adequate sunlight and fertilizer. You can also try forcing the plant to flower by placing an apple core near the base of the plant. Apples release ethylene gas, which can stimulate flowering. Cover the plant with a plastic bag for a few days to trap the gas. Be patient, and with the right care, your pineapple plant will eventually reward you with a delicious fruit.
Leave a Comment