
Growing Peppers at Home can seem daunting, but trust me, it’s more rewarding than you might think! Imagine plucking vibrant, sun-ripened peppers straight from your own garden – the taste is simply unmatched. For centuries, peppers have added zest and flavor to cuisines around the globe, from the fiery curries of India to the spicy salsas of Mexico. Their journey from the Americas to the rest of the world is a testament to their enduring appeal.
But why should you bother growing peppers at home? Well, store-bought peppers often lack the freshness and flavor intensity of homegrown varieties. Plus, you have complete control over the growing process, ensuring your peppers are free from harmful pesticides and chemicals. I’m here to tell you that with a few simple tricks and DIY hacks, even those with limited space or a less-than-green thumb can successfully cultivate a thriving pepper patch.
This article is packed with easy-to-follow tips and tricks that will transform your backyard (or even your balcony!) into a pepper paradise. We’ll cover everything from choosing the right pepper varieties for your climate to creating the perfect soil mix and warding off common pests. So, get ready to unleash your inner gardener and discover the joy of growing peppers at home – you’ll be amazed at what you can achieve!
Growing Peppers Like a Pro: My DIY Guide to a Bountiful Harvest
Okay, pepper lovers, gather ’round! I’m going to share my secrets to growing peppers at home, from fiery habaneros to sweet bell peppers. Trust me, there’s nothing quite like the satisfaction of picking your own homegrown peppers. This guide is packed with everything I’ve learned over the years, so you can avoid the common pitfalls and enjoy a pepper explosion in your garden (or even on your balcony!).
Choosing Your Pepper Varieties
First things first, let’s talk peppers! The sheer variety can be overwhelming, but don’t worry, I’ll break it down. Consider these factors when choosing your pepper seeds or seedlings:
* Heat Level: This is measured using the Scoville scale. Sweet bell peppers have a Scoville Heat Unit (SHU) of 0, while ghost peppers can reach over 1 million SHU! Decide how much heat you can handle.
* Pepper Type: Bell peppers, jalapenos, cayenne, habaneros, serranos, banana peppers… the list goes on! Each has a unique flavor and use.
* Plant Size: Some pepper plants grow tall and bushy, while others are more compact. Choose varieties that fit your available space.
* Days to Maturity: This tells you how long it takes from planting to harvest. Shorter maturity times are great for cooler climates.
* Disease Resistance: Look for varieties that are resistant to common pepper diseases like blossom end rot and tobacco mosaic virus.
My personal favorites include jalapenos (versatile and easy to grow), bell peppers (classic and productive), and habaneros (for that serious heat!).
Starting Your Peppers: Seeds vs. Seedlings
You have two main options for starting your pepper plants: from seed or from seedlings (small plants you buy from a nursery).
* Starting from Seed: This gives you more control over the varieties you grow and is generally cheaper. However, it requires more time and effort.
* Buying Seedlings: This is a quicker and easier option, especially for beginners. Just make sure to choose healthy-looking plants with no signs of disease or pests.
I usually start my peppers from seed indoors about 8-10 weeks before the last expected frost. This gives them a head start and ensures a longer growing season.
Starting Peppers from Seed: A Step-by-Step Guide
Here’s how I start my pepper seeds indoors:
1. Gather Your Supplies: You’ll need:
* Pepper seeds
* Seed starting trays or small pots
* Seed starting mix (a light, well-draining soil mix)
* A spray bottle
* A heat mat (optional, but highly recommended)
* A grow light (also optional, but helpful)
* A humidity dome (or plastic wrap)
2. Prepare Your Seed Starting Trays: Fill your seed starting trays or pots with seed starting mix. Gently tap the trays to settle the soil.
3. Sow the Seeds: Make a small indentation (about ¼ inch deep) in the soil in each cell or pot. Place 1-2 pepper seeds in each indentation.
4. Cover the Seeds: Gently cover the seeds with seed starting mix.
5. Water the Seeds: Use a spray bottle to lightly moisten the soil. Avoid overwatering, as this can lead to damping off (a fungal disease that kills seedlings).
6. Provide Warmth: Place the seed starting trays on a heat mat. Pepper seeds germinate best in warm temperatures (around 80-85°F).
7. Maintain Humidity: Cover the seed starting trays with a humidity dome or plastic wrap to create a humid environment.
8. Provide Light: If you’re using a grow light, position it a few inches above the seed starting trays. If you’re not using a grow light, place the trays in a sunny window.
9. Monitor and Water: Check the soil moisture daily. Water lightly when the soil surface feels dry. Remove the humidity dome or plastic wrap once the seeds have germinated.
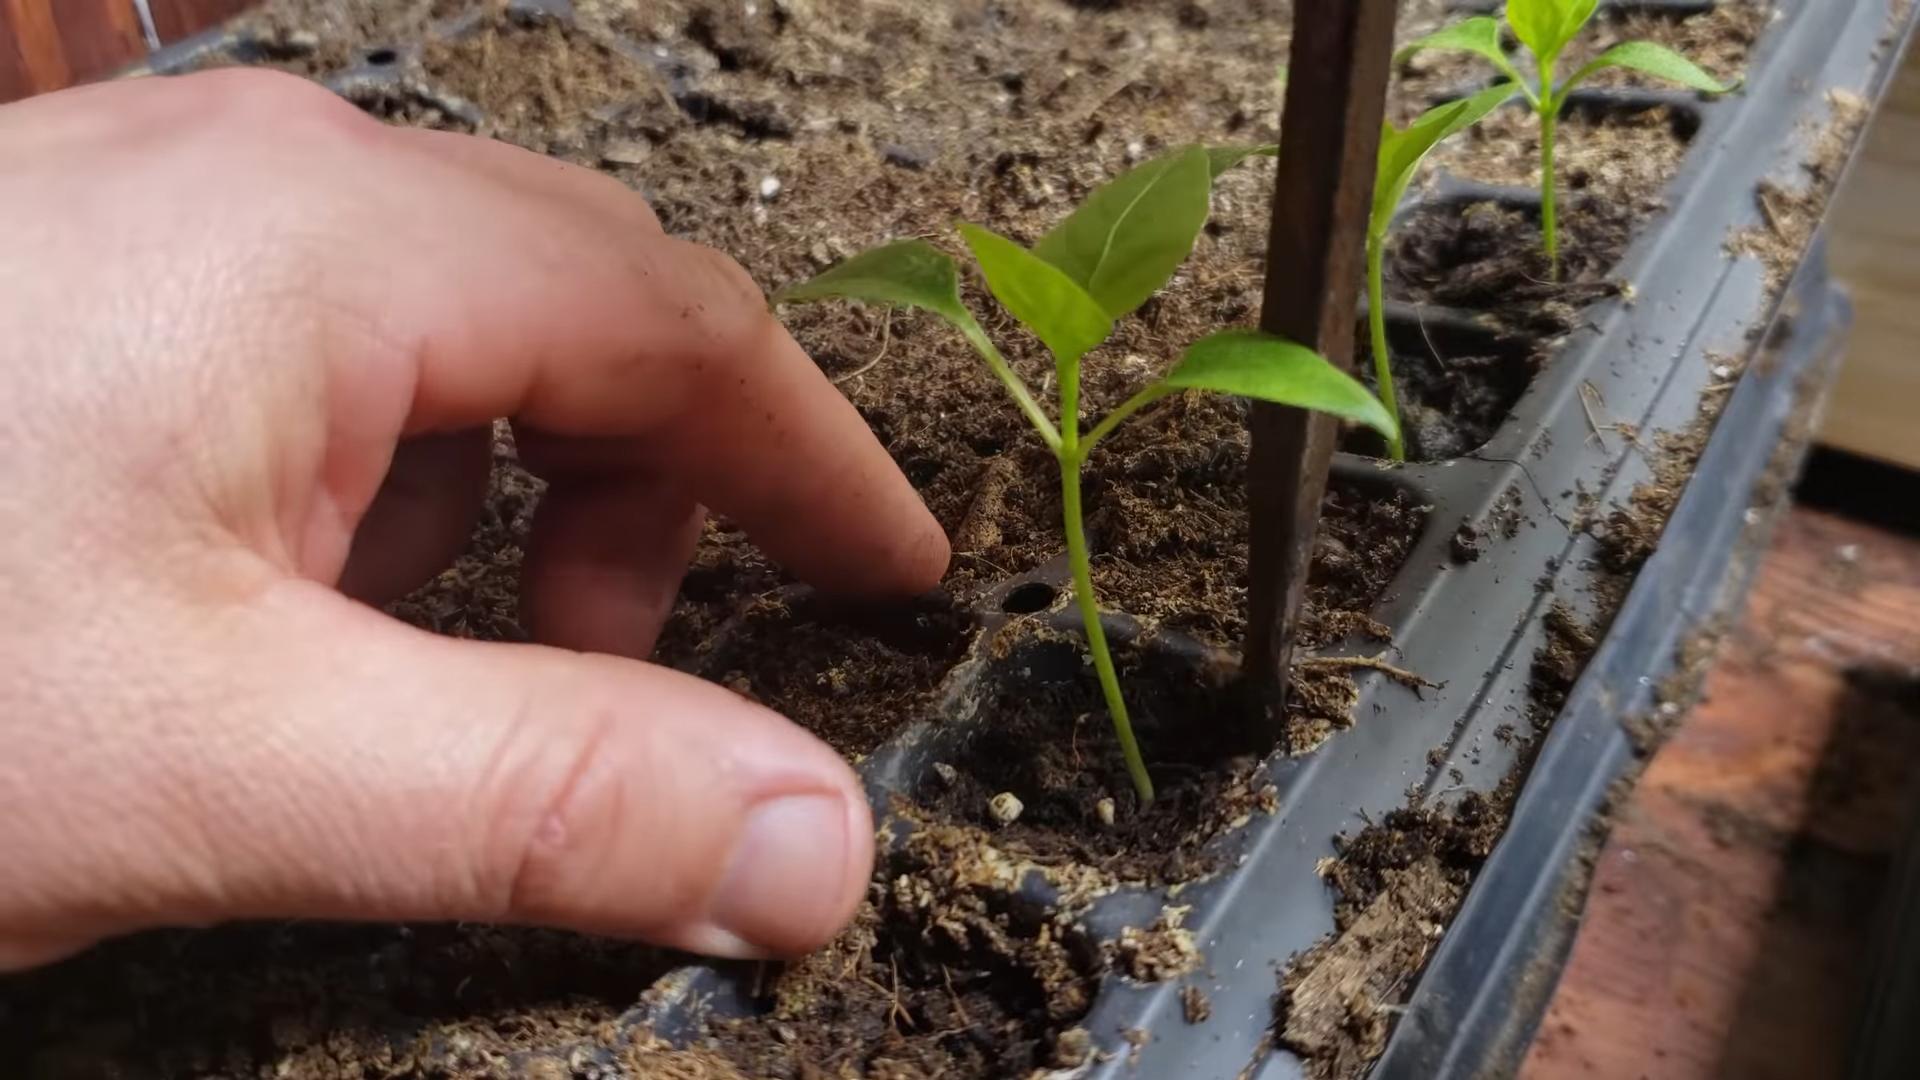
10. Thin Seedlings (If Necessary): Once the seedlings have developed their first true leaves (the second set of leaves), thin them to one seedling per cell or pot. Choose the strongest, healthiest-looking seedling and snip off the others at the soil line.
11. Harden Off Seedlings: Before transplanting your seedlings outdoors, you need to “harden them off.” This process gradually acclimates them to outdoor conditions. Start by placing the seedlings outdoors in a sheltered location for a few hours each day, gradually increasing the amount of time they spend outdoors over a period of 1-2 weeks.
Transplanting Your Peppers Outdoors
Once the danger of frost has passed and the soil has warmed up, it’s time to transplant your pepper seedlings outdoors.
1. Choose a Sunny Location: Peppers need at least 6-8 hours of sunlight per day.
2. Prepare the Soil: Peppers prefer well-drained soil that is rich in organic matter. Amend your soil with compost or well-rotted manure before planting.
3. Space Your Plants: Space your pepper plants about 18-24 inches apart, depending on the variety.
4. Dig Holes: Dig holes that are slightly larger than the root balls of your seedlings.
5. Transplant the Seedlings: Gently remove the seedlings from their pots and place them in the holes. Make sure the top of the root ball is level with the surrounding soil.
6. Fill the Holes: Fill the holes with soil and gently firm the soil around the plants.
7. Water Thoroughly: Water the plants thoroughly after transplanting.
8. Mulch: Apply a layer of mulch around the plants to help retain moisture, suppress weeds, and regulate soil temperature. I like to use straw or shredded leaves.
Caring for Your Pepper Plants
Now that your pepper plants are in the ground, it’s time to provide them with the care they need to thrive.
* Watering: Water your pepper plants regularly, especially during hot, dry weather. Aim to keep the soil consistently moist, but not waterlogged.
* Fertilizing: Peppers are heavy feeders, so they need regular fertilization. Use a balanced fertilizer (e.g., 10-10-10) or a fertilizer specifically formulated for peppers and tomatoes. Follow the instructions on the fertilizer label. I usually fertilize my peppers every 2-3 weeks.
* Pruning: Pruning can help improve air circulation and encourage bushier growth. Remove any suckers (small shoots that grow from the base of the plant) and any yellowing or diseased leaves.
* Staking or Caging: Some pepper varieties, especially those with heavy fruit, may need staking or caging to prevent them from falling over. I use tomato cages for my bell peppers and taller varieties.
* Pest and Disease Control: Keep an eye out for pests and diseases. Common pepper pests include aphids, flea beetles, and spider mites. Common pepper diseases include blossom end rot, powdery mildew, and bacterial leaf spot. Treat any problems promptly with appropriate organic or chemical controls. I prefer to use organic methods whenever possible, such as insecticidal soap or neem oil.
Troubleshooting Common Pepper Problems
Even with the best care, you may encounter some problems while growing peppers. Here are some common issues and how to address them:
* Blossom End Rot: This is a common problem that causes the bottom of the pepper to rot. It’s usually caused by a calcium deficiency, which can be due to inconsistent watering or poor soil. To prevent blossom end rot, water your plants regularly and amend your soil with calcium-rich amendments like bone meal or crushed eggshells.
* Sunscald: This occurs when peppers are exposed to too much direct sunlight, causing them to develop white or yellow patches. To prevent sunscald, provide your plants with some shade during the hottest part of the day.
* Aphids: These small, sap-sucking insects can weaken your pepper plants. Control aphids with insecticidal soap or neem oil.
* Flea Beetles: These tiny beetles can chew small holes in the leaves of your pepper plants. Control flea beetles with row covers or insecticidal soap.
* Powdery Mildew: This fungal disease causes a white, powdery coating on the leaves of your pepper plants. Control powdery mildew with a fungicide or by improving air circulation around your plants.
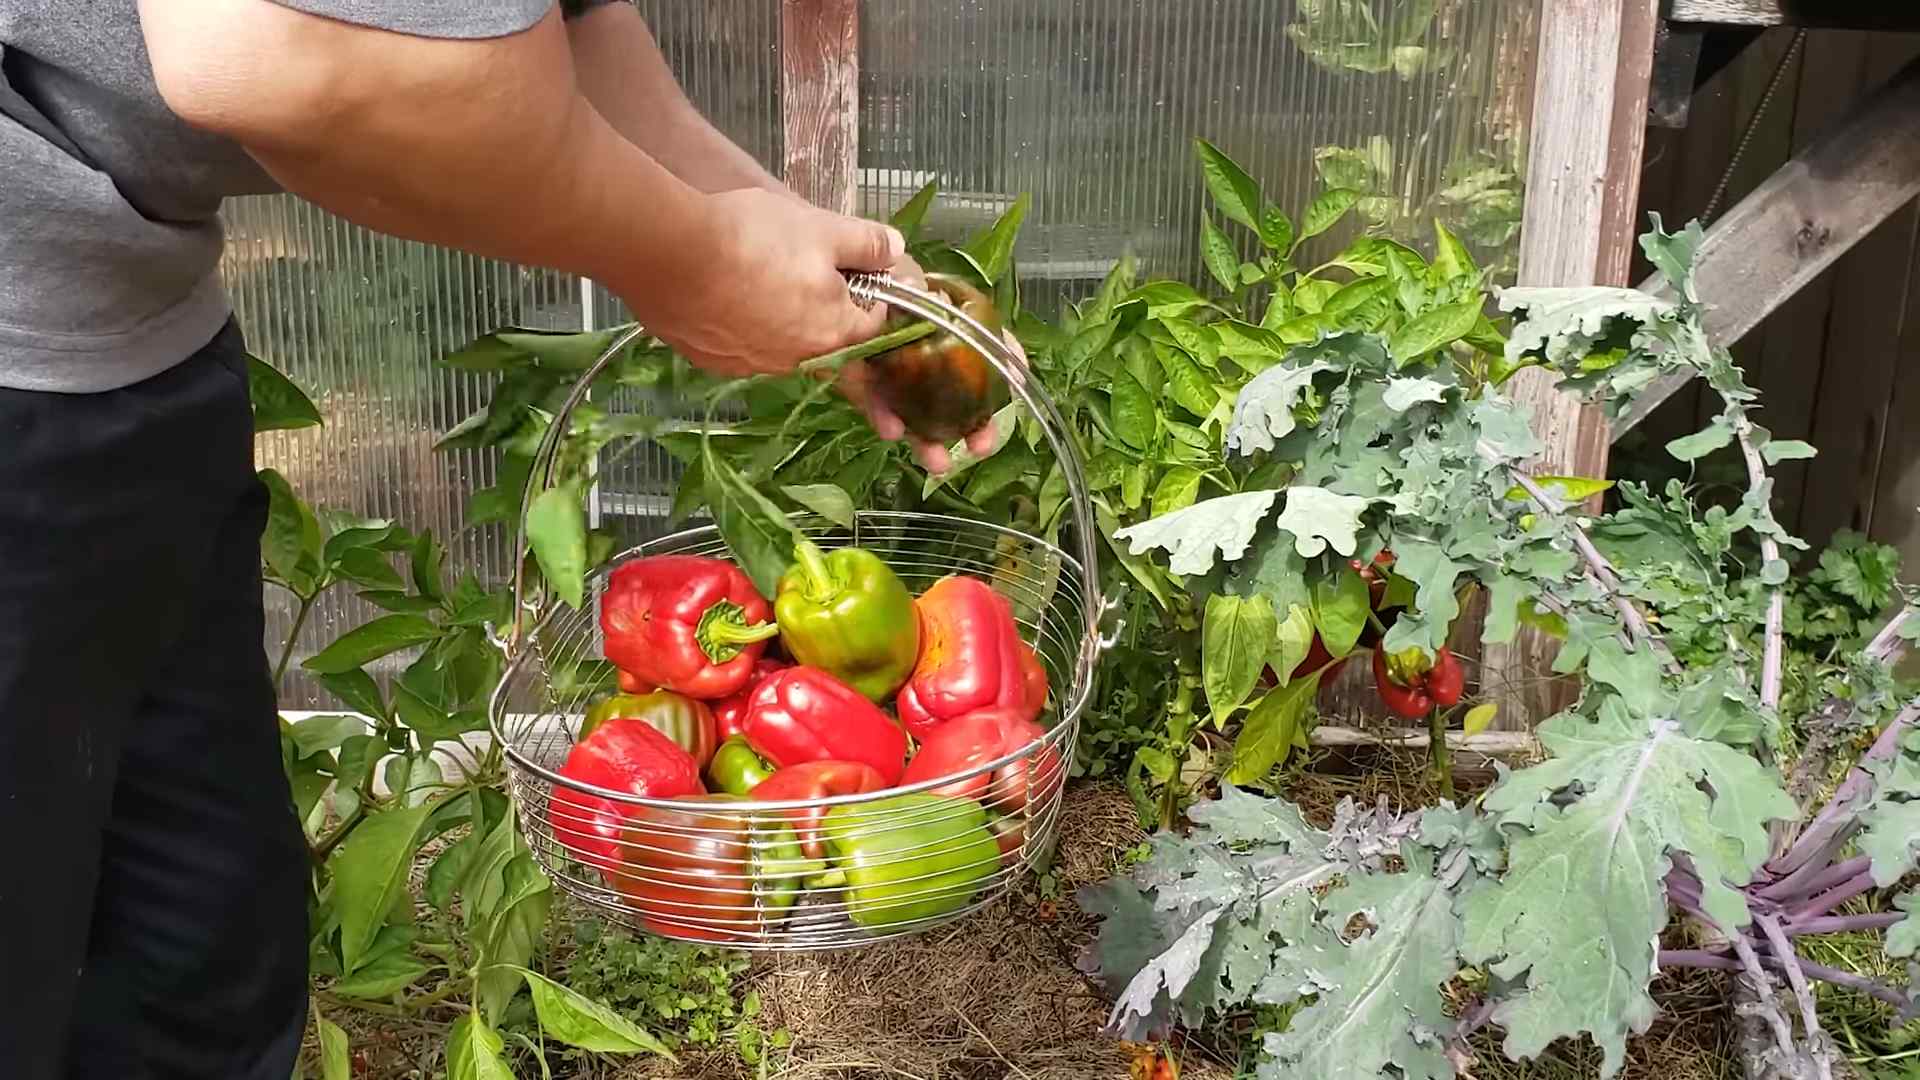
Harvesting Your Peppers
The moment you’ve been waiting for! Harvesting your peppers is the most rewarding part of the process.
* When to Harvest: The timing of your harvest depends on the pepper variety and your personal preference. Bell peppers are typically harvested when they are fully colored and firm. Jalapenos are usually harvested when they are green and about 3-4 inches long. Habaneros are harvested when they are fully colored and
Conclusion
So, there you have it! Growing peppers at home, especially with these simple DIY tricks, is not only achievable but incredibly rewarding. We’ve walked through the process, highlighting methods that can significantly boost your yield and the overall health of your pepper plants. From seed starting to pest control, these techniques are designed to empower you, the home gardener, to cultivate a thriving pepper patch, regardless of your experience level.
Why is this a must-try? Because fresh, homegrown peppers are simply unmatched in flavor and quality. The vibrant colors, the intense aromas, and the satisfying crunch – these are experiences you just can’t replicate with store-bought varieties. Plus, knowing exactly where your food comes from and how it was grown provides a peace of mind that’s priceless. You control the inputs, ensuring your peppers are free from unwanted chemicals and pesticides.
But the benefits extend beyond just taste and health. Gardening is a therapeutic activity, a chance to connect with nature and de-stress from the demands of daily life. Nurturing your pepper plants from tiny seedlings to mature, fruit-bearing specimens is an incredibly fulfilling process. And let’s not forget the cost savings! Once you’ve established your pepper garden, you’ll be enjoying a steady supply of fresh peppers for months, significantly reducing your grocery bill.
Ready to take your pepper growing to the next level? Consider experimenting with different varieties. From the mild bell pepper to the fiery habanero, there’s a pepper out there for every palate. Try companion planting, pairing your peppers with herbs like basil or marigolds to deter pests and attract beneficial insects. You can also explore different growing mediums, such as hydroponics or container gardening, to adapt your pepper growing to your specific space and resources. For example, if you live in an apartment, container gardening is a great way to grow peppers on your balcony or patio.
Don’t be afraid to get creative and personalize your pepper growing journey. The most important thing is to have fun and learn along the way. Every gardener has their own unique style and preferences, so find what works best for you and your plants.
We are confident that these DIY tricks will transform your pepper growing experience. So, grab your seeds, gather your supplies, and get ready to embark on a flavorful adventure. We encourage you to try these methods and share your results with us! Post pictures of your thriving pepper plants, share your favorite recipes using your homegrown peppers, and let us know what challenges you faced and how you overcame them. Your experiences can inspire and help other gardeners in our community.
Growing peppers at home is a journey of discovery, a chance to connect with nature, and a way to enjoy the freshest, most flavorful peppers imaginable. So, what are you waiting for? Get started today!
Frequently Asked Questions (FAQ)
Q: What are the best pepper varieties to grow for beginners?
A: For beginners, bell peppers are an excellent choice due to their mild flavor and relatively easy growing requirements. Jalapeños are also a good option, as they are fairly resilient and produce a good yield. Banana peppers are another beginner-friendly variety, offering a slightly sweet and tangy flavor. Avoid extremely hot peppers like habaneros or ghost peppers until you have some experience under your belt, as they can be more challenging to grow. Remember to choose varieties that are well-suited to your local climate and growing conditions.
Q: How often should I water my pepper plants?
A: The watering frequency for pepper plants depends on several factors, including the climate, soil type, and size of the plant. Generally, you should water your pepper plants deeply whenever the top inch of soil feels dry to the touch. Avoid overwatering, as this can lead to root rot. During hot, dry weather, you may need to water your plants daily. In cooler, wetter weather, you may only need to water them every few days. A good rule of thumb is to check the soil moisture regularly and adjust your watering schedule accordingly. Using a moisture meter can be helpful in determining the moisture level of the soil.
Q: What kind of fertilizer should I use for my pepper plants?
A: Pepper plants benefit from regular fertilization, especially during the growing season. A balanced fertilizer with an NPK ratio of 10-10-10 or 14-14-14 is a good starting point. You can also use a fertilizer specifically formulated for tomatoes and peppers. Avoid fertilizers that are too high in nitrogen, as this can promote excessive foliage growth at the expense of fruit production. Apply fertilizer according to the package directions, typically every 2-3 weeks. You can also supplement with organic fertilizers like compost tea or fish emulsion.
Q: How do I protect my pepper plants from pests and diseases?
A: Pest and disease control is an important aspect of growing peppers at home. Common pests that affect pepper plants include aphids, spider mites, and whiteflies. You can control these pests with insecticidal soap, neem oil, or by introducing beneficial insects like ladybugs. Diseases that can affect pepper plants include blossom end rot, fungal leaf spot, and viral diseases. Blossom end rot is caused by a calcium deficiency and can be prevented by ensuring adequate calcium levels in the soil. Fungal leaf spot can be treated with a fungicide. Viral diseases are often spread by insects, so controlling pests is crucial. Practicing good sanitation, such as removing diseased leaves and debris, can also help prevent the spread of diseases.
Q: How do I know when my peppers are ripe?
A: The ripeness of peppers depends on the variety. Bell peppers are typically harvested when they are fully colored and firm to the touch. Jalapeños are usually harvested when they are dark green and about 2-3 inches long. Habaneros are typically harvested when they turn orange or red. The best way to determine ripeness is to taste a small piece of the pepper. If it has the desired flavor and heat level, it’s ready to harvest. Remember to use gloves when handling hot peppers to avoid skin irritation.
Q: Can I grow peppers in containers?
A: Yes, peppers can be successfully grown in containers. Choose a container that is at least 12 inches in diameter and has good drainage. Use a high-quality potting mix and provide regular watering and fertilization. Container-grown peppers may need to be watered more frequently than those grown in the ground, especially during hot weather. Choose compact pepper varieties that are well-suited for container gardening.
Q: What is companion planting, and how can it benefit my pepper plants?
A: Companion planting is the practice of planting different plants together to benefit each other. Some good companion plants for peppers include basil, marigolds, and onions. Basil helps to repel pests like aphids and whiteflies. Marigolds also repel pests and attract beneficial insects like ladybugs. Onions can help to deter certain soilborne diseases. Companion planting can improve the health and yield of your pepper plants.
Q: How do I overwinter my pepper plants?
A: In colder climates, you can overwinter your pepper plants indoors to keep them alive until the next growing season. Before the first frost, prune your pepper plants back to about 6-8 inches tall. Dig them up carefully and pot them in containers. Bring them indoors and place them in a sunny location. Water them sparingly and fertilize them occasionally. In the spring, after the last frost, you can transplant them back into the garden.
Q: What if my pepper plant is producing flowers but no peppers?
A: There are several reasons why your pepper plant might be producing flowers but no peppers. One common reason is lack of pollination. Peppers are self-pollinating, but they may need some help from wind or insects to transfer pollen. You can manually pollinate your pepper plants by gently shaking the flowers or using a small brush to transfer pollen from one flower to another. Other reasons for lack of fruit production include insufficient sunlight, improper watering, and nutrient deficiencies. Make sure your pepper plants are getting at least 6-8 hours of sunlight per day, are watered regularly, and are fertilized properly.
Leave a Comment