
Growing Peanuts in Bottles: Sounds crazy, right? But trust me, it’s a surprisingly rewarding and space-saving way to cultivate these delicious legumes! Forget sprawling gardens; we’re taking peanut production vertical! Have you ever wondered where peanuts come from? While their exact origins are debated, peanuts have been cultivated for thousands of years, with evidence pointing to South America as their birthplace. They’ve since become a global staple, enjoyed in countless forms.
But why grow them in bottles? Well, for starters, it’s incredibly fun and a fantastic conversation starter. More importantly, it’s perfect for apartment dwellers, balcony gardeners, or anyone with limited outdoor space. Imagine the look on your friends’ faces when you show them your peanut plant thriving in a recycled bottle! Plus, it’s a great way to teach kids about plant life cycles and sustainable gardening practices. This DIY project is not only about the joy of harvesting your own snacks but also about embracing innovative and eco-friendly gardening techniques. So, if you’re ready to ditch the traditional garden bed and embark on a unique gardening adventure, let’s dive into the world of growing peanuts in bottles!
Erdnüsse im Glas ziehen: Dein DIY-Guide für den urbanen Garten
Hey Gartenfreunde! Habt ihr schon mal darüber nachgedacht, Erdnüsse in Flaschen anzubauen? Klingt verrückt, oder? Aber glaubt mir, es ist ein super spannendes Projekt, das auch auf kleinstem Raum funktioniert. Ich zeige euch, wie ihr eure eigenen Erdnüsse im Glas ziehen könnt – ein echter Hingucker und eine tolle Möglichkeit, Kindern die Entstehung von Lebensmitteln näherzubringen. Los geht’s!
Was du brauchst: Die Materialliste
Bevor wir loslegen, hier eine Liste mit allem, was du für dein Erdnuss-Glas-Garten brauchst:
* Erdnüsse: Rohe, ungesalzene Erdnüsse (am besten Bio-Qualität). Achte darauf, dass sie noch ihre rote Haut haben. Geröstete oder gesalzene Erdnüsse keimen nicht!
* Große Glasflaschen oder Einmachgläser: Je größer, desto besser. Denk an alte Gurkengläser, Saftflaschen oder ähnliches. Sie sollten sauber und transparent sein.
* Erde: Hochwertige Blumenerde oder eine Mischung aus Gartenerde, Kompost und Sand. Die Erde sollte locker und gut durchlässig sein.
* Kieselsteine oder Blähton: Für eine gute Drainage am Boden der Flasche.
* Wasser: Zum Befeuchten der Erde.
* Sprühflasche: Zum Besprühen der Blätter.
* Optional: Ein kleiner Holzstab oder Löffel zum Andrücken der Erde.
* Optional: Eine Schere oder ein Messer (zum eventuellen Zuschneiden der Erdnüsse).
Schritt-für-Schritt-Anleitung: Dein Erdnuss-Glas-Garten
So, jetzt haben wir alles zusammen. Dann können wir ja loslegen!
1. Die Vorbereitung der Erdnüsse:
* Auswahl: Suche dir die schönsten und prallsten Erdnüsse aus.
* Einweichen (optional): Du kannst die Erdnüsse für 24 Stunden in lauwarmes Wasser legen. Das beschleunigt die Keimung. Ich persönlich mache das meistens, aber es geht auch ohne.
* Anritzen (optional): Manche Erdnüsse haben eine sehr harte Schale. Du kannst sie vorsichtig mit einem Messer oder einer Schere anritzen, um der Keimung zu helfen. Aber sei vorsichtig, dass du den Kern nicht beschädigst!
2. Die Vorbereitung der Flasche:
* Reinigung: Stelle sicher, dass deine Flasche sauber ist. Spüle sie gründlich mit heißem Wasser und Spülmittel aus.
* Drainage: Fülle eine Schicht Kieselsteine oder Blähton (ca. 2-3 cm hoch) auf den Boden der Flasche. Das sorgt für eine gute Drainage und verhindert Staunässe.
3. Das Befüllen der Flasche:
* Erde einfüllen: Fülle die Flasche mit Erde. Lass oben noch etwa 5-7 cm Platz.
* Erde befeuchten: Befeuchte die Erde mit Wasser. Sie sollte feucht, aber nicht nass sein.
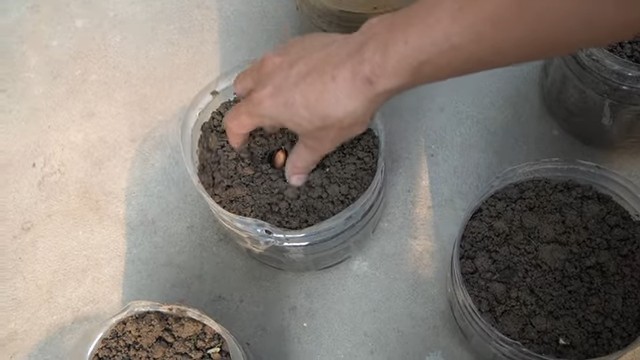
4. Das Pflanzen der Erdnüsse:
* Erdnüsse platzieren: Drücke die Erdnüsse etwa 2-3 cm tief in die Erde. Achte darauf, dass sie genügend Abstand zueinander haben (ca. 5-7 cm). Je nach Größe deiner Flasche kannst du 3-5 Erdnüsse pflanzen.
* Mit Erde bedecken: Bedecke die Erdnüsse mit einer dünnen Schicht Erde.
* Nochmal befeuchten: Befeuchte die Erde noch einmal vorsichtig mit Wasser.
5. Der richtige Standort:
* Helligkeit: Stelle die Flasche an einen hellen, warmen Ort. Ein Fensterbrett mit direkter Sonneneinstrahlung ist ideal.
* Temperatur: Erdnüsse mögen es warm. Die ideale Temperatur liegt zwischen 20 und 25 Grad Celsius.
6. Die Pflege:
* Gießen: Halte die Erde feucht, aber nicht nass. Gieße regelmäßig, aber vermeide Staunässe.
* Besprühen: Besprühe die Blätter regelmäßig mit Wasser. Das erhöht die Luftfeuchtigkeit und beugt Schädlingen vor.
* Düngen (optional): Du kannst die Erdnüsse alle paar Wochen mit einem organischen Flüssigdünger düngen. Aber übertreibe es nicht!
* Drehen: Drehe die Flasche regelmäßig, damit die Pflanzen gleichmäßig Licht bekommen.
Geduld ist gefragt: Die Keimung und das Wachstum
Jetzt heißt es warten! Die Keimung kann je nach Temperatur und Feuchtigkeit 1-3 Wochen dauern. Hab Geduld!
* Die Keimung: Wenn die Erdnüsse keimen, siehst du kleine grüne Triebe aus der Erde kommen.
* Das Wachstum: Die Erdnusspflanzen wachsen relativ schnell. Sie bilden Blätter und Blüten.
* Die Blüten: Die Blüten der Erdnusspflanze sind gelb und klein. Sie sind selbstbestäubend.
* Die Fruchtbildung: Nach der Bestäubung biegen sich die Blütenstiele nach unten und bohren sich in die Erde. Dort bilden sich die Erdnüsse. Das ist ein faszinierender Prozess!
Herausforderungen und Tipps: Was du beachten solltest
Auch beim Erdnussanbau im Glas gibt es ein paar Dinge zu beachten:
* Schimmel: Wenn die Erde zu feucht ist, kann sich Schimmel bilden. Achte auf eine gute Belüftung und vermeide Staunässe.
* Schädlinge: Erdnusspflanzen können von Blattläusen oder Spinnmilben befallen werden. Kontrolliere die Pflanzen regelmäßig und bekämpfe Schädlinge bei Bedarf mit natürlichen Mitteln.
* Platzmangel: Wenn die Pflanzen zu groß werden, kannst du sie in größere Gefäße umtopfen.
* Lichtmangel: Im Winter kann es zu Lichtmangel kommen. Du kannst die Pflanzen mit einer Pflanzenlampe unterstützen.
* Die richtige Erde: Verwende unbedingt hochwertige Erde. Billige Erde kann zu Problemen führen.
* Geduld: Erdnüsse brauchen Zeit zum Wachsen. Sei geduldig und gib nicht auf!
Die Ernte: Wann ist es soweit?
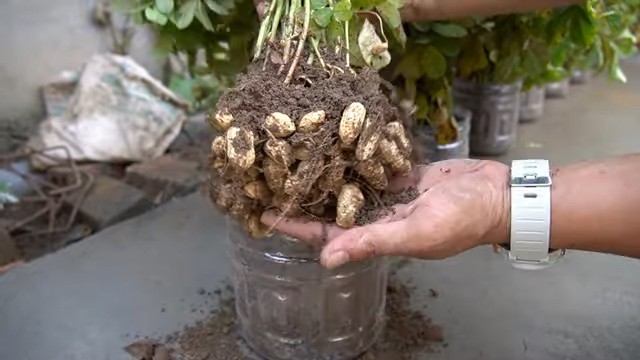
Die Erntezeit ist gekommen, wenn die Blätter der Erdnusspflanze gelb werden und absterben. Das ist normalerweise nach etwa 4-5 Monaten der Fall.
* Die Ernte: Ziehe die Pflanzen vorsichtig aus der Erde. Die Erdnüsse hängen an den Wurzeln.
* Reinigung: Wasche die Erdnüsse gründlich mit Wasser.
* Trocknung: Lasse die Erdnüsse an einem warmen, trockenen Ort trocknen. Das kann ein paar Tage dauern.
* Lagerung: Lagere die getrockneten Erdnüsse an einem kühlen, trockenen Ort.
Extra-Tipps für den Erdnuss-Profi
* Sortenwahl: Es gibt verschiedene Erdnusssorten. Informiere dich, welche Sorte für den Anbau im Glas am besten geeignet ist.
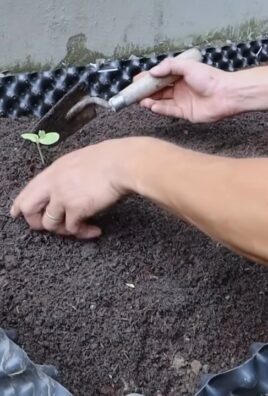
* Vorkultur: Du kannst die Erdnüsse auch in kleinen Töpfen vorkultivieren und sie dann in die Flasche umpflanzen.
* Beschneiden: Du kannst die Erdnusspflanzen beschneiden, um das Wachstum zu fördern.
* Kreativität: Gestalte deine Erdnuss-Glas-Gärten individuell. Verwende verschiedene Flaschen, Farben und Dekorationen.
Fazit: Dein eigener Erdnuss-Glas-Garten
Ich hoffe, diese Anleitung hat dir geholfen, deinen eigenen Erdnuss-Glas-Garten anzulegen. Es ist ein tolles Projekt, das Spaß macht und dir frische Erdnüsse liefert. Viel Erfolg und viel Spaß beim Gärtnern! Und denk dran: Gärtnern ist wie eine Therapie – es entspannt und macht glücklich!
Conclusion
So, there you have it! Growing peanuts in bottles isn’t just a quirky gardening experiment; it’s a surprisingly effective and rewarding way to cultivate these delicious legumes, especially if you’re short on space or simply looking for a fun and engaging project. This DIY trick offers a unique opportunity to witness the entire peanut life cycle up close, from the initial sprouting to the eventual formation of those subterranean treasures. Forget sprawling gardens and back-breaking digging; with a few repurposed bottles, some quality soil, and a little patience, you can enjoy a homegrown harvest of fresh, flavorful peanuts right on your balcony, patio, or even indoors.
The beauty of this method lies in its adaptability. Feel free to experiment with different peanut varieties to discover your personal favorite. Virginia peanuts, known for their large size, might require slightly larger bottles, while Spanish peanuts, with their smaller stature, could thrive in more compact containers. Consider adding companion plants like marigolds or basil to your bottle gardens to deter pests and enhance the overall health of your peanut plants. You can even get creative with your bottle design, painting them with vibrant colors or adding decorative elements to create eye-catching displays.
Beyond the practical benefits, growing peanuts in bottles offers a valuable educational experience, particularly for children. It’s a hands-on way to learn about plant biology, the importance of soil health, and the fascinating process of food production. Imagine the excitement of watching those delicate yellow flowers bloom and then, almost magically, seeing the pegs burrow into the soil to form the peanuts below. It’s a truly captivating spectacle that will spark curiosity and foster a deeper appreciation for the natural world.
But the real proof is in the pudding, or rather, in the peanuts! The taste of freshly harvested, homegrown peanuts is simply unparalleled. They’re sweeter, more flavorful, and bursting with that unmistakable nutty aroma. Whether you roast them, boil them, or simply enjoy them raw, you’ll be amazed by the difference compared to store-bought varieties. Plus, you’ll have the satisfaction of knowing that you grew them yourself, using a sustainable and eco-friendly method.
Don’t be intimidated by the prospect of trying something new. Growing peanuts in bottles is surprisingly easy, even for novice gardeners. With a little bit of preparation and attention, you can achieve impressive results. So, gather your supplies, grab some peanut seeds, and get ready to embark on this exciting gardening adventure.
We wholeheartedly encourage you to try this DIY trick and experience the joy of growing your own peanuts. And most importantly, we want to hear about your experiences! Share your photos, tips, and stories with us in the comments section below. Let’s create a community of bottle-peanut growers and inspire others to embrace this fun and rewarding gardening method. Let us know what peanut varieties worked best for you, what challenges you encountered, and what innovative solutions you discovered. Together, we can unlock the full potential of this unique and sustainable gardening technique. So, go ahead, give it a try, and let the peanut-growing fun begin! This **DIY trick** is sure to impress!
Frequently Asked Questions (FAQ)
What kind of bottles are best for growing peanuts?
The ideal bottles for growing peanuts are clear plastic bottles, such as those used for water, soda, or juice. The size of the bottle will depend on the variety of peanuts you plan to grow. For smaller varieties like Spanish peanuts, 2-liter bottles may suffice. However, for larger varieties like Virginia peanuts, you may need to use larger bottles, such as 3-liter or even 5-liter bottles. Make sure the bottles are clean and have drainage holes drilled in the bottom to prevent waterlogging.
What type of soil should I use?
Peanuts thrive in well-draining, sandy loam soil. Avoid heavy clay soils, as they can become compacted and hinder the development of the peanut pods. You can purchase a pre-mixed potting soil specifically formulated for vegetables, or you can create your own mix by combining equal parts of garden soil, sand, and compost. The compost will provide essential nutrients for the peanut plants, while the sand will improve drainage.
How many peanut seeds should I plant in each bottle?
It’s generally recommended to plant 2-3 peanut seeds per bottle. This increases the chances of at least one seed germinating successfully. Once the seedlings emerge, you can thin them out, leaving only the strongest and healthiest plant in each bottle.
How often should I water my peanut plants?
Peanut plants need consistent moisture, especially during the flowering and pod-forming stages. Water deeply whenever the top inch of soil feels dry to the touch. Avoid overwatering, as this can lead to root rot. Ensure that the drainage holes in the bottles are functioning properly to prevent water from accumulating at the bottom.
How much sunlight do peanut plants need?
Peanut plants require at least 6-8 hours of direct sunlight per day. Choose a location that receives ample sunlight throughout the day. If you’re growing peanuts indoors, you may need to supplement with artificial lighting, such as grow lights.
When will my peanuts be ready to harvest?
Peanuts typically take 120-150 days to mature, depending on the variety and growing conditions. You’ll know your peanuts are ready to harvest when the foliage begins to turn yellow and the pods feel plump and full. To harvest, carefully remove the entire plant from the bottle and gently shake off the excess soil.
Can I grow peanuts indoors year-round?
Yes, you can grow peanuts indoors year-round, provided you have adequate lighting and temperature control. Use grow lights to supplement natural sunlight and maintain a consistent temperature of 70-80°F (21-27°C).
What are some common pests and diseases that affect peanut plants?
Common pests that can affect peanut plants include aphids, spider mites, and leafhoppers. Diseases include leaf spot and root rot. Regularly inspect your plants for signs of pests or diseases and take appropriate action, such as using insecticidal soap or fungicide.
Can I reuse the soil from my peanut bottles?
It’s generally not recommended to reuse the soil from your peanut bottles, as it may contain pathogens or depleted nutrients. However, if you choose to reuse the soil, you should sterilize it first by baking it in the oven at 200°F (93°C) for 30 minutes. You should also amend the soil with compost or other organic matter to replenish nutrients.
What can I do with my homegrown peanuts?
The possibilities are endless! You can roast them, boil them, make peanut butter, add them to salads or stir-fries, or simply enjoy them as a healthy snack. Homegrown peanuts are also a great addition to homemade trail mix or granola bars.
Leave a Comment