
Growing peanuts at home might sound like a whimsical dream reserved for sprawling farms, but I’m here to tell you it’s totally achievable, even in a small backyard or on a sunny balcony! Forget trekking to the store for your peanut butter fix; imagine the satisfaction of harvesting your own homegrown peanuts, bursting with fresh, nutty flavor.
The humble peanut, despite its name, isn’t actually a nut! It’s a legume, and its journey from South America, where it was first cultivated thousands of years ago, to becoming a global snack food is a fascinating tale of trade and cultural exchange. In many cultures, peanuts symbolize prosperity and good fortune, and what better way to invite some of that into your life than by nurturing your own peanut patch?
But why should you bother with the effort? Well, beyond the sheer joy of gardening and connecting with nature, growing peanuts at home offers several advantages. Store-bought peanuts can sometimes be treated with preservatives or grown using methods that aren’t always environmentally friendly. By growing your own, you control the entire process, ensuring you have access to fresh, organic peanuts. Plus, it’s a fantastic educational experience for kids (and adults!), teaching them about plant life cycles and where their food comes from. So, are you ready to ditch the store-bought peanuts and embark on a rewarding gardening adventure? Let’s dive into some simple DIY tricks and hacks that will have you harvesting your own peanut bounty in no time!
Erdnüsse zu Hause anbauen: Dein umfassender DIY-Leitfaden
Hey Gartenfreunde! Habt ihr euch jemals gefragt, wie Erdnüsse eigentlich wachsen? Ich auch! Und was gibt es Besseres, als es einfach selbst auszuprobieren? Erdnüsse im eigenen Garten anzubauen ist nicht nur super spannend, sondern auch überraschend einfach. In diesem Artikel zeige ich euch Schritt für Schritt, wie ihr eure eigenen Erdnüsse ziehen könnt – von der Auswahl der richtigen Sorte bis zur Ernte. Los geht’s!
Was du brauchst: Die Vorbereitung
Bevor wir loslegen, brauchen wir natürlich das richtige Equipment und die passenden Materialien. Hier ist eine Liste, damit du alles griffbereit hast:
* Erdnüsse: Unbehandelte, rohe Erdnüsse (am besten aus dem Bioladen oder einem Saatguthandel). Geröstete oder gesalzene Erdnüsse keimen nicht!
* Töpfe oder Pflanzkästen: Mindestens 30 cm tief, damit die Erdnüsse genug Platz haben, um sich zu entwickeln.
* Hochwertige Blumenerde: Gut durchlässig und locker.
* Kompost oder organischer Dünger: Für eine Extraportion Nährstoffe.
* Gießkanne oder Gartenschlauch: Zum regelmäßigen Gießen.
* Gartengeräte: Spaten, Schaufel, eventuell eine kleine Harke.
* Standort: Ein sonniger Platz im Garten oder auf dem Balkon. Erdnüsse lieben die Wärme!
Schritt-für-Schritt-Anleitung: So ziehst du deine eigenen Erdnüsse
Jetzt kommt der spannende Teil: Das Anpflanzen und Pflegen deiner Erdnüsse. Keine Sorge, es ist wirklich nicht schwer!
1. Erdnüsse vorbereiten:
* Zuerst wähle ich die schönsten und prallsten Erdnüsse aus.
* Dann knacke ich vorsichtig die Schale, ohne die Erdnusskerne zu beschädigen.
* Ich lasse die Kerne für etwa 24 Stunden in lauwarmem Wasser quellen. Das hilft ihnen, schneller zu keimen.
2. Aussaat:
* Ich fülle die Töpfe oder Pflanzkästen mit Blumenerde.
* Dann mache ich kleine Löcher in die Erde, etwa 2-3 cm tief.
* In jedes Loch lege ich 2-3 Erdnusskerne. Das erhöht die Wahrscheinlichkeit, dass mindestens eine keimt.
* Ich bedecke die Kerne vorsichtig mit Erde und drücke sie leicht an.
* Anschließend gieße ich die Erde gut an, aber vermeide Staunässe.
3. Standort und Pflege:
* Ich stelle die Töpfe an einen sonnigen und warmen Ort. Erdnüsse brauchen mindestens 6-8 Stunden Sonne pro Tag.
* Die Erde sollte immer leicht feucht sein, aber nicht nass. Ich gieße regelmäßig, besonders an heißen Tagen.
* Nach etwa 2-3 Wochen sollten die ersten Keimlinge zu sehen sein.
* Sobald die Pflanzen etwas größer sind, dünne ich sie aus, sodass nur die stärkste Pflanze pro Topf übrig bleibt.
4. Blüte und Fruchtbildung:
* Erdnusspflanzen blühen gelb und sehen hübsch aus.
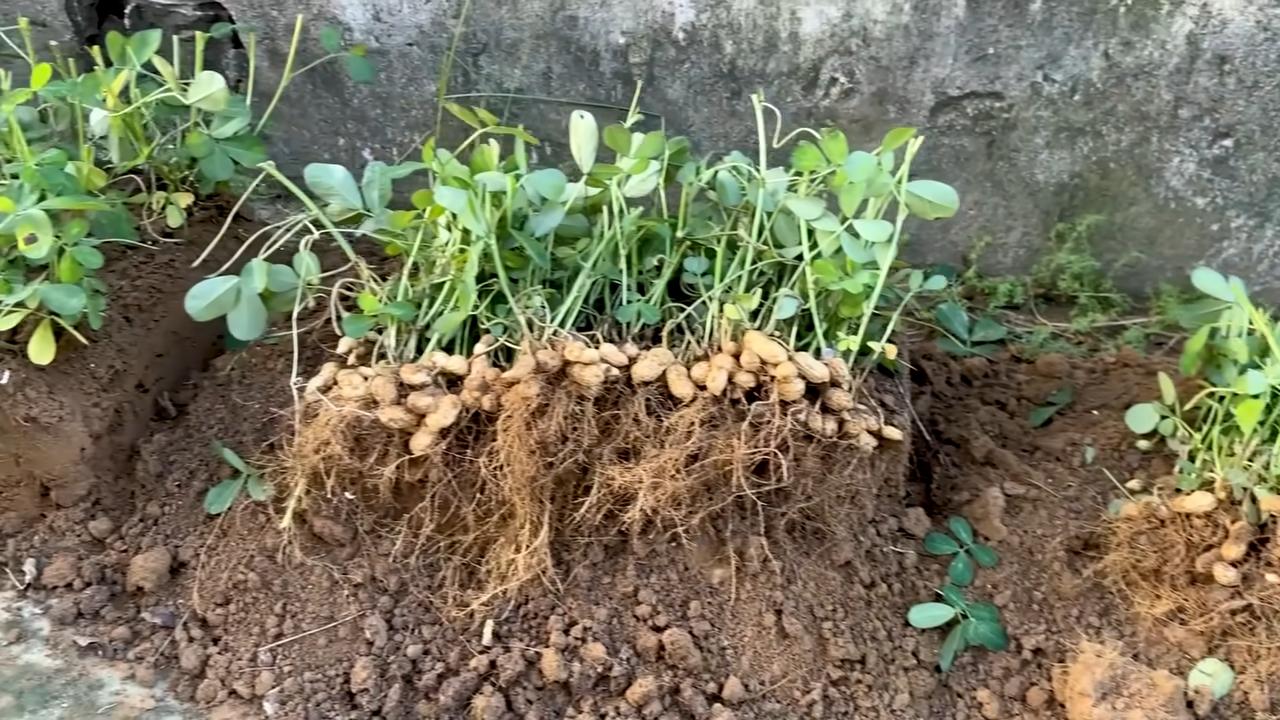
* Nach der Blüte bilden sich sogenannte “Fruchtstiele” (Pegs), die sich in die Erde bohren. An diesen Stielen entwickeln sich die Erdnüsse unter der Erde.
* Es ist wichtig, dass die Erde um die Pflanzen herum locker und gut durchlässig ist, damit die Fruchtstiele leicht eindringen können.
* Ich häufele die Erde um die Pflanzen herum an, sobald die Fruchtstiele erscheinen. Das fördert die Fruchtbildung.
5. Düngung:
* Erdnüsse sind keine Starkzehrer, aber eine gelegentliche Düngung schadet nicht.
* Ich verwende organischen Dünger oder Kompost, um die Pflanzen mit Nährstoffen zu versorgen.
* Ich dünge etwa alle 4-6 Wochen.
6. Schutz vor Schädlingen und Krankheiten:
* Erdnüsse sind relativ robust, aber es können trotzdem Schädlinge oder Krankheiten auftreten.
* Ich achte auf Anzeichen von Blattläusen, Spinnmilben oder Pilzbefall.
* Bei Bedarf bekämpfe ich die Schädlinge oder Krankheiten mit natürlichen Mitteln. Zum Beispiel kann ich einen Sud aus Brennnesseln oder Knoblauch verwenden.
Die Ernte: Der krönende Abschluss
Nach etwa 4-5 Monaten ist es endlich so weit: Die Ernte steht vor der Tür!
1. Erntezeitpunkt:
* Ich warte, bis die Blätter der Erdnusspflanzen gelb werden und absterben. Das ist ein Zeichen dafür, dass die Erdnüsse reif sind.
* Ich kann auch vorsichtig eine Pflanze ausgraben und schauen, ob die Erdnüsse gut entwickelt sind.
2. Erntevorgang:
* Ich lockere die Erde um die Pflanzen herum auf.
* Dann ziehe ich die Pflanzen vorsichtig aus der Erde.
* An den Wurzeln hängen die Erdnüsse.
* Ich schüttle die Erde von den Erdnüssen ab.
3. Trocknung:
* Ich lasse die Erdnüsse an einem trockenen und luftigen Ort trocknen.
* Ich breite sie auf einem Tuch oder Gitter aus.
* Die Trocknung dauert etwa 2-3 Wochen.
* Ich wende die Erdnüsse regelmäßig, damit sie gleichmäßig trocknen.
4. Lagerung:
* Nach dem Trocknen lagere ich die Erdnüsse in einem luftdichten Behälter an einem kühlen und trockenen Ort.
* So halten sie sich mehrere Monate.
Hey Gartenfreunde! Habt ihr euch jemals gefragt, wie Erdnüsse eigentlich wachsen? Ich auch! Und was gibt es Besseres, als es einfach selbst auszuprobieren? Erdnüsse im eigenen Garten anzubauen ist nicht nur super spannend, sondern auch überraschend einfach. In diesem Artikel zeige ich euch Schritt für Schritt, wie ihr eure eigenen Erdnüsse ziehen könnt – von der Auswahl der richtigen Sorte bis zur Ernte. Los geht’s!
Was du brauchst: Die Vorbereitung
Bevor wir loslegen, brauchen wir natürlich das richtige Equipment und die passenden Materialien. Hier ist eine Liste, damit du alles griffbereit hast:
* Erdnüsse: Unbehandelte, rohe Erdnüsse (am besten aus dem Bioladen oder einem Saatguthandel). Geröstete oder gesalzene Erdnüsse keimen nicht!
* Töpfe oder Pflanzkästen: Mindestens 30 cm tief, damit die Erdnüsse genug Platz haben, um sich zu entwickeln.
* Hochwertige Blumenerde: Gut durchlässig und locker.
* Kompost oder organischer Dünger: Für eine Extraportion Nährstoffe.
* Gießkanne oder Gartenschlauch: Zum regelmäßigen Gießen.
* Gartengeräte: Spaten, Schaufel, eventuell eine kleine Harke.
* Standort: Ein sonniger Platz im Garten oder auf dem Balkon. Erdnüsse lieben die Wärme!
Schritt-für-Schritt-Anleitung: So ziehst du deine eigenen Erdnüsse
Jetzt kommt der spannende Teil: Das Anpflanzen und Pflegen deiner Erdnüsse. Keine Sorge, es ist wirklich nicht schwer!
1. Erdnüsse vorbereiten:
* Zuerst wähle ich die schönsten und prallsten Erdnüsse aus.
* Dann knacke ich vorsichtig die Schale, ohne die Erdnusskerne zu beschädigen.
* Ich lasse die Kerne für etwa 24 Stunden in lauwarmem Wasser quellen. Das hilft ihnen, schneller zu keimen.
2. Aussaat:
* Ich fülle die Töpfe oder Pflanzkästen mit Blumenerde.
* Dann mache ich kleine Löcher in die Erde, etwa 2-3 cm tief.
* In jedes Loch lege ich 2-3 Erdnusskerne. Das erhöht die Wahrscheinlichkeit, dass mindestens eine keimt.
* Ich bedecke die Kerne vorsichtig mit Erde und drücke sie leicht an.
* Anschließend gieße ich die Erde gut an, aber vermeide Staunässe.
3. Standort und Pflege:
* Ich stelle die Töpfe an einen sonnigen und warmen Ort. Erdnüsse brauchen mindestens 6-8 Stunden Sonne pro Tag.
* Die Erde sollte immer leicht feucht sein, aber nicht nass. Ich gieße regelmäßig, besonders an heißen Tagen.
* Nach etwa 2-3 Wochen sollten die ersten Keimlinge zu sehen sein.
* Sobald die Pflanzen etwas größer sind, dünne ich sie aus, sodass nur die stärkste Pflanze pro Topf übrig bleibt.
4. Blüte und Fruchtbildung:
* Erdnusspflanzen blühen gelb und sehen hübsch aus.
* Nach der Blüte bilden sich sogenannte “Fruchtstiele” (Pegs), die sich in die Erde bohren. An diesen Stielen entwickeln sich die Erdnüsse unter der Erde.
* Es ist wichtig, dass die Erde um die Pflanzen herum locker und gut durchlässig ist, damit die Fruchtstiele leicht eindringen können.
* Ich häufele die Erde um die Pflanzen herum an, sobald die Fruchtstiele erscheinen. Das fördert die Fruchtbildung.
5. Düngung:
* Erdnüsse sind keine Starkzehrer, aber eine gelegentliche Düngung schadet nicht.
* Ich verwende organischen Dünger oder Kompost, um die Pflanzen mit Nährstoffen zu versorgen.
* Ich dünge etwa alle 4-6 Wochen.
6. Schutz vor Schädlingen und Krankheiten:
* Erdnüsse sind relativ robust, aber es können trotzdem Schädlinge oder Krankheiten auftreten.
* Ich achte auf Anzeichen von Blattläusen, Spinnmilben oder Pilzbefall.
* Bei Bedarf bekämpfe ich die Schädlinge oder Krankheiten mit natürlichen Mitteln. Zum Beispiel kann ich einen Sud aus Brennnesseln oder Knoblauch verwenden.
Die Ernte: Der krönende Abschluss
Nach etwa 4-5 Monaten ist es endlich so weit: Die Ernte steht vor der Tür!
1. Erntezeitpunkt:
* Ich warte, bis die Blätter der Erdnusspflanzen gelb werden und absterben. Das ist ein Zeichen dafür, dass die Erdnüsse reif sind.
* Ich kann auch vorsichtig eine Pflanze ausgraben und schauen, ob die Erdnüsse gut entwickelt sind.
2. Erntevorgang:
* Ich lockere die Erde um die Pflanzen herum auf.
* Dann ziehe ich die Pflanzen vorsichtig aus der Erde.
* An den Wurzeln hängen die Erdnüsse.
* Ich schüttle die Erde von den Erdnüssen ab.
3. Trocknung:
* Ich lasse die Erdnüsse an einem trockenen und luftigen Ort trocknen.
* Ich breite sie auf einem Tuch oder Gitter aus.
* Die Trocknung dauert etwa 2-3 Wochen.
* Ich wende die Erdnüsse regelmäßig, damit sie gleichmäßig trocknen.
4. Lagerung:
* Nach dem Trocknen lagere ich die Erdnüsse in einem luftdichten Behälter an einem kühlen und trockenen Ort.
* So halten sie sich mehrere Monate.
Zusätzliche Tipps und Tricks für eine erfolgreiche Erdnussernte
Hier sind noch ein paar zusätzliche Tipps, die euch helfen können, eure Erdnussernte zu optimieren:
* Wähle die richtige Sorte: Es gibt verschiedene Erdnusssorten, die sich in ihrer Größe, ihrem Geschmack und ihrer Reifezeit unterscheiden. Informiere dich, welche Sorte am besten für dein Klima und deine Bedürfnisse geeignet ist.
* Verbessere die Bodenqualität: Erdnüsse bevorzugen lockeren und gut durchlässigen Boden. Du kannst die Bodenqualität verbessern, indem du Kompost oder organischen Dünger einarbeitest.
* Achte auf eine gute Belüftung: Eine gute Belüftung ist wichtig, um Pilzkrankheiten vorzubeugen. Stelle die Töpfe oder Pflanzkästen nicht zu eng nebeneinander und sorge für ausreichend Abstand zwischen den Pflanzen.
* Sei geduldig: Erdnüsse brauchen Zeit, um zu wachsen und zu reifen. Sei geduldig und gib den Pflanzen die Zeit, die sie brauchen.
Häufige Fehler vermeiden: Was du nicht tun solltest
Damit bei der Erdnusszucht nichts schiefgeht, hier ein paar Fehler, die du vermeiden solltest:
* Verwende keine gerösteten oder gesalzenen Erdnüsse: Diese keimen nicht!
* Gieße nicht zu viel: Staunässe kann zu Wurzelfäule führen.
* Dünge nicht zu stark: Eine Überdüngung kann das Wachstum der Pflanzen beeinträchtigen.
* Ernte nicht zu früh: Warte, bis die Blätter gelb werden und absterben.
* Lagere die Erdnüsse nicht feucht: Feuchtigkeit kann zu Schimmelbildung führen.
Fazit: Erdnüsse selbst anbauen ist ein tolles Erlebnis!
Ich hoffe, dieser Leitfaden hat euch geholfen und inspiriert, eure eigenen Erdnüsse anzubauen. Es ist ein wirklich lohnendes Erlebnis, die kleinen Pflanzen wachsen und gedeihen zu sehen und am Ende die eigenen Erdnüsse zu ernten. Viel Spaß beim Gärtnern! Und denkt daran: Mit etwas Geduld und Sorgfalt könnt ihr auch ohne grünen Daumen eine reiche Ernte erzielen. Lasst es euch schmecken!

Conclusion
So, there you have it! Growing peanuts at home is not only achievable but also incredibly rewarding. From the initial thrill of planting those raw peanuts to the immense satisfaction of harvesting your very own crop, this DIY project offers a unique connection to your food and a fascinating glimpse into the life cycle of this humble legume.
Why is this a must-try? Because it’s more than just gardening; it’s an experience. It’s a chance to teach children about where their food comes from, a way to connect with nature, and a source of fresh, delicious peanuts that taste infinitely better than anything you can buy in a store. Plus, it’s surprisingly easy! With just a little preparation and consistent care, you can enjoy a bountiful harvest of homegrown goodness.
Consider these variations to personalize your peanut-growing adventure. For those with limited space, try growing peanuts in large containers or raised beds. This allows you to control the soil quality and drainage, ensuring optimal growing conditions even on a balcony or patio. Experiment with different peanut varieties, such as Virginia peanuts for their large size or Spanish peanuts for their sweet flavor. You can also try roasting your freshly harvested peanuts with different spices and seasonings to create your own signature snack. Imagine the possibilities: chili-lime peanuts, honey-roasted peanuts, or even chocolate-covered peanuts, all made with your very own homegrown ingredients!
Growing peanuts at home is a fantastic way to embrace sustainable living and enjoy the fruits (or rather, legumes) of your labor. It’s a project that’s both educational and enjoyable, and the results are undeniably delicious.
Don’t just take our word for it, though. We wholeheartedly encourage you to give this DIY trick a try. Start small, learn as you go, and most importantly, have fun! Once you’ve experienced the joy of harvesting your own peanuts, you’ll be hooked.
We’re eager to hear about your experiences! Share your photos, tips, and stories in the comments below. Let’s create a community of home peanut growers and inspire others to embark on this rewarding journey. What challenges did you face? What successes did you celebrate? What unique variations did you try? Your insights will be invaluable to fellow gardeners. So, grab some raw peanuts, prepare your soil, and get ready to experience the magic of growing peanuts at home! We can’t wait to see what you create.
Frequently Asked Questions (FAQ)
What kind of soil is best for growing peanuts?
Peanuts thrive in well-drained, sandy loam soil. This type of soil allows for proper root development and prevents waterlogging, which can lead to fungal diseases. The ideal pH level is between 6.0 and 6.5. If your soil is heavy clay, amend it with organic matter like compost or peat moss to improve drainage and aeration. Avoid soils that are excessively rocky or compacted, as these can hinder the development of peanut pods.
How much sunlight do peanuts need?
Peanuts require at least 6-8 hours of direct sunlight per day to produce a good yield. Choose a location in your garden that receives ample sunlight throughout the growing season. If you’re growing peanuts in containers, make sure to place them in a sunny spot. Insufficient sunlight can result in stunted growth and reduced peanut production.
How often should I water my peanut plants?
Peanuts need consistent moisture, especially during flowering and pod development. Water deeply and regularly, aiming to keep the soil consistently moist but not waterlogged. Avoid overhead watering, as this can promote fungal diseases. A good rule of thumb is to water when the top inch of soil feels dry to the touch. During periods of drought or extreme heat, you may need to water more frequently.
When is the best time to plant peanuts?
The best time to plant peanuts is after the last frost, when the soil temperature has warmed to at least 65°F (18°C). In most regions, this is typically in late spring or early summer. Planting too early in cold soil can lead to poor germination and seedling death. You can start peanut seeds indoors 4-6 weeks before the last frost to get a head start, but be sure to transplant them carefully to avoid disturbing the roots.
How long does it take for peanuts to mature?
Peanuts typically take 120-150 days to mature, depending on the variety and growing conditions. You’ll know they’re ready to harvest when the foliage begins to yellow and the pods feel plump and full. To check for maturity, dig up a few plants and examine the pods. The inside of the pods should be dark and the kernels should be well-formed.
What are common pests and diseases that affect peanuts?
Common pests that can affect peanuts include aphids, spider mites, and leafhoppers. These pests can be controlled with insecticidal soap or neem oil. Diseases that can affect peanuts include leaf spot, rust, and white mold. These diseases can be prevented by ensuring good air circulation, avoiding overhead watering, and using disease-resistant varieties. Crop rotation can also help to reduce the incidence of soilborne diseases.
How do I harvest peanuts?
To harvest peanuts, carefully dig up the entire plant, being careful not to damage the pods. Gently shake off any excess soil and hang the plants upside down in a well-ventilated area to dry for 2-3 weeks. Once the plants are dry, you can remove the pods from the vines.
How do I store peanuts?
After harvesting and drying, store your peanuts in a cool, dry place in an airtight container. Shelled peanuts can be stored in the refrigerator for several months or in the freezer for up to a year. Unshelled peanuts can be stored in a cool, dry place for several months.
Can I grow peanuts in containers?
Yes, peanuts can be successfully grown in containers. Choose a large container (at least 18 inches in diameter) with good drainage. Use a well-draining potting mix and provide plenty of sunlight and water. Container-grown peanuts may require more frequent watering and fertilization than those grown in the ground.
What are some different varieties of peanuts I can grow?
There are four main types of peanuts: Virginia, Spanish, Runner, and Valencia. Virginia peanuts are known for their large size and are often used for roasting and snacking. Spanish peanuts are small and round with a reddish skin and a sweet flavor. Runner peanuts are medium-sized and are commonly used for peanut butter. Valencia peanuts have multiple kernels per pod and are often roasted in the shell. Choose a variety that is well-suited to your climate and growing conditions.
Do peanuts need to be inoculated with nitrogen-fixing bacteria?
While not always necessary, inoculating peanut seeds with nitrogen-fixing bacteria can significantly improve yields, especially in soils that haven’t previously grown legumes. These bacteria help the peanut plants convert atmospheric nitrogen into a form they can use, reducing the need for nitrogen fertilizer. You can purchase peanut inoculant from most garden supply stores. Follow the instructions on the package for proper application.
How do I know if my peanuts are getting enough nutrients?
Peanut plants require adequate nutrients for healthy growth and pod development. Yellowing leaves can indicate a nitrogen deficiency, while stunted growth may suggest a lack of phosphorus or potassium. Conduct a soil test to determine the nutrient levels in your soil and amend accordingly with appropriate fertilizers. Organic options like compost and bone meal can provide a slow-release source of essential nutrients.
Can I save seeds from my homegrown peanuts to plant next year?
Yes, you can save seeds from your homegrown peanuts to plant the following year. Select healthy, mature pods from your best-performing plants. Allow the pods to dry completely before shelling them and storing the seeds in a cool, dry place. Keep in mind that peanuts are self-pollinating, so the seeds will generally produce plants that are true to type. However, there is always a small chance of cross-pollination, which could result in variations in the offspring.

Leave a Comment