
Growing Onions at Home can seem daunting, but trust me, it’s more rewarding than you think! Imagine plucking fresh, flavorful onions straight from your backyard, ready to elevate your culinary creations. Forget those bland, store-bought onions – we’re talking about homegrown goodness bursting with taste.
For centuries, onions have been a staple in cuisines worldwide, dating back to ancient civilizations where they were not only valued for their flavor but also for their medicinal properties. From the Egyptians who revered them to the Romans who carried them on their conquests, onions have a rich and fascinating history. Now, you can be a part of that history by cultivating your own onion patch!
Why should you embark on this DIY adventure? Well, for starters, growing onions at home allows you to control the quality and freshness of your produce. You’ll know exactly what’s going into your onions, avoiding harmful pesticides and chemicals. Plus, it’s incredibly satisfying to nurture a plant from seed to harvest. In this article, I’ll share some simple yet effective DIY tricks and hacks that will transform your backyard into an onion-growing haven, even if you’re a complete beginner. Get ready to unlock the secrets to a bountiful onion harvest!
Zwiebeln selbst anbauen: Dein umfassender DIY-Leitfaden
Hallo Gartenfreunde! Ich freue mich riesig, euch heute zu zeigen, wie ihr eure eigenen Zwiebeln zu Hause anbauen könnt. Es ist einfacher, als ihr denkt, und nichts schmeckt besser als frische, selbst gezogene Zwiebeln! Dieser Leitfaden ist vollgepackt mit Tipps und Tricks, die ich im Laufe der Jahre gelernt habe. Also, lasst uns loslegen!
Was du brauchst: Die richtige Ausrüstung und Materialien
Bevor wir anfangen, stelle sicher, dass du alles griffbereit hast. Hier ist eine Liste der Dinge, die du benötigst:
* Zwiebelsamen oder Steckzwiebeln: Du kannst entweder mit Samen beginnen oder vorgezogene Steckzwiebeln verwenden. Steckzwiebeln sind einfacher für Anfänger.
* Gute Erde: Verwende am besten eine hochwertige Blumenerde oder eine Mischung aus Gartenerde, Kompost und Sand.
* Pflanzgefäße oder ein Gartenbeet: Je nachdem, wie viele Zwiebeln du anbauen möchtest, brauchst du Töpfe, Pflanzkästen oder ein vorbereitetes Beet im Garten.
* Gießkanne oder Gartenschlauch: Zum Bewässern deiner Zwiebeln.
* Gartengeräte: Eine kleine Schaufel, eine Harke und eventuell ein Unkrautstecher.
* Dünger: Ein organischer Dünger oder Komposttee ist ideal, um deine Zwiebeln mit Nährstoffen zu versorgen.
* Mulch (optional): Mulch hilft, die Feuchtigkeit im Boden zu halten und Unkraut zu unterdrücken.
Schritt-für-Schritt-Anleitung: Zwiebeln anbauen
Hier ist eine detaillierte Anleitung, wie du Zwiebeln erfolgreich anbaust:
1. Die richtige Zeit wählen: Der beste Zeitpunkt, um Zwiebeln zu pflanzen, hängt von deinem Klima ab. In kälteren Regionen solltest du im Frühjahr pflanzen, sobald der Boden aufgetaut ist. In milderen Regionen kannst du auch im Herbst pflanzen. Ich persönlich pflanze meine Steckzwiebeln meistens im April.
2. Den Boden vorbereiten: Zwiebeln brauchen einen gut durchlässigen, lockeren Boden.
* Lockere den Boden mit einer Harke auf.
* Entferne Steine und Unkraut.
* Mische Kompost oder organischen Dünger unter die Erde, um sie mit Nährstoffen anzureichern. Ich verwende gerne eine Mischung aus Kompost und Hornspänen.
3. Zwiebelsamen aussäen (optional): Wenn du mit Samen beginnst, säe sie in Anzuchtschalen oder direkt ins Beet.
* Säe die Samen etwa 1 cm tief und 2 cm auseinander.
* Halte die Erde feucht, aber nicht nass.
* Sobald die Sämlinge groß genug sind (etwa 5-10 cm), kannst du sie ins Beet umpflanzen.
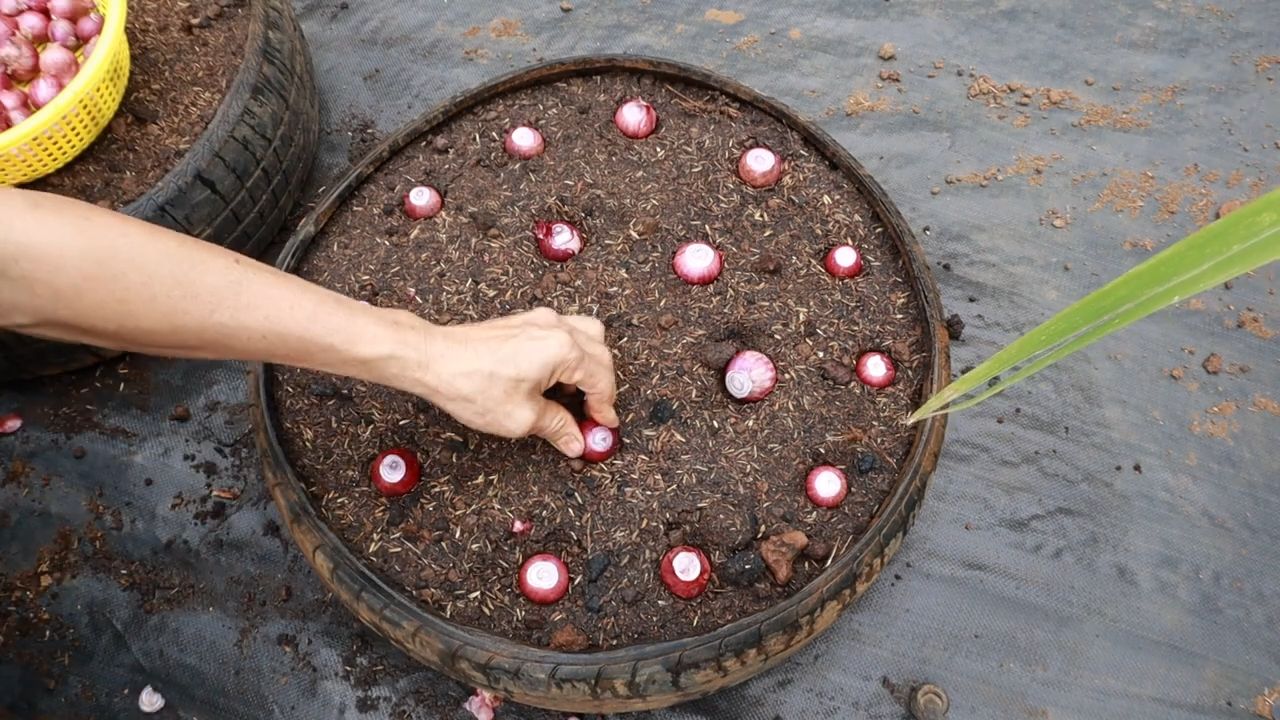
4. Steckzwiebeln pflanzen: Steckzwiebeln sind einfacher zu handhaben als Samen.
* Mache mit einer kleinen Schaufel oder einem Pflanzholz Löcher in den Boden. Die Löcher sollten etwa 2-3 cm tief sein.
* Pflanze die Steckzwiebeln so, dass die Spitze gerade noch aus der Erde herausschaut.
* Achte darauf, dass die Zwiebeln etwa 10-15 cm auseinander liegen, damit sie genügend Platz zum Wachsen haben.
5. Bewässern: Gieße die Zwiebeln nach dem Pflanzen gründlich. Achte darauf, dass der Boden feucht bleibt, aber nicht durchnässt ist. Ich gieße meine Zwiebeln in der Regel alle paar Tage, je nach Wetterlage.
6. Düngen: Zwiebeln sind hungrige Pflanzen und brauchen regelmäßige Düngung.
* Dünge die Zwiebeln alle 2-3 Wochen mit einem organischen Dünger oder Komposttee.
* Ich verwende gerne Brennnesseljauche, die ich selbst herstelle. Sie ist reich an Nährstoffen und stärkt die Pflanzen.
7. Unkraut entfernen: Halte das Beet sauber von Unkraut. Unkraut konkurriert mit den Zwiebeln um Nährstoffe und Wasser. Ich entferne Unkraut am liebsten von Hand, um die Zwiebeln nicht zu beschädigen.
8. Mulchen (optional): Eine Schicht Mulch hilft, die Feuchtigkeit im Boden zu halten und Unkraut zu unterdrücken. Ich verwende gerne Stroh oder Holzhackschnitzel als Mulch.
Spezielle Tipps für den Anbau im Topf
Wenn du keinen Garten hast, kannst du Zwiebeln auch problemlos im Topf anbauen. Hier sind ein paar Tipps:
* Wähle den richtigen Topf: Der Topf sollte mindestens 20 cm tief sein und über Abzugslöcher verfügen.
* Verwende gute Erde: Verwende eine hochwertige Blumenerde oder eine Mischung aus Gartenerde, Kompost und Sand.
* Achte auf die Bewässerung: Töpfe trocknen schneller aus als Beete. Gieße die Zwiebeln regelmäßig und achte darauf, dass das Wasser gut abfließen kann.
* Dünge regelmäßig: Zwiebeln im Topf brauchen regelmäßige Düngung, da die Nährstoffe im Topf schneller verbraucht sind.
Schutz vor Schädlingen und Krankheiten
Zwiebeln können von verschiedenen Schädlingen und Krankheiten befallen werden. Hier sind einige häufige Probleme und wie du sie bekämpfen kannst:
* Zwiebelfliege: Die Zwiebelfliege legt ihre Eier an den Zwiebeln ab. Die Larven fressen sich dann in die Zwiebeln und zerstören sie. Du kannst Zwiebelfliegen mit Netzen oder Insektiziden bekämpfen. Ich verwende gerne natürliche Insektizide wie Neemöl.
* Falscher Mehltau: Falscher Mehltau ist eine Pilzkrankheit, die sich durch einen weißen, flaumigen Belag auf den Blättern äußert. Du kannst Falschen Mehltau mit Fungiziden bekämpfen. Achte darauf, dass die Zwiebeln nicht zu dicht stehen, damit die Luft gut zirkulieren kann.
* Zwiebelrost: Zwiebelrost ist eine weitere Pilzkrankheit, die sich durch orangefarbene Pusteln auf den Blättern äußert. Du kannst Zwiebelrost mit Fungiziden bekämpfen. Entferne befallene Blätter sofort, um die Ausbreitung der Krankheit zu verhindern.
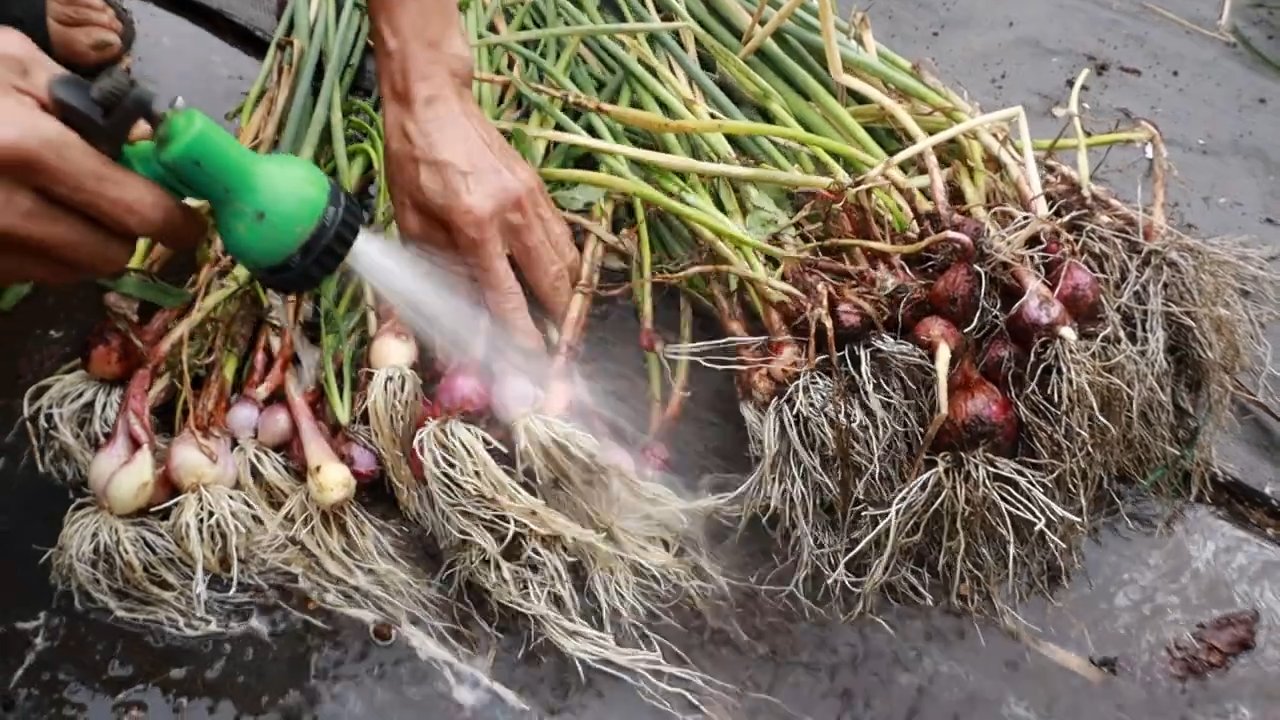
Erntezeit: Wann sind die Zwiebeln reif?
Die Erntezeit hängt von der Sorte und dem Zeitpunkt der Pflanzung ab. In der Regel sind Zwiebeln reif, wenn das Laub gelb wird und umknickt.
* Ernte die Zwiebeln an einem trockenen Tag.
* Ziehe die Zwiebeln vorsichtig aus der Erde.
* Lasse die Zwiebeln einige Tage an einem trockenen, luftigen Ort trocknen.
* Schneide das Laub ab und lagere die Zwiebeln an einem kühlen, dunklen Ort.
Zusätzliche Tipps und Tricks
Hier sind noch ein paar zusätzliche Tipps, die dir helfen können, erfolgreich Zwiebeln anzubauen:
* Wähle die richtige Sorte: Es gibt verschiedene Zwiebelsorten, die sich in Geschmack, Größe und Lagerfähigkeit unterscheiden. Informiere dich, welche Sorte für deine Bedürfnisse am besten geeignet ist.
* Fruchtfolge beachten: Pflanze Zwiebeln nicht jedes Jahr am selben Ort. Wechsle die Anbaufläche, um Krankheiten und Schädlingen vorzubeugen.
* Begleitpflanzung: Pflanze Zwiebeln zusammen mit anderen Pflanzen, die sich gegenseitig unterstützen. Gute Begleitpflanzen für Zwiebeln sind Karotten, Kamille und Ringelblumen.
* Beobachte deine Pflanzen: Achte auf Veränderungen im Aussehen deiner Pflanzen. Wenn du Probleme frühzeitig erkennst, kannst du schnell handeln und Schäden verhindern.
Ich hoffe, dieser Leitfaden hat dir geholfen, deine eigenen Zwiebeln anzubauen. Es ist ein lohnendes Projekt, das dir frische, gesunde Zwiebeln direkt aus deinem Garten liefert. Viel Spaß beim
Conclusion
So, there you have it! Growing onions at home, especially using this simple DIY trick, is not just a gardening project; it’s an investment in flavor, freshness, and a deeper connection to your food. We’ve explored how easy it is to transform those humble onion scraps into a thriving supply of flavorful bulbs, all from the comfort of your own backyard or even a sunny windowsill.
Why is this DIY method a must-try? Because it’s incredibly cost-effective. Think about it: instead of tossing those onion bottoms into the compost bin, you’re essentially getting a free second harvest. It’s also a fantastic way to reduce food waste and embrace a more sustainable lifestyle. Plus, the taste of homegrown onions is simply unmatched. They’re often sweeter and more vibrant than store-bought varieties, adding a special touch to your culinary creations.
But the benefits don’t stop there. Growing your own onions is a rewarding experience in itself. It’s a chance to connect with nature, learn about the growing process, and enjoy the satisfaction of nurturing something from start to finish. And let’s not forget the educational aspect – it’s a great project to involve kids in, teaching them about where their food comes from and the importance of sustainability.
Looking for variations? Absolutely! Try experimenting with different types of onions. Red onions, yellow onions, white onions – each will bring its unique flavor profile to your garden and your kitchen. You can also explore different growing mediums. While we’ve focused on soil, hydroponics is another option for those with limited space or a desire for a more controlled environment. Consider companion planting as well. Onions are known to deter certain pests, making them a great addition to gardens alongside carrots, tomatoes, and other vegetables.
Don’t be afraid to get creative with your onion-growing setup. Use recycled containers, build a raised garden bed, or even create a vertical garden to maximize space. The possibilities are endless!
We wholeheartedly encourage you to give this DIY onion-growing trick a try. It’s a simple, rewarding, and sustainable way to enhance your culinary experience and connect with nature. Once you’ve harvested your first batch of homegrown onions, we’d love to hear about your experience! Share your photos, tips, and stories in the comments below. Let’s build a community of home gardeners and inspire others to embrace the joy of growing their own food. Happy gardening!
Frequently Asked Questions (FAQ)
1. What part of the onion do I need to regrow it?
You need the bottom part of the onion, the root end. This is the part that typically gets discarded when you’re prepping onions for cooking. Make sure to leave about an inch or two of the onion attached to the root base. This provides the necessary nutrients and energy for the onion to sprout and grow.
2. How long does it take for an onion to regrow?
The time it takes for an onion to regrow can vary depending on several factors, including the type of onion, the growing conditions (sunlight, temperature, moisture), and the quality of the soil. Generally, you can expect to see new green shoots emerging within a week or two of planting the onion bottom. It can take several months to grow a full-sized onion bulb. Be patient and consistent with watering and care, and you’ll be rewarded with a bountiful harvest.
3. Can I regrow any type of onion?
Yes, you can regrow most types of onions, including yellow onions, white onions, red onions, and even shallots. However, some varieties may be more successful than others. Experiment with different types to see which ones thrive best in your local climate and growing conditions. Keep in mind that the flavor of the regrown onion may differ slightly from the original onion, but it will still be delicious and usable in your cooking.
4. How much sunlight do regrowing onions need?
Onions need plenty of sunlight to thrive. Aim for at least 6-8 hours of direct sunlight per day. If you’re growing your onions indoors, place them near a sunny window or use a grow light to supplement natural light. Insufficient sunlight can lead to weak, leggy growth and smaller onion bulbs.
5. How often should I water my regrowing onions?
Water your regrowing onions regularly, keeping the soil consistently moist but not waterlogged. Overwatering can lead to root rot, while underwatering can stunt growth. A good rule of thumb is to water when the top inch of soil feels dry to the touch. Adjust your watering schedule based on the weather conditions and the drainage of your soil.
6. What kind of soil is best for growing onions?
Onions prefer well-draining, fertile soil that is rich in organic matter. A loamy soil is ideal. Before planting, amend your soil with compost or well-rotted manure to improve its fertility and drainage. You can also add a slow-release fertilizer to provide essential nutrients for healthy growth. Avoid heavy clay soils, as they can retain too much moisture and lead to root rot.
7. Do I need to fertilize my regrowing onions?
Yes, fertilizing your regrowing onions can help them grow bigger and stronger. Use a balanced fertilizer or one that is specifically formulated for vegetables. Apply the fertilizer according to the package instructions, being careful not to over-fertilize, which can burn the roots. You can also use organic fertilizers, such as compost tea or fish emulsion, to provide a gentle and sustainable source of nutrients.
8. Can I grow onions in containers?
Absolutely! Growing onions in containers is a great option for those with limited space or who want to grow onions indoors. Choose a container that is at least 6-8 inches deep and has drainage holes. Use a good-quality potting mix and follow the same watering and fertilizing guidelines as you would for onions grown in the ground.
9. How do I know when my onions are ready to harvest?
Onions are typically ready to harvest when the tops start to turn yellow and fall over. This indicates that the bulb has reached its full size and is starting to mature. You can gently pull the onions from the ground or use a garden fork to loosen the soil around them. After harvesting, cure the onions by laying them out in a dry, well-ventilated place for a week or two to allow the outer layers to dry and harden.
10. Can I store regrown onions like store-bought onions?
Yes, you can store regrown onions in the same way as store-bought onions. After curing them, store them in a cool, dry, and dark place, such as a pantry or cellar. Avoid storing them near potatoes, as they can cause each other to spoil more quickly. Properly stored onions can last for several months.
11. What if my regrown onion only produces green shoots and no bulb?
Sometimes, regrown onions may only produce green shoots (scallions or green onions) and not develop a large bulb. This can happen if the growing conditions are not ideal, such as insufficient sunlight or poor soil. You can still use the green shoots in your cooking, just like you would use scallions. To encourage bulb formation, make sure your onions are getting plenty of sunlight, water, and nutrients.
12. Are there any pests or diseases that affect regrowing onions?
Yes, onions can be susceptible to certain pests and diseases, such as onion maggots, thrips, and fungal diseases like downy mildew. To prevent these problems, practice good garden hygiene, such as removing weeds and debris, and rotate your crops each year. You can also use organic pest control methods, such as insecticidal soap or neem oil, to control pests. If you notice signs of disease, treat your onions with a fungicide.
Leave a Comment