
Growing mini carrots at home might sound like a whimsical dream, but I’m here to tell you it’s totally achievable, even if you don’t have acres of land! Forget those bland, store-bought baby carrots – imagine popping sweet, vibrant, homegrown mini carrots straight from your garden into your salad or your child’s lunchbox.
For centuries, cultivating our own food has been a deeply ingrained part of human culture. From ancient civilizations nurturing small plots to modern-day urban gardeners, the desire to connect with the earth and enjoy fresh produce remains strong. But let’s face it, not everyone has the space or time for a sprawling vegetable patch. That’s where the magic of mini carrots comes in!
This DIY guide is your passport to unlocking the secrets of successfully growing mini carrots at home, regardless of your gardening experience. I’ll walk you through everything from choosing the right seeds and containers to providing the perfect growing conditions and harvesting your miniature treasures. Why buy when you can grow? Not only will you save money, but you’ll also enjoy the unparalleled satisfaction of nurturing your own food and knowing exactly what went into it. Plus, these little guys are incredibly cute and fun to grow, making them a perfect project for kids and adults alike. So, grab your gardening gloves, and let’s get started!
Growing Mini Carrots: A Step-by-Step Guide to Tiny, Tasty Treats!
Okay, fellow gardening enthusiasts! Let’s talk about something adorable and delicious: growing mini carrots at home! I’ve been experimenting with these little guys for a while now, and I’m excited to share my secrets to a successful mini carrot harvest. It’s easier than you might think, and the reward of pulling up those perfectly petite carrots is just so satisfying.
Choosing the Right Carrot Variety
First things first, not all carrots are created equal when it comes to growing them small. You’ll want to select a variety specifically bred for producing mini or baby carrots. Here are a few of my favorites:
* ‘Thumbelina’: These are round carrots, almost like little orange radishes! They’re super cute and mature quickly.
* ‘Paris Market’: Similar to Thumbelina, these are also round and perfect for small spaces.
* ‘Little Finger’: As the name suggests, these are small and slender, about the size of your little finger.
* ‘Short n Sweet’: A classic choice for shorter carrots, known for their sweet flavor.
Why these varieties? They mature faster and don’t require as much space as full-sized carrots, making them ideal for container gardening or raised beds.
Preparing Your Growing Space
Carrots need loose, well-draining soil to thrive. Rocky or compacted soil will result in stunted or misshapen carrots. Here’s how I prepare my soil:
* Choose the right container: If you’re growing in containers, select one that’s at least 6-8 inches deep. This gives the carrots enough room to develop. Make sure it has drainage holes!
* Amend the soil: Whether you’re using a container or a garden bed, amend the soil with plenty of compost or well-rotted manure. This will improve drainage and provide essential nutrients.
* Remove rocks and debris: This is crucial! Even small rocks can impede carrot growth. Sift through the soil carefully to remove any obstacles.
* Loosen the soil: Use a garden fork or tiller to loosen the soil to a depth of at least 6 inches. This will make it easier for the carrot roots to penetrate.
My secret weapon: I like to add a bit of sand to my soil mix to further improve drainage. Carrots hate sitting in soggy soil!
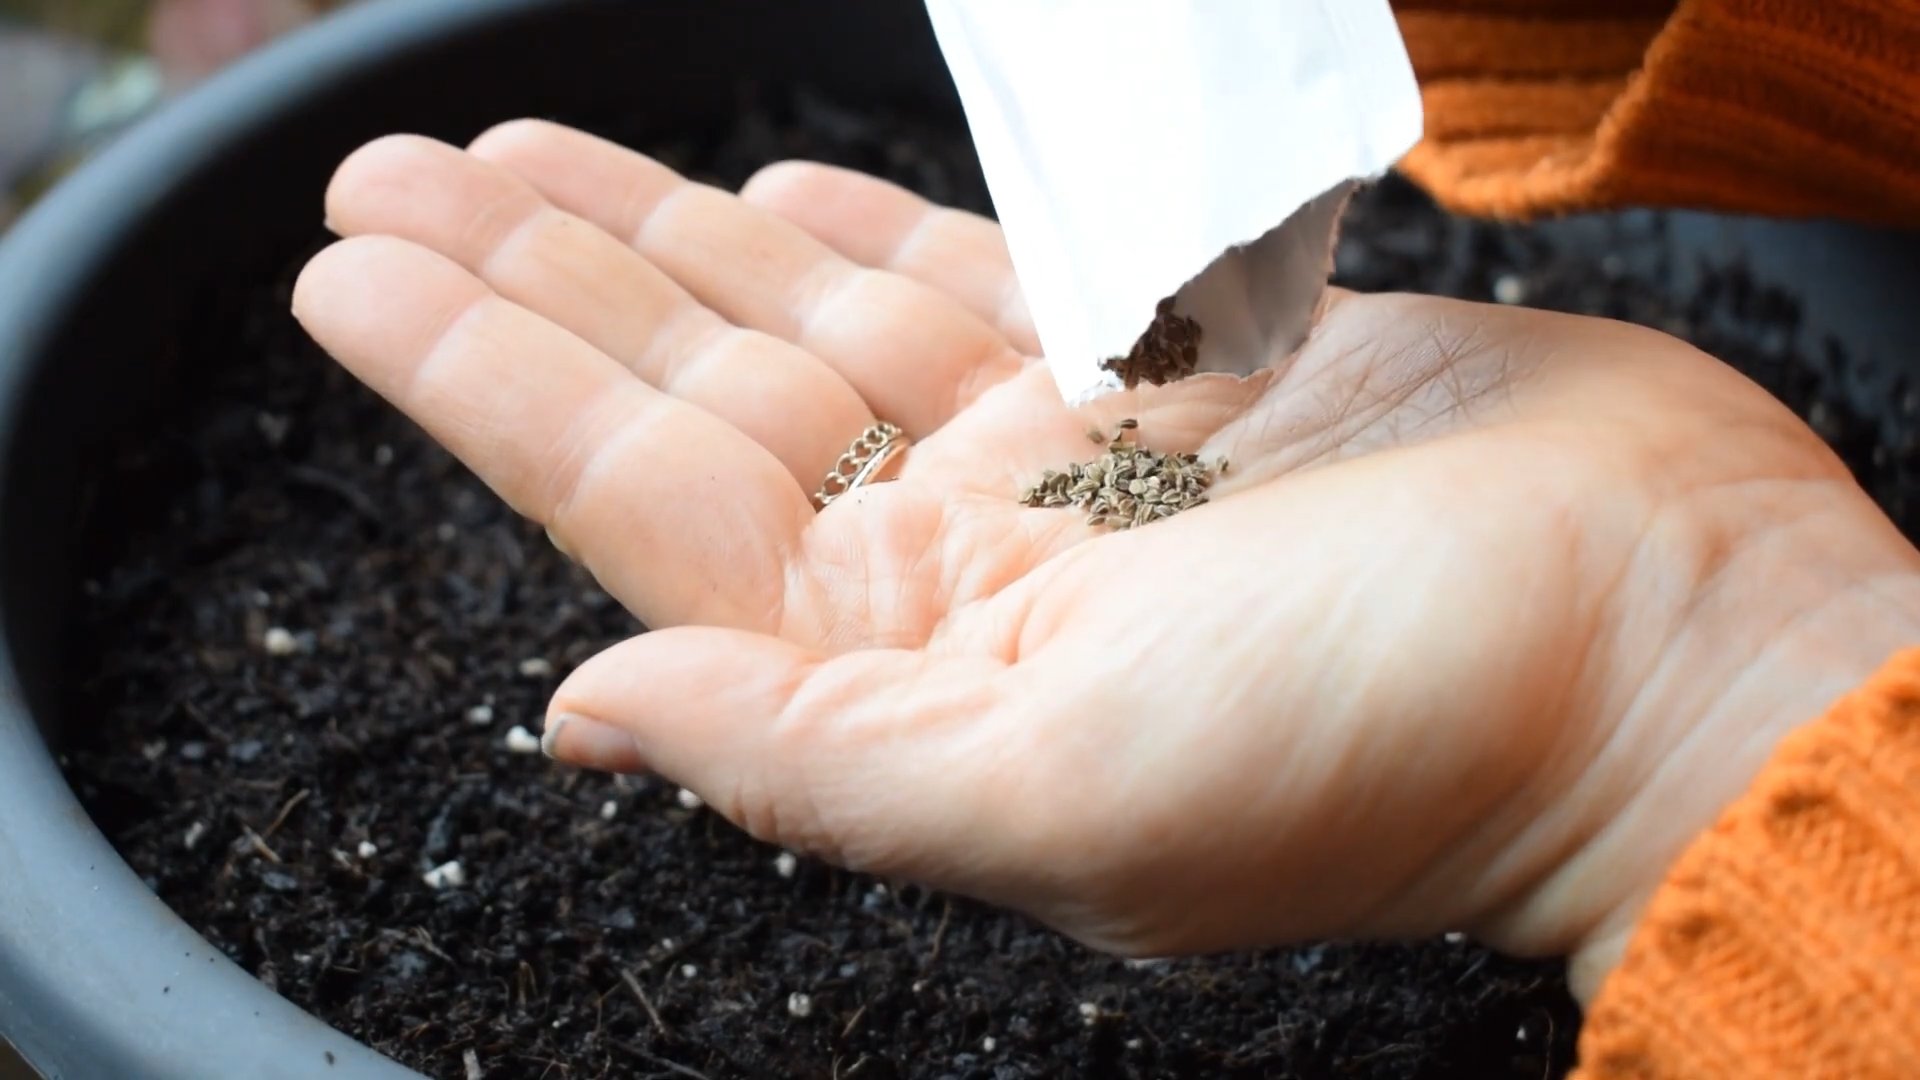
Planting Your Mini Carrot Seeds
Now for the fun part: planting! Carrot seeds are tiny, so it can be a bit tricky to sow them evenly. Here’s my method:
1. Water the soil: Before planting, thoroughly water the soil. This will help the seeds germinate.
2. Create shallow furrows: Use your finger or a small tool to create shallow furrows about 1/4 inch deep and 1-2 inches apart.
3. Sow the seeds: Sprinkle the seeds thinly along the furrows. Don’t overcrowd them!
4. Cover the seeds: Gently cover the seeds with a thin layer of soil.
5. Water again: Water gently to avoid washing away the seeds.
6. Label your rows: It’s always a good idea to label your rows so you know what you’ve planted!
A tip for even sowing: Mix the carrot seeds with sand before sowing. This will help you spread them more evenly.
Caring for Your Mini Carrots
Once your seeds are planted, it’s important to provide them with the right care to ensure a bountiful harvest.
1. Watering: Keep the soil consistently moist, but not waterlogged. Water deeply whenever the top inch of soil feels dry.
2. Thinning: This is essential! Once the seedlings emerge, thin them to about 1-2 inches apart. This will give the carrots enough room to grow. Don’t be afraid to pull out the weaker seedlings.
3. Weeding: Keep the area around your carrots free of weeds. Weeds compete for nutrients and can stunt carrot growth.
4. Fertilizing: Carrots are not heavy feeders, but they will benefit from a light feeding of a balanced fertilizer. I like to use a liquid fertilizer diluted to half strength.
5. Sunlight: Carrots need at least 6 hours of sunlight per day. Choose a sunny spot in your garden or on your patio.
Dealing with pests: Carrot rust flies can be a problem. Cover your carrots with row covers to protect them from these pests.
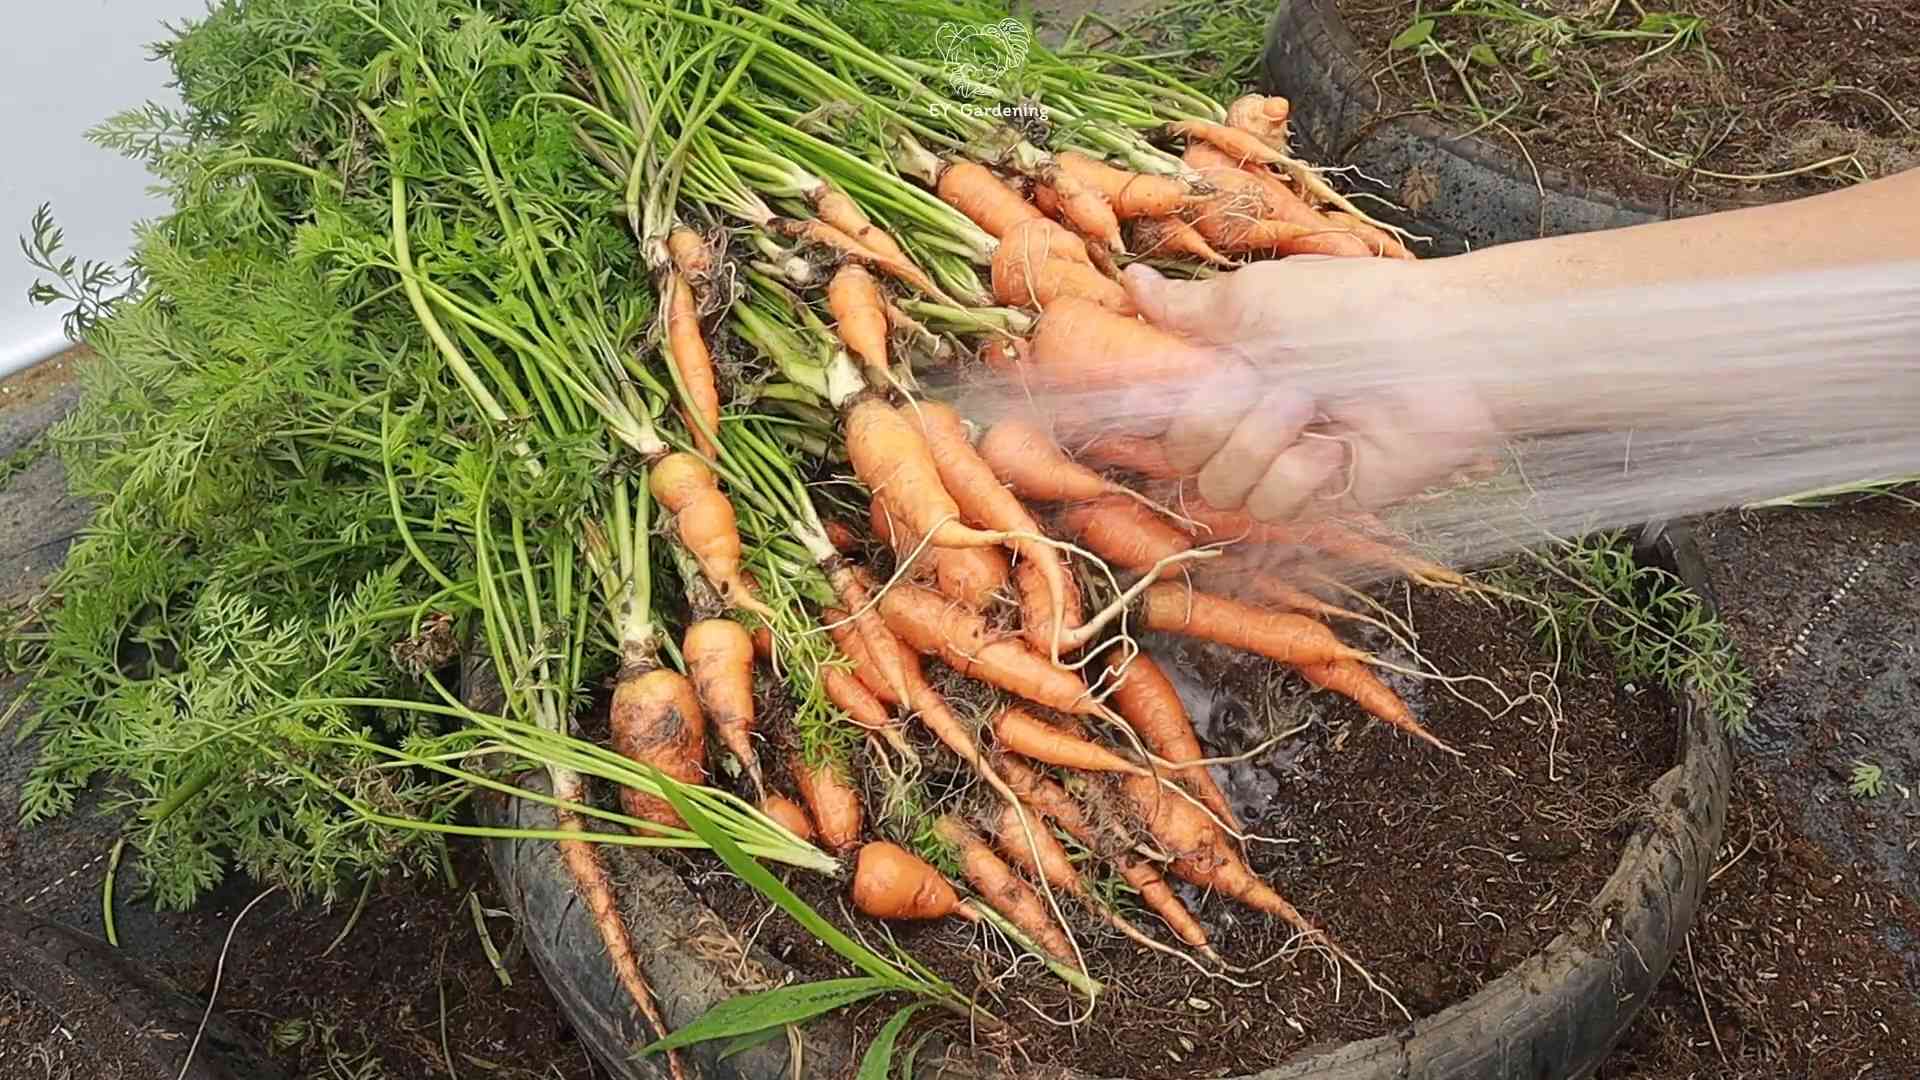
Harvesting Your Mini Carrots
The best part! Mini carrots mature quickly, usually in about 50-70 days. Here’s how to know when they’re ready to harvest:
1. Check the seed packet: The seed packet will give you an estimated maturity date.
2. Look at the size: The carrots should be about the size you expect for the variety you’re growing.
3. Gently pull one up: If the carrot comes up easily, it’s ready to harvest. If it’s still firmly in the ground, give it a few more days.
Harvesting tips:
* Water the soil before harvesting to make it easier to pull up the carrots.
* Gently loosen the soil around the carrots with a garden fork if they’re difficult to pull up.
* Wash the carrots thoroughly after harvesting.
Troubleshooting Common Problems
Even with the best care, you might encounter some problems when growing mini carrots. Here are a few common issues and how to address them:
* Forked carrots: This is usually caused by rocky or compacted soil. Make sure to prepare your soil properly before planting.
* Stunted growth: This could be due to a lack of nutrients, insufficient sunlight, or overcrowding. Make sure to fertilize your carrots regularly, provide them with plenty of sunlight, and thin them properly.
* Pests: Carrot rust flies, aphids, and other pests can damage your carrots. Use row covers or insecticidal soap to control pests.
* Bolting: Bolting is when the carrot plant prematurely produces a flower stalk. This is usually caused by stress, such as extreme temperatures or lack of water. Keep your carrots well-watered and protect them from extreme temperatures.
Extending Your Carrot Harvest
Want to enjoy fresh mini carrots for as long as possible? Here are a few tips for extending your harvest:
* Succession planting: Sow a new batch of seeds every 2-3 weeks to ensure a continuous harvest.
* Choose the right varieties: Some carrot varieties are more heat-tolerant than others. Choose heat-tolerant varieties for summer planting.
* Provide shade: In hot weather, provide your carrots with some shade to protect them from the intense sun.
* Store your carrots properly: Store harvested carrots in the refrigerator in a plastic bag or container. They will last for several weeks.
Growing Mini Carrots in Containers: A Detailed Guide
Container gardening is a fantastic option if you have limited space or want to grow carrots on a balcony or patio. Here’s a more in-depth look at growing mini carrots in containers:
1. Choosing the Right Container: As mentioned earlier, depth is key. Opt for a container that’s at least 6-8 inches deep. A wider container will allow you to grow more carrots. Make sure the container has drainage holes to prevent waterlogging. Terracotta pots are a good choice because they allow the soil to breathe, but plastic pots are also fine.
2. Selecting the Right Soil Mix: Use a high-quality potting mix that’s specifically formulated for vegetables. Avoid using garden soil in containers, as it can become compacted and doesn’t drain well. I like to amend my potting mix with compost and perlite to improve drainage and aeration.
3. Planting Your Seeds: Follow the same planting instructions as for garden beds. Sow the seeds thinly and cover them with a thin layer of soil. Water gently and keep the soil consistently moist.
4. Watering and Fertilizing: Container-grown carrots will need more frequent watering than those grown in the ground, as the soil in containers tends to dry out more quickly. Check the soil moisture regularly and water whenever the top inch feels dry. Fertilize your carrots every 2-3 weeks with a liquid fertilizer diluted to half strength.
5. Sunlight: Place your container in a sunny location that receives at least 6 hours of sunlight per day.
6. Thinning: Thin the seedlings to about 1-2 inches apart once they emerge.
7. Harvesting: Harvest your mini carrots when they reach the desired size. Gently pull them up from the soil.
Container Gardening Tip: Consider using self-watering containers to make watering easier and more consistent.
Enjoying Your Homegrown Mini Carrots
Now that you’ve successfully grown your own mini carrots, it’s time to enjoy the fruits (or vegetables!) of your labor. Here are
Conclusion
So, there you have it! Growing mini carrots at home is not only achievable but also surprisingly rewarding. Forget those bland, pre-packaged baby carrots from the supermarket. With a little effort and the right approach, you can cultivate a vibrant harvest of sweet, tender, and perfectly petite carrots right in your own backyard, balcony, or even on a sunny windowsill.
This DIY trick is a must-try for several compelling reasons. First and foremost, the flavor difference is undeniable. Homegrown mini carrots boast a sweetness and freshness that commercially grown varieties simply can’t match. You control the growing conditions, ensuring optimal flavor development. Secondly, it’s incredibly satisfying to nurture something from seed to table. Watching those tiny sprouts emerge and gradually transform into delicious, edible roots is a truly fulfilling experience. Thirdly, growing your own mini carrots is a fantastic way to reduce your carbon footprint and support sustainable practices. You’re cutting down on transportation costs and packaging waste, making a small but significant contribution to a healthier planet. Finally, it’s a fun and engaging activity for the whole family! Get the kids involved in planting, watering, and harvesting – it’s a great way to teach them about where their food comes from.
But the beauty of this DIY project lies in its adaptability. Feel free to experiment with different carrot varieties. Nantes and Chantenay types are particularly well-suited for growing mini carrots due to their shorter, stockier shapes. Consider planting companion herbs like rosemary or sage nearby to deter pests and enhance the flavor of your carrots. You can also try succession planting, sowing seeds every few weeks to ensure a continuous harvest throughout the growing season. If you’re growing in containers, be sure to choose pots that are deep enough to accommodate the roots and use a well-draining potting mix. For those with limited space, vertical gardening techniques can be a game-changer.
Don’t be afraid to get your hands dirty and embrace the learning process. Growing mini carrots at home is a journey, and there will be successes and setbacks along the way. The key is to be patient, observant, and willing to adapt your approach as needed.
We wholeheartedly encourage you to give this DIY trick a try. The rewards – fresh, flavorful mini carrots, a sense of accomplishment, and a connection to nature – are well worth the effort. And once you’ve harvested your first batch, be sure to share your experience with us! We’d love to hear about your successes, your challenges, and any tips or tricks you’ve discovered along the way. Post photos of your homegrown mini carrots on social media using #HomegrownMiniCarrots and tag us so we can celebrate your gardening triumphs! Let’s inspire others to embrace the joy of growing their own food.
Ready to embark on your mini carrot growing adventure?
Frequently Asked Questions (FAQ)
What is the best time of year to plant mini carrots?
The ideal time to plant mini carrots depends on your climate. In general, carrots are a cool-season crop, so the best time to plant them is in early spring or late summer/early fall. For spring planting, sow seeds as soon as the soil can be worked, typically a few weeks before the last expected frost. For fall planting, sow seeds about 2-3 months before the first expected frost. This will give the carrots enough time to mature before the weather turns too cold. If you live in a region with mild winters, you may be able to grow carrots throughout the year.
How much sunlight do mini carrots need?
Mini carrots require at least 6 hours of direct sunlight per day to thrive. Choose a planting location that receives plenty of sunlight throughout the day. If you’re growing carrots in containers, you can move them around to ensure they get enough sunlight. If you don’t have access to a sunny location, you can supplement with grow lights.
What kind of soil is best for growing mini carrots?
Carrots prefer loose, well-drained soil that is rich in organic matter. Avoid heavy clay soils, as they can restrict root growth and result in misshapen carrots. Before planting, amend the soil with compost or other organic matter to improve drainage and fertility. The ideal soil pH for carrots is between 6.0 and 6.8. If your soil is too acidic or alkaline, you can amend it with lime or sulfur, respectively.
How often should I water mini carrots?
Carrots need consistent moisture to grow properly. Water deeply and regularly, especially during dry periods. Aim to keep the soil consistently moist but not waterlogged. Overwatering can lead to root rot, while underwatering can cause the carrots to become stunted and bitter. A good rule of thumb is to water when the top inch of soil feels dry to the touch.
How do I prevent pests and diseases from affecting my mini carrots?
Several pests and diseases can affect carrots, including carrot rust flies, aphids, and fungal diseases. To prevent these problems, practice good garden hygiene. Remove any weeds or debris from the garden, and rotate your crops each year. You can also use row covers to protect your carrots from pests. If you notice any signs of pests or diseases, treat them promptly with organic pesticides or fungicides. Companion planting with herbs like rosemary and sage can also help deter pests.
When are mini carrots ready to harvest?
Mini carrots are typically ready to harvest about 50-60 days after planting, depending on the variety. You can harvest them when they are about 2-3 inches long. To harvest, gently loosen the soil around the carrots and pull them out by the tops. Be careful not to damage the roots.
Can I grow mini carrots in containers?
Yes, mini carrots are well-suited for growing in containers. Choose pots that are at least 8-10 inches deep to accommodate the roots. Use a well-draining potting mix and water regularly. Be sure to place the containers in a sunny location.
What are some good varieties of carrots for growing mini carrots?
Some good varieties of carrots for growing mini carrots include ‘Thumbelina,’ ‘Paris Market,’ ‘Little Finger,’ and ‘Short ‘n Sweet.’ These varieties are known for their small size and sweet flavor.
How do I store mini carrots after harvesting?
After harvesting, remove the tops from the carrots and wash them thoroughly. Store them in the refrigerator in a plastic bag or container. They will keep for several weeks. You can also freeze carrots for longer storage. To freeze, blanch them in boiling water for a few minutes, then cool them in ice water. Drain them well and store them in freezer bags.
What are the benefits of growing my own mini carrots?
Growing your own mini carrots offers several benefits, including:
* Fresher, more flavorful carrots
* Reduced carbon footprint
* A fun and rewarding gardening experience
* Control over growing conditions
* The satisfaction of growing your own food
* Access to unique varieties not found in stores
By following these tips, you can successfully grow delicious and nutritious mini carrots at home. Happy gardening!

Leave a Comment