
Growing Malabar Spinach Indoors might sound like a challenge, but trust me, it’s a rewarding adventure that brings a touch of the tropics right into your home! For centuries, Malabar Spinach, also known as Basella alba, has been a culinary staple in Asian and African cultures, prized for its nutritious leaves and vibrant color. Imagine harvesting fresh, succulent greens from your own indoor garden, even when the weather outside is frightful.
Are you tired of bland salads and expensive grocery store greens? Do you dream of a sustainable, homegrown food source? Then this DIY guide is for you! Growing Malabar Spinach Indoors offers a fantastic solution for urban gardeners, apartment dwellers, or anyone looking to extend their growing season. I’m going to share my best tips and tricks to help you cultivate this unique vine successfully, regardless of your experience level.
This isn’t just about having a pretty plant; it’s about accessing a powerhouse of vitamins and minerals, adding a unique flavor to your dishes, and experiencing the joy of nurturing life. Plus, it’s incredibly satisfying to say, “I grew this myself!” So, let’s dive in and unlock the secrets to a thriving indoor Malabar Spinach garden!
Growing Malabar Spinach Indoors: A Complete DIY Guide
Hey there, fellow plant enthusiasts! I’m so excited to share my experience with growing Malabar spinach indoors. This vining green is not only delicious but also a beautiful addition to any indoor garden. It thrives in warm conditions, making it perfect for indoor cultivation, especially if you live in a cooler climate. Let’s dive into how you can successfully grow your own Malabar spinach indoors!
Choosing the Right Variety and Starting from Seed or Cuttings
Before we get started, it’s important to understand that Malabar spinach isn’t actually spinach! It’s a different plant altogether, *Basella alba* or *Basella rubra*, known for its heat tolerance and slightly mucilaginous texture. You can find both green-stemmed (*Basella alba*) and red-stemmed (*Basella rubra*) varieties. I personally love the red-stemmed variety for its vibrant color, which adds a pop to my indoor garden.
Starting from Seed:
* Soaking the Seeds: Malabar spinach seeds have a hard outer shell, so soaking them in warm water for 24-48 hours before planting significantly improves germination rates. I usually put them in a small bowl of water and leave them on my kitchen counter.
* Choosing a Seed Starting Mix: Use a well-draining seed starting mix. I prefer a mix of peat moss, perlite, and vermiculite. Avoid using garden soil, as it can be too heavy and may contain pathogens.
* Sowing the Seeds: Fill small pots or seed trays with the seed starting mix. Sow the seeds about ½ inch deep and gently cover them with soil.
* Providing Warmth and Moisture: Malabar spinach needs warmth to germinate. I place my seed trays on a heat mat to maintain a soil temperature of around 75-85°F (24-29°C). Keep the soil consistently moist but not waterlogged. A spray bottle is perfect for this.
* Patience is Key: Germination can take anywhere from 10-21 days, so don’t get discouraged if you don’t see sprouts right away. Just keep the soil moist and warm.
Starting from Cuttings:
This is my preferred method because it’s faster!
* Taking Cuttings: Select healthy stems from an existing Malabar spinach plant. Cut 4-6 inch sections just below a node (where a leaf grows). Remove the lower leaves, leaving only a few at the top.
* Rooting in Water: Place the cuttings in a glass of water, ensuring that the nodes are submerged. Change the water every 2-3 days to prevent bacterial growth.
* Root Development: Roots should start to appear within a week or two. Once the roots are about an inch long, the cuttings are ready to be planted.
* Planting the Cuttings: Plant the rooted cuttings in a pot with well-draining potting mix.
Preparing the Potting Mix and Choosing the Right Container
Malabar spinach needs a well-draining and nutrient-rich potting mix. I like to create my own mix using the following:
* Potting Soil: Provides a good base for the mix.
* Compost: Adds essential nutrients and improves drainage.
* Perlite: Enhances drainage and aeration.
* Coco Coir: Helps retain moisture without becoming waterlogged.
I usually mix these ingredients in a ratio of 1:1:1:1.
Choosing the Right Container:
Since Malabar spinach is a vining plant, it needs a pot that’s large enough to support its growth. I recommend a pot that’s at least 12 inches in diameter and 12 inches deep. Make sure the pot has drainage holes to prevent waterlogging.
Planting and Providing the Right Environment
Now comes the fun part – planting!
1. Fill the Pot: Fill the pot with your prepared potting mix, leaving about an inch of space at the top.
2. Plant the Seedling or Cutting: Gently remove the seedling from its seed tray or the rooted cutting from the water. Create a small hole in the potting mix and carefully place the plant in the hole. Backfill with soil and gently press down to secure the plant.
3. Water Thoroughly: Water the plant thoroughly until water drains out of the drainage holes.
4. Provide Support: Malabar spinach is a vining plant and needs support to climb. You can use a trellis, bamboo stakes, or even a tomato cage. I personally prefer a trellis because it looks aesthetically pleasing in my indoor garden.
5. Location, Location, Location: Place the pot in a location that receives at least 6-8 hours of direct sunlight per day. A south-facing window is ideal. If you don’t have enough natural light, you can supplement with grow lights. I use LED grow lights and find they work wonders.
6. Temperature and Humidity: Malabar spinach thrives in warm temperatures, ideally between 70-85°F (21-29°C). It also prefers high humidity. If your indoor environment is dry, you can increase humidity by using a humidifier, placing a tray of water near the plant, or misting the leaves regularly.
Watering, Fertilizing, and Pruning
Proper watering, fertilizing, and pruning are essential for healthy Malabar spinach growth.
1. Watering: Water the plant when the top inch of soil feels dry to the touch. Avoid overwatering, as this can lead to root rot. I usually check the soil moisture every other day.
2. Fertilizing: Feed the plant with a balanced liquid fertilizer every 2-3 weeks during the growing season. I use a fertilizer with an N-P-K ratio of 10-10-10. You can also use organic fertilizers like compost tea or fish emulsion.
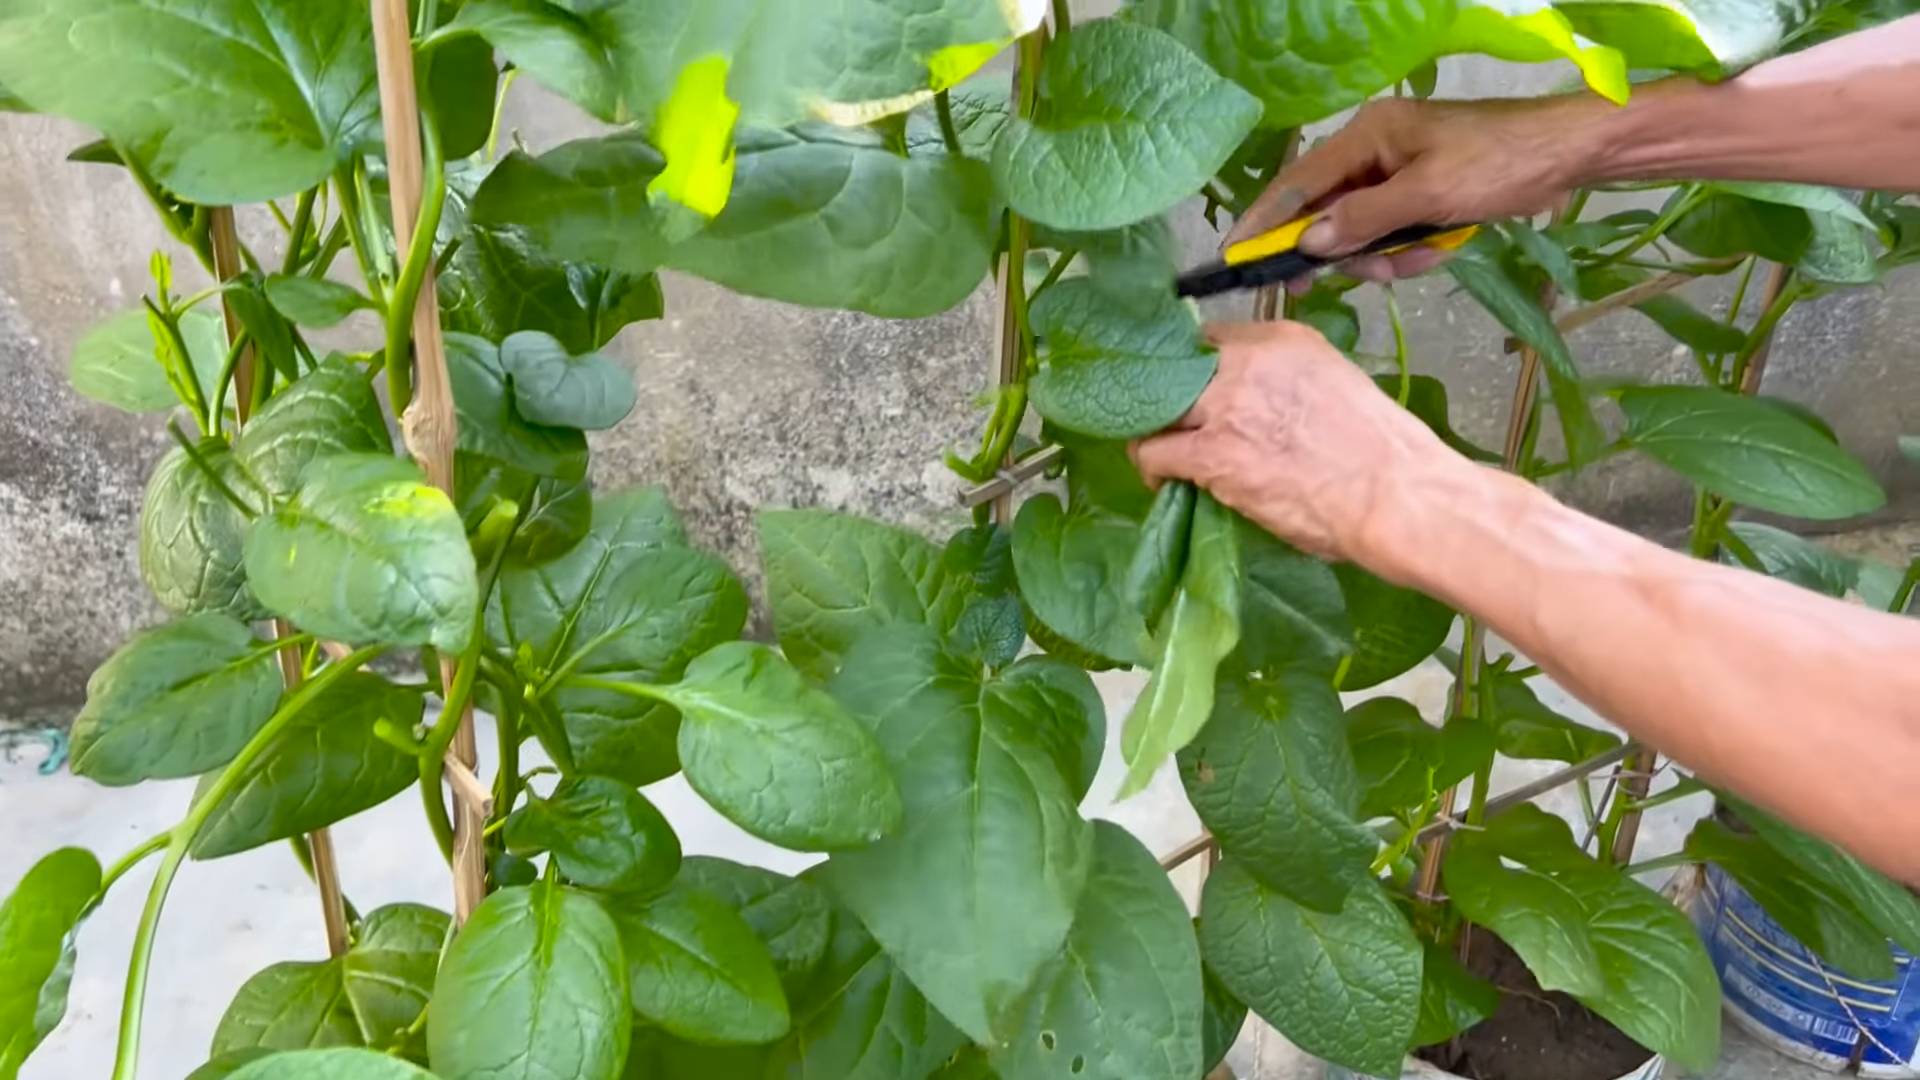
3. Pruning: Pruning encourages bushier growth and prevents the plant from becoming too leggy. Regularly pinch off the tips of the vines to promote branching. You can also harvest leaves as needed.
Dealing with Pests and Diseases
While Malabar spinach is relatively pest-resistant, it can occasionally be affected by common indoor plant pests like aphids, spider mites, and whiteflies.
1. Aphids: These tiny insects suck sap from the leaves and stems. You can control aphids by spraying the plant with a strong stream of water or using insecticidal soap.
2. Spider Mites: These tiny pests create webs on the leaves and can cause them to turn yellow and dry out. Increase humidity and spray the plant with insecticidal soap or neem oil to control spider mites.
3. Whiteflies: These small, white, flying insects suck sap from the leaves. You can control whiteflies by using yellow sticky traps or spraying the plant with insecticidal soap.
To prevent fungal diseases, ensure good air circulation and avoid overwatering. If you notice any signs of fungal disease, such as powdery mildew or leaf spot, treat the plant with a fungicide.
Harvesting and Enjoying Your Homegrown Malabar Spinach
You can start harvesting Malabar spinach leaves about 60-70 days after planting.
1. Harvesting Leaves: Harvest the leaves by snipping them off with scissors or pruning shears. You can harvest individual leaves or entire stems.
2. Regular Harvesting: Regular harvesting encourages continued growth.
3. Culinary Uses: Malabar spinach can be used in a variety of dishes, just like regular spinach. It’s great in salads, stir-fries, soups, and stews. I love adding it to my smoothies for an extra boost of nutrients. It has a slightly lemony flavor and a slightly thicker texture than regular spinach.
Troubleshooting Common Issues
Even with the best care, you might encounter some issues while growing Malabar spinach indoors. Here are some common problems and how to fix them:
* Yellowing Leaves: This could be a sign of overwatering, underwatering, nutrient deficiency, or pest infestation. Check the soil moisture, fertilize the plant, and inspect for pests.
* Slow Growth: This could be due to insufficient light, low temperatures, or nutrient deficiency. Move the plant to a sunnier location, provide supplemental light, and fertilize the plant.
* Leggy Growth: This is usually caused by insufficient light. Prune the plant to encourage bushier growth and move it to a sunnier location.
* No Flowers: While you’re primarily growing Malabar spinach for its leaves, it can produce small, white or pink flowers. Lack of flowering is usually due to insufficient light or nutrient deficiency.
Overwintering Malabar Spinach
Malabar spinach is a perennial in tropical climates, but it’s typically grown as an annual in cooler regions. However, you can overwinter your Malabar spinach plant indoors to enjoy it for multiple seasons.
1. Reduce Watering: In the fall, reduce watering and fertilizing to allow

Conclusion
So, there you have it! Growing Malabar spinach indoors is not only achievable, but also incredibly rewarding. Imagine having a constant supply of fresh, vibrant greens right at your fingertips, ready to be tossed into salads, stir-fries, or used as a nutritious addition to your favorite soups. Forget those wilted, overpriced bunches at the grocery store – with a little effort and the right setup, you can cultivate your own thriving Malabar spinach patch indoors, regardless of the season.
This DIY trick is a must-try for several reasons. First and foremost, it grants you control over the quality and freshness of your produce. You know exactly what goes into your plants, ensuring they are free from harmful pesticides and chemicals. Secondly, it’s a fantastic way to connect with nature, even within the confines of your home. The simple act of nurturing a plant from seed to harvest can be incredibly therapeutic and satisfying. Finally, growing Malabar spinach indoors is a sustainable practice that reduces your carbon footprint and promotes a healthier lifestyle.
But don’t stop there! Feel free to experiment with different varieties of Malabar spinach. Some cultivars offer varying leaf colors and textures, adding visual appeal to your indoor garden. You can also try different growing mediums, such as hydroponics, for a more advanced and efficient setup. Consider using grow lights with different spectrums to optimize growth and flavor. And if you’re feeling adventurous, why not try propagating your Malabar spinach from cuttings? This is a great way to expand your indoor garden without having to start from seed each time.
The possibilities are endless!
We wholeheartedly encourage you to give this DIY trick a try. It’s easier than you might think, and the benefits are well worth the effort. Once you’ve harvested your first batch of homegrown Malabar spinach, we’d love to hear about your experience. Share your tips, tricks, and photos in the comments below. Let’s create a community of indoor gardeners and inspire others to embrace the joy of growing their own food. Don’t be afraid to experiment and adapt the techniques to suit your specific environment and preferences. Remember, the key to successful indoor gardening is patience, observation, and a willingness to learn. So, grab your seeds, potting mix, and grow lights, and get ready to embark on a rewarding journey of growing Malabar spinach indoors! We are confident that you will find the process enjoyable and the results delicious. Happy gardening!
Frequently Asked Questions (FAQ)
What are the ideal temperature and humidity levels for growing Malabar spinach indoors?
Malabar spinach thrives in warm and humid conditions, mimicking its native tropical environment. Aim for a temperature range of 70-85°F (21-29°C) during the day and slightly cooler temperatures at night. Humidity levels should be maintained between 60-80%. You can increase humidity by using a humidifier, placing a tray of water near your plants, or grouping plants together. Regularly misting the leaves can also help. If your home is particularly dry, consider using a small greenhouse or humidity dome to create a more favorable environment. Monitoring temperature and humidity levels with a hygrometer is highly recommended for optimal growth.
How much light does Malabar spinach need when grown indoors?
Malabar spinach requires at least 6-8 hours of direct sunlight per day to thrive. If you don’t have a sunny window, you’ll need to supplement with artificial grow lights. LED grow lights are a great option as they are energy-efficient and provide the full spectrum of light that plants need. Position the grow lights about 6-12 inches above the plants and adjust as they grow. Rotate your plants regularly to ensure even light exposure on all sides. Insufficient light can lead to leggy growth and reduced yields.
What type of potting mix is best for Malabar spinach?
Malabar spinach prefers a well-draining and nutrient-rich potting mix. A good option is a mix of equal parts potting soil, compost, and perlite or vermiculite. The potting soil provides a base for the plants to grow in, the compost adds essential nutrients, and the perlite or vermiculite improves drainage and aeration. Avoid using heavy garden soil, as it can become compacted and hinder root growth. You can also add a slow-release fertilizer to the potting mix to provide a steady supply of nutrients.
How often should I water my Malabar spinach plants?
Water your Malabar spinach plants regularly, keeping the soil consistently moist but not waterlogged. Check the soil moisture by sticking your finger about an inch into the soil. If it feels dry, it’s time to water. Water deeply, allowing the excess water to drain out of the bottom of the pot. Avoid overwatering, as this can lead to root rot. The frequency of watering will depend on factors such as temperature, humidity, and pot size. During hot and dry periods, you may need to water more frequently.
How often should I fertilize my Malabar spinach plants?
Malabar spinach is a heavy feeder and benefits from regular fertilization. Start fertilizing about two weeks after planting, using a balanced liquid fertilizer diluted to half strength. Fertilize every 2-3 weeks during the growing season. You can also use a slow-release fertilizer incorporated into the potting mix. Avoid over-fertilizing, as this can burn the roots. Look for fertilizers that are rich in nitrogen, phosphorus, and potassium, as well as micronutrients such as iron, magnesium, and calcium.
What are some common pests and diseases that affect Malabar spinach?
Malabar spinach is generally resistant to pests and diseases, but it can be susceptible to aphids, spider mites, and whiteflies. Regularly inspect your plants for signs of infestation, such as small insects on the leaves or webbing. If you find pests, you can try washing them off with a strong stream of water or using insecticidal soap. Avoid using harsh chemicals, as they can harm the plants and contaminate your produce. Good air circulation and proper watering can also help prevent fungal diseases.
How do I harvest Malabar spinach?
You can start harvesting Malabar spinach leaves when they are about 4-6 inches long. Simply snip off the leaves with scissors or pruning shears, leaving about an inch of stem attached. Harvest regularly to encourage new growth. You can also harvest the tender stems and shoots. Malabar spinach is a cut-and-come-again crop, meaning that it will continue to produce new leaves as long as you harvest it regularly.
Can I grow Malabar spinach in hanging baskets?
Yes, Malabar spinach is well-suited for growing in hanging baskets. Its vining habit makes it an attractive and productive addition to any hanging garden. Choose a large hanging basket with good drainage and use a well-draining potting mix. Provide adequate support for the vines as they grow. Water and fertilize regularly, and position the hanging basket in a sunny location.
Is Malabar spinach safe to eat raw?
Yes, Malabar spinach is safe to eat raw, but it has a slightly mucilaginous texture that some people may not enjoy. Cooking the leaves reduces the mucilage and makes them more palatable. Malabar spinach can be used in a variety of dishes, such as salads, stir-fries, soups, and stews. It has a mild, slightly tangy flavor that pairs well with other vegetables and spices.
How can I propagate Malabar spinach?
Malabar spinach can be propagated from seeds or cuttings. To propagate from seeds, sow the seeds directly into the potting mix and keep them moist until they germinate. To propagate from cuttings, take a 4-6 inch cutting from a healthy stem and remove the lower leaves. Dip the cut end in rooting hormone and plant it in a pot filled with moist potting mix. Keep the cutting in a warm and humid environment until it roots, which usually takes about 2-3 weeks.
Leave a Comment