
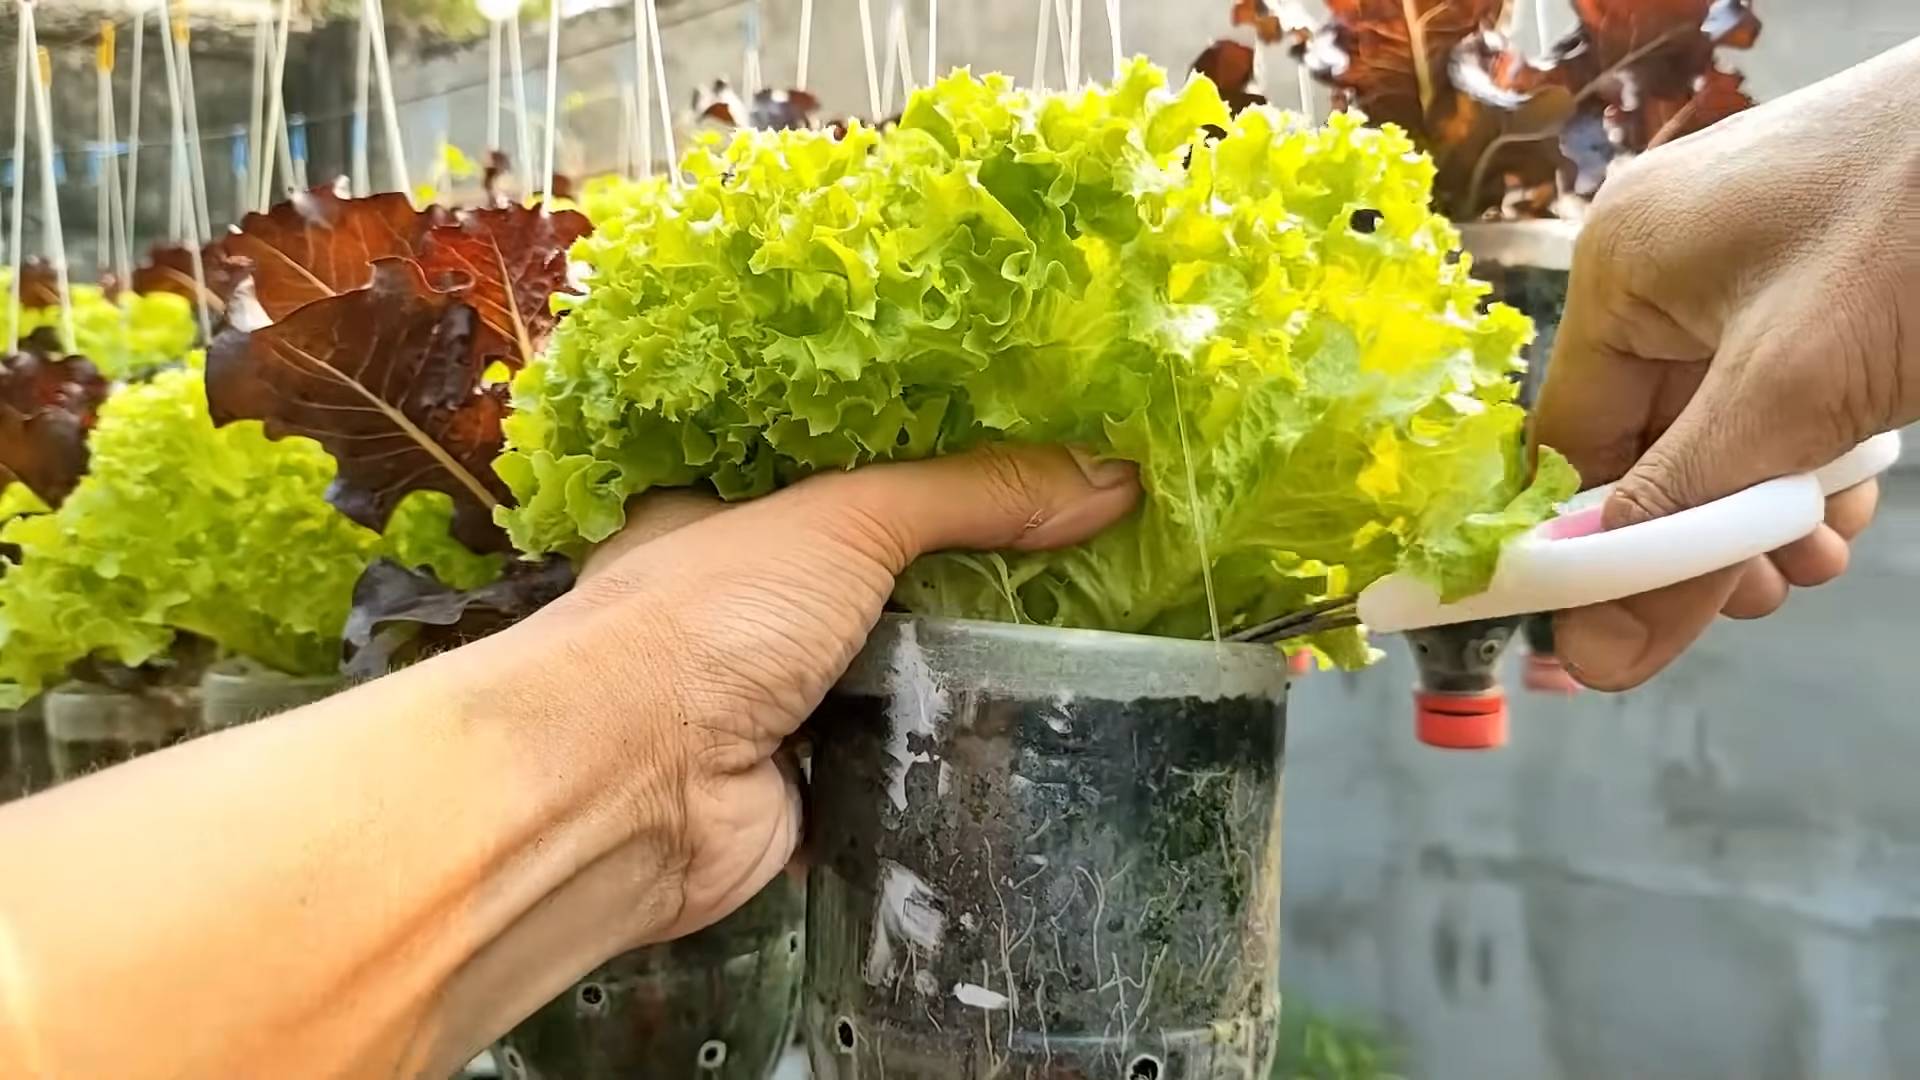
Growing Lettuce: It’s easier than you think, and I’m here to show you how! Imagine stepping outside your door and snipping fresh, crisp lettuce leaves for your salad – a taste of summer, grown right in your own backyard. Forget those limp, pre-packaged greens from the store; with a few simple tricks, you can enjoy vibrant, flavorful lettuce all season long.
Lettuce has a rich history, dating back to ancient Egypt where it was initially cultivated for its seeds and oil. Over time, the leafy greens became a staple in diets worldwide, prized for their refreshing taste and nutritional benefits. Today, the desire for fresh, locally sourced food is stronger than ever, making home gardening, especially growing lettuce, a popular and rewarding hobby.
Why should you try this DIY guide? Well, for starters, you’ll save money! Plus, you’ll know exactly what’s going into your food – no pesticides or hidden chemicals. More importantly, it’s incredibly satisfying to nurture a plant from seed to harvest. This guide is packed with easy-to-follow tips and tricks that will help even the most novice gardener succeed. Let’s get started and transform your garden (or even your balcony!) into a lettuce lover’s paradise!
Grow Your Own Ginger: A Beginner’s Guide to Indoor Cultivation
Hey there, fellow plant enthusiasts! Have you ever thought about growing your own ginger? It’s surprisingly easy to do indoors, and having fresh ginger on hand for cooking and tea is a total game-changer. Plus, the plant itself is quite beautiful! I’m going to walk you through the whole process, from choosing the right ginger to harvesting your very own rhizomes. Let’s get started!
Choosing Your Ginger Rhizome
Before we dive into the planting process, it’s crucial to select the right ginger rhizome (that knobby root we call ginger). This is the foundation of your future ginger plant, so let’s make sure we pick a good one.
* Look for plump, healthy rhizomes: When you’re at the grocery store or nursery, choose ginger that looks plump and firm, not shriveled or dried out. Avoid any that are soft, moldy, or have signs of damage.
* Check for “eyes”: Just like potatoes, ginger rhizomes have “eyes” – small buds that will sprout into new shoots. Look for rhizomes with visible eyes, preferably ones that are already starting to turn green. This indicates that the ginger is ready to grow.
* Organic is best: Opt for organic ginger if possible. Non-organic ginger may have been treated with growth inhibitors to prevent sprouting during shipping and storage. This can make it harder to get your ginger to grow.
* Consider size: You don’t need a huge piece of ginger to start. A rhizome that’s a few inches long is perfectly fine. You can even break a larger rhizome into smaller pieces, ensuring each piece has at least one or two eyes.
Preparing Your Ginger for Planting
Once you’ve selected your ginger, it’s time to prepare it for planting. This step helps to encourage sprouting and gives your ginger a head start.
* Soaking (Optional but Recommended): Soaking the ginger rhizome in water for a few hours (or even overnight) can help to rehydrate it and stimulate sprouting. I usually soak mine in a bowl of lukewarm water for about 12-24 hours.
* Cutting (If Necessary): If you have a large rhizome, you can cut it into smaller pieces, making sure each piece has at least one or two eyes. Use a clean, sharp knife to avoid introducing bacteria. Let the cut surfaces callous over for a day or two before planting. This helps to prevent rot.
* Callousing: After cutting, leave the pieces in a dry, well-ventilated place for a day or two. This allows the cut surfaces to dry and form a protective layer, reducing the risk of fungal infections.
Planting Your Ginger
Now for the fun part – planting your ginger! This is where you’ll transform your rhizome into a thriving ginger plant.
1. Choose the Right Pot: Ginger needs room to grow, so select a pot that’s at least 12 inches in diameter and 12 inches deep. A wider pot is better than a taller one, as ginger rhizomes tend to spread horizontally. Make sure the pot has drainage holes to prevent waterlogging.
2. Prepare the Soil: Ginger prefers well-draining soil that’s rich in organic matter. I like to use a mix of potting soil, compost, and perlite. The perlite helps to improve drainage and aeration. You can also add a bit of aged manure or worm castings for extra nutrients.
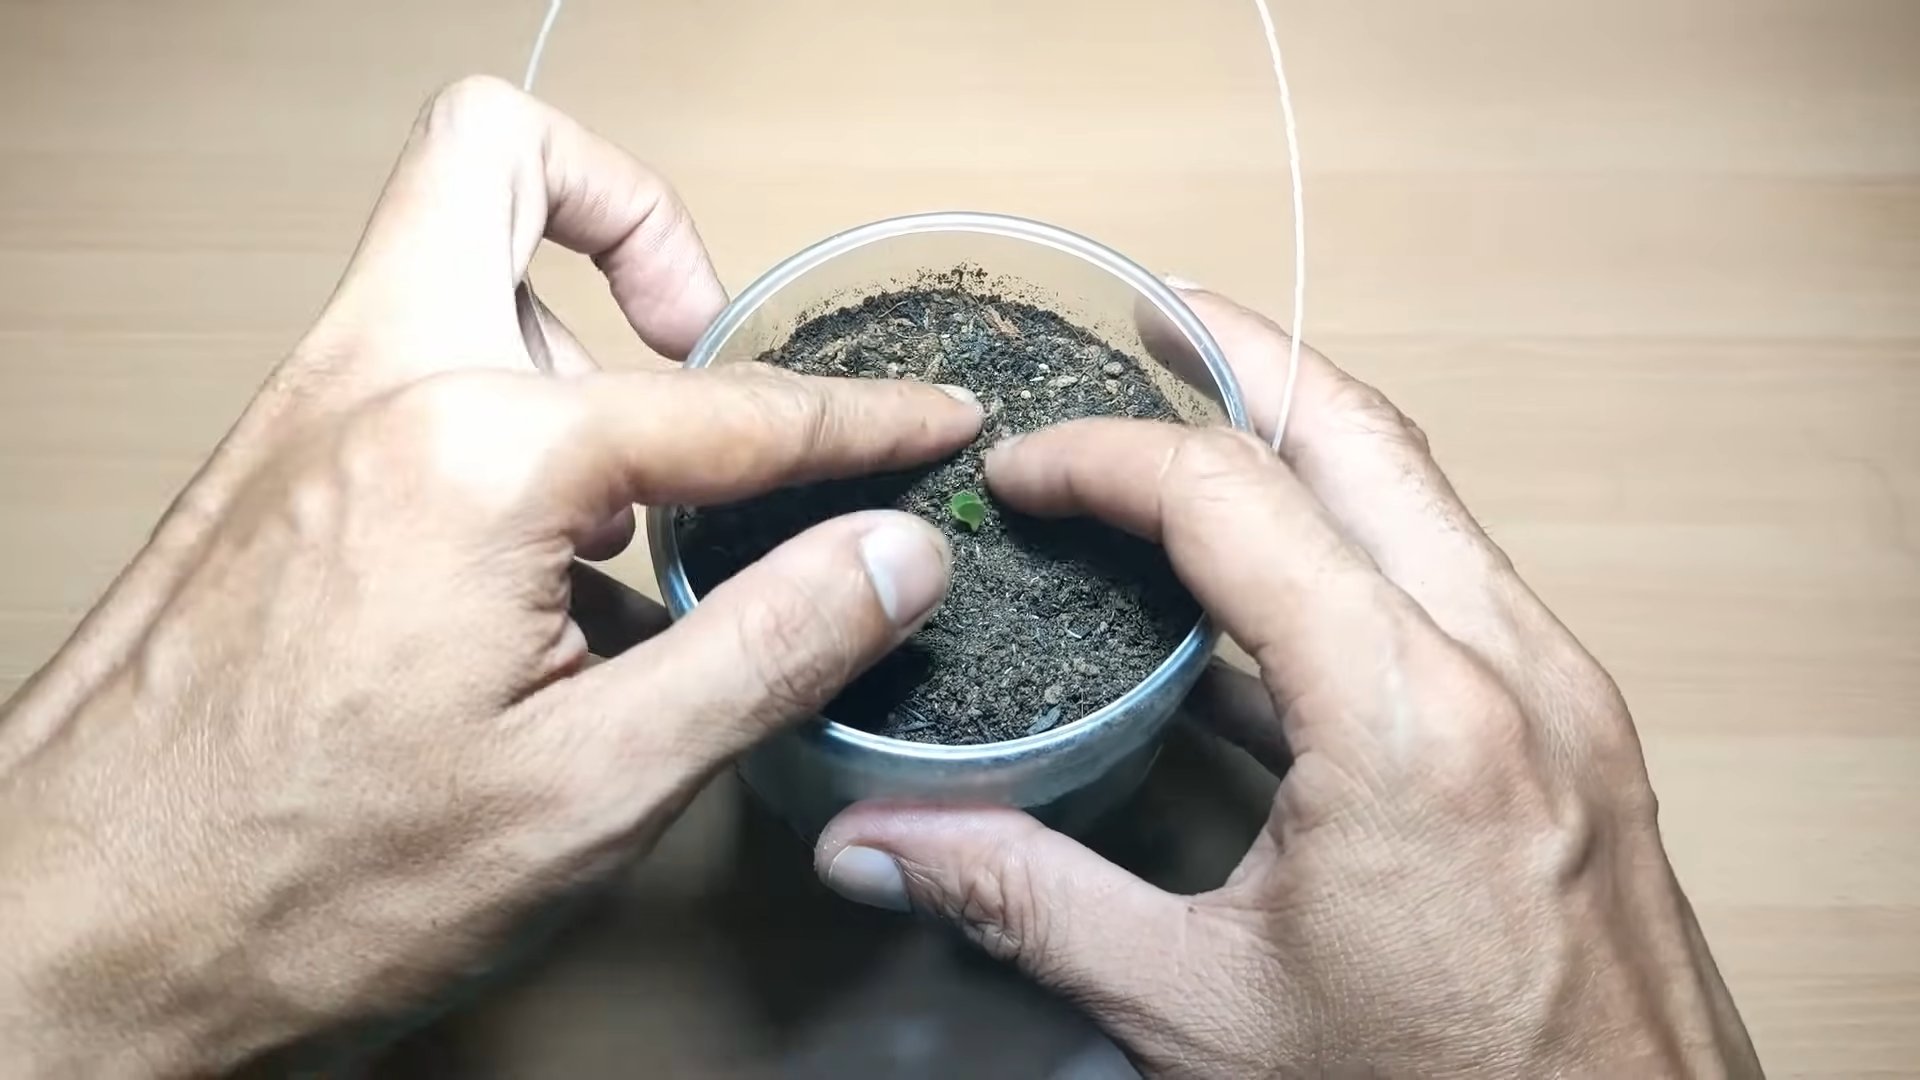
3. Plant the Rhizome: Fill the pot with your soil mixture, leaving a few inches of space at the top. Place the ginger rhizome on top of the soil, with the eyes facing upwards. Cover the rhizome with about 1-2 inches of soil.
4. Water Thoroughly: After planting, water the soil thoroughly until water drains out of the bottom of the pot. This helps to settle the soil and ensures that the rhizome is properly hydrated.
5. Choose the Right Location: Ginger needs warmth and bright, indirect sunlight to thrive. Place your pot in a location that receives at least 6 hours of indirect sunlight per day. A south-facing window is often a good choice. Avoid direct sunlight, as it can scorch the leaves.
6. Maintain Consistent Moisture: Keep the soil consistently moist, but not soggy. Water when the top inch of soil feels dry to the touch. Avoid overwatering, as this can lead to root rot.
7. Be Patient: It can take several weeks for the ginger to sprout, so don’t be discouraged if you don’t see any growth right away. Just keep the soil moist and be patient.
Caring for Your Ginger Plant
Once your ginger plant has sprouted, it’s important to provide it with the right care to ensure healthy growth.
* Watering: As mentioned earlier, keep the soil consistently moist, but not soggy. Water when the top inch of soil feels dry to the touch. During the warmer months, you may need to water more frequently.
* Fertilizing: Ginger is a heavy feeder, so it benefits from regular fertilization. Feed your plant with a balanced liquid fertilizer every 2-3 weeks during the growing season (spring and summer). Follow the instructions on the fertilizer label.
* Humidity: Ginger prefers high humidity. If your home is dry, you can increase humidity by misting the leaves regularly, placing a tray of water near the plant, or using a humidifier.
* Temperature: Ginger thrives in warm temperatures, ideally between 70-90°F (21-32°C). Avoid exposing your plant to cold drafts or temperatures below 50°F (10°C).
* Pest Control: Ginger plants are generally pest-resistant, but they can occasionally be affected by aphids, spider mites, or scale. Inspect your plant regularly for signs of pests and treat them promptly with insecticidal soap or neem oil.
* Repotting: As your ginger plant grows, it may eventually outgrow its pot. Repot it into a larger pot every year or two, using fresh potting soil.
Harvesting Your Ginger
The best part of growing your own ginger is, of course, the harvest! You can start harvesting ginger about 8-10 months after planting.
* When to Harvest: You can harvest ginger at any time, but the flavor will be milder when the plant is young. For a stronger, more mature flavor, wait until the leaves start to turn yellow and die back.
* How to Harvest: To harvest ginger, gently dig around the edges of the pot and lift the plant out of the soil. You can then break off pieces of the rhizome as needed, leaving the rest of the plant to continue growing. Alternatively, you can harvest the entire plant at once.
* Storing Your Ginger: Freshly harvested ginger can be stored in the refrigerator for several weeks. Wrap it in a paper towel and place it in a plastic bag. You can also freeze ginger for longer storage. To freeze ginger, peel it and grate it or slice it into small pieces. Place the pieces in a freezer bag and freeze.
Troubleshooting
Even with the best care, you may encounter some challenges when growing ginger indoors. Here are a few common problems and how to address them:
* Yellowing Leaves: Yellowing leaves can be caused by a variety of factors, including overwatering, underwatering, nutrient deficiencies, or pest infestations. Check the soil moisture, fertilize your plant, and inspect it for pests.
* Root Rot: Root rot is a fungal disease that can occur when the soil is too wet. To prevent root rot, make sure your pot has drainage holes and avoid overwatering. If you suspect root rot, repot your plant into fresh soil and remove any affected roots.
* Lack of Sprouting: If your ginger isn’t sprouting, it could be due to several reasons, including using a rhizome that’s too old, planting it too deep, or keeping the soil too cold. Make sure you’re using a fresh rhizome with visible eyes, planting it shallowly, and keeping the soil warm.
* Slow Growth: Slow growth can be caused by insufficient light, nutrients, or warmth. Make sure your plant is receiving enough sunlight, fertilize it regularly, and keep it in a warm location.
Enjoying Your Homegrown Ginger
Congratulations! You’ve successfully grown your own ginger indoors. Now it’s time to enjoy the fruits (or rather, rhizomes) of your labor.
* Cooking: Fresh ginger adds a delicious flavor to a wide variety of dishes, from stir-fries and soups to curries and marinades.
* Tea: Ginger tea is a soothing and warming beverage that’s perfect for cold days. Simply steep a few slices of fresh ginger in hot water for 10-15 minutes.
* Medicinal Uses: Ginger has been used for centuries for its medicinal properties. It can help to relieve nausea, reduce inflammation, and boost the immune system.
Hey there, fellow plant enthusiasts! Have you ever thought about growing your own ginger? It’s surprisingly easy to do indoors, and having fresh ginger on hand for cooking and tea is a total game-changer. Plus, the plant itself is quite beautiful! I’m going to walk you through the whole process, from choosing the right ginger to harvesting your very own rhizomes. Let’s get started!
Choosing Your Ginger Rhizome
Before we dive into the planting process, it’s crucial to select the right ginger rhizome (that knobby root we call ginger). This is the foundation of your future ginger plant, so let’s make sure we pick a good one.
* Look for plump, healthy rhizomes: When you’re at the grocery store or nursery, choose ginger that looks plump and firm, not shriveled or dried out. Avoid any that are soft, moldy, or have signs of damage.
* Check for “eyes”: Just like potatoes, ginger rhizomes have “eyes” – small buds that will sprout into new shoots. Look for rhizomes with visible eyes, preferably ones that are already starting to turn green. This indicates that the ginger is ready to grow.
* Organic is best: Opt for organic ginger if possible. Non-organic ginger may have been treated with growth inhibitors to prevent sprouting during shipping and storage. This can make it harder to get your ginger to grow.
* Consider size: You don’t need a huge piece of ginger to start. A rhizome that’s a few inches long is perfectly fine. You can even break a larger rhizome into smaller pieces, ensuring each piece has at least one or two eyes.
Preparing Your Ginger for Planting
Once you’ve selected your ginger, it’s time to prepare it for planting. This step helps to encourage sprouting and gives your ginger a head start.
* Soaking (Optional but Recommended): Soaking the ginger rhizome in water for a few hours (or even overnight) can help to rehydrate it and stimulate sprouting. I usually soak mine in a bowl of lukewarm water for about 12-24 hours.
* Cutting (If Necessary): If you have a large rhizome, you can cut it into smaller pieces, making sure each piece has at least one or two eyes. Use a clean, sharp knife to avoid introducing bacteria. Let the cut surfaces callous over for a day or two before planting. This helps to prevent rot.
* Callousing: After cutting, leave the pieces in a dry, well-ventilated place for a day or two. This allows the cut surfaces to dry and form a protective layer, reducing the risk of fungal infections.
Planting Your Ginger
Now for the fun part – planting your ginger! This is where you’ll transform your rhizome into a thriving ginger plant.
1. Choose the Right Pot: Ginger needs room to grow, so select a pot that’s at least 12 inches in diameter and 12 inches deep. A wider pot is better than a taller one, as ginger rhizomes tend to spread horizontally. Make sure the pot has drainage holes to prevent waterlogging.
2. Prepare the Soil: Ginger prefers well-draining soil that’s rich in organic matter. I like to use a mix of potting soil, compost, and perlite. The perlite helps to improve drainage and aeration. You can also add a bit of aged manure or worm castings for extra nutrients.
3. Plant the Rhizome: Fill the pot with your soil mixture, leaving a few inches of space at the top. Place the ginger rhizome on top of the soil, with the eyes facing upwards. Cover the rhizome with about 1-2 inches of soil.
4. Water Thoroughly: After planting, water the soil thoroughly until water drains out of the bottom of the pot. This helps to settle the soil and ensures that the rhizome is properly hydrated.
5. Choose the Right Location: Ginger needs warmth and bright, indirect sunlight to thrive. Place your pot in a location that receives at least 6 hours of indirect sunlight per day. A south-facing window is often a good choice. Avoid direct sunlight, as it can scorch the leaves.
6. Maintain Consistent Moisture: Keep the soil consistently moist, but not soggy. Water when the top inch of soil feels dry to the touch. Avoid overwatering, as this can lead to root rot.
7. Be Patient: It can take several weeks for the ginger to sprout, so don’t be discouraged if you don’t see any growth right away. Just keep the soil moist and be patient.
Caring for Your Ginger Plant
Once your ginger plant has sprouted, it’s important to provide it with the right care to ensure healthy growth.
* Watering: As mentioned earlier, keep the soil consistently moist, but not soggy. Water when the top inch of soil feels dry to the touch. During the warmer months, you may need to water more frequently.
* Fertilizing: Ginger is a heavy feeder, so it benefits from regular fertilization. Feed your plant with a balanced liquid fertilizer every 2-3 weeks during the growing season (spring and summer). Follow the instructions on the fertilizer label.
* Humidity: Ginger prefers high humidity. If your home is dry, you can increase humidity by misting the leaves regularly, placing a tray of water near the plant, or using a humidifier.
* Temperature: Ginger thrives in warm temperatures, ideally between 70-90°F (21-32°C). Avoid exposing your plant to cold drafts or temperatures below 50°F (10°C).
* Pest Control: Ginger plants are generally pest-resistant, but they can occasionally be affected by aphids, spider mites, or scale. Inspect your plant regularly for signs of pests and treat them promptly with insecticidal soap or neem oil.
* Repotting: As your ginger plant grows, it may eventually outgrow its pot. Repot it into a larger pot every year or two, using fresh potting soil.
Harvesting Your Ginger
The best part of growing your own ginger is, of course, the harvest! You can start harvesting ginger about 8-10 months after planting.
* When to Harvest: You can harvest ginger at any time, but the flavor will be milder when the plant is young. For a stronger, more mature flavor, wait until the leaves start to turn yellow and die back.
* How to Harvest: To harvest ginger, gently dig around the edges of the pot and lift the plant out of the soil. You can then break off pieces of the rhizome as needed, leaving the rest of the plant to continue growing. Alternatively, you can harvest the entire plant at once.
* Storing Your Ginger: Freshly harvested ginger can be stored in the refrigerator for several weeks. Wrap it in a paper towel and place it in a plastic bag. You can also freeze ginger for longer storage. To freeze ginger, peel it and grate it or slice it into small pieces. Place the pieces in a freezer bag and freeze.
Troubleshooting
Even with the best care, you may encounter some challenges when growing ginger indoors. Here are a few common problems and how to address them:
* Yellowing Leaves: Yellowing leaves can be caused by a variety of factors, including overwatering, underwatering, nutrient deficiencies, or pest infestations. Check the soil moisture, fertilize your plant, and inspect it for pests.
* Root Rot: Root rot is a fungal disease that can occur when the soil is too wet. To prevent root rot, make sure your pot has drainage holes and avoid overwatering. If you suspect root rot, repot your plant into fresh soil and remove any affected roots.
* Lack of Sprouting: If your ginger isn’t sprouting, it could be due to several reasons, including using a rhizome that’s too old, planting it too deep, or keeping the soil too cold. Make sure you’re using a fresh rhizome with visible eyes, planting it shallowly, and keeping the soil warm.
* Slow Growth: Slow growth can be caused by insufficient light, nutrients, or warmth. Make sure your plant is receiving enough sunlight, fertilize it regularly, and keep it in a warm location.
Enjoying Your Homegrown Ginger
Congratulations! You’ve successfully grown your own ginger indoors. Now it’s time to enjoy the fruits (or rather, rhizomes) of your labor.
* Cooking: Fresh ginger adds a delicious flavor to a wide variety of dishes, from stir-fries and soups to curries and marinades.
* Tea: Ginger tea is a soothing and warming beverage that’s perfect for cold days. Simply steep a few slices of fresh ginger in hot water for 10-15 minutes.
* Medicinal Uses: Ginger has been used for centuries for its medicinal properties. It can help to relieve nausea, reduce inflammation, and boost the immune system.
Growing ginger indoors is a rewarding experience that allows you
Conclusion
So, there you have it! Your comprehensive guide to successfully growing lettuce, even if you’re a complete beginner. We’ve covered everything from selecting the right varieties and preparing your soil to planting, watering, and harvesting your own crisp, delicious lettuce. But why is this DIY approach a must-try?
Because nothing beats the taste of freshly harvested lettuce from your own garden. The vibrant flavors and satisfying crunch are simply unmatched by store-bought varieties. Plus, you have complete control over the growing process, ensuring your lettuce is free from harmful pesticides and herbicides. You’ll also be reducing your carbon footprint by minimizing transportation and packaging waste.
Beyond the taste and health benefits, growing lettuce is incredibly rewarding. Watching those tiny seeds sprout and transform into leafy greens is a truly magical experience. It’s a connection to nature that can bring a sense of peace and accomplishment to your life.
But the fun doesn’t stop there! Feel free to experiment with different lettuce varieties to discover your favorites. Try mixing in some companion plants like marigolds or nasturtiums to deter pests and attract beneficial insects. You can even extend your growing season by using row covers or cold frames to protect your lettuce from frost.
Consider these variations to elevate your lettuce growing experience:
* Vertical Gardening: If you’re short on space, try growing lettuce in vertical planters or hanging baskets. This is a great way to maximize your yield in a small area.
* Succession Planting: Plant new lettuce seeds every few weeks to ensure a continuous harvest throughout the growing season.
* Container Gardening: Lettuce thrives in containers, making it perfect for patios, balconies, or even indoor growing with proper lighting.
* Hydroponics: For a more advanced approach, explore hydroponic lettuce growing. This method uses nutrient-rich water instead of soil, resulting in faster growth and higher yields.
Ultimately, the best way to learn is by doing. Don’t be afraid to get your hands dirty and experiment. Every garden is unique, and what works for one person may not work for another. The key is to observe your plants, learn from your mistakes, and adapt your approach as needed.
We are confident that with the knowledge you’ve gained from this guide, you’ll be well on your way to enjoying a bountiful harvest of homegrown lettuce. So, grab your seeds, prepare your soil, and get ready to experience the joy of growing your own food.
We encourage you to try this DIY trick of growing lettuce and share your experiences with us! Let us know what varieties you’ve tried, what challenges you’ve faced, and what successes you’ve achieved. Share your photos and tips in the comments below. We can’t wait to hear from you! Happy gardening!
Frequently Asked Questions (FAQ)
What is the best time of year to plant lettuce?
Lettuce is a cool-season crop, meaning it thrives in temperatures between 60°F and 70°F (15°C and 21°C). The best time to plant lettuce is in early spring or late summer/early fall. In spring, plant as soon as the soil can be worked. For a fall harvest, sow seeds about 6-8 weeks before the first expected frost. In warmer climates, you can grow lettuce throughout the winter.
What kind of soil is best for growing lettuce?
Lettuce prefers well-drained, fertile soil that is rich in organic matter. A slightly acidic to neutral pH of 6.0 to 7.0 is ideal. Amend your soil with compost or well-rotted manure before planting to improve its fertility and drainage. If your soil is heavy clay, consider adding sand or perlite to improve drainage.
How much sunlight does lettuce need?
Lettuce needs at least 6 hours of sunlight per day to thrive. However, in hot climates, it can benefit from some afternoon shade to prevent bolting (going to seed). If you’re growing lettuce indoors, provide it with supplemental lighting, such as grow lights, to ensure it gets enough light.
How often should I water lettuce?
Lettuce needs consistent moisture to grow well. Water deeply and regularly, especially during hot, dry weather. Aim to keep the soil consistently moist but not waterlogged. Check the soil moisture regularly and water when the top inch feels dry to the touch. Avoid overhead watering, as this can lead to fungal diseases. Drip irrigation or soaker hoses are excellent options for watering lettuce.
How do I prevent lettuce from bolting?
Bolting is when lettuce plants prematurely send up a flower stalk and become bitter. This is usually triggered by hot weather or stress. To prevent bolting, choose bolt-resistant varieties, provide afternoon shade, water regularly, and harvest your lettuce frequently. Mulching around the plants can also help keep the soil cool and moist.
What are some common pests and diseases that affect lettuce?
Common pests that affect lettuce include aphids, slugs, snails, and cutworms. Diseases include downy mildew, powdery mildew, and bottom rot. To prevent pests and diseases, practice good garden hygiene, such as removing weeds and debris, and avoid overhead watering. Use organic pest control methods, such as insecticidal soap or diatomaceous earth, to control pests. If diseases occur, remove affected leaves and treat with a fungicide if necessary.
When and how should I harvest lettuce?
Lettuce can be harvested at any stage, depending on your preference. For baby greens, harvest when the leaves are about 3-4 inches long. For mature heads, harvest when the head is firm and well-formed. To harvest, either cut the entire head at the base or harvest individual leaves from the outer edges of the plant. Harvesting outer leaves encourages continued growth. Harvest in the morning when the leaves are crisp and cool.
Can I grow lettuce indoors?
Yes, you can grow lettuce indoors, especially during the winter months. Choose a sunny location near a window or provide supplemental lighting with grow lights. Use a well-draining potting mix and water regularly. Consider growing loose-leaf varieties, as they are easier to harvest indoors.
What are some good companion plants for lettuce?
Good companion plants for lettuce include carrots, radishes, onions, garlic, marigolds, and nasturtiums. Carrots and radishes help loosen the soil, while onions and garlic deter pests. Marigolds and nasturtiums attract beneficial insects and repel harmful ones. Avoid planting lettuce near fennel, as it can inhibit its growth.
How do I store harvested lettuce?
To store harvested lettuce, wash it thoroughly and dry it well. Wrap it in a paper towel and store it in a plastic bag or container in the refrigerator. Lettuce can typically be stored for up to a week using this method. Avoid storing lettuce near ethylene-producing fruits, such as apples and bananas, as this can cause it to spoil more quickly.

Leave a Comment