
Growing Kale in Plastic Bottle: Unlock the secrets to a thriving garden, even without a sprawling backyard! Have you ever dreamed of fresh, homegrown kale gracing your dinner plate, but felt limited by space? I’m here to tell you that dream can absolutely become a reality, and it’s easier than you think. This DIY guide will walk you through the surprisingly simple process of cultivating delicious, nutritious kale using nothing more than a humble plastic bottle.
The concept of container gardening, and upcycling materials for planting, has roots stretching back centuries. From ancient hanging gardens to resourceful communities during wartime, people have always found innovative ways to grow food in limited spaces. Today, with increasing urbanization and a renewed focus on sustainability, the need for space-saving gardening solutions is more crucial than ever.
Let’s face it, buying organic kale at the grocery store can be expensive. Plus, there’s nothing quite like the satisfaction of harvesting your own food, knowing exactly where it came from and how it was grown. Growing Kale in Plastic Bottle is not just a fun project; it’s a practical way to save money, reduce waste, and enjoy the freshest possible greens. So, grab a plastic bottle, and let’s get started on this exciting gardening adventure together! I’ll show you all the tips and tricks I’ve learned along the way to ensure your kale thrives.
DIY Vertical Kale Garden: Upcycling Plastic Bottles
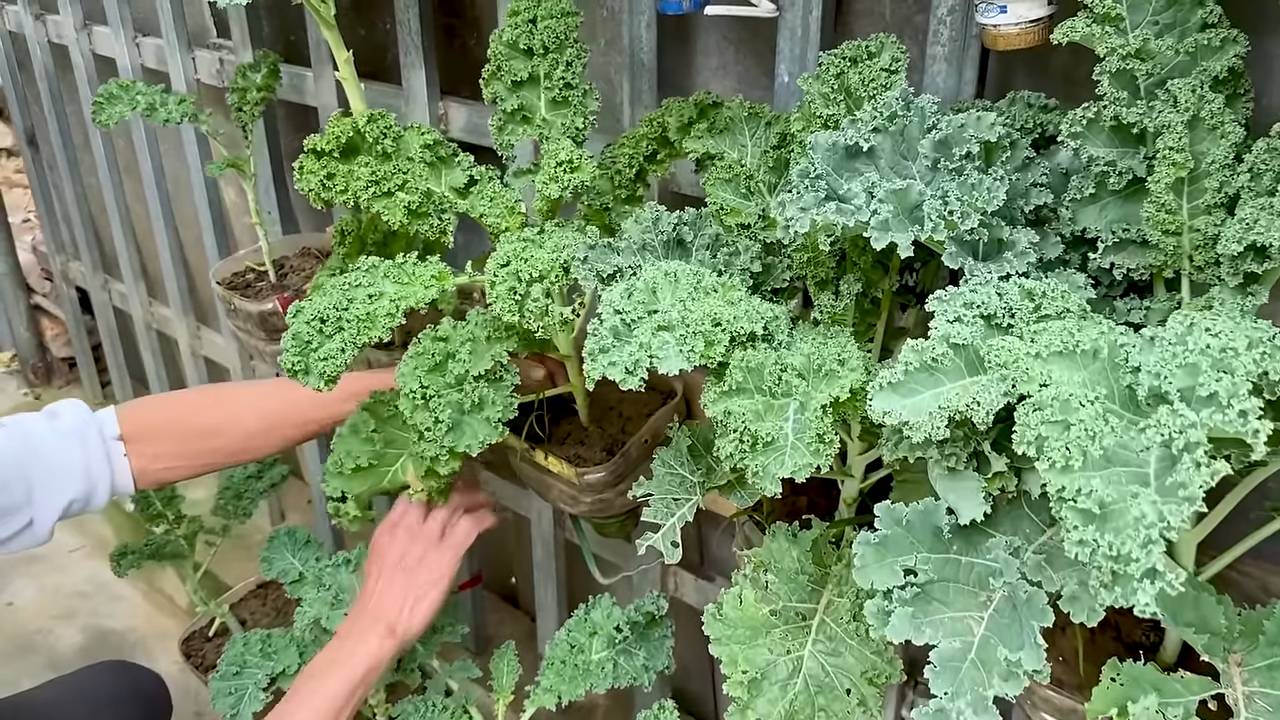
Hey there, fellow gardening enthusiasts! I’m super excited to share this awesome DIY project with you: creating a vertical kale garden using recycled plastic bottles. Not only is it a fantastic way to grow your own fresh, nutritious kale, but it’s also a brilliant way to reduce plastic waste. Plus, it looks pretty cool! This project is perfect for small spaces, balconies, or even just adding a touch of green to your patio. Let’s get started!
What You’ll Need
Before we dive in, let’s gather our supplies. Here’s a list of everything you’ll need to build your own vertical kale garden:
* Plastic Bottles: The more, the merrier! Aim for bottles that are relatively the same size and shape for a uniform look. 2-liter soda bottles or similar sizes work great. I usually collect them over a few weeks.
* Potting Soil: Choose a good quality potting mix that’s well-draining. Kale needs nutrient-rich soil to thrive.
* Kale Seeds or Seedlings: You can start from seeds or buy small kale seedlings from your local nursery. I personally prefer seedlings because they give you a head start.
* Scissors or a Utility Knife: Be careful when using these! A sharp knife will make cleaner cuts.
* Drill or Nail and Hammer: For creating drainage holes and hanging points.
* Rope or Strong Twine: To hang your bottles vertically. Make sure it’s sturdy enough to support the weight of the bottles filled with soil and plants.
* Measuring Tape or Ruler: To ensure consistent spacing.
* Marker or Pen: For marking cutting lines.
* Gloves: To protect your hands from dirt and sharp edges.
* Watering Can or Hose: For watering your kale.
Preparing the Bottles
This is where the magic begins! We’ll transform those ordinary plastic bottles into mini kale planters.
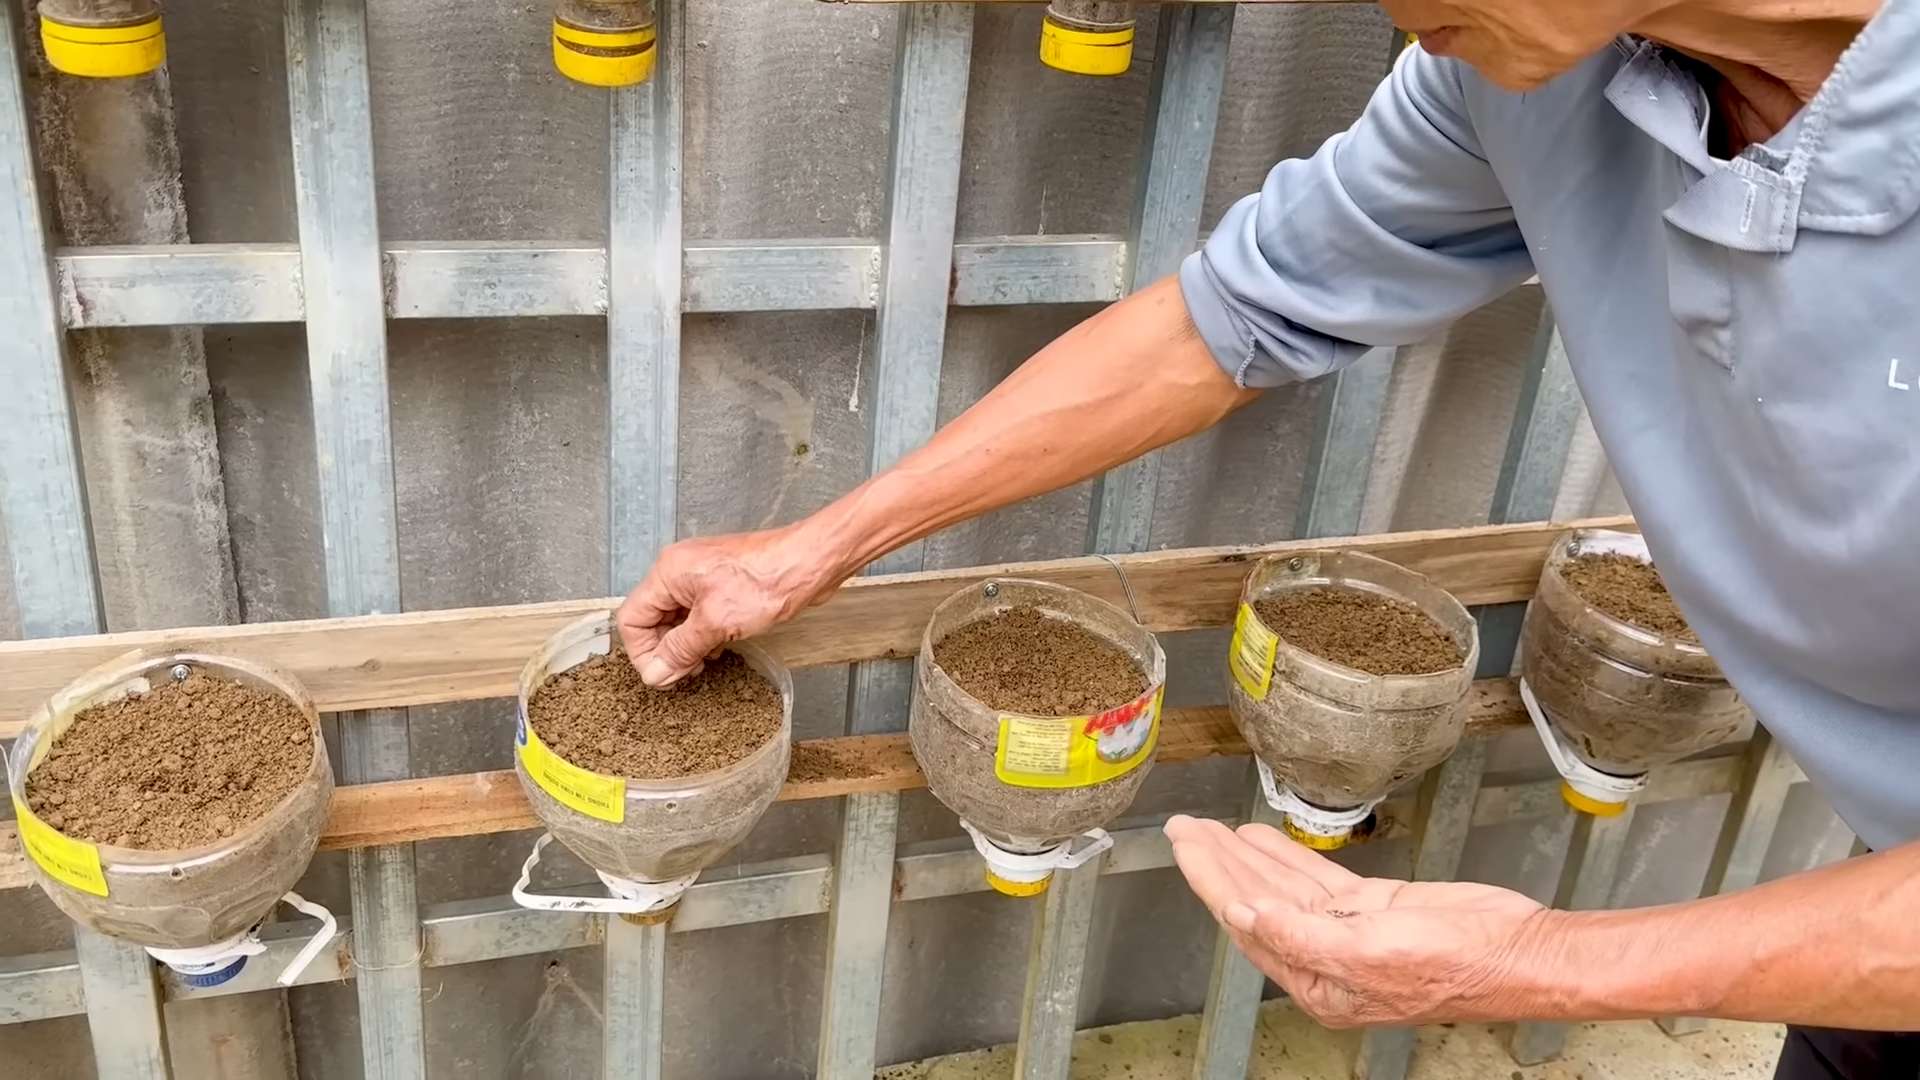
1. Clean the Bottles: Thoroughly wash each bottle with soap and water to remove any residue. Rinse them well and let them dry completely. This is important to prevent any contamination of your soil.
2. Cut the Bottles: This is the trickiest part, so take your time and be careful.
* Decide how you want to cut your bottles. There are two main ways:
* Option 1 (Horizontal Cut): Cut each bottle horizontally, about two-thirds of the way down from the top. This creates a larger planting area. You’ll discard the top portion.
* Option 2 (Window Cut): Cut a rectangular “window” on one side of the bottle, leaving the rest of the bottle intact. This option is more visually appealing, in my opinion, and helps retain moisture.
* Using your marker and ruler, draw a cutting line around the bottle (for Option 1) or a rectangular shape (for Option 2).
* Carefully use your scissors or utility knife to cut along the marked lines. If you’re using a utility knife, make sure to use a cutting board or other protective surface.
* Smooth out any sharp edges with sandpaper or a file to prevent injuries.
3. Create Drainage Holes: Kale needs good drainage to prevent root rot.
* Using your drill or nail and hammer, create several small drainage holes in the bottom of each bottle. I usually make about 4-5 holes, evenly spaced.
* If you’re using the “window cut” method, you can also add a few drainage holes to the bottom of the bottle.
4. Create Hanging Points: Now, we’ll create the points where you’ll attach the rope or twine to hang the bottles.
* Drill or punch two holes near the top of each bottle, on opposite sides. These holes should be large enough to thread your rope or twine through.
* Make sure the holes are strong enough to support the weight of the bottle when it’s filled with soil and plants. You might want to reinforce them with tape or small washers if needed.
Planting Your Kale
Time to get our hands dirty! This is the fun part where we bring our vertical garden to life.
1. Fill the Bottles with Soil: Carefully fill each bottle with potting soil, leaving about an inch of space at the top. Gently pat down the soil to remove any air pockets.
2. Plant Your Kale:
* From Seeds: Sprinkle a few kale seeds on top of the soil in each bottle. Cover them with a thin layer of soil and gently water. Keep the soil moist until the seeds germinate.
* From Seedlings: Gently remove the kale seedlings from their containers. Create a small hole in the soil in each bottle and carefully place the seedling inside. Backfill with soil and gently pat down.
3. Water Your Kale: Water the kale thoroughly after planting. Make sure the water drains out of the drainage holes.
Assembling Your Vertical Garden
Now, let’s put it all together and create our amazing vertical kale garden!
1. Cut the Rope or Twine: Cut several lengths of rope or twine, depending on how many bottles you want to hang in each row. Make sure the lengths are long enough to allow for some space between the bottles. I usually leave about 6-8 inches between each bottle.
2. Thread the Rope Through the Bottles: Thread the rope or twine through the hanging holes in each bottle. Start with the bottom bottle and work your way up.
3. Secure the Bottles: Tie knots in the rope or twine above and below each bottle to secure them in place. This will prevent them from sliding down.
4. Hang Your Vertical Garden: Find a suitable location to hang your vertical garden. Make sure it’s a sunny spot that gets at least 6 hours of sunlight per day. You can hang it from a balcony railing, a fence, or even a sturdy tree branch.
5. Adjust the Spacing: Adjust the spacing between the bottles to ensure they’re evenly spaced and look visually appealing.
Caring for Your Kale
Now that your vertical kale garden is up and running, it’s important to take good care of your plants to ensure they thrive.
1. Watering: Kale needs consistent moisture to grow well. Water your plants regularly, especially during hot and dry weather. Check the soil moisture by sticking your finger into the soil. If it feels dry, it’s time to water.
2. Fertilizing: Kale is a heavy feeder, so it needs regular fertilization. Use a balanced liquid fertilizer every 2-3 weeks. Follow the instructions on the fertilizer label.
3. Sunlight: Kale needs at least 6 hours of sunlight per day. If you’re growing your kale indoors, you may need to supplement with artificial light.
4. Pest Control: Keep an eye out for pests like aphids, cabbage worms, and slugs. You can control these pests with organic methods like handpicking, insecticidal soap, or neem oil.
5. Harvesting: You can start harvesting kale leaves when they’re about 4-6 inches long. Simply cut off the outer leaves, leaving the inner leaves to continue growing. This will encourage the plant to produce more leaves.
Troubleshooting
Even with the best care, you might encounter some problems along the way. Here are a few common issues and how to fix them:
* Yellowing Leaves: This could be a sign of overwatering, underwatering, or nutrient deficiency. Check the soil moisture and adjust your watering schedule accordingly. Fertilize your plants regularly to provide them with the nutrients they need.
* Stunted Growth: This could be caused by lack of sunlight, poor soil, or pests. Make sure your plants are getting enough sunlight and that the soil is well-draining and nutrient-rich. Check for pests and treat them accordingly.
* Root Rot: This is caused by overwatering and poor drainage. Make sure your bottles have adequate drainage holes and avoid overwatering.
Tips and Tricks
Here are a few extra tips and tricks to help you succeed with your vertical kale garden:
* Choose the Right Kale Variety: Some kale varieties are better suited for container gardening than others. Dwarf varieties like Dwarf Blue Curled Vates are a good choice.
* Rotate Your Crops: To prevent soil depletion, rotate your crops every year. Plant different vegetables in the same bottles each year.
* Add Compost: Adding compost to your potting soil will improve its fertility and drainage.
* Mulch Your Plants: Mulching your plants with straw or wood chips will help retain moisture and suppress weeds.
* Protect from Frost: Kale is relatively cold-hardy, but it can be damaged by severe frost. If you live in a cold climate, protect your plants with a frost blanket or move them indoors during the winter.
I hope you found this guide helpful! Building a vertical kale garden from
Conclusion
So, there you have it! Growing kale in plastic bottles isn’t just a quirky gardening experiment; it’s a genuinely effective and rewarding way to cultivate fresh, nutritious greens right at your fingertips. We’ve explored how this method transforms discarded plastic into a thriving mini-garden, offering a sustainable solution for both your appetite and the environment.
Why is this DIY trick a must-try? Because it democratizes gardening. You don’t need acres of land or expensive equipment to enjoy the benefits of homegrown kale. This method is perfect for apartment dwellers, urban gardeners with limited space, or anyone looking for a low-cost, low-effort way to add fresh produce to their diet. Plus, it’s incredibly satisfying to watch your kale flourish in a container you repurposed yourself.
Beyond the practical advantages, growing kale in plastic bottles offers a unique educational opportunity. It’s a fantastic project for kids, teaching them about plant life cycles, sustainability, and the importance of reducing waste. It’s also a great way to experiment with different kale varieties. Try growing curly kale, Lacinato kale (also known as dinosaur kale), or even Red Russian kale to see which thrives best in your bottle garden.
Don’t be afraid to get creative with your setup! You can paint the bottles to add a splash of color to your balcony or patio. Consider creating a vertical garden by hanging multiple bottles from a wall or fence. You can even experiment with different soil mixes to find the perfect blend for your kale. Remember to adjust your watering schedule based on the weather and the specific needs of your kale variety.
This method is also incredibly adaptable. While we’ve focused on kale, you can easily adapt this technique to grow other leafy greens like spinach, lettuce, or even herbs like basil and parsley. The possibilities are endless!
The key takeaway is that growing kale in plastic bottles is an accessible, sustainable, and rewarding gardening experience. It’s a chance to connect with nature, reduce your environmental footprint, and enjoy the delicious taste of homegrown kale.
We wholeheartedly encourage you to give this DIY trick a try. It’s easier than you think, and the results are well worth the effort. Once you’ve harvested your first batch of homegrown kale, we’d love to hear about your experience! Share your photos, tips, and any variations you’ve tried in the comments below. Let’s build a community of bottle gardeners and inspire others to embrace sustainable living. Let us know if you have found the best way to grow kale using this method.
Frequently Asked Questions (FAQs)
What type of plastic bottle is best for growing kale?
Ideally, you should use food-grade plastic bottles, such as those that previously contained water, juice, or soda. Avoid bottles that held chemicals or cleaning products, as these may leach harmful substances into the soil. PET (polyethylene terephthalate) bottles, commonly used for water and soda, are a good choice. Make sure to thoroughly clean the bottles with soap and water before using them.
How much sunlight does kale grown in plastic bottles need?
Kale thrives in full sun, which means it needs at least 6 hours of direct sunlight per day. If you don’t have a sunny spot, you can supplement with grow lights. Place your bottle garden in a location that receives ample sunlight, such as a south-facing balcony or windowsill. If you live in a particularly hot climate, you may need to provide some afternoon shade to prevent the kale from overheating.
What kind of soil should I use for growing kale in plastic bottles?
Use a well-draining potting mix that is rich in organic matter. You can purchase a pre-made potting mix or create your own by combining equal parts of compost, peat moss (or coconut coir), and perlite or vermiculite. The compost provides nutrients, the peat moss (or coconut coir) helps retain moisture, and the perlite or vermiculite improves drainage. Avoid using garden soil, as it can be too heavy and may contain pests or diseases.
How often should I water kale grown in plastic bottles?
Water your kale regularly, keeping the soil consistently moist but not waterlogged. The frequency of watering will depend on the weather, the size of the bottle, and the type of soil you’re using. Check the soil moisture by sticking your finger about an inch into the soil. If it feels dry, it’s time to water. Water deeply, until water drains out of the bottom of the bottle. Avoid overwatering, as this can lead to root rot.
Do I need to fertilize kale grown in plastic bottles?
Yes, kale is a heavy feeder and will benefit from regular fertilization. Use a balanced organic fertilizer, such as compost tea or fish emulsion, every 2-3 weeks. Follow the instructions on the fertilizer packaging. You can also add slow-release fertilizer granules to the soil when you plant the kale.
How do I prevent pests and diseases from affecting my kale?
Inspect your kale plants regularly for signs of pests or diseases. Common pests that affect kale include aphids, cabbage worms, and flea beetles. You can control these pests by handpicking them off the plants, spraying with insecticidal soap, or using row covers. Common diseases that affect kale include powdery mildew and black rot. Prevent these diseases by providing good air circulation, avoiding overhead watering, and removing any infected leaves.
When is the best time to harvest kale grown in plastic bottles?
You can start harvesting kale leaves when they are about 4-6 inches long. Harvest the outer leaves first, leaving the inner leaves to continue growing. This will encourage the plant to produce more leaves. You can harvest kale throughout the growing season, as long as the plant is healthy.
Can I grow kale in plastic bottles indoors?
Yes, you can grow kale in plastic bottles indoors, but you will need to provide adequate light. Place the bottles near a sunny window or use grow lights. You will also need to ensure good air circulation to prevent diseases.
How long will kale plants last in plastic bottles?
With proper care, kale plants can last for several months in plastic bottles. However, they may eventually become root-bound and need to be transplanted into larger containers or the ground.
Can I reuse the plastic bottles for growing other plants after harvesting the kale?
Yes, you can reuse the plastic bottles for growing other plants after harvesting the kale. Just make sure to thoroughly clean the bottles with soap and water before using them again. You may also want to sterilize them with a diluted bleach solution to kill any remaining pathogens.
Leave a Comment