
Growing Kale at Home can seem daunting, but trust me, it’s easier than you think! Have you ever dreamed of stepping into your backyard and harvesting fresh, vibrant kale for a healthy smoothie or a delicious salad? Well, dream no more! This DIY guide is packed with simple tricks and hacks that will transform your garden into a kale-producing powerhouse, even if you’re a complete beginner.
Kale, a nutritional powerhouse, has been cultivated for over 2,000 years, with roots tracing back to the eastern Mediterranean. The ancient Greeks and Romans recognized its value, and it has since become a staple in cuisines worldwide. But beyond its historical significance, growing kale at home offers a fantastic way to access fresh, organic produce without relying on grocery stores.
In today’s world, where healthy eating is more important than ever, knowing exactly where your food comes from is a huge advantage. Plus, let’s be honest, store-bought kale can sometimes be a bit… lackluster. This DIY article will empower you to cultivate kale that’s bursting with flavor and packed with nutrients. I’m going to share my favorite tips and tricks for successful kale cultivation, from seed to harvest, ensuring you enjoy a bountiful supply of this leafy green all season long. Get ready to get your hands dirty and discover the joy of homegrown kale!
Kohl Anbauen: Dein DIY-Leitfaden für den eigenen Garten
Hallo Gartenfreunde! Ich liebe es, frisches Gemüse direkt aus meinem Garten zu ernten, und Kohl ist da keine Ausnahme. Er ist super gesund, vielseitig und überraschend einfach anzubauen. In diesem Artikel zeige ich dir, wie du Kohl erfolgreich zu Hause anbauen kannst, egal ob du einen großen Garten oder nur einen kleinen Balkon hast. Los geht’s!
Die Vorbereitung: Was du brauchst
Bevor wir mit dem Pflanzen loslegen, müssen wir sicherstellen, dass wir alles Notwendige zur Hand haben. Hier ist eine Liste der Dinge, die du brauchst:
* Kohl-Samen oder Jungpflanzen: Du kannst entweder mit Samen beginnen oder Jungpflanzen kaufen, um den Prozess zu beschleunigen. Ich persönlich mag es, mit Samen anzufangen, weil es mir mehr Kontrolle über den gesamten Prozess gibt.
* Anzuchterde (optional): Wenn du mit Samen beginnst, brauchst du Anzuchterde für die Vorkultur.
* Töpfe oder Anzuchtschalen (optional): Für die Vorkultur.
* Gartenerde: Kohl braucht einen nährstoffreichen Boden.
* Kompost oder organischer Dünger: Um den Boden anzureichern.
* Gießkanne oder Gartenschlauch: Zum Bewässern.
* Gartenwerkzeug: Spaten, Schaufel, Harke.
* Mulch (optional): Um die Feuchtigkeit im Boden zu halten und Unkraut zu unterdrücken.
* Pflanzstäbe (optional): Für größere Kohlarten, um sie zu stützen.
* Schutznetz (optional): Gegen Schädlinge wie Kohlweißlinge.
Schritt-für-Schritt-Anleitung: Kohl anbauen
Jetzt, wo wir alles vorbereitet haben, können wir mit dem eigentlichen Anbau beginnen. Hier ist eine detaillierte Anleitung, die dir hilft, Kohl erfolgreich anzubauen:
1. Die richtige Sorte auswählen
Es gibt viele verschiedene Kohlsorten, jede mit ihren eigenen Vor- und Nachteilen. Einige beliebte Sorten sind:
* Grünkohl: Sehr robust und winterhart.
* Palmkohl (Cavolo Nero): Auch bekannt als Schwarzkohl, hat einen milden Geschmack.
* Rotkohl: Ideal für Salate und zum Einlegen.
* Weißkohl: Vielseitig verwendbar, z.B. für Krautsalat.
* Wirsing: Hat einen milden, leicht süßlichen Geschmack.
Wähle die Sorte, die dir am besten schmeckt und die zu deinem Klima passt. Ich persönlich mag Grünkohl und Palmkohl sehr gerne, weil sie so einfach anzubauen sind und auch im Winter geerntet werden können.
2. Der richtige Zeitpunkt zum Pflanzen
Der beste Zeitpunkt zum Pflanzen von Kohl hängt von deiner Region und der Kohlsorte ab. Generell gilt:
* Frühjahrspflanzung: Für eine Sommerernte. Beginne mit der Vorkultur im Haus etwa 6-8 Wochen vor dem letzten Frost.
* Sommerpflanzung: Für eine Herbst- oder Winterernte. Pflanze die Samen oder Jungpflanzen im Juni oder Juli.
Informiere dich über die spezifischen Empfehlungen für deine Region und die gewählte Kohlsorte. Ich wohne in einer Region mit milden Wintern, daher kann ich Kohl auch im Herbst pflanzen und über den Winter ernten.
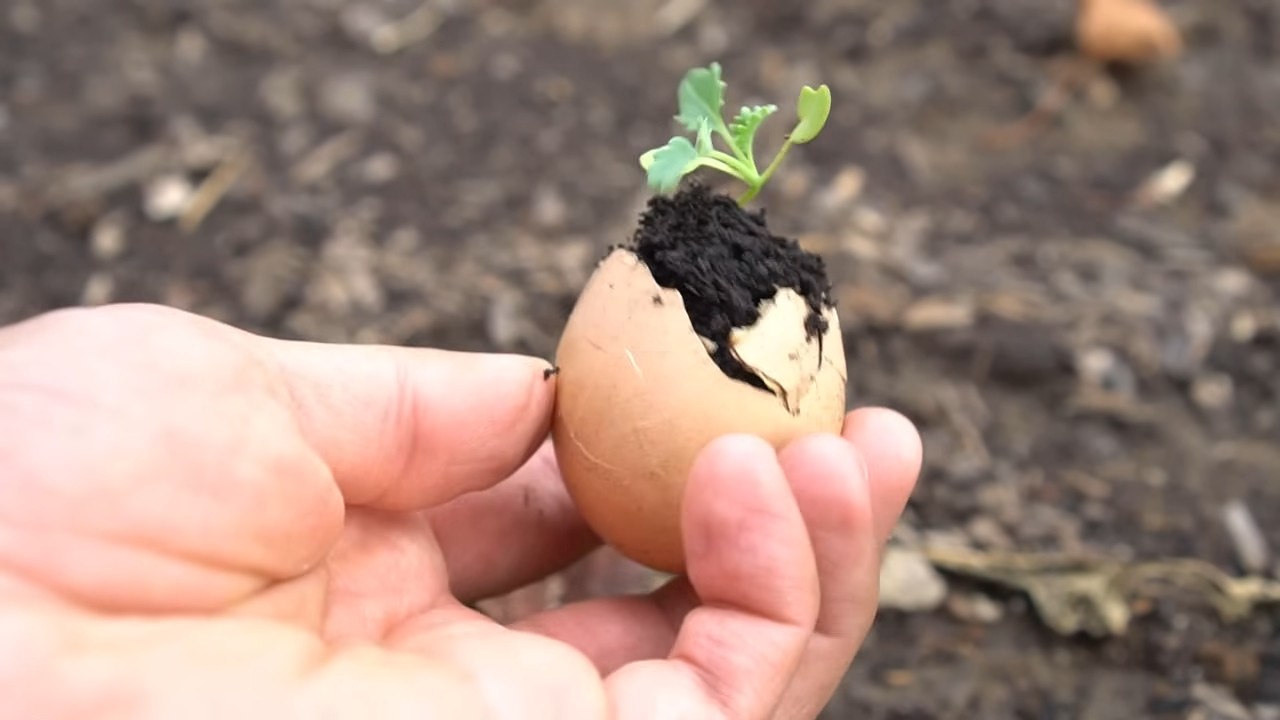
3. Die Vorkultur (optional)
Wenn du mit Samen beginnst, ist die Vorkultur im Haus eine gute Idee. So geht’s:
1. Fülle Anzuchtschalen oder kleine Töpfe mit Anzuchterde.
2. Säe die Kohl-Samen etwa 1 cm tief in die Erde.
3. Befeuchte die Erde vorsichtig mit einer Sprühflasche.
4. Stelle die Anzuchtschalen an einen hellen, warmen Ort. Eine Temperatur von 18-20°C ist ideal.
5. Halte die Erde feucht, aber nicht nass.
6. Sobald die Sämlinge ein paar Blätter haben (nach etwa 4-6 Wochen), kannst du sie in größere Töpfe umpflanzen.
4. Den Boden vorbereiten
Kohl braucht einen nährstoffreichen, gut durchlässigen Boden. So bereitest du den Boden vor:
1. Wähle einen sonnigen Standort. Kohl braucht mindestens 6 Stunden Sonne pro Tag.
2. Lockere den Boden mit einem Spaten oder einer Grabegabel auf.
3. Entferne Steine und Unkraut.
4. Reichere den Boden mit Kompost oder organischem Dünger an. Ich verwende gerne eine Mischung aus Kompost und Hornspänen.
5. Harke den Boden glatt.
5. Das Pflanzen
Jetzt kommt der spannende Teil: das Pflanzen!
1. Grabe Löcher im Abstand von 40-60 cm, je nach Kohlsorte. Größere Kohlarten brauchen mehr Platz.
2. Setze die Kohl-Pflanzen in die Löcher. Achte darauf, dass die Wurzeln nicht gequetscht werden.
3. Fülle die Löcher mit Erde und drücke sie leicht an.
4. Gieße die Pflanzen gründlich.
6. Die Pflege
Nach dem Pflanzen ist es wichtig, den Kohl gut zu pflegen, damit er gesund wächst und eine reiche Ernte bringt.
* Bewässerung: Kohl braucht regelmäßig Wasser, besonders während trockener Perioden. Gieße die Pflanzen am besten früh morgens oder spät abends, um Verdunstung zu vermeiden.
* Düngung: Dünge den Kohl alle paar Wochen mit einem organischen Dünger. Ich verwende gerne Brennnesseljauche oder verdünnten Gemüsedünger.
* Unkrautbekämpfung: Entferne regelmäßig Unkraut, um zu verhindern, dass es dem Kohl Nährstoffe und Wasser entzieht.
* Mulchen: Eine Mulchschicht aus Stroh oder Rasenschnitt hilft, die Feuchtigkeit im Boden zu halten und Unkraut zu unterdrücken.
* Schädlingsbekämpfung: Kohl ist anfällig für verschiedene Schädlinge, wie z.B. Kohlweißlinge, Blattläuse und Schnecken. Kontrolliere die Pflanzen regelmäßig und ergreife bei Bedarf Maßnahmen. Ich verwende gerne ein Schutznetz gegen Kohlweißlinge und sammle Schnecken von Hand ab.
Schädlinge und Krankheiten
Kohl kann von verschiedenen Schädlingen und Krankheiten befallen werden. Hier sind einige der häufigsten Probleme und wie du sie bekämpfen kannst:
* Kohlweißling: Die Raupen fressen die Blätter des Kohls. Du kannst sie von Hand absammeln oder ein Schutznetz verwenden.
* Blattläuse: Saugen den Pflanzensaft und schwächen die Pflanze. Du kannst sie mit einem Wasserstrahl abspritzen oder mit einer Seifenlauge behandeln.
* Schnecken: Fressen die Blätter des Kohls. Du kannst Schneckenkorn verwenden oder Schnecken von Hand absammeln.
* Kohlhernie: Eine Pilzkrankheit, die die Wurzeln befällt. Achte auf eine gute Bodendurchlässigkeit und wechsle den Standort des Kohls regelmäßig.
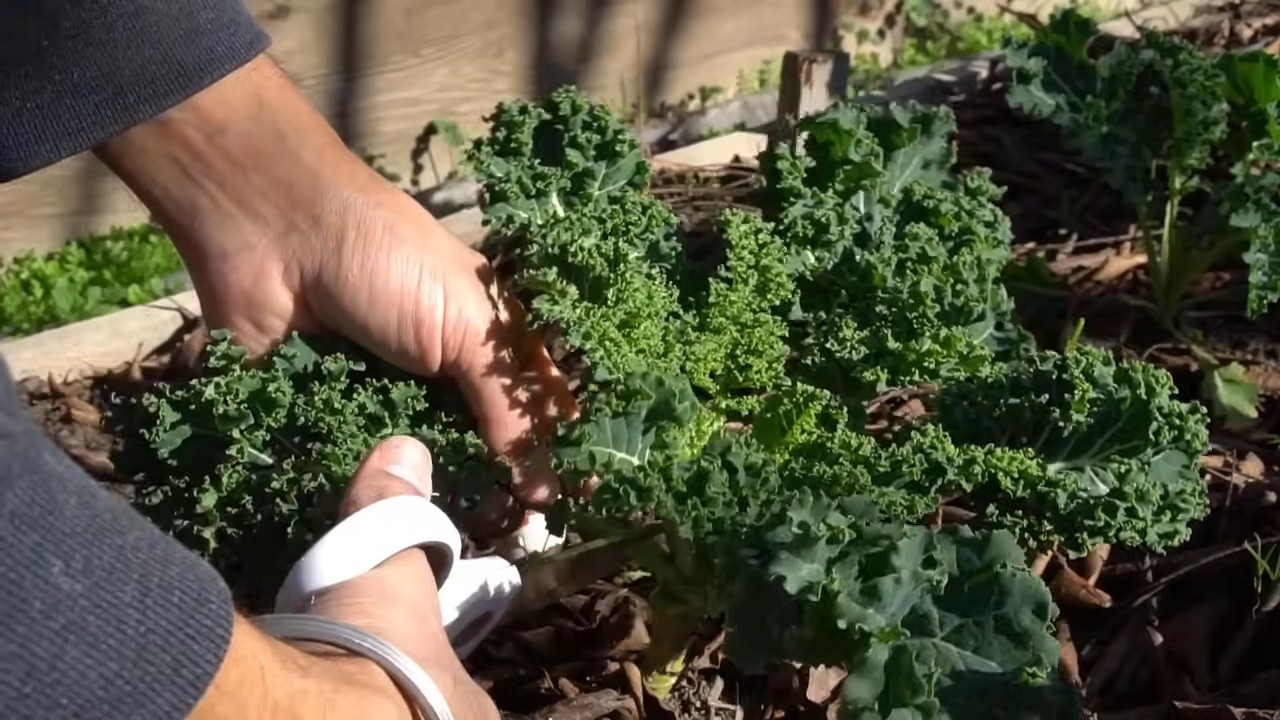
Die Ernte
Je nach Kohlsorte und Pflanzzeitpunkt kannst du den Kohl nach etwa 2-4 Monaten ernten.
* Grünkohl: Du kannst die Blätter nach Bedarf ernten, beginnend mit den unteren Blättern.
* Palmkohl: Ernte die Blätter von unten nach oben.
* Rotkohl, Weißkohl, Wirsing: Ernte den ganzen Kopf, wenn er fest und prall ist.
Schneide den Kohl mit einem scharfen Messer ab.
Zusätzliche Tipps für den erfolgreichen Kohlanbau
* Fruchtfolge beachten: Pflanze Kohl nicht jedes Jahr am selben Standort, um Krankheiten vorzubeugen.
* Kombinationspflanzung: Pflanze Kohl zusammen mit anderen Pflanzen, die ihn vor Schädlingen schützen oder sein Wachstum fördern. Gute Nachbarn sind z.B. Ringelblumen, Kapuzinerkresse und Salbei.
* Regelmäßig gießen: Kohl braucht besonders während der Wachstumsphase ausreichend Wasser.
* Bodenprobe nehmen: Wenn
Conclusion
So, there you have it! Growing kale at home is not only achievable, but it’s also incredibly rewarding. From the vibrant, nutrient-packed leaves gracing your garden to the satisfaction of knowing exactly where your food comes from, the benefits are numerous. We’ve walked you through the essential steps, from selecting the right variety and preparing your soil to nurturing your kale plants and harvesting their bounty.
But why is this DIY trick a must-try? Simply put, it’s about control, freshness, and flavor. Store-bought kale, while convenient, often lacks the vibrant taste and crisp texture of homegrown varieties. Plus, you have complete control over the growing process, ensuring your kale is free from harmful pesticides and herbicides. Imagine stepping into your garden, snipping off a handful of fresh kale leaves, and adding them to your morning smoothie or a hearty salad – the difference in taste is truly remarkable.
Don’t be afraid to experiment with different kale varieties to find your favorites. Try the classic curly kale for its robust flavor and texture, or opt for the milder, smoother leaves of Tuscan kale (also known as Lacinato or dinosaur kale). Red Russian kale offers a beautiful visual appeal with its reddish-purple stems and slightly sweeter taste. You can even try growing kale in containers if you have limited garden space. A sunny balcony or patio can easily accommodate a few kale plants, bringing a touch of green to your urban dwelling.
Consider companion planting to further enhance your kale-growing experience. Planting herbs like rosemary, sage, and thyme near your kale can help deter pests and attract beneficial insects. Marigolds are also excellent companion plants, known for their pest-repelling properties.
Growing kale at home is more than just a gardening project; it’s an investment in your health and well-being. It’s a chance to connect with nature, learn new skills, and enjoy the delicious rewards of your labor.
We encourage you to take the plunge and give this DIY trick a try. Start small, be patient, and don’t be afraid to make mistakes. Gardening is a learning process, and every challenge is an opportunity to grow (pun intended!).
And most importantly, we want to hear about your experiences! Share your tips, tricks, and triumphs in the comments below. Let us know what varieties you’re growing, what challenges you’ve faced, and what delicious recipes you’ve created with your homegrown kale. Together, we can build a community of kale-loving gardeners and inspire others to embrace the joy of growing their own food. Happy gardening!
FAQ
What are the best kale varieties to grow for beginners?
For beginners, we highly recommend starting with either curly kale or Tuscan kale (Lacinato). Curly kale is known for its hardiness and relatively easy cultivation. It’s also readily available as seedlings in most garden centers. Tuscan kale is another excellent choice, offering a milder flavor and smoother texture compared to curly kale. Both varieties are relatively pest-resistant and can tolerate a range of growing conditions. Red Russian kale is also a good option, offering a slightly sweeter taste and adding visual interest to your garden. Avoid more exotic or less common varieties until you’ve gained some experience with the basics of kale cultivation.
How much sunlight does kale need to grow well?
Kale thrives in full sun, requiring at least 6 hours of direct sunlight per day. However, it can also tolerate partial shade, especially in hotter climates. If you live in a region with intense summer heat, providing some afternoon shade can help prevent the leaves from scorching. When planting kale, choose a location in your garden that receives ample sunlight throughout the day. If you’re growing kale in containers, make sure to place them in a sunny spot on your balcony or patio. Insufficient sunlight can result in leggy plants with weak growth and reduced yields.
What kind of soil is best for growing kale?
Kale prefers well-drained soil that is rich in organic matter. Before planting, amend your soil with compost, aged manure, or other organic materials to improve its fertility and drainage. Kale also prefers a slightly acidic to neutral soil pH, ideally between 6.0 and 7.0. You can test your soil pH using a soil testing kit available at most garden centers. If your soil is too acidic, you can add lime to raise the pH. If it’s too alkaline, you can add sulfur to lower the pH. Good drainage is crucial for preventing root rot, so avoid planting kale in areas where water tends to pool.
How often should I water my kale plants?
Water your kale plants regularly, especially during dry periods. Aim to keep the soil consistently moist but not waterlogged. The frequency of watering will depend on the weather conditions, soil type, and the size of your plants. As a general rule, water deeply once or twice a week, providing enough water to reach the roots. Check the soil moisture regularly by sticking your finger into the soil. If the top inch of soil feels dry, it’s time to water. Avoid overhead watering, as this can promote fungal diseases. Instead, water at the base of the plants, using a watering can or a soaker hose.
What are some common pests and diseases that affect kale, and how can I prevent them?
Some common pests that affect kale include aphids, cabbage worms, flea beetles, and slugs. To prevent pest infestations, inspect your plants regularly for signs of damage. Handpick any pests you find and dispose of them properly. You can also use organic pest control methods, such as insecticidal soap or neem oil. Row covers can also be used to protect your plants from pests. Common diseases that affect kale include downy mildew, black rot, and clubroot. To prevent diseases, ensure good air circulation around your plants and avoid overhead watering. Rotate your crops regularly to prevent soilborne diseases from building up. If you notice any signs of disease, remove the affected leaves immediately and dispose of them properly.
When is the best time to harvest kale?
You can start harvesting kale leaves as soon as they are large enough to eat, typically when they are about 6-8 inches long. Harvest the outer leaves first, leaving the inner leaves to continue growing. You can harvest kale leaves continuously throughout the growing season, as long as you don’t remove more than one-third of the plant at a time. The flavor of kale leaves tends to improve after a frost, as the cold temperatures convert starches into sugars. To harvest kale, simply cut the leaves off at the base of the stem using a sharp knife or scissors.
Can I grow kale in containers?
Yes, you can absolutely grow kale in containers! This is a great option if you have limited garden space or want to grow kale on a balcony or patio. Choose a container that is at least 12 inches deep and wide to provide enough room for the roots to grow. Use a well-draining potting mix and make sure the container has drainage holes to prevent waterlogging. Place the container in a sunny location that receives at least 6 hours of direct sunlight per day. Water regularly and fertilize every few weeks with a balanced fertilizer.
How can I store kale after harvesting?
To store kale after harvesting, wash the leaves thoroughly and dry them completely. You can use a salad spinner or pat them dry with paper towels. Store the kale leaves in a plastic bag or container in the refrigerator. Kale will typically last for about 5-7 days in the refrigerator. You can also freeze kale for longer storage. To freeze kale, blanch the leaves in boiling water for 2-3 minutes, then transfer them to an ice bath to stop the cooking process. Drain the kale well and squeeze out any excess water. Pack the kale into freezer bags or containers and store them in the freezer for up to 12 months.


Leave a Comment