
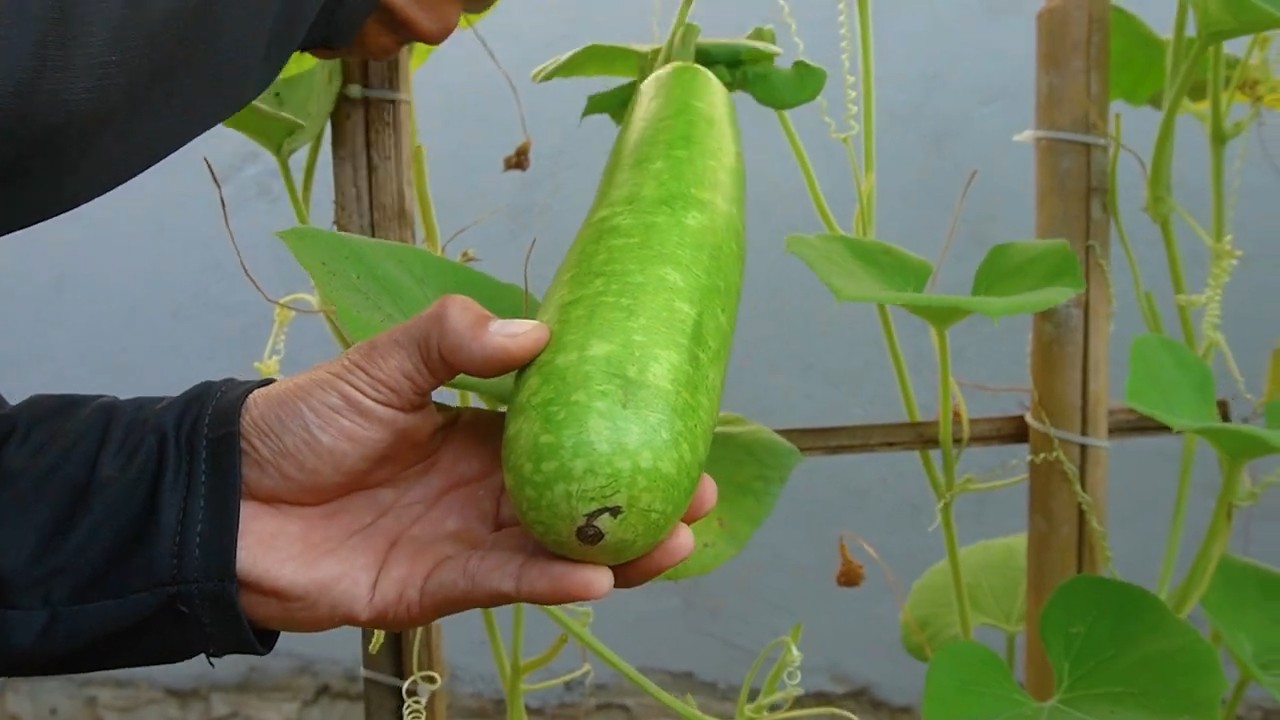
Growing Gourds at Home: Ever dreamt of transforming your backyard into a whimsical wonderland, bursting with unique shapes and vibrant colors? Imagine crafting your own birdhouses, bowls, or even musical instruments from something you’ve nurtured from a tiny seed! This isn’t just a fantasy; it’s the magic of growing gourds at home, and I’m here to show you how incredibly rewarding (and surprisingly easy!) it can be.
Gourds have a rich history, dating back thousands of years. They weren’t just ornamental; ancient civilizations relied on them for practical purposes like carrying water, storing food, and even as tools. From the Americas to Africa and Asia, gourds have played a vital role in human culture, showcasing their versatility and enduring appeal.
But why should you consider growing gourds at home today? In our increasingly mass-produced world, there’s something deeply satisfying about creating something beautiful and functional with your own hands. Plus, growing gourds at home is a fantastic way to connect with nature, learn about the growing process, and add a unique, personal touch to your home and garden. Whether you’re a seasoned gardener or a complete beginner, this guide will provide you with the essential tricks and DIY hacks to successfully cultivate these fascinating plants and unlock their creative potential. Let’s get started!
Kürbisse selbst anbauen: Dein umfassender DIY-Leitfaden
Hallo liebe Gartenfreunde! Ich freue mich riesig, euch heute in die faszinierende Welt des Kürbisanbaus einzuführen. Kürbisse sind nicht nur wunderschön anzusehen, sondern auch unglaublich vielseitig in der Küche. Und das Beste daran? Sie sind gar nicht so schwer selbst anzubauen! In diesem Artikel zeige ich euch Schritt für Schritt, wie ihr eure eigenen Kürbisse im Garten oder sogar auf dem Balkon ziehen könnt. Los geht’s!
Was du für den Kürbisanbau brauchst
Bevor wir loslegen, hier eine Liste der Dinge, die du für den erfolgreichen Kürbisanbau benötigst:
* Kürbissamen: Wähle die Sorte, die dir am besten gefällt! Es gibt unzählige Varianten, von kleinen Zierkürbissen bis hin zu riesigen Speisekürbissen.
* Anzuchttöpfe oder -platten: Für die Voranzucht im Haus.
* Anzuchterde: Spezielle Erde für die Anzucht, die nährstoffarm und locker ist.
* Gartenerde: Gute, nährstoffreiche Gartenerde für das Beet oder den Kübel.
* Kompost oder organischer Dünger: Um den Boden mit Nährstoffen anzureichern.
* Gießkanne oder Gartenschlauch: Zum regelmäßigen Gießen.
* Spitzhacke oder Spaten: Zum Umgraben des Bodens.
* Mulchmaterial (z.B. Stroh oder Holzhackschnitzel): Um den Boden feucht zu halten und Unkraut zu unterdrücken.
* Pflanzstäbe oder Rankhilfen (optional): Für rankende Kürbissorten.
* Schneckenkorn (optional): Zum Schutz vor Schneckenfraß.
* Geduld und Liebe: Das Wichtigste überhaupt!
Die Vorbereitung: Der Schlüssel zum Erfolg
Eine gute Vorbereitung ist das A und O für eine reiche Kürbisernte. Hier sind die Schritte, die du im Vorfeld erledigen solltest:
1. Die Wahl des richtigen Standorts
Kürbisse sind Sonnenanbeter! Sie brauchen mindestens 6-8 Stunden direkte Sonneneinstrahlung pro Tag. Wähle also einen sonnigen Platz in deinem Garten oder auf deinem Balkon. Außerdem brauchen Kürbisse viel Platz, da ihre Ranken sich gerne ausbreiten. Plane also genügend Raum ein.
2. Die Bodenbearbeitung
Kürbisse sind Starkzehrer, das heißt, sie benötigen viele Nährstoffe. Bereite den Boden daher gut vor, indem du ihn tiefgründig umgräbst und mit Kompost oder organischem Dünger anreicherst. Der Boden sollte locker, durchlässig und humusreich sein.
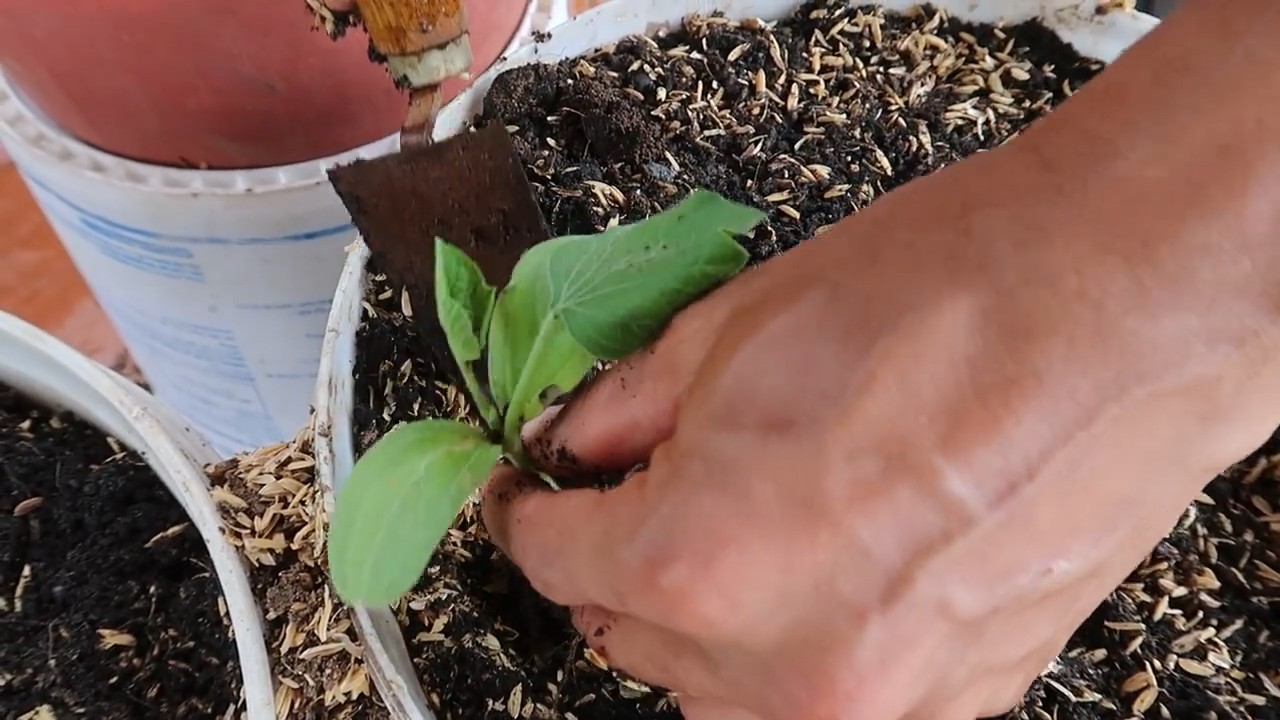
3. Die Voranzucht (optional, aber empfehlenswert)
Um den Kürbissen einen Vorsprung zu verschaffen, kannst du sie im Haus vorziehen. Das ist besonders in Regionen mit kurzen Sommern sinnvoll.
Schritt-für-Schritt-Anleitung zur Voranzucht:
1. Fülle Anzuchttöpfe oder -platten mit Anzuchterde.
2. Lege in jeden Topf 1-2 Kürbissamen.
3. Bedecke die Samen mit einer dünnen Schicht Erde (ca. 1-2 cm).
4. Gieße die Erde vorsichtig an.
5. Stelle die Töpfe an einen warmen, hellen Ort (z.B. auf eine Fensterbank).
6. Halte die Erde feucht, aber nicht nass.
7. Nach ca. 1-2 Wochen sollten die Samen keimen.
8. Sobald die Keimlinge 2-3 Blätter haben, kannst du sie in größere Töpfe umpflanzen.
Die Pflanzung: Ab ins Beet!
Sobald die Temperaturen steigen und keine Frostgefahr mehr besteht (in der Regel Mitte Mai), können die Kürbispflanzen ins Freie gepflanzt werden.
Schritt-für-Schritt-Anleitung zur Pflanzung:
1. Hebe im Beet oder Kübel Pflanzlöcher aus, die etwas größer sind als die Wurzelballen der Kürbispflanzen.
2. Setze die Pflanzen vorsichtig in die Löcher.
3. Fülle die Löcher mit Erde auf und drücke sie leicht an.
4. Gieße die Pflanzen gründlich an.
5. Bedecke den Boden um die Pflanzen herum mit Mulchmaterial (z.B. Stroh oder Holzhackschnitzel). Das hält den Boden feucht und unterdrückt Unkraut.
6. Achte darauf, dass die Pflanzen genügend Platz haben, um sich auszubreiten. Bei Bedarf kannst du sie mit Pflanzstäben oder Rankhilfen unterstützen.
Die Pflege: Gießen, Düngen, Schützen
Kürbisse sind relativ pflegeleicht, aber ein paar Dinge solltest du beachten, um eine reiche Ernte zu erzielen.
1. Gießen
Kürbisse brauchen viel Wasser, besonders während der Blütezeit und der Fruchtbildung. Gieße sie regelmäßig, am besten morgens oder abends, damit das Wasser nicht so schnell verdunstet. Vermeide es, die Blätter zu gießen, da dies Pilzkrankheiten fördern kann.
2. Düngen
Kürbisse sind Starkzehrer und benötigen regelmäßige Düngergaben. Dünge sie alle 2-3 Wochen mit einem organischen Dünger oder Kompost.
3. Schützen
Kürbisse sind anfällig für verschiedene Schädlinge und Krankheiten. Achte auf Anzeichen von Befall und bekämpfe diese gegebenenfalls mit geeigneten Mitteln. Besonders Schnecken können jungen Kürbispflanzen gefährlich werden. Schütze sie daher mit Schneckenkorn oder anderen Schneckenabwehrmitteln.
4. Ausgeizen (optional)
Bei einigen Kürbissorten, insbesondere bei rankenden Sorten, kann es sinnvoll sein, die Seitentriebe (Geiztriebe) zu entfernen. Dadurch konzentriert sich die Pflanze auf die Entwicklung der Hauptfrucht.
Die Ernte: Der Lohn der Mühe
Die Erntezeit für Kürbisse ist in der Regel im Herbst, von September bis Oktober. Der genaue Zeitpunkt hängt von der Sorte und den Witterungsbedingungen ab.
So erkennst du, ob ein Kürbis reif ist:
* Die Schale ist hart und lässt sich nicht mehr mit dem Fingernagel eindrücken.
* Der Stiel ist trocken und verholzt.
* Der Kürbis klingt hohl, wenn man darauf klopft.
Schritt-für-Schritt-Anleitung zur Ernte:
1. Schneide den Kürbis mit einem scharfen Messer oder einer Gartenschere vom Stiel ab. Lasse dabei einen ca. 5-10 cm langen Stielansatz stehen.
2. Reinige den Kürbis vorsichtig mit einem Tuch.
3. Lagere den Kürbis an einem kühlen, trockenen und gut belüfteten Ort.
Kürbisse lagern: So bleiben sie lange haltbar
Gut gelagerte Kürbisse können mehrere Monate haltbar sein. Achte darauf, dass sie keine Beschädigungen haben und lagere sie an einem kühlen, trockenen und gut belüfteten Ort. Ideal ist ein Keller oder eine Speisekammer.
Kürbisrezepte: Inspiration für die Küche
Kürbisse sind unglaublich vielseitig in der Küche. Ob Suppe, Auflauf, Kuchen oder Marmelade – es gibt unzählige Möglichkeiten, sie zuzubereiten. Lass deiner Kreativität freien Lauf und probiere neue Rezepte aus!
Hier sind ein paar Ideen:
* Kürbissuppe
* Kürbisrisotto
* Kürbiskuchen
* Kürbismarmelade
* Gegrillter Kürbis
* Kürbis-Curry
Ich hoffe, dieser Leitfaden hat dir geholfen, deine eigenen Kürbisse anzubauen. Viel Spaß beim Gärtnern und guten Appetit!
Conclusion
So, there you have it! Growing gourds at home isn’t just a gardening project; it’s an adventure, a chance to connect with nature, and a pathway to creating unique, handcrafted items. From the initial thrill of planting the seeds to the satisfaction of harvesting your own homegrown treasures, the entire process is incredibly rewarding. We’ve covered everything from selecting the right gourd varieties and preparing your garden to nurturing the plants and ensuring a bountiful harvest.
But why is this DIY trick a must-try? Because it empowers you to take control of your creative process from start to finish. Instead of relying on mass-produced items, you can cultivate your own materials and craft personalized decorations, functional tools, or even musical instruments. Imagine the pride you’ll feel displaying a birdhouse you made from a gourd you grew yourself, or gifting a hand-painted dipper to a friend. The possibilities are truly endless.
Don’t be afraid to experiment with different gourd varieties to achieve unique shapes and sizes. Consider trying bottle gourds for crafting dippers and bowls, or snake gourds for their unusual, elongated forms. You can also explore different growing techniques, such as training the vines on trellises or allowing them to sprawl along the ground, to influence the shape and size of your gourds.
And the fun doesn’t stop at harvest time! Once your gourds are dried and cured, you can unleash your creativity with paints, dyes, carvings, and other embellishments. Try painting intricate designs, carving geometric patterns, or even adding beads and feathers for a truly unique touch. You can also use your gourds to create functional items like lamps, planters, or even musical instruments.
We encourage you to embrace the challenge and embark on your own gourd-growing journey. It’s a fantastic way to learn about nature, develop your crafting skills, and create beautiful, one-of-a-kind items. Remember to document your progress, take lots of pictures, and most importantly, have fun!
We’re confident that you’ll find growing gourds at home to be a deeply satisfying and rewarding experience. So, grab your seeds, prepare your garden, and get ready to grow some gourds!
We’d love to hear about your experiences! Share your tips, tricks, and creations with us in the comments below. Let’s build a community of gourd-growing enthusiasts and inspire each other with our creativity. Happy growing!
Frequently Asked Questions (FAQ)
What is the best time of year to plant gourd seeds?
Gourds are warm-weather plants, so it’s crucial to wait until the danger of frost has passed before planting. In most regions, this means planting in late spring or early summer, typically after the soil temperature has reached at least 65 degrees Fahrenheit. Check your local planting calendar for specific dates based on your climate. Starting seeds indoors 4-6 weeks before the last expected frost can give you a head start.
How much space do gourds need to grow?
Gourds are vigorous vines that require plenty of space to spread. Allow at least 6-8 feet between plants, and consider providing a trellis or other support structure for the vines to climb. If you’re growing gourds on the ground, make sure they have ample room to sprawl without overcrowding other plants. Proper spacing is essential for good air circulation, which helps prevent fungal diseases.
What kind of soil is best for growing gourds?
Gourds thrive in well-drained, fertile soil that is rich in organic matter. Before planting, amend your soil with compost, aged manure, or other organic materials to improve its structure and nutrient content. A slightly acidic to neutral soil pH (around 6.0 to 7.0) is ideal. Conduct a soil test to determine your soil’s pH and nutrient levels, and amend accordingly.
How often should I water my gourd plants?
Gourds need consistent moisture, especially during hot, dry weather. Water deeply and regularly, aiming to keep the soil consistently moist but not waterlogged. Avoid overhead watering, as this can promote fungal diseases. Mulching around the plants can help retain moisture and suppress weeds. Check the soil moisture regularly and adjust your watering schedule as needed.
How do I know when my gourds are ripe and ready to harvest?
Gourds are typically ready to harvest in the fall, after the vines have died back and the gourds have turned hard and dry. The skin of the gourd should be firm and resistant to scratching. You can also shake the gourd to listen for the seeds rattling inside. If the gourd feels heavy and the seeds are loose, it’s likely ready to harvest. Use pruning shears or a sharp knife to cut the gourd from the vine, leaving a few inches of stem attached.
What is the best way to dry and cure gourds?
Proper drying and curing are essential for preserving gourds and preventing them from rotting. After harvesting, wash the gourds with soapy water and allow them to air dry completely. Place the gourds in a well-ventilated area, such as a shed or garage, away from direct sunlight and moisture. Elevate the gourds on racks or pallets to allow air to circulate around them. Turn the gourds regularly to ensure even drying. The drying process can take several weeks or even months, depending on the size and thickness of the gourd. You’ll know the gourds are fully dried when they are lightweight and the seeds rattle freely inside.
How can I prevent pests and diseases from affecting my gourd plants?
To minimize pest and disease problems, choose disease-resistant gourd varieties, practice good garden hygiene, and provide proper care for your plants. Regularly inspect your plants for signs of pests or diseases, such as aphids, squash bugs, or powdery mildew. Remove any infected leaves or plants promptly. Use organic pest control methods, such as insecticidal soap or neem oil, to control pests. Ensure good air circulation around your plants to prevent fungal diseases. Avoid overhead watering and water early in the day to allow the foliage to dry before nightfall. Crop rotation can also help prevent soilborne diseases.
Can I eat gourds?
While some gourds are edible when young, many ornamental gourds are not safe to eat and can be toxic. It’s important to know the specific variety of gourd you are growing and whether it is safe for consumption. If you are unsure, it’s best to err on the side of caution and avoid eating the gourd. Edible gourds, such as zucchini and squash, are typically harvested when they are young and tender.
How can I decorate my dried gourds?
Once your gourds are dried and cured, you can decorate them using a variety of techniques, such as painting, carving, wood burning, and decoupage. Use acrylic paints, dyes, or stains to add color and designs to your gourds. Carve intricate patterns or designs using carving tools or a rotary tool. Wood burning can create beautiful and permanent designs on the gourd’s surface. Decoupage involves gluing paper cutouts or fabric onto the gourd and sealing it with varnish. Let your creativity flow and experiment with different techniques to create unique and personalized gourd art.
Where can I find gourd seeds and supplies?
Gourd seeds and supplies can be found at most garden centers, nurseries, and online retailers. Look for reputable seed companies that offer a wide variety of gourd seeds, including different shapes, sizes, and colors. You can also find gourd-growing supplies, such as trellises, fertilizers, and pest control products, at these locations. Consider joining a local gourd society or gardening club to connect with other gourd enthusiasts and learn more about growing and crafting with gourds.
Leave a Comment