
Growing Ginger at Home might seem like a challenge reserved for seasoned gardeners, but I’m here to tell you it’s surprisingly achievable, even if you’re a complete beginner! Forget those expensive trips to the grocery store every time you need a little zing in your stir-fry or a soothing cup of ginger tea. Imagine harvesting your own fresh, flavorful ginger right from your backyard or even your windowsill.
Ginger, with its fiery kick and numerous health benefits, has been cultivated for thousands of years. Originating in South Asia, it quickly spread across the globe, becoming a staple in traditional medicine and cuisines worldwide. From ancient Ayurvedic practices to modern-day culinary creations, ginger’s versatility is undeniable. But why rely on store-bought ginger when you can easily cultivate your own supply?
Let’s face it, store-bought ginger can sometimes be a gamble. You never quite know how fresh it is or how long it’s been sitting on the shelf. Growing Ginger at Home ensures you have access to the freshest, most potent ginger whenever you need it. Plus, it’s incredibly rewarding to nurture a plant from rhizome to harvest. In this article, I’ll share my favorite DIY tricks and hacks to help you successfully grow ginger at home, regardless of your gardening experience. Get ready to unleash your inner gardener and enjoy the delicious rewards!
Growing Ginger at Home: Your Own Little Ginger Garden
I love ginger! Whether in tea, curry, or just nibbled on its own – the spicy root is a real all-rounder. And the best part: You can easily grow ginger yourself at home! I’ll show you how. Don’t worry, it’s easier than you think and a lot of fun.
What You Need:
- A piece of ginger root (rhizome) from the supermarket or organic store. Make sure it is plump, firm, and ideally already has small green “eyes.”
- A pot or container with good drainage (holes in the bottom are important!). It should be at least 15 cm (6 inches) deep, and even a bit larger is better.
- High-quality potting soil or a mix of potting soil, compost, and a little sand. Ginger likes it loose and nutrient-rich.
- A spray bottle with water.
- A warm, bright location, but without direct midday sun.
- Patience! Ginger doesn’t grow overnight.
Step-by-Step Guide:
1. Prepare the Ginger Root:
- Take your ginger root and look at it closely. Do you see the small green buds, the “eyes”? These are the spots where the new shoots will grow.
- If your ginger root is very large, you can cut it into several pieces. It’s important that each piece has at least one or two “eyes.” It’s best to let the cut surfaces dry for a few days before planting. This prevents rot.
- Personally, I often just leave the root as it is if it’s not too huge.
2. Prepare the Pot:
- Fill the pot with your potting soil mix. Leave about 2-3 cm (1 inch) of space at the top.
- Lightly moisten the soil with the spray bottle. It should be damp, but not wet.
3. Plant the Ginger Root:
- Lay the ginger root horizontally on the soil, with the “eyes” facing up.
- Cover the root with about 2-3 cm (1 inch) of soil. Lightly press the soil down.
- Water the soil carefully so that it is well-moistened. Make sure the water can drain well.
4. The Right Location:
- Place the pot in a warm and bright location. An east- or west-facing windowsill is ideal. Avoid direct midday sun, as it can burn the leaves.
- Ginger likes it warm, but not too hot. A temperature between 20 and 25 degrees Celsius (68-77°F) is ideal.
5. Care:
- Keep the soil slightly moist at all times, but avoid waterlogging. I water my ginger about every 2-3 days, depending on the weather.
- Regularly spray the leaves with water to increase humidity. Ginger really likes that.
- Fertilize the ginger every few weeks with an organic liquid fertilizer. This ensures strong growth.
- Watch out for pests. Aphids can sometimes appear. If you spot any, you can treat them with a mild insecticide or a soap solution.
Patience is Required:
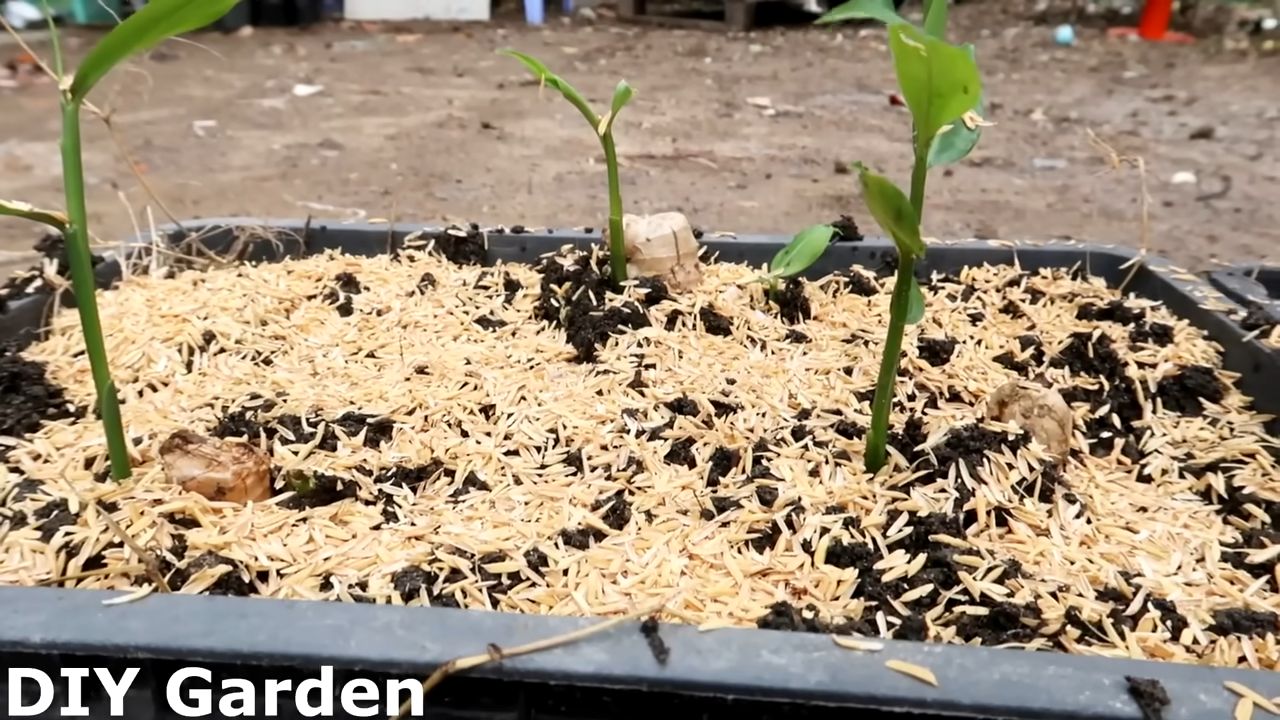
It can take a few weeks for the first shoots to sprout from the soil. Be patient! Ginger is not a fast starter. But once it gets going, it grows quite quickly.
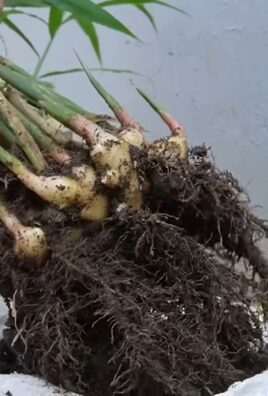
Harvest Time:
- After about 8-10 months, you can harvest your own ginger!
- You can either take the whole plant out of the pot and harvest the roots, or you can simply cut off a piece of the root and let the rest continue to grow in the pot.
- If you harvest the whole plant, you can save a piece of the root for the next growing season.
A Few More Tips:
- The Right Soil: Ginger likes loose, well-draining soil. I always mix my potting soil with some compost and sand. This ensures good drainage and provides the ginger with nutrients.
- The Right Pot: Make sure the pot is big enough. Ginger needs space to spread. A pot with a diameter of at least 20 cm (8 inches) is ideal.
- The Right Watering: Water the ginger regularly, but avoid waterlogging. The soil should always be slightly moist.
- The Right Location: Ginger likes it warm and bright, but not too sunny. An east- or west-facing windowsill is ideal.
- The Right Fertilizing: Fertilize the ginger every few weeks with an organic liquid fertilizer. This ensures strong growth.
- Overwintering: In colder regions, you should bring the ginger indoors for the winter. It cannot tolerate frost.
Common Problems and Solutions:
- Yellow leaves: Yellow leaves can be a sign of too much or too little water. Check the soil moisture and adjust your watering accordingly.
- Brown leaf tips: Brown leaf tips can be a sign of air that is too dry. Regularly spray the leaves with water to increase humidity.
- No growth: If the ginger isn’t growing, it could be due to too little light, not enough warmth, or a lack of nutrients. Move the pot to a brighter and warmer location and fertilize the ginger regularly.
- Rot: Rot can occur if the soil is too wet. Make sure the water can drain well and avoid waterlogging.
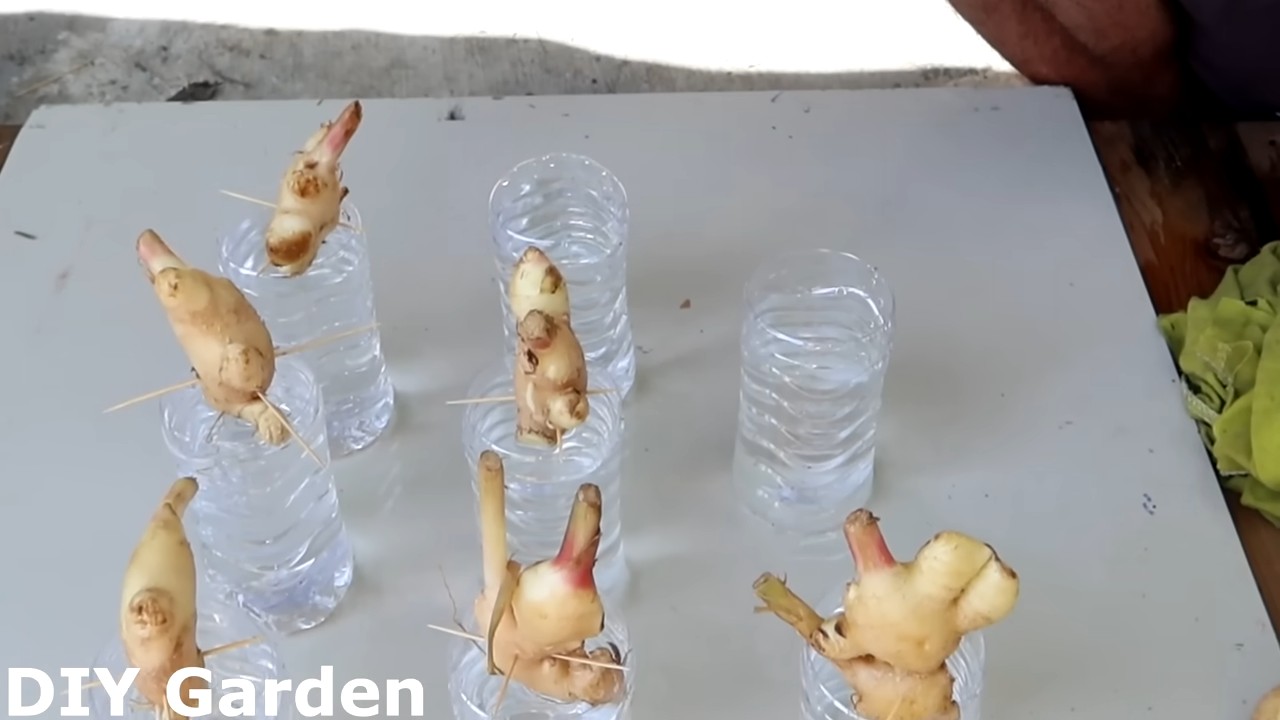
Growing Ginger in Water (Alternative Method):
You can also start ginger in water first before planting it in soil. This often speeds up the germination process.
- Preparation: Choose a piece of ginger with visible “eyes.”
- Soaking: Place the ginger in a glass or bowl of water so that about half of the root is covered.
- Location: Place the glass in a bright, warm spot, but without direct sunlight.
- Water Change: Change the water every few days.
- Root Formation: After a few days or weeks, small roots should form.
- Planting: Once the roots are about 1-2 cm (0.5-1 inch) long, you can plant the ginger in soil as described above.
Why Grow Your Own Ginger?
There are many reasons why I love to grow my own ginger:
- Fresh Ginger: You always have fresh ginger on hand when you need it.
- Organic Quality: You know exactly what’s in your ginger because you grow it yourself.
- Sustainability: You save on transport miles and packaging waste.
- Relaxation: Gardening is a great way to relax and relieve stress.
- It’s fun!: It’s just great to see something you planted yourself grow.
I hope this guide helps you start your own little ginger garden! Good luck and have fun gardening
Conclusion
So, there you have it! Growing ginger at home is not only achievable, but it’s also a deeply rewarding experience that connects you directly to the food you consume. Forget those bland, store-bought rhizomes that have been sitting on shelves for weeks. Imagine the vibrant, spicy flavor of freshly harvested ginger, ready to elevate your culinary creations and soothe your senses. This DIY project transforms a simple root into a source of pride and a constant supply of fresh, organic ginger.
Why is this a must-try? Because it empowers you to control the quality and freshness of your ginger. You know exactly where it came from, how it was grown, and what (or rather, what wasn’t) used in its cultivation. This is especially important if you’re conscious about avoiding pesticides and herbicides. Plus, let’s be honest, there’s a certain magic in nurturing something from a small piece of root to a thriving plant. It’s a tangible connection to nature, right in your own home.
But the benefits don’t stop there. Growing your own ginger allows for experimentation. Try different varieties! Explore the nuances of flavor between young ginger, with its delicate sweetness, and mature ginger, with its fiery kick. Consider growing ginger in containers of varying sizes to see how it affects the yield. You can even experiment with different soil mixes to optimize growth.
Variations to Consider:
* Ornamental Ginger: While this article focuses on culinary ginger, remember that there are also beautiful ornamental ginger varieties. These add a tropical flair to your garden or indoor space with their stunning foliage and exotic flowers. While not typically used for cooking, they offer a visual delight.
* Ginger Tea Garden: Combine your ginger plants with other herbs like mint, lemon balm, and chamomile to create a dedicated tea garden. This ensures a constant supply of fresh ingredients for soothing and flavorful herbal teas.
* Hydroponic Ginger: For the more adventurous gardener, consider growing ginger hydroponically. This soilless method can lead to faster growth and higher yields, but it requires a bit more technical knowledge and setup.
We wholeheartedly encourage you to embark on this ginger-growing adventure. It’s a simple, satisfying, and sustainable way to enhance your culinary life and connect with nature. Don’t be intimidated by the process; it’s far more forgiving than you might think. Start small, be patient, and enjoy the journey.
Most importantly, we want to hear about your experiences! Share your successes, your challenges, and your tips with us and the rest of the community. Did you try a particular variety of ginger? Did you encounter any unexpected hurdles? What did you learn along the way? Your insights can help others succeed in their own ginger-growing endeavors. Post your photos, share your stories, and let’s cultivate a thriving community of home-grown ginger enthusiasts. We are confident that you will enjoy the process of growing ginger at home.
Frequently Asked Questions (FAQ)
1. What kind of ginger should I use to start growing?
The best ginger to use for planting is fresh, plump ginger rhizomes from a grocery store or nursery. Look for rhizomes that are firm, with visible “eyes” or buds. Organic ginger is often recommended, as it’s less likely to have been treated with growth inhibitors. Avoid ginger that is shriveled, soft, or moldy. If you can find ginger specifically labeled as “seed ginger,” that’s even better, as it’s been specifically cultivated for propagation.
2. How long does it take to grow ginger from rhizome to harvest?
Generally, it takes about 8-10 months from planting to harvest mature ginger. However, you can start harvesting young ginger (also known as “spring ginger”) after about 4-6 months. Young ginger has a milder flavor and more tender texture. The exact time will depend on your climate, growing conditions, and the variety of ginger you’re growing.
3. What are the ideal growing conditions for ginger?
Ginger thrives in warm, humid conditions with partial shade. It prefers well-draining soil that is rich in organic matter. The ideal temperature range is between 65°F and 90°F (18°C and 32°C). Protect your ginger plants from direct sunlight, especially during the hottest part of the day. Consistent moisture is crucial, but avoid overwatering, which can lead to root rot.
4. Can I grow ginger indoors?
Yes, you can absolutely grow ginger indoors! Choose a pot that is at least 12 inches deep and wide to accommodate the growing rhizomes. Use a well-draining potting mix and place the pot in a location that receives bright, indirect light. You may need to supplement with artificial light if you don’t have enough natural light. Maintain consistent moisture and humidity levels. A humidifier or pebble tray can help increase humidity.
5. What are some common problems when growing ginger, and how can I prevent them?
Some common problems include root rot, fungal diseases, and pests like aphids and spider mites. To prevent root rot, ensure your soil is well-draining and avoid overwatering. Improve air circulation around the plants. For fungal diseases, use a fungicide if necessary and remove any affected leaves. Regularly inspect your plants for pests and treat them with insecticidal soap or neem oil.
6. How do I harvest ginger?
To harvest mature ginger, carefully dig up the entire plant. You can then break off pieces of the rhizome as needed. For young ginger, you can simply dig around the plant and harvest a few pieces of the rhizome without disturbing the rest of the plant. After harvesting, wash the ginger thoroughly and store it in the refrigerator or freezer.
7. How do I store ginger after harvesting?
Freshly harvested ginger can be stored in the refrigerator for several weeks. Wrap it in a paper towel and place it in a plastic bag to prevent it from drying out. For longer storage, you can freeze ginger. Peel and chop the ginger into smaller pieces, then freeze them in a single layer on a baking sheet. Once frozen, transfer the pieces to a freezer bag or container. You can also grate the ginger before freezing it.
8. What kind of fertilizer should I use for ginger?
Ginger benefits from regular fertilization. Use a balanced organic fertilizer with a ratio of 10-10-10 or 14-14-14. You can also use compost tea or other organic soil amendments to provide nutrients. Fertilize every 2-3 weeks during the growing season.
9. Can I grow ginger in colder climates?
Yes, you can grow ginger in colder climates, but you’ll need to start it indoors and provide extra protection during the winter months. Start the rhizomes indoors in pots about 6-8 weeks before the last expected frost. Once the weather warms up, you can move the plants outdoors. In colder climates, you may need to bring the plants back indoors before the first frost.
10. Is growing ginger at home worth the effort?
Absolutely! Growing your own ginger offers numerous benefits, including access to fresh, organic ginger, the satisfaction of nurturing a plant from seed to harvest, and the opportunity to experiment with different varieties and growing techniques. The flavor of homegrown ginger is far superior to store-bought ginger, and you’ll have a constant supply of this versatile spice at your fingertips. The process of growing ginger at home is a rewarding experience.
Leave a Comment