
Growing Garlic from Cloves: Unlock the secrets to a bountiful harvest right in your backyard! Have you ever dreamed of plucking fresh, pungent garlic straight from your garden, ready to elevate your culinary creations? I know I have! This isn’t just about saving money at the grocery store; it’s about connecting with nature, understanding the growing process, and experiencing the unparalleled flavor of homegrown garlic.
Garlic, a staple in cuisines worldwide, boasts a rich history dating back thousands of years. From ancient Egypt, where it fueled the pyramid builders, to its prominent role in traditional medicine across cultures, garlic has always been valued for its potent properties and distinct taste. Now, you can easily participate in this legacy by growing garlic from cloves yourself!
In today’s fast-paced world, many of us crave a return to simpler pleasures. Gardening offers a therapeutic escape, and what could be more rewarding than nurturing your own food source? This DIY guide provides easy-to-follow steps and insider tips to ensure your garlic thrives, even if you’re a complete beginner. Imagine the satisfaction of sharing your homegrown garlic with friends and family, knowing you cultivated it with your own two hands. Let’s get started and transform your garden into a garlic haven!
Growing Garlic From Cloves: A Beginner’s Guide
Hey there, fellow garden enthusiasts! Ever dreamt of having a constant supply of fresh, flavorful garlic right at your fingertips? Well, you’re in the right place! Growing garlic is surprisingly easy, even for beginners. Forget those bland, store-bought bulbs – homegrown garlic is bursting with flavor and so rewarding to harvest. I’m going to walk you through the entire process, step-by-step, so you can enjoy your own delicious garlic crop.
Choosing Your Garlic
Before we get our hands dirty, let’s talk about garlic varieties. There are two main types: hardneck and softneck.
* Hardneck Garlic: This type is known for its bolder flavor and hard stem (hence the name). It produces scapes (curly flower stalks) in the spring, which are also edible and delicious! Hardneck varieties generally do better in colder climates. Some popular hardneck varieties include ‘German Extra Hardy,’ ‘Music,’ and ‘Chesnok Red.’
* Softneck Garlic: Softneck garlic is more common in grocery stores. It has a milder flavor and a soft stem that can be braided. It’s better suited for warmer climates. Common softneck varieties include ‘California Early’ and ‘Silverskin.’
Choosing the Right Variety:
* Climate: Consider your local climate. Hardneck varieties are generally more cold-hardy, while softneck varieties prefer milder winters.
* Flavor: Do you prefer a strong, pungent garlic or a milder flavor? Hardneck varieties tend to have a bolder flavor.
* Storage: Softneck garlic generally stores longer than hardneck garlic.
Where to Get Your Garlic:
* Local Farms or Farmers Markets: This is my favorite option! You can often find unique varieties that are well-suited to your local climate. Plus, you’re supporting local farmers!
* Online Seed Companies: Many reputable online seed companies offer a wide selection of garlic varieties.
* Avoid Grocery Store Garlic: While you *can* technically plant garlic from the grocery store, it’s often treated with chemicals to prevent sprouting, which can hinder its growth. Plus, you don’t know the variety or where it came from, so you might not get the best results.
Preparing for Planting
Okay, you’ve got your garlic – awesome! Now, let’s get ready to plant.
* Timing is Key: The best time to plant garlic is in the fall, about 4-6 weeks before the ground freezes. This allows the cloves to establish roots before winter sets in. In colder climates, this is usually around October or November. In warmer climates, you can plant a bit later, around November or December.
* Choosing the Right Location: Garlic needs plenty of sunlight – at least 6 hours per day. Choose a spot in your garden that gets full sun.
* Soil Preparation: Garlic prefers well-drained soil that is rich in organic matter. Amend your soil with compost or well-rotted manure before planting. This will provide essential nutrients and improve drainage.
* Soil pH: Garlic thrives in soil with a pH between 6.0 and 7.0. You can test your soil pH with a soil testing kit. If your soil is too acidic, you can add lime to raise the pH.
Planting Your Garlic
Alright, let’s get those cloves in the ground!
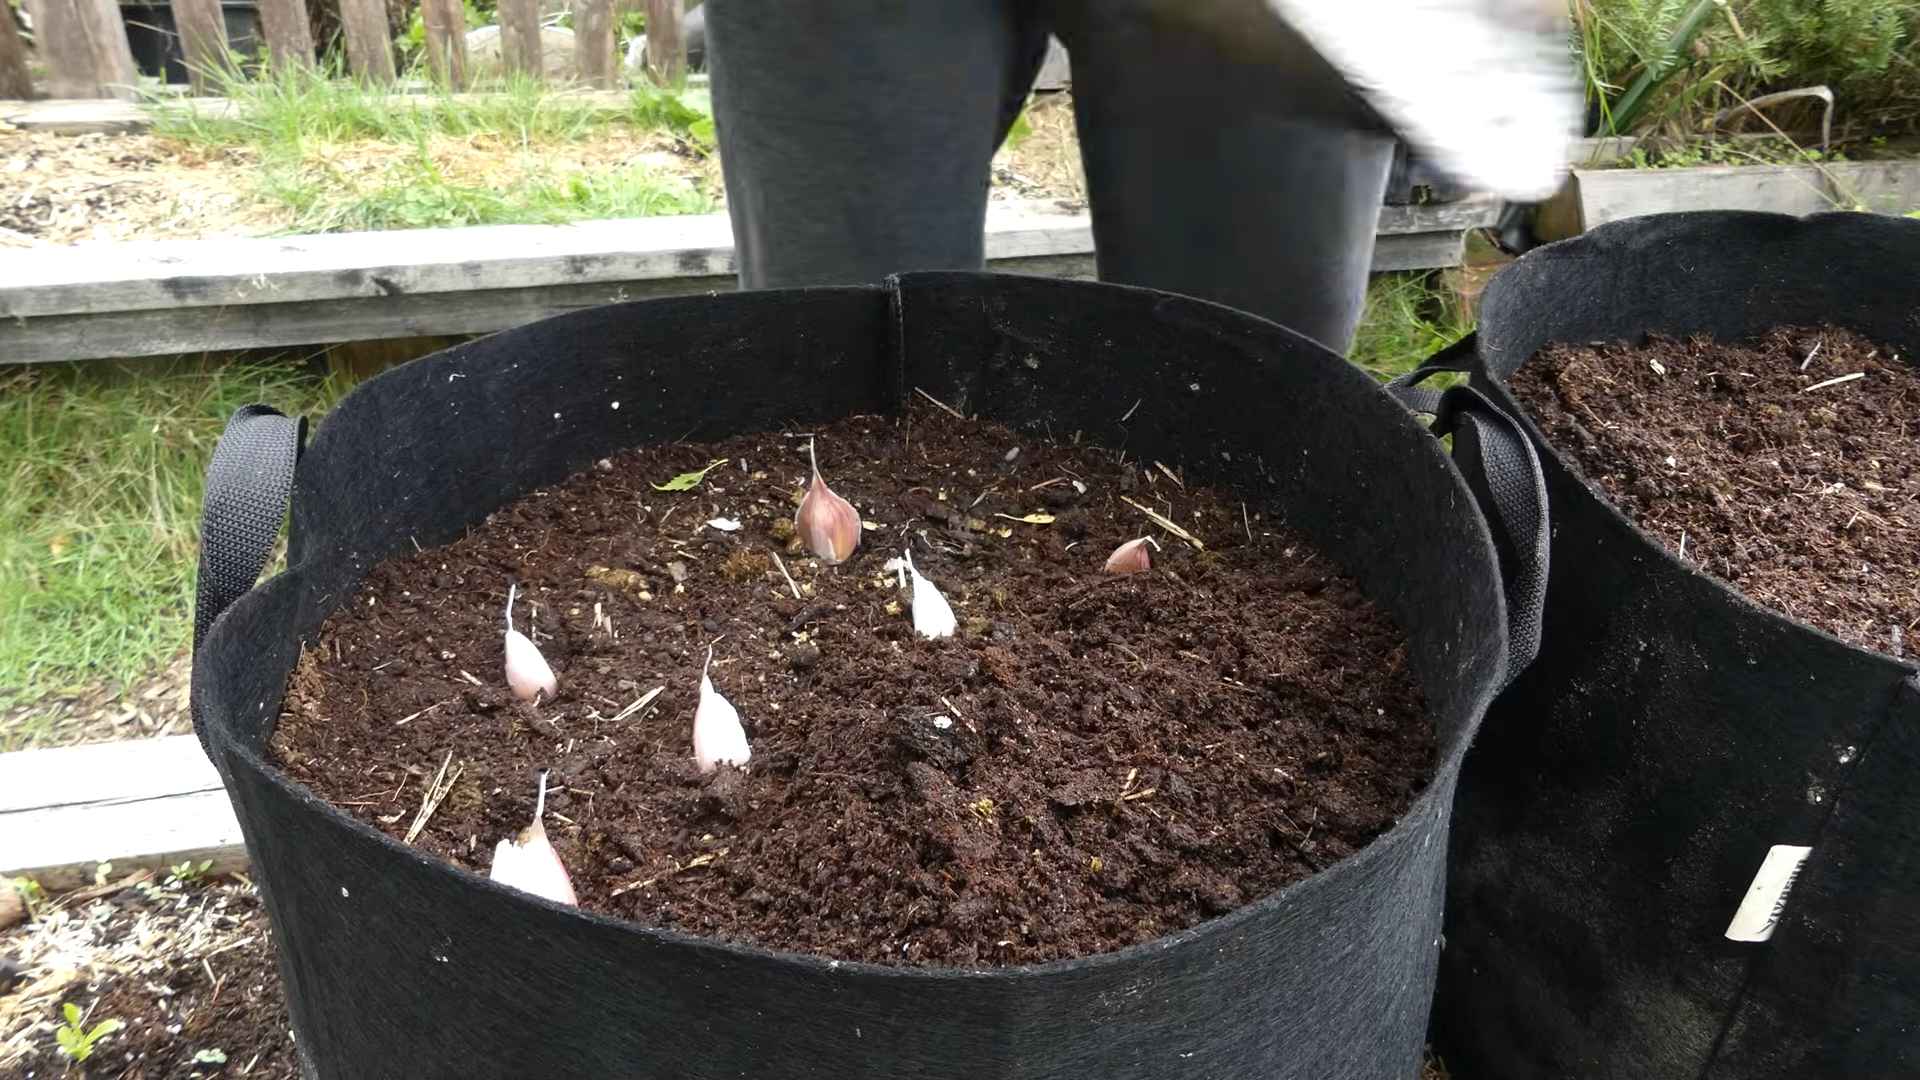
1. Separate the Cloves: Gently separate the cloves from the bulb. Leave the papery skin on each clove intact. Only plant the largest, healthiest cloves – these will produce the biggest bulbs. Don’t separate the cloves too far in advance, as they can dry out. I usually do this right before planting.
2. Prepare the Planting Bed: Create rows in your prepared garden bed, spacing them about 6-8 inches apart.
3. Plant the Cloves: Plant the cloves pointy-end up, about 2-3 inches deep. Space the cloves about 4-6 inches apart within the rows.
4. Cover with Soil: Gently cover the cloves with soil and lightly pat down.
5. Water Thoroughly: Water the planting bed thoroughly after planting. This will help settle the soil and encourage root growth.
6. Mulch (Optional but Recommended): Apply a layer of mulch, such as straw or shredded leaves, over the planting bed. Mulch helps to retain moisture, suppress weeds, and protect the garlic from extreme temperatures. I highly recommend mulching!
Caring for Your Garlic
Now that your garlic is planted, it’s time to provide some TLC.
* Watering: Garlic needs consistent moisture, especially during the spring when it’s actively growing. Water deeply whenever the soil feels dry to the touch. Avoid overwatering, as this can lead to rot.
* Weeding: Keep the planting bed free of weeds. Weeds compete with garlic for nutrients and water. Hand-pull weeds regularly.
* Fertilizing: Garlic is a heavy feeder. In the spring, when the plants start to grow, fertilize with a balanced fertilizer or a nitrogen-rich fertilizer. You can also side-dress with compost. I like to use fish emulsion for a natural boost.
* Removing Scapes (Hardneck Garlic Only): If you’re growing hardneck garlic, you’ll notice curly flower stalks (scapes) emerging in the spring. Remove these scapes as soon as they appear. This will encourage the plant to put its energy into bulb development, resulting in larger bulbs. Don’t throw the scapes away – they’re delicious! You can use them in pesto, stir-fries, or grilled.
* Pest and Disease Control: Garlic is generally pest-resistant, but it can be susceptible to certain pests and diseases, such as onion maggots and white rot. Monitor your plants regularly and take action if you notice any problems. You can use organic pest control methods, such as insecticidal soap or neem oil.
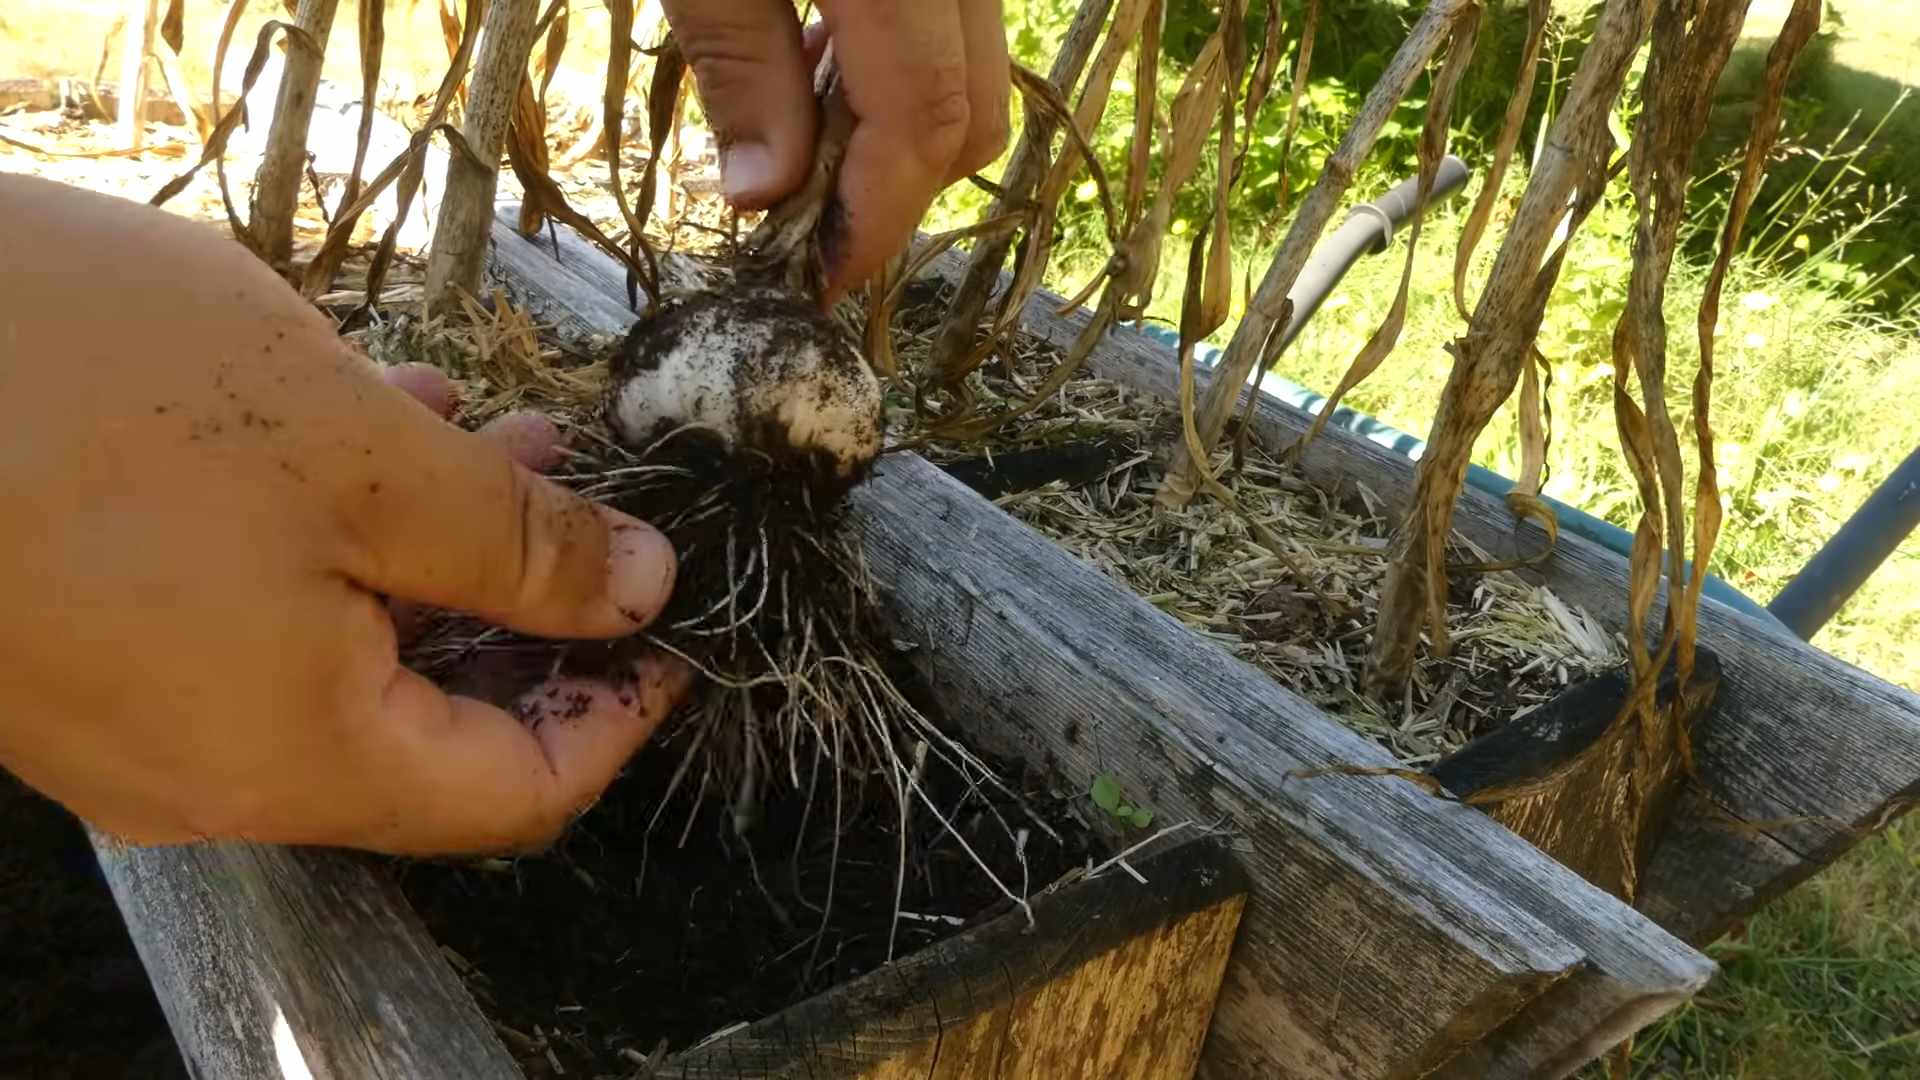
Harvesting Your Garlic
The moment you’ve been waiting for! Harvesting your homegrown garlic.
* When to Harvest: The timing of your garlic harvest depends on the variety and your climate. Generally, garlic is ready to harvest in mid-summer, when the lower leaves start to turn yellow and brown.
* How to Harvest: Carefully loosen the soil around the bulbs with a garden fork or trowel. Gently lift the bulbs from the ground. Avoid pulling on the stems, as this can damage the bulbs.
* Handle with Care: Be careful not to bruise the bulbs during harvest. Bruised bulbs are more susceptible to rot.
Curing and Storing Your Garlic
Proper curing and storage are essential for preserving your garlic harvest.
1. Clean the Garlic: Gently brush off any excess soil from the bulbs. Avoid washing the garlic, as this can promote rot.
2. Curing: Cure the garlic in a well-ventilated, dry, and shady location for 2-4 weeks. You can cure the garlic by hanging it in bunches or spreading it out on screens or racks. Make sure the bulbs are not touching each other.
3. Trimming: Once the garlic is cured, trim the roots and cut the stems about 1-2 inches above the bulb.
4. Storing: Store the cured garlic in a cool, dry, and dark place. A temperature between 60-70°F (15-21°C) is ideal. You can store the garlic in mesh bags, paper bags, or loosely in a basket. Avoid storing garlic in the refrigerator, as this can cause it to sprout.
5. Check Regularly: Check your stored garlic regularly for any signs of spoilage. Discard any bulbs that are soft, moldy, or sprouting.
Troubleshooting
Even with the best care, you might encounter some challenges. Here are a few common problems and how to address them:
* Small Bulbs: This could be due to several factors, including poor soil, insufficient sunlight, or not removing scapes (hardneck garlic). Make sure your soil is rich in organic matter, your garlic is getting plenty of sunlight, and you’re removing scapes promptly.
* Rotting Bulbs: This is usually caused by overwatering or poor drainage. Make sure your soil is well-drained and avoid overwatering.
* Pests and Diseases: Monitor your plants regularly and take action if you notice any problems. Use organic pest control methods whenever possible.
Enjoying Your Homegrown Garlic
Congratulations! You’ve successfully grown your own garlic. Now it’s time to enjoy the fruits (or rather, bulbs) of your labor. Use your homegrown garlic in all your favorite recipes. It’s so much more flavorful than store-bought garlic! You can also save some of your best bulbs to plant next year.
Growing garlic is a rewarding experience that anyone can enjoy. With a little bit of planning and care, you can have a bountiful harvest of delicious, homegrown garlic. Happy gardening!
Conclusion
So, there you have it! Growing garlic from cloves isn’t just a gardening project; it’s an investment in flavor, sustainability, and a deeper connection to the food you eat. Forget those bland, imported bulbs from the supermarket. Imagine the satisfaction of harvesting your own plump, pungent garlic, knowing exactly where it came from and how it was grown. It’s a culinary game-changer.
This DIY trick is a must-try for several compelling reasons. Firstly, the taste difference is undeniable. Homegrown garlic boasts a richer, more complex flavor profile than commercially available varieties. Secondly, you have complete control over the growing process, ensuring your garlic is free from harmful pesticides and herbicides. Thirdly, it’s incredibly rewarding! Watching those tiny cloves sprout and mature into full-sized bulbs is a testament to the power of nature and your own green thumb.
But the beauty of growing garlic from cloves lies in its adaptability. Feel free to experiment with different varieties to discover your personal favorite. Hardneck garlic, with its robust flavor and edible scapes, is perfect for roasting or grilling. Softneck garlic, known for its long storage life and pliable stalks, is ideal for braiding. You can even try growing garlic in containers if you have limited garden space. Just ensure they have adequate drainage and are placed in a sunny location.
Consider enriching your soil with compost or well-rotted manure before planting to give your garlic a nutrient boost. During the growing season, keep the soil consistently moist but not waterlogged. Mulching around the plants will help retain moisture, suppress weeds, and regulate soil temperature. And don’t forget to harvest the scapes from hardneck varieties – they’re a delicious treat that adds a garlicky punch to stir-fries, pesto, and other dishes.
We’ve armed you with the knowledge; now it’s time to get your hands dirty! Don’t be intimidated if you’re a beginner gardener. Growing garlic from cloves is surprisingly easy, and the rewards are well worth the effort. We encourage you to embrace this simple yet transformative DIY project and experience the joy of harvesting your own homegrown garlic.
Once you’ve harvested your bounty, we’d love to hear about your experience! Share your tips, tricks, and photos with us in the comments below. Let’s build a community of garlic growers and inspire others to discover the magic of this amazing plant. What variety did you grow? What challenges did you face? What culinary creations did you whip up with your homegrown garlic? Your insights could be invaluable to fellow gardeners. So, go ahead, plant those cloves, and let the garlic-growing adventure begin! We are confident that you will find that **growing garlic from cloves** is a rewarding and flavorful experience.
Frequently Asked Questions (FAQ)
Q: When is the best time to plant garlic cloves?
A: The ideal time to plant garlic cloves is in the fall, typically 4-6 weeks before the ground freezes. This allows the cloves to establish roots before winter sets in. In colder climates, this is usually around October or November. In milder climates, you can plant as late as December. Spring planting is possible, but the bulbs may not be as large.
Q: What type of garlic should I plant?
A: There are two main types of garlic: hardneck and softneck. Hardneck garlic is more cold-hardy and produces a flower stalk called a scape. It generally has a more complex flavor. Softneck garlic is better suited for warmer climates and has a longer storage life. It’s also the type commonly used for braiding. Choose a variety that is well-suited to your climate and personal taste preferences. Local nurseries or agricultural extension offices can provide recommendations for varieties that thrive in your area.
Q: How do I prepare the soil for planting garlic?
A: Garlic prefers well-drained soil that is rich in organic matter. Before planting, amend the soil with compost or well-rotted manure. This will improve drainage, fertility, and water retention. Ensure the soil is loose and free of rocks and debris. A slightly acidic to neutral soil pH (around 6.0-7.0) is ideal.
Q: How deep and how far apart should I plant the garlic cloves?
A: Plant garlic cloves about 2 inches deep and 6-8 inches apart. Space rows about 12 inches apart. Plant the cloves with the pointed end facing up and the flat end facing down. This ensures that the roots will grow downwards and the shoot will grow upwards.
Q: How much water does garlic need?
A: Garlic needs consistent moisture, especially during the spring when the bulbs are actively growing. Water deeply whenever the top inch of soil feels dry. Avoid overwatering, as this can lead to rot. Mulching around the plants will help retain moisture and reduce the need for frequent watering.
Q: What are garlic scapes, and what do I do with them?
A: Garlic scapes are the flower stalks that grow from hardneck garlic varieties. They should be removed in the spring to encourage the plant to focus its energy on bulb development. Scapes are edible and have a mild garlic flavor. They can be used in stir-fries, pesto, soups, and other dishes. Simply snip them off where they emerge from the plant.
Q: How do I know when the garlic is ready to harvest?
A: Garlic is typically ready to harvest in mid-summer, about 7-8 months after planting. The leaves will start to turn yellow and brown, and the stalks may begin to fall over. To check if the bulbs are ready, carefully dig up a test bulb. The bulb should be plump and well-formed, with papery skins.
Q: How do I cure and store garlic?
A: After harvesting, cure the garlic by laying the bulbs out in a single layer in a well-ventilated, dry, and shady location for 2-3 weeks. This allows the skins to dry and harden, which helps prevent rot. Once cured, trim the roots and stalks, leaving about 1-2 inches of stalk. Store the garlic in a cool, dry, and dark place. Softneck garlic can be braided and hung for storage. Properly cured and stored garlic can last for several months.
Q: Can I use garlic from the grocery store to plant?
A: While it’s possible to grow garlic from grocery store cloves, it’s not always recommended. Grocery store garlic may have been treated to prevent sprouting, and it may not be well-suited to your local climate. It’s best to use garlic cloves specifically intended for planting, which you can purchase from a reputable nursery or seed supplier. These cloves are more likely to be disease-free and adapted to your growing conditions.
Q: My garlic plants have yellow leaves. What could be the problem?
A: Yellowing leaves can be caused by several factors, including nutrient deficiencies, overwatering, underwatering, or pests and diseases. Check the soil moisture and ensure the plants are getting adequate water. Fertilize with a balanced fertilizer if the soil is lacking nutrients. Inspect the plants for signs of pests or diseases, such as aphids, mites, or fungal infections. Treat any problems promptly to prevent further damage.
Leave a Comment