
Growing Figs Indoors might seem like a challenge reserved for seasoned gardeners with sun-drenched greenhouses, but I’m here to tell you it’s totally achievable, even if you’re working with limited space and a less-than-tropical climate! Have you ever dreamed of plucking a perfectly ripe, sweet fig straight from a tree you nurtured yourself, right in the comfort of your own home? This DIY guide will turn that dream into a delicious reality.
Figs have a rich history, dating back to ancient civilizations. They were prized by the Romans and Egyptians, often associated with prosperity and abundance. Bringing that ancient symbol of good fortune into your home is easier than you think! For centuries, figs were cultivated outdoors, but modern techniques and a little ingenuity have opened up the possibility of enjoying these delectable fruits year-round, regardless of your location.
Why should you embark on this indoor fig-growing adventure? Well, besides the sheer joy of nurturing a plant and harvesting your own food, growing figs indoors offers a unique solution for those of us who live in colder climates where outdoor fig cultivation is simply not an option. Plus, it’s a fantastic way to add a touch of greenery and a conversation starter to your living space. I’m going to share some simple, effective DIY tricks and hacks that will help you successfully grow your own fig tree indoors, from choosing the right variety to providing the perfect environment. Get ready to enjoy the sweet taste of success!
Growing Figs Indoors: Your DIY Guide for a Sweet Harvest
Hello, dear plant friends! Do you also dream of juicy, sweet figs straight from your own garden—or even your own apartment? Then you’ve come to the right place! I’ll show you how to successfully grow figs indoors. It’s easier than you think, and with a little patience, you’ll soon be harvesting your own figs. Let’s get started!
What You Need: The Materials List
Before we begin, here’s a list of everything you’ll need for your indoor fig project:
- Fig tree seedling or cutting: It’s best to choose a variety that is well-suited for growing in pots, such as ‘Brown Turkey,’ ‘Celeste,’ or ‘Little Miss Figgy.’ These varieties are more compact and bear fruit well even in containers.
- Large pot: At least 30-40 cm (12-16 inches) in diameter. Fig trees need space for their roots.
- High-quality potting soil: A well-draining mixture is important. I recommend a mix of potting soil, compost, and perlite or vermiculite.
- Drainage material: Expanded clay pebbles, gravel, or clay shards for the bottom of the pot. This prevents waterlogging.
- Plant pot saucer: To catch excess water.
- Garden shears or a knife: For trimming cuttings or removing damaged leaves.
- Rooting hormone (optional): If you are using cuttings, rooting hormone can speed up the rooting process.
- Spray bottle: For moistening the leaves.
- Fertilizer: A balanced liquid fertilizer for fruit trees.
- Grow light (optional): If your location does not provide enough sunlight.
The Preparation: The Foundation for Your Success
Before we start planting, good preparation is key.
- Prepare the pot: Start by thoroughly cleaning the pot. Then, place a layer of drainage material at the bottom. This prevents the roots from sitting in water and rotting.
- Mix the soil: Mix your potting soil with compost and perlite or vermiculite. This ensures good drainage and aeration. The soil should be loose and crumbly.
- Choose a location: Fig trees love the sun! Choose a location that receives at least 6-8 hours of direct sunlight per day. A south-facing window is ideal. If that’s not possible, you can use a grow light.
Planting: Step by Step to a Fig Tree
Now let’s get down to it! Here I’ll show you how to plant your fig tree correctly.
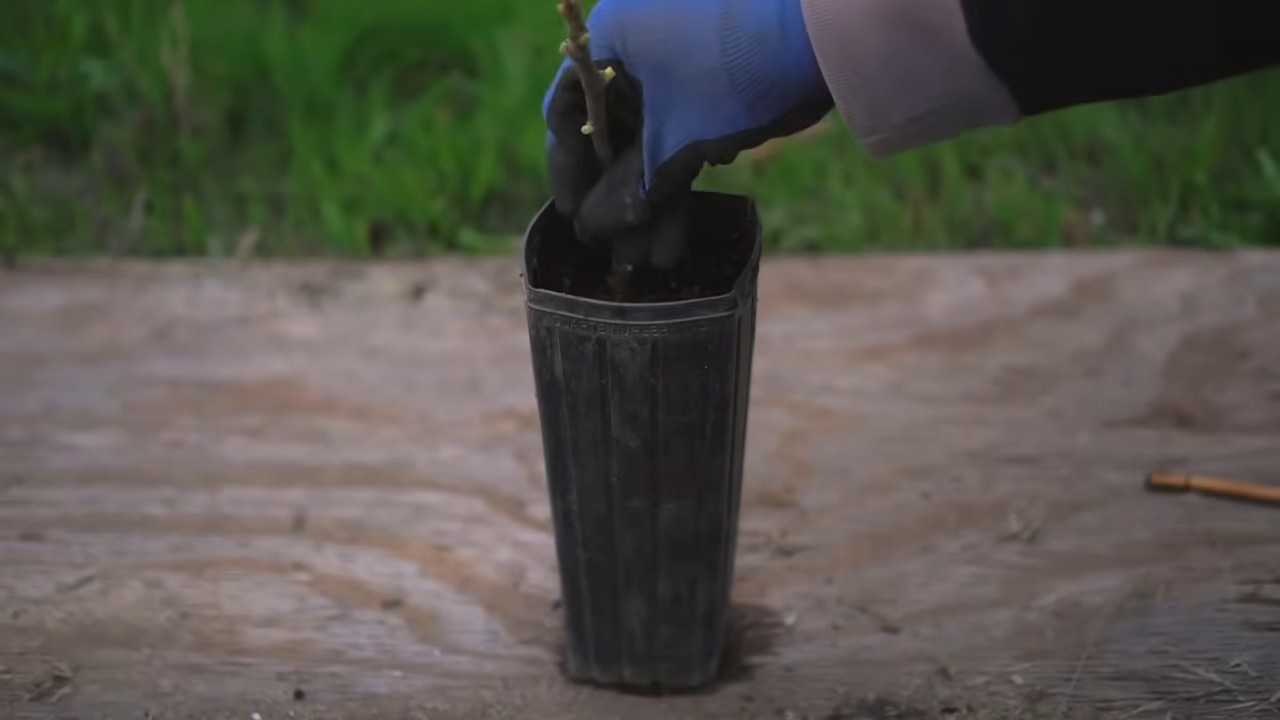
- Prepare the seedling: If you have a seedling, carefully remove it from the nursery pot. Loosen the roots a bit so they can spread out better in the new pot.
- Prepare the cutting (if applicable): If you are using a cutting, cut it at an angle with a sharp knife or garden shears. Remove the lower leaves, leaving only the top ones. Dip the bottom end of the cutting in rooting hormone (optional).
- Planting: Fill the pot with the prepared soil, leaving enough space for the seedling or cutting. Place the seedling or cutting in the center of the pot and fill the rest of the pot with soil. Press the soil down lightly.
- Watering in: Water the fig tree thoroughly until water runs out of the drainage hole. This helps the soil to settle and moistens the roots.
Care: Keeping Your Fig Tree Happy
Proper care is crucial for a successful harvest. Here are my tips:
- Watering: Water your fig tree regularly, but not too much. The soil should always be slightly moist, but not wet. Avoid waterlogging. In winter, when the tree is dormant, reduce watering.
- Fertilizing: During the growing season (spring and summer), fertilize your fig tree every two weeks with a balanced liquid fertilizer for fruit trees. Do not fertilize in fall and winter.
- Sunlight: Make sure your fig tree gets enough sunlight. If this is not possible, use a grow light.
- Humidity: Fig trees like high humidity. Spray the leaves regularly with water, especially in winter when the heating makes the air dry. You can also place a tray of water near the tree.
- Pruning: Prune your fig tree in late winter or early spring, before new growth begins. Remove dead or damaged branches and thin out the crown to improve air circulation.
- Overwintering: Fig trees are not frost-hardy. If you live in a region with cold winters, you must overwinter your fig tree indoors. Place it in a cool, bright location and reduce watering.
- Pests and Diseases: Watch out for pests like spider mites or aphids. If infested, you can use natural pesticides, such as neem oil or insecticidal soap.
Special Tips for Cuttings
If you are growing your fig tree from a cutting, there are a few additional things to consider:
- Humidity: Cuttings need high humidity to form roots. You can cover the cutting with a plastic bag or a mini-greenhouse to increase humidity. Make sure the bag does not directly touch the leaves.
- Warmth: a warm environment promotes root growth. Place the cutting in a warm spot, for example, on a heating mat.
- Patience: Rooting cuttings can take several weeks. Be patient and don’t give up!
The Harvest: The Reward for Your Effort
After all the work and care, the best part finally arrives: the harvest!
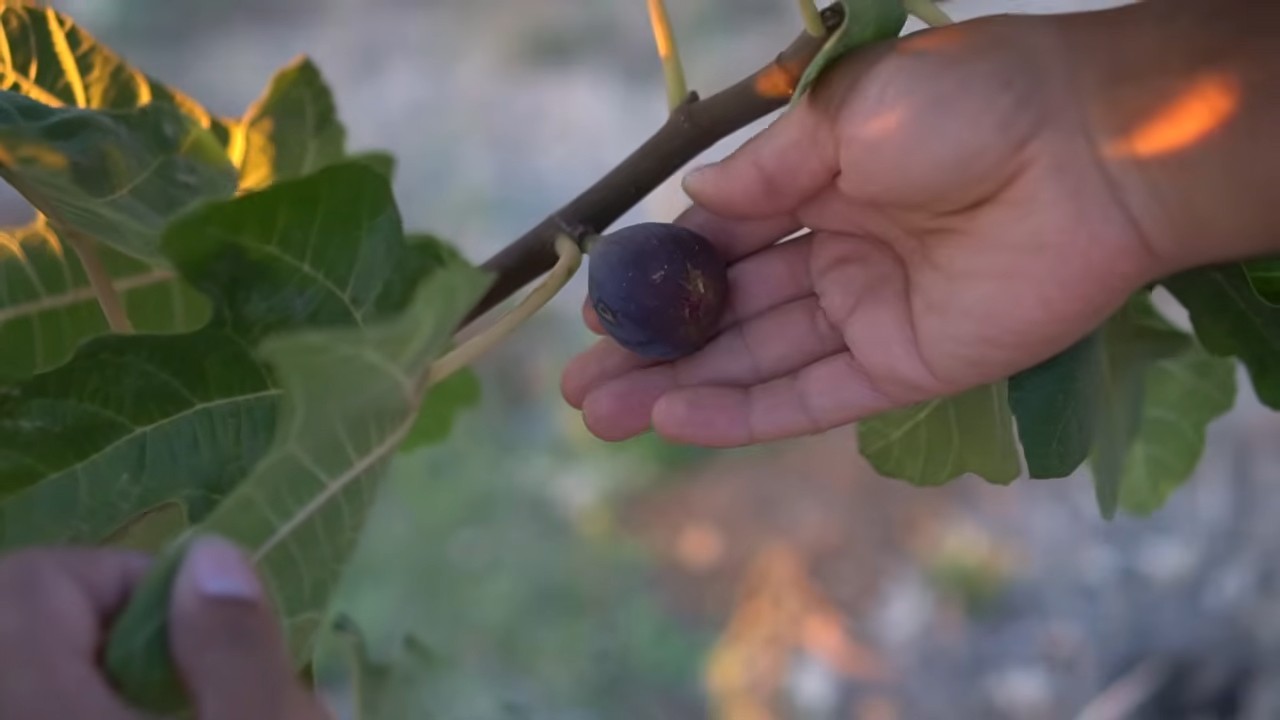
- Recognizing ripeness: Figs are ripe when they are soft and fall easily from the tree. The color of the figs depends on the variety.
- Harvesting: Gently pick the ripe figs from the tree.
- Enjoying: Enjoy your homegrown figs fresh from the tree or use them for delicious recipes.
Common Problems and Solutions
Problems can also arise with indoor fig cultivation. Here are some common problems and how you can solve them:
- Leaf drop: Leaf drop can have various causes, such as too little light, too much water, or too little humidity. Check your care routine and adjust it accordingly.
- No fruit: If your fig tree is not producing fruit, it could be due to too little sunlight, not enough fertilizer, or too much nitrogen in the fertilizer. Make sure your tree gets enough sunlight and fertilize it with a balanced fertilizer.
- Pests: Watch out for pests like spider mites or aphids. If infested, you can use natural pesticides.
Variety Recommendations for Indoor Growing
As mentioned, some fig varieties are better suited for growing in pots than others. Here are my recommendations:
‘Little Miss Figgy’: A compact variety that is ideal for small spaces.
‘Brown Turkey’: A robust and high-yielding variety that is well-suited for beginners.
‘Celeste’: A sweet and aromatic variety that ripens early.
Conclusion
So, there you have it! Growing figs indoors might seem like a daunting task, but with a little patience, the right setup, and this simple DIY trick, you can enjoy the sweet taste of homegrown figs even if you don’t have a sprawling outdoor garden. This isn’t just about having a plant; it’s about cultivating a connection to nature, learning a new skill, and reaping the delicious rewards of your labor.
Why is this DIY approach a must-try? Because it empowers you to control the environment your fig tree needs to thrive. You’re not at the mercy of unpredictable weather patterns or limited sunlight. You’re creating a microclimate perfectly tailored to your fig tree’s needs, maximizing your chances of a bountiful harvest. Plus, let’s be honest, there’s a certain satisfaction that comes from nurturing a plant from a small sapling to a fruit-bearing beauty, all within the comfort of your own home.
Looking for variations? Consider experimenting with different fig varieties known for their suitability for indoor growing, such as the ‘Brown Turkey’ or ‘Ficus carica ‘Little Miss Figgy”. You can also adjust the soil mix to suit your specific fig variety’s needs. Some varieties prefer a slightly more acidic soil, while others thrive in a more neutral environment. Don’t be afraid to tweak the lighting setup as well. If you notice your fig tree isn’t getting enough light, supplement with additional grow lights. You can also try different types of containers. Terracotta pots are great for drainage, while plastic pots retain moisture better. The key is to observe your fig tree closely and adjust your approach as needed.
But the most important thing is to just start! Don’t let the perceived complexity of growing figs indoors intimidate you. This DIY trick is designed to be accessible and straightforward. Gather your materials, follow the steps, and watch your fig tree flourish.
We’re confident that you’ll be amazed by the results. Imagine plucking fresh, juicy figs from your own indoor tree, adding them to your morning yogurt, or using them to create delectable desserts. It’s a truly rewarding experience.
So, what are you waiting for? Give this DIY trick a try and share your experience with us! We’d love to hear about your successes, your challenges, and any variations you’ve discovered along the way. Share your photos, your tips, and your stories in the comments below. Let’s create a community of indoor fig growers and inspire others to embark on this exciting journey. Remember, growing figs indoors is not just a hobby; it’s a passion. And with this simple DIY trick, you’re well on your way to becoming a successful indoor fig grower. Happy growing!
Frequently Asked Questions (FAQs)
What kind of container should I use for my indoor fig tree?
The ideal container for your indoor fig tree depends on several factors, including the size of the tree and your watering habits. Generally, a pot that is at least 12 inches in diameter and depth is a good starting point. As the tree grows, you may need to repot it into a larger container. Terracotta pots are excellent for drainage, which is crucial for preventing root rot. However, they also dry out more quickly, so you’ll need to water more frequently. Plastic pots retain moisture better, but it’s important to ensure they have adequate drainage holes. Fabric pots are another option that allows for good aeration and drainage. Ultimately, the best container is one that provides adequate space for the roots to grow, good drainage, and is appropriate for your watering style.
How often should I water my indoor fig tree?
Watering frequency depends on several factors, including the size of the pot, the type of soil, the temperature, and the humidity. As a general rule, water your fig tree when the top inch of soil feels dry to the touch. Avoid overwatering, as this can lead to root rot. During the growing season (spring and summer), you may need to water more frequently than during the dormant season (fall and winter). When you water, water thoroughly until water drains out of the drainage holes. This ensures that the entire root ball is moistened. You can also use a moisture meter to check the moisture level of the soil.
What kind of fertilizer should I use for my indoor fig tree?
Fig trees are heavy feeders and benefit from regular fertilization, especially during the growing season. Use a balanced fertilizer with an NPK ratio of 10-10-10 or 20-20-20. You can also use a fertilizer specifically formulated for fruit trees. Follow the instructions on the fertilizer label for application rates. Fertilize your fig tree every 2-4 weeks during the growing season. Reduce or stop fertilizing during the dormant season. Organic fertilizers, such as compost tea or fish emulsion, are also excellent options.
How much sunlight does my indoor fig tree need?
Fig trees need at least 6-8 hours of direct sunlight per day to thrive. If you don’t have a sunny window, you can supplement with grow lights. Place the grow lights about 12-18 inches above the tree. Rotate the tree regularly to ensure that all sides receive adequate light. Signs of insufficient light include leggy growth, pale leaves, and lack of fruit production.
How do I pollinate my indoor fig tree?
Some fig varieties are self-pollinating, while others require pollination by a specific wasp. If you are growing a variety that requires pollination, you may need to hand-pollinate it. You can do this by using a small paintbrush to transfer pollen from the male flowers to the female flowers. However, most common indoor varieties are self-pollinating and do not require this step.
What are some common pests and diseases that affect indoor fig trees?
Common pests that can affect indoor fig trees include spider mites, aphids, and scale. These pests can be controlled with insecticidal soap or neem oil. Common diseases include root rot and leaf spot. Root rot is caused by overwatering and can be prevented by ensuring good drainage. Leaf spot can be caused by fungal or bacterial infections and can be treated with a fungicide or bactericide. Regularly inspect your fig tree for signs of pests or diseases and take action promptly to prevent them from spreading.
How do I prune my indoor fig tree?
Pruning is important for maintaining the shape and size of your indoor fig tree, as well as for promoting fruit production. Prune your fig tree in late winter or early spring, before new growth begins. Remove any dead, damaged, or crossing branches. You can also prune to shape the tree and encourage branching. Fig trees produce fruit on new growth, so avoid pruning too heavily, as this can reduce fruit production.
Why are the leaves on my fig tree turning yellow and falling off?
Yellowing and leaf drop can be caused by several factors, including overwatering, underwatering, insufficient light, nutrient deficiencies, or pest infestations. Check the soil moisture and adjust your watering accordingly. Ensure that your fig tree is receiving adequate light. Fertilize your fig tree with a balanced fertilizer. Inspect the tree for signs of pests or diseases. If the problem persists, consult with a local gardening expert.
Can I grow figs indoors from seed?
While it is possible to grow figs from seed, it is a very slow and challenging process. Fig seeds require specific conditions to germinate and the resulting trees may not be true to type. It is generally easier and more reliable to propagate fig trees from cuttings or by purchasing a young tree from a nursery.
How long does it take for an indoor fig tree to produce fruit?
The time it takes for an indoor fig tree to produce fruit depends on the variety, the age of the tree, and the growing conditions. Generally, it takes 1-3 years for a fig tree to start producing fruit. Providing optimal growing conditions, including adequate light, water, and fertilizer, can help to speed up the process.

Leave a Comment