
Growing corn in a concrete yard might sound like an impossible dream, right? But what if I told you it’s absolutely achievable with a little DIY ingenuity? Forget the sprawling fields of Iowa; we’re bringing the farm-fresh goodness right to your urban oasis! For centuries, corn has been a staple crop, deeply woven into the cultures of the Americas, providing sustenance and playing a vital role in traditions. Now, you can tap into that rich history, even without acres of land.
Let’s face it, not everyone has access to a traditional garden. Many of us are working with limited space, like a concrete yard, and that’s where these DIY tricks come in handy. Imagine the satisfaction of harvesting your own sweet corn, knowing you nurtured it from seed to table, right in your own backyard. This article is packed with simple, effective methods to help you overcome the challenges of growing corn in a concrete yard. We’ll explore container gardening techniques, soil preparation secrets, and even some clever hacks to maximize sunlight and space. Get ready to transform your concrete jungle into a thriving corn patch!
DIY: Maisanbau im Betonhof – So verwandelst du deinen grauen Garten in eine grüne Oase!
Hey Leute! Habt ihr auch genug von eurem tristen Betonhof? Ich auch! Und deshalb habe ich mich entschieden, etwas dagegen zu unternehmen. Ich zeige euch, wie ihr selbst Mais in eurem Betonhof anbauen könnt. Ja, richtig gehört! Mais! Es ist einfacher als ihr denkt und bringt nicht nur Leben in euren Garten, sondern auch frisches Gemüse auf den Tisch. Lasst uns loslegen!
Was du brauchst:
* Maissamen: Wählt eine Sorte, die für eure Region geeignet ist. Ich habe mich für eine frühe Sorte entschieden, da unser Sommer nicht ewig dauert.
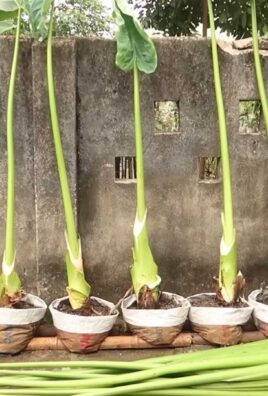
* Große Pflanzgefäße: Am besten sind Kübel mit mindestens 40 Litern Fassungsvermögen. Mais braucht Platz für seine Wurzeln.
* Hochwertige Pflanzerde: Achtet auf eine gute Drainage, damit das Wasser gut ablaufen kann.
* Drainagematerial: Blähton, Kies oder Tonscherben eignen sich hervorragend, um Staunässe zu vermeiden.
* Dünger: Mais ist ein Starkzehrer, daher braucht er ausreichend Nährstoffe. Ich verwende organischen Dünger.
* Gießkanne oder Gartenschlauch: Für die regelmäßige Bewässerung.
* Spaten oder Schaufel: Zum Befüllen der Pflanzgefäße.
* Handschuhe: Zum Schutz eurer Hände.
* Eventuell: Rankhilfe: Je nach Maissorte kann eine Rankhilfe sinnvoll sein, um die Pflanzen zu stützen.
Vorbereitung ist alles: Die Pflanzgefäße vorbereiten
Bevor wir mit dem Pflanzen beginnen, müssen wir die Pflanzgefäße vorbereiten. Das ist ein wichtiger Schritt, um sicherzustellen, dass der Mais gut wächst.
1. Reinigung der Pflanzgefäße: Beginnt damit, die Pflanzgefäße gründlich zu reinigen. Entfernt alle alten Pflanzenreste und Erde. Ich spüle meine Kübel immer mit heißem Wasser und etwas Spülmittel aus, um sicherzustellen, dass sie sauber sind.
2. Drainageschicht anlegen: Füllt den Boden der Pflanzgefäße mit einer Schicht Drainagematerial. Ich verwende Blähton, da er leicht ist und gut Wasser speichert. Eine Schicht von etwa 5-10 cm ist ideal. Das verhindert Staunässe und sorgt dafür, dass die Wurzeln nicht faulen.
3. Pflanzerde einfüllen: Füllt die Pflanzgefäße mit hochwertiger Pflanzerde. Lasst etwa 5-10 cm Platz bis zum Rand. Achtet darauf, dass die Erde locker und luftig ist. Ich mische meine Pflanzerde gerne mit etwas Kompost, um den Nährstoffgehalt zu erhöhen.
4. Erde leicht andrücken: Drückt die Erde leicht an, aber nicht zu fest. Sie sollte locker genug sein, damit die Wurzeln gut eindringen können.
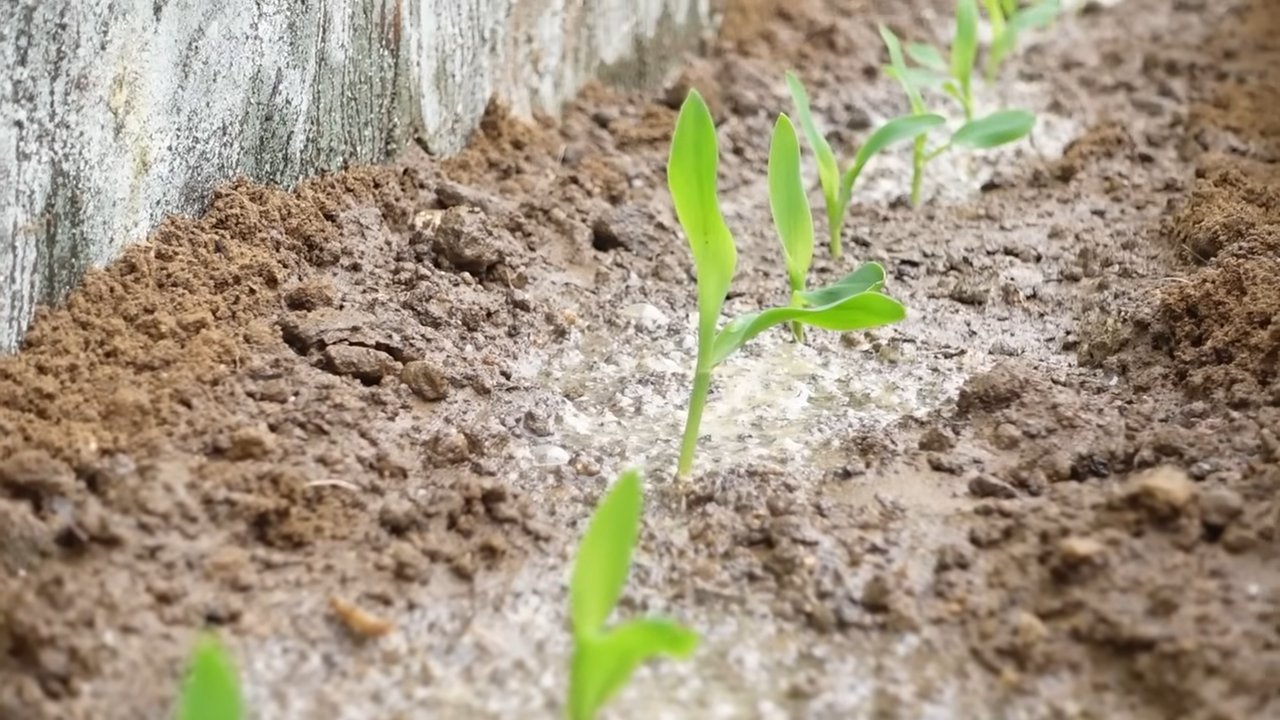
Aussaat: Die Maissamen in die Erde bringen
Jetzt kommt der spannende Teil: Die Aussaat! Hier zeige ich euch, wie ihr die Maissamen richtig in die Erde bringt.
1. Aussaatzeitpunkt wählen: Der beste Zeitpunkt für die Aussaat ist, wenn keine Frostgefahr mehr besteht. In der Regel ist das ab Mitte Mai der Fall. Ihr könnt die Samen auch schon im April in Töpfen vorziehen und sie dann nach den Eisheiligen auspflanzen.
2. Aussaattiefe bestimmen: Die Maissamen sollten etwa 2-3 cm tief in die Erde gelegt werden. Macht mit dem Finger oder einem kleinen Stock kleine Löcher in die Erde.
3. Samen einlegen: Legt in jedes Loch 2-3 Samen. Das erhöht die Wahrscheinlichkeit, dass mindestens ein Samen keimt.
4. Löcher schließen: Bedeckt die Samen mit Erde und drückt sie leicht an.
5. Angießen: Gießt die Erde vorsichtig an, damit die Samen nicht weggespült werden. Verwendet am besten eine Gießkanne mit Brauseaufsatz.
Pflege: So bleibt euer Mais gesund und kräftig
Die Pflege ist entscheidend, damit euer Mais gut wächst und eine reiche Ernte bringt. Hier sind meine Tipps:
1. Bewässerung: Mais braucht viel Wasser, besonders während der Wachstumsphase. Gießt regelmäßig, aber vermeidet Staunässe. Ich gieße meine Pflanzen am liebsten morgens, damit die Blätter über den Tag abtrocknen können.
2. Düngung: Mais ist ein Starkzehrer und benötigt ausreichend Nährstoffe. Düngt eure Pflanzen regelmäßig mit einem organischen Dünger. Ich verwende Hornspäne oder Kompost.
3. Unkraut entfernen: Entfernt regelmäßig Unkraut, damit der Mais nicht von ihm überwuchert wird.
4. Schutz vor Schädlingen: Achtet auf Schädlinge wie Schnecken oder Blattläuse. Bei Bedarf könnt ihr biologische Schädlingsbekämpfungsmittel einsetzen.
5. Rankhilfe anbringen (optional): Je nach Maissorte kann eine Rankhilfe sinnvoll sein, um die Pflanzen zu stützen. Ich habe bei meinen Pflanzen Bambusstäbe verwendet.
Ernte: Die Früchte eurer Arbeit genießen
Nach einigen Monaten harter Arbeit ist es endlich soweit: Die Ernte! Hier zeige ich euch, wann und wie ihr euren Mais ernten könnt.
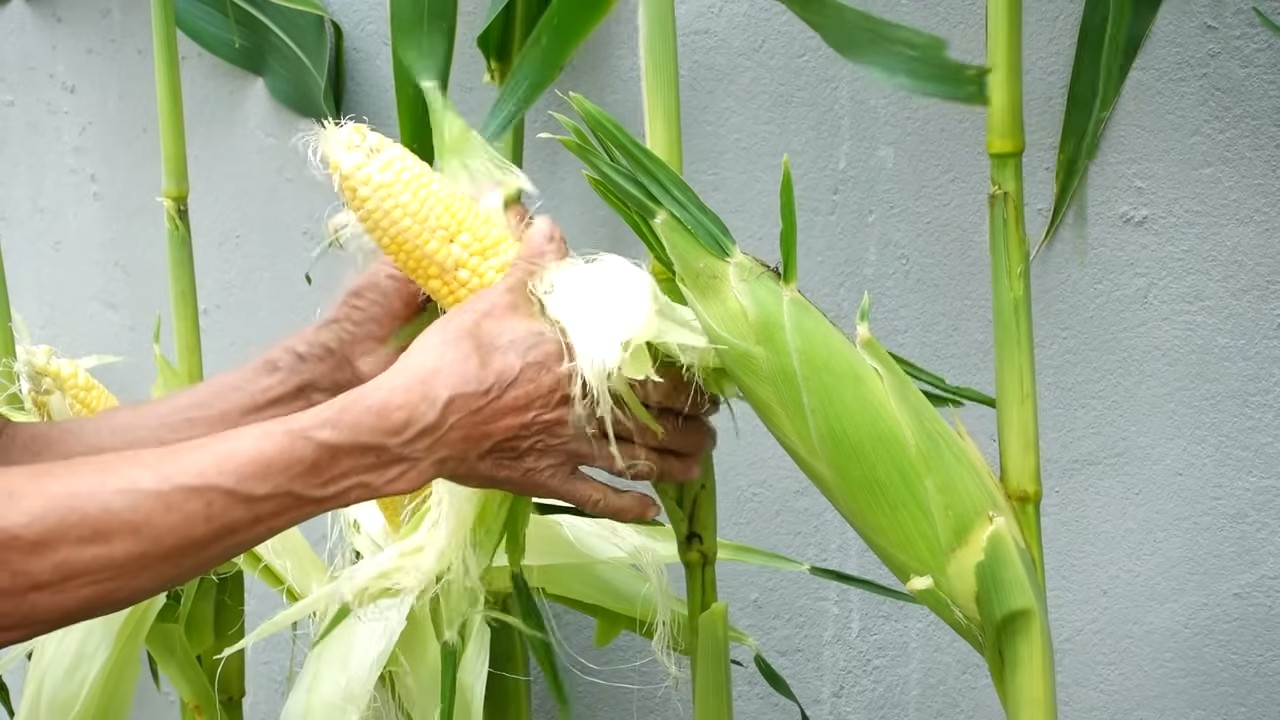
1. Erntezeitpunkt bestimmen: Der Mais ist reif, wenn die Kolben prall gefüllt sind und die Fäden an der Spitze braun werden. Drückt vorsichtig auf die Kolben. Wenn sie sich fest anfühlen, sind sie reif.
2. Kolben ernten: Brecht die Kolben vorsichtig von der Pflanze ab.
3. Verarbeitung: Ihr könnt den Mais sofort essen, grillen, kochen oder einfrieren. Ich liebe es, frischen Maiskolben vom Grill zu essen!
Zusätzliche Tipps und Tricks:
* Sortenwahl: Wählt eine Maissorte, die für eure Region geeignet ist. Es gibt viele verschiedene Sorten, die sich in Größe, Geschmack und Reifezeit unterscheiden.
* Vorziehen: Ihr könnt die Maissamen auch schon im April in Töpfen vorziehen und sie dann nach den Eisheiligen auspflanzen. Das verkürzt die Wachstumszeit und ermöglicht eine frühere Ernte.
* Mischkultur: Mais verträgt sich gut mit anderen Pflanzen wie Bohnen oder Kürbis. Diese Pflanzen können als natürliche Rankhilfe dienen und den Boden verbessern.
* Sonnenstand: Achtet darauf, dass der Mais ausreichend Sonne bekommt. Er benötigt mindestens 6 Stunden Sonne pro Tag.
* Windschutz: Mais kann bei starkem Wind leicht umknicken. Stellt die Pflanzgefäße an einen windgeschützten Ort oder verwendet eine Rankhilfe.
* Bodenverbesserung: Mischt eurer Pflanzerde Kompost oder Hornspäne bei, um den Nährstoffgehalt zu erhöhen.
* Regelmäßige Kontrolle: Kontrolliert eure Pflanzen regelmäßig auf Schädlinge und Krankheiten. Je früher ihr Probleme erkennt, desto besser könnt ihr sie bekämpfen.
* Geduld: Mais braucht Zeit zum Wachsen. Seid geduldig und gebt nicht auf, wenn es nicht sofort klappt.
Häufige Fehler vermeiden:
* Zu wenig Wasser: Mais braucht viel Wasser, besonders während der Wachstumsphase. Achtet darauf, dass die Erde immer feucht ist.
* Zu wenig Dünger: Mais ist ein Starkzehrer und benötigt ausreichend Nährstoffe. Düngt eure Pflanzen regelmäßig.
* Staunässe: Vermeidet Staunässe, da sie zu Wurzelfäule führen kann. Sorgt für eine gute Drainage.
* Falscher Standort: Mais benötigt viel Sonne. Stellt die Pflanzgefäße an einen sonnigen Ort.
* Schädlinge ignorieren: Kontrolliert eure Pflanzen regelmäßig auf Schädlinge und bekämpft sie bei Bedarf.
Fazit:
Mit etwas Geduld und Sorgfalt könnt ihr auch in eurem Betonhof erfolgreich Mais anbauen. Es ist eine tolle Möglichkeit, euren Garten zu verschönern und frisches Gemüse zu ernten. Probiert es aus und lasst euch überraschen! Ich bin gespannt auf eure Ergebnisse! Viel Spaß beim Gärtnern!
Conclusion
So, there you have it! Transforming your drab concrete yard into a vibrant, corn-filled oasis might sound unconventional, but the results speak for themselves. This DIY trick isn’t just about aesthetics; it’s about reclaiming unused space, embracing sustainable practices, and adding a touch of unexpected charm to your outdoor living area. Imagine the conversations sparked by your unique, corn-studded concrete landscape!
Why is this a must-try? Beyond the sheer novelty, growing corn directly in concrete offers several compelling advantages. First, it’s an incredibly efficient use of space, particularly for those with limited gardening areas. Second, the concrete itself, while seemingly inhospitable, can actually retain heat, creating a microclimate that benefits corn growth, especially in cooler regions. Third, it’s a fantastic conversation starter and a testament to your creative gardening spirit. Finally, and perhaps most importantly, it’s a fun and rewarding project that connects you with nature in an unexpected way.
But don’t stop there! Feel free to experiment with different varieties of corn. Consider ornamental corn for a splash of color, or try a smaller, more manageable variety if space is a concern. You can also interplant with other compatible vegetables or herbs to create a mini-ecosystem within your concrete garden. Think about adding some drought-tolerant succulents around the base of the corn stalks for added visual appeal and to help retain moisture in the concrete.
Remember to monitor the soil moisture levels carefully, especially during hot weather. A good rule of thumb is to water deeply but infrequently, allowing the soil to dry out slightly between waterings. And don’t forget to fertilize regularly to provide your corn plants with the nutrients they need to thrive.
We’re confident that this DIY project will not only transform your concrete yard but also inspire you to think outside the box when it comes to gardening. The key to successful **growing corn** in concrete lies in proper preparation, consistent care, and a willingness to experiment.
So, grab your drill, gather your supplies, and get ready to embark on this exciting gardening adventure. We can’t wait to see the amazing transformations you create! Don’t forget to share your photos and experiences with us. Let us know what worked, what didn’t, and any creative variations you came up with. Together, we can unlock the full potential of concrete gardening and inspire others to embrace the unexpected. Happy growing!
Frequently Asked Questions (FAQ)
1. What type of corn is best for growing in concrete?
The best type of corn for growing in concrete depends on your goals and the size of your concrete area. For ornamental purposes, consider colorful varieties like Indian corn or Glass Gem corn. These add visual interest and don’t necessarily require a large growing space. If you’re looking for edible corn, choose a shorter, more compact variety like sweet corn or popcorn. These are generally easier to manage in a confined space. Dent corn, often used for animal feed, can also be grown, but it typically requires more space and a longer growing season. Ultimately, the best choice is the one that suits your personal preferences and the specific conditions of your concrete yard.
2. How deep should the holes be that I drill into the concrete?
The depth of the holes is crucial for providing adequate space for the corn roots to develop. Aim for a minimum depth of 12 inches, but ideally, you should strive for 18-24 inches. This will give the roots plenty of room to grow and access nutrients and moisture. If your concrete slab is thinner than 12 inches, you may need to consider building raised beds or using large containers placed on top of the concrete to achieve the necessary depth. Remember to use a drill bit specifically designed for concrete and wear appropriate safety gear, such as eye protection and a dust mask.
3. What kind of soil should I use?
The soil you use is just as important as the depth of the holes. Avoid using regular garden soil, as it can become compacted and poorly drained in a concrete environment. Instead, opt for a high-quality potting mix that is specifically formulated for container gardening. This type of mix typically contains a blend of peat moss, perlite, and vermiculite, which provides excellent drainage and aeration. You can also amend the potting mix with compost or other organic matter to improve its fertility and water-holding capacity. A slightly acidic to neutral pH (around 6.0-7.0) is ideal for corn growth.
4. How often should I water the corn growing in concrete?
Watering frequency will depend on several factors, including the weather, the type of soil you’re using, and the size of the corn plants. As a general rule, water deeply but infrequently, allowing the soil to dry out slightly between waterings. Check the soil moisture level by inserting your finger into the soil a few inches deep. If the soil feels dry to the touch, it’s time to water. Avoid overwatering, as this can lead to root rot. During hot, dry weather, you may need to water daily, while during cooler, wetter periods, you may only need to water every few days.
5. What kind of fertilizer should I use, and how often should I fertilize?
Corn is a heavy feeder, so regular fertilization is essential for optimal growth. Use a balanced fertilizer with an NPK ratio (nitrogen, phosphorus, potassium) of around 10-10-10 or 14-14-14. You can use either a slow-release granular fertilizer or a water-soluble liquid fertilizer. Apply the fertilizer according to the manufacturer’s instructions. For granular fertilizers, typically apply every 4-6 weeks. For liquid fertilizers, you may need to apply more frequently, such as every 2-3 weeks. Be sure to water thoroughly after fertilizing to help the nutrients reach the roots.
6. How do I protect the corn from pests and diseases?
While growing corn in concrete can help to minimize some pest and disease problems, it’s still important to be vigilant. Common corn pests include corn earworms, aphids, and spider mites. You can control these pests with insecticidal soap, neem oil, or other organic insecticides. Diseases such as corn smut and leaf blight can also affect corn plants. To prevent these diseases, ensure good air circulation around the plants, avoid overhead watering, and remove any infected leaves promptly. Consider using disease-resistant corn varieties if you live in an area with a history of corn diseases.
7. Can I grow other plants alongside the corn in the concrete?
Yes, you can definitely grow other plants alongside the corn in the concrete. This is known as companion planting and can offer several benefits, such as improved pest control, increased nutrient availability, and enhanced biodiversity. Good companion plants for corn include beans, squash, and cucumbers. Beans fix nitrogen in the soil, which benefits the corn. Squash provides ground cover, which helps to suppress weeds and retain moisture. Cucumbers can climb up the corn stalks, providing vertical support. Avoid planting plants that compete with corn for nutrients and sunlight, such as sunflowers or tomatoes.
8. What if the concrete cracks or crumbles around the holes?
Cracking or crumbling around the holes is a potential concern, especially if the concrete is old or weak. To minimize this risk, use a sharp drill bit and drill slowly and carefully. Avoid applying excessive pressure, as this can cause the concrete to crack. If cracks do appear, you can repair them with concrete patching compound. This will help to prevent further damage and maintain the structural integrity of the concrete. You can also consider reinforcing the area around the holes with metal mesh or wire to provide additional support.
9. How do I harvest the corn?
The harvesting time for corn depends on the variety you’re growing. Sweet corn is typically ready to harvest about 20-25 days after the silks emerge. The silks will turn brown and dry, and the kernels will be plump and milky when squeezed. Popcorn is typically harvested when the kernels are hard and dry. Ornamental corn can be harvested when the husks are dry and the kernels are fully colored. To harvest, simply twist the ear of corn off the stalk.
10. What do I do with the concrete holes after the growing season is over?
After the growing season is over, you have several options for what to do with the concrete holes. You can leave them as they are and use them again next year. You can fill them with soil and plant other types of plants, such as flowers or herbs. Or, you can fill them with concrete patching compound to restore the concrete to its original condition. The best option depends on your personal preferences and your plans for the future.
Leave a Comment