
Growing Chamomile at Home can be incredibly rewarding, transforming your garden into a fragrant oasis and providing you with a soothing herbal remedy right at your fingertips! Have you ever dreamt of sipping a warm cup of chamomile tea, knowing you nurtured the plant from seed to cup? This DIY guide will make that dream a reality, even if you’re a complete beginner.
Chamomile boasts a rich history, dating back to ancient Egypt where it was revered for its medicinal properties and used in embalming rituals. The Greeks and Romans also recognized its calming effects, using it to treat anxiety and promote relaxation. Today, this humble flower continues to be cherished worldwide for its therapeutic benefits and delicate, apple-like aroma.
Why should you learn this DIY trick? Well, in today’s fast-paced world, finding moments of tranquility is more important than ever. Growing Chamomile at Home allows you to create your own personal sanctuary, a place where you can unwind and reconnect with nature. Plus, store-bought chamomile tea can be expensive and may contain additives. By growing your own, you’ll have access to fresh, organic chamomile whenever you need it, saving money and ensuring the highest quality. I’m excited to share my easy-to-follow tips and tricks to help you cultivate a thriving chamomile patch, no matter your gardening experience!
Growing Chamomile at Home: Your DIY Guide for a Calming Garden
Hello, gardening friends! I’m so excited to introduce you to the world of growing chamomile today. Chamomile is not only a beautiful plant with its delicate flowers but also a true multi-talent. Whether as a soothing tea, for skincare, or as a natural remedy—chamomile is a gift from nature. And the best part? You can easily grow it yourself at home! In this article, I’ll show you step-by-step how to create your own little chamomile garden. Let’s get started!
What You’ll Need for Growing Chamomile
Before we begin, let’s make sure we have everything we need. Here is a list of things you’ll need for successful chamomile cultivation:
- Chamomile seeds or young plants: You have a choice! Seeds are cheaper, but young plants save you time. Make sure you get high-quality seeds or healthy young plants from a trusted source. There are two main types: German Chamomile (Matricaria chamomilla) and Roman Chamomile (Chamaemelum nobile). German Chamomile is an annual and grows more upright, while Roman Chamomile is a perennial and spreads as a creeping ground cover.
- Seedling pots or trays: If you’re starting from seed, you’ll need small pots or trays.
- Seed starting mix: This soil is particularly low in nutrients and loose, ideal for seed germination.
- Garden soil: For later transplanting into larger pots or into the garden.
- Watering can or spray bottle: For gently watering the plants.
- Garden trowel or planting scoop: For transplanting and planting.
- Location: A sunny spot in the garden or on the balcony. Chamomile loves the sun!
- Optional: Organic fertilizer to give the plants an extra boost.
Growing Chamomile from Seed: Step by Step
If you’ve decided to grow from seed, here is a detailed guide:
- Prepare the seedling containers: Fill the seedling pots or trays with seed starting mix. Lightly press the soil down, but not too firmly.
- Sow the seeds: Chamomile seeds are light germinators, which means they need light to sprout. Therefore, only sprinkle the seeds lightly on the soil and do not press them in. You can also cover them very lightly with a thin layer of sand.
- Watering: Gently moisten the soil with a spray bottle. Make sure the soil is moist, but not wet.
- Location: Place the containers in a bright, warm spot. A temperature of 18-20°C (65-68°F) is ideal for germination.
- Germination: Germination usually takes 10-14 days. Keep the soil moist during this time.
- Pricking out: Once the seedlings have developed their first true leaves (besides the initial seed leaves), you can prick them out. This means transplanting each seedling into its own, slightly larger pot with garden soil. Be very careful during this process not to damage the delicate roots.
Growing Chamomile from Young Plants
If you want an easier start, you can also buy young plants and plant them directly. Here’s how:
- Prepare the location: Choose a sunny spot in the garden or on the balcony. Loosen the soil well and remove any weeds.
- Planting: Dig a hole that is slightly larger than the root ball of the young plant. Place the plant inside and fill the hole with garden soil. Lightly press the soil down.
- Watering: Water the plant thoroughly after planting.
Caring for Your Chamomile Plants
Whether you grew your chamomile from seed or bought young plants, proper care is crucial for a bountiful harvest.
- Watering: Chamomile likes it moist, but not wet. Water the plants regularly, especially during dry periods. Avoid waterlogging, as this can lead to root rot.
- Fertilizing: Chamomile is not very demanding, but an occasional feeding with organic fertilizer can promote growth. Use a fertilizer that is rich in potassium to support flower production.
- Weed Control: Keep the area around the chamomile plants free of weeds. Weeds can steal nutrients and water, weakening the plants.
- Pruning: If the plants grow too densely, you can lightly prune them to improve air circulation. For Roman Chamomile, you can regularly remove the runners to prevent uncontrolled spreading.
- Protecting against pests and diseases: Chamomile is relatively resistant to pests and diseases. Occasionally, aphids may appear. You can combat these with a jet of water or a mild soap solution.
The Harvest: When and How?
The timing of the harvest is crucial for the flavor and effectiveness of the chamomile.
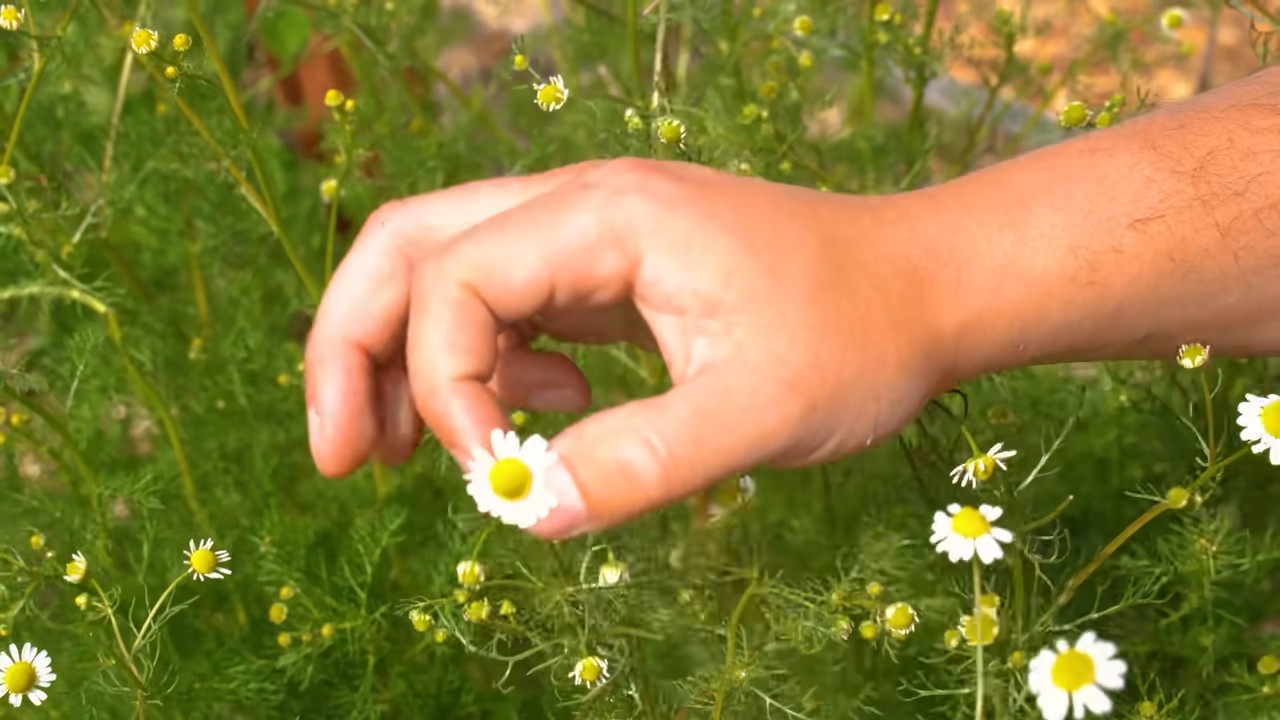
- Harvesting Time: The best time to harvest is when the flowers are fully open and the white petals are drooping slightly downwards. This is usually on sunny days in the late morning or early afternoon.
- Harvesting Method: Cut the flowers with scissors or a knife. You can also just pinch off the entire flower heads.
- Drying: The harvested flowers must be dried to preserve them. Lay the flowers on a clean cloth or a drying rack in an airy, shady place. Avoid direct sunlight, as this can destroy the essential oils. Drying usually takes 1-2 weeks. The flowers are dry when they crumble easily.
- Storage: Store the dried flowers in an airtight container in a cool, dark place. This way, they will last for up to a year.
Using Your Homegrown Chamomile
Now comes the fun part: using your homegrown chamomile! Here are some ideas:
- Chamomile Tea: The classic! Pour hot water over 1-2 teaspoons of dried chamomile flowers and let the tea steep for 5-10 minutes. Chamomile tea has a calming and relaxing effect.
- Chamomile Steam Bath: Put a handful of dried chamomile flowers in a bowl of hot water. Lean over the bowl and cover your head with a towel. The steam bath opens the pores and has an anti-inflammatory effect.
- Chamomile Oil: Place dried chamomile flowers in a jar and cover them with a high-quality carrier oil (e.g., olive oil or almond oil). Let the oil infuse in a dark place for 4-6 weeks. Then, strain the oil and use it for skincare.
- Chamomile Bath: Put a handful of dried chamomile flowers in a cloth bag and hang it in the bathwater. A chamomile bath is calming and relaxing.
- Chamomile in the Garden: Chamomile is not only beautiful but also useful in the garden. It attracts beneficial insects and can be used as a ground cover.
Common Mistakes in Growing Chamomile and How to Avoid Them
Even with chamomile, mistakes can happen. Here are some common errors and how to fix them:
Drying flowers in the sun: It might seem faster, but direct sunlight will destroy the delicate essential oils that give chamomile its wonderful aroma and medicinal properties. Solution: Always dry your flowers in a shady, dry, and well-ventilated area.
Planting seeds too deep: This is the most common mistake. Since chamomile seeds are light germinators, burying them will prevent them from sprouting. Solution: Always sprinkle seeds on the surface of the soil and press them in very gently, or don’t press them at all.
Overwatering: While chamomile likes moisture, it hates “wet feet.” This leads to yellowing leaves and root rot. Solution: Check the soil before watering. Only water when the top inch of soil feels dry. Ensure your pots have good drainage.
Not enough sunlight: If your chamomile plants are tall and “leggy” with few flowers, they are likely not getting enough sun. Solution: Move your pots to the sunniest spot you have. For garden plants, choose a location that gets at least 6 hours of direct sun per day.

Conclusion
So, there you have it! Growing chamomile at home is not only achievable, but it’s also a deeply rewarding experience that brings a touch of tranquility and natural goodness right to your doorstep. From the delicate fragrance that fills your garden to the soothing tea you can brew with your own homegrown blossoms, the benefits are numerous and far outweigh the minimal effort required.
This isn’t just about having access to fresh chamomile; it’s about connecting with nature, understanding the life cycle of a plant, and appreciating the simple pleasures of cultivating something yourself. Imagine the satisfaction of offering a cup of homemade chamomile tea to a friend, knowing that you nurtured the very flowers that infused it with their calming properties.
But the beauty of growing chamomile at home lies in its versatility. Feel free to experiment with different varieties, such as German chamomile (Matricaria chamomilla) for its potent medicinal properties or Roman chamomile (Chamaemelum nobile) for its ground cover potential and apple-like scent. Consider companion planting chamomile with other herbs or vegetables to deter pests and attract beneficial insects. You can even dry your harvested chamomile flowers and create your own potpourri or bath sachets for a truly luxurious and personalized experience.
Don’t be afraid to get creative! Perhaps you’ll discover a unique way to incorporate chamomile into your daily routine, whether it’s adding a few fresh sprigs to your bathwater for a relaxing soak or using chamomile-infused oil as a gentle skin soother. The possibilities are endless.
We understand that venturing into the world of home gardening can sometimes feel daunting, but we assure you that growing chamomile is a beginner-friendly project that yields impressive results. With just a little bit of sunlight, well-drained soil, and a touch of patience, you’ll be well on your way to harvesting your own supply of this wonderful herb.
We wholeheartedly encourage you to give this DIY trick a try. Start small, learn as you go, and most importantly, enjoy the process. We’re confident that you’ll be amazed by the ease and satisfaction of growing chamomile at home.
And now, we want to hear from you! Share your experiences, tips, and tricks in the comments below. What variety of chamomile did you choose to grow? What challenges did you encounter, and how did you overcome them? What are your favorite ways to use your homegrown chamomile? Your insights will not only inspire others but also contribute to a vibrant community of chamomile enthusiasts. Let’s cultivate a garden of knowledge together!
Frequently Asked Questions (FAQ)
What are the best conditions for growing chamomile at home?
Chamomile thrives in full sun to partial shade, requiring at least 4-6 hours of sunlight per day. Well-drained soil is crucial to prevent root rot. While chamomile can tolerate poor soil, amending it with compost or other organic matter will promote healthier growth and more abundant blooms. The ideal soil pH is between 6.0 and 7.5. Water regularly, especially during dry periods, but avoid overwatering.
How do I start growing chamomile from seed?
You can start chamomile seeds indoors 6-8 weeks before the last expected frost or direct sow them outdoors after the danger of frost has passed. For indoor starting, sow seeds in seed trays filled with seed-starting mix. Gently press the seeds into the soil surface, but do not cover them, as they need light to germinate. Keep the soil consistently moist but not waterlogged. Once the seedlings have developed a few sets of true leaves, transplant them into individual pots. Harden them off gradually before transplanting them outdoors. For direct sowing, prepare the soil by removing weeds and loosening the top layer. Scatter the seeds evenly over the soil surface and gently press them in. Water lightly and keep the soil moist until germination occurs.
How often should I water my chamomile plants?
Water chamomile plants regularly, especially during dry spells. The soil should be kept consistently moist but not waterlogged. Check the soil moisture by sticking your finger about an inch deep. If the soil feels dry, it’s time to water. Avoid overhead watering, as this can promote fungal diseases. Instead, water at the base of the plants.
When and how do I harvest chamomile flowers?
Chamomile flowers are typically ready for harvest when the petals are fully open and the central cone is yellow and slightly raised. Harvest the flowers in the morning after the dew has dried. Use scissors or your fingers to gently pluck the flowers from the stems. Avoid pulling the entire plant up by the roots. You can harvest chamomile flowers multiple times throughout the growing season.
How do I dry chamomile flowers for tea?
There are several ways to dry chamomile flowers. One method is to spread the flowers in a single layer on a clean screen or tray in a well-ventilated area. Turn the flowers occasionally to ensure even drying. Another method is to use a dehydrator set to a low temperature (around 95-100°F). The flowers are dry when they are brittle and crumble easily. Store the dried flowers in an airtight container in a cool, dark place.
Can I grow chamomile in containers?
Yes, chamomile grows well in containers. Choose a pot that is at least 12 inches in diameter and has drainage holes. Use a well-draining potting mix. Place the container in a sunny location. Water regularly and fertilize occasionally with a balanced fertilizer.
What are some common pests and diseases that affect chamomile?
Chamomile is generally pest and disease resistant. However, it can be susceptible to aphids, spider mites, and fungal diseases such as powdery mildew. Inspect your plants regularly for signs of pests or diseases. If you notice any problems, treat them promptly with appropriate organic pest control methods or fungicides.
Is chamomile safe for pets?
While chamomile is generally considered safe for pets in small amounts, it’s always best to consult with your veterinarian before giving it to your animals. Some pets may be allergic to chamomile.
What are the benefits of drinking chamomile tea?
Chamomile tea is known for its calming and relaxing properties. It can help to relieve stress, anxiety, and insomnia. It also has anti-inflammatory and antioxidant properties. Chamomile tea can also help to soothe digestive upset and relieve menstrual cramps.
Can I use chamomile in my garden as a companion plant?
Yes, chamomile is a great companion plant for many vegetables and herbs. It can help to deter pests, attract beneficial insects, and improve the overall health of the garden. Chamomile is particularly beneficial for planting near cabbage, onions, and basil.
Leave a Comment