
Growing Celery at Home might seem like a challenge reserved for seasoned gardeners, but I’m here to tell you it’s totally achievable, even if you’re a beginner! Forget those limp, expensive stalks from the grocery store. Imagine crisp, flavorful celery, fresh from your own backyard (or balcony!).
Celery has a fascinating history, dating back to ancient times where it was valued more for its medicinal properties than its culinary uses. The ancient Greeks even crowned victors of the Nemean Games with celery wreaths! While we might not be awarding any athletic prizes for our gardening efforts, the satisfaction of harvesting your own celery is a victory in itself.
Why should you bother with this DIY project? Well, for starters, homegrown celery tastes significantly better than store-bought. Plus, you have complete control over what goes into your plants, ensuring they’re free from harmful pesticides. But more importantly, learning how to start growing celery at home is a rewarding experience that connects you with nature and provides a sustainable source of fresh produce. In this article, I’ll share my favorite tricks and hacks to help you cultivate thriving celery plants, regardless of your gardening experience. Get ready to ditch the store-bought stuff and enjoy the delicious taste of homegrown celery!

Homemade Celery Paradise: How to Grow Your Own Celery in the Garden or on the Balcony
Hello dear garden friends! Today I’m going to show you how you can easily grow your own celery at home. It’s easier than you think, and the result is crisp, fresh celery that tastes much better than the kind from the supermarket. Let’s get started!
What You Need: The Ingredients for Your Celery Success
Before we begin, here’s a list of all the things you’ll need for your celery adventure:
-
A bunch of celery from the supermarket: Yes, you read that right! We’re starting with a store-bought bunch. Make sure the base (the bottom part where the roots were) still looks firm and healthy.
-
A sharp knife: For a clean cut of the celery base.
-
A glass or bowl of water: For rooting the celery base.
-
Seed starting mix or potting soil: For planting the rooted celery.
-
A pot or a garden bed: Depending on where you want to plant your celery. The pot should be at least 20 cm in diameter.
-
Patience: Celery needs a bit of time to grow.
Phase 1: Bringing the Celery Base to Life – Rooting in Water
This step is super important because here we lay the foundation for our own celery.
-
Prepare the celery: Take your celery bunch and cut the stalk about 5-7 cm above the base. You can, of course, use the stalks for soups, salads, or smoothies!
-
Add water!: Fill your glass or bowl with fresh water. Make sure the water is not chlorinated. If you’re unsure, let the water sit for a few hours so the chlorine can evaporate.
-
Place the celery base: Put the celery base with the cut side down into the water. Make sure that only the bottom half of the base is in the water. The upper leaves should remain dry.
-
A sunny spot: Place the glass or bowl in a bright, warm place, but avoid direct sunlight. A windowsill is ideal.
-
Change the water: Change the water every 1-2 days to prevent rot.
-
A test of patience: Now it’s time to wait! After about a week, you should see small roots on the underside of the celery base. After two to three weeks, the roots should be strong enough to plant the celery. You will also see new green leaves sprouting from the center of the celery base. This is a good sign!
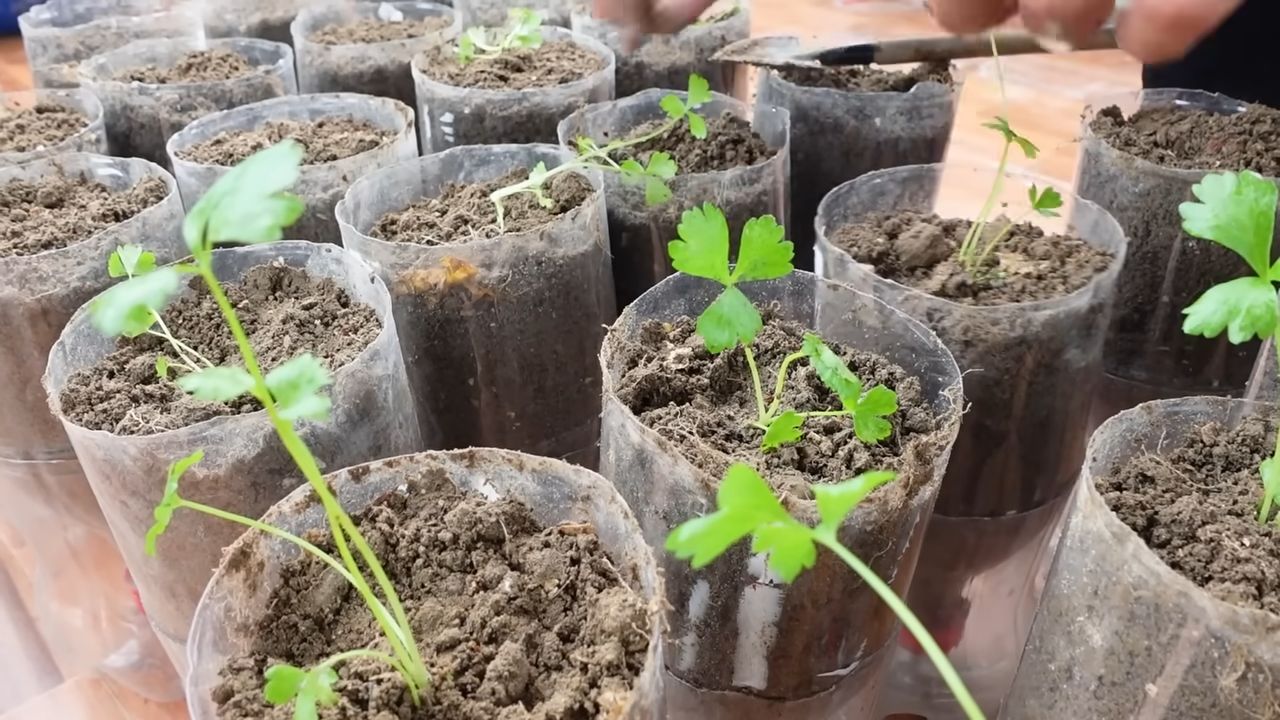
Phase 2: A New Home for Your Celery – Planting
Once your celery has strong roots, it’s time to move it into the soil.
-
Prepare the pot or bed: Fill your pot or bed with seed starting mix or potting soil. The soil should be loose and well-draining.
-
Plant the celery: Dig a small hole in the soil large enough to accommodate the celery base. Carefully place the celery base in the hole and cover the roots with soil. Make sure the top of the celery base is still peeking out of the soil a little.
-
Water it in: Water the celery thoroughly after planting.
-
The right location: Place the pot or bed in a sunny to partially shaded spot. Celery likes it bright, but not too hot.
-
Regular care: Keep the soil moist, but not wet. Water the celery regularly, especially on hot days. Fertilize the celery every few weeks with an organic fertilizer.
Phase 3: Celery Care – Helping Your Celery Thrive
Proper care is the key to a healthy and productive celery plant.
-
Watering: Celery needs a lot of water, especially during its growth phase. Make sure the soil is always moist, but avoid waterlogging. It’s best to water in the morning or evening when the sun is not as strong.
-
Fertilizing: Celery is a heavy feeder and needs regular nutrients. Fertilize the celery every few weeks with an organic fertilizer, such as compost or horn shavings.
-
Weeding: Keep the area around the celery free of weeds. Weeds steal nutrients and water from the celery.
-
Pest protection: Celery can be infested by various pests, such as slugs or aphids. Check the celery regularly for pests and combat them with natural methods if necessary.
-
Blanching (optional): If you want particularly tender and light-colored celery, you can blanch the stalks. To do this, wrap the stalks with paper or cardboard about two weeks before harvesting. Make sure the leaves remain free.
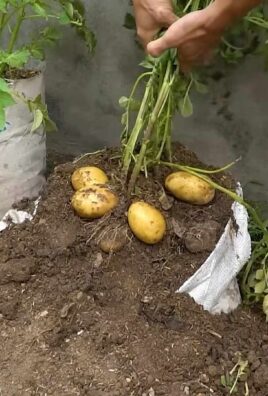
Phase 4: The Harvest – Your Homegrown Celery is Ready!
After about 3-4 months, your homegrown celery is ready to be harvested.
-
Harvest time: The celery is ready to harvest when the stalks have reached a sufficient size and are firm.
-
Harvesting method: Cut the stalks with a sharp knife just above the ground. You can either harvest all the stalks at once or just the outer stalks as needed.
-
Storage: Store the harvested celery in the refrigerator. It will keep there for about a week.
Additional Tips for the Perfect Celery
-
Celery in a pot: If you plant your celery in a pot, make sure the pot is large enough. A pot with a diameter of at least 20 cm is ideal.
-
Celery in a bed: If you plant your celery in a garden bed, make sure the soil is well-prepared. Loosen the soil and mix in compost or horn shavings.
-
Celery as a companion plant: Celery is a good companion plant for cabbage, tomatoes, and onions.
-
Celery varieties: There are different varieties of celery that differ in size, taste, and color. Inform yourself about the different varieties before buying and choose the one that best suits your needs.
-
Celery diseases: Celery can be affected by various diseases, such as celery rot or Septoria leaf spot. Watch for signs of disease and combat them with natural methods if necessary.
I hope this guide helps you grow your own celery at home. It’s a great feeling to harvest vegetables from your own garden and know where they come from. Happy gardening
Conclusion
So, there you have it! Growing celery at home, while it might seem daunting at first, is a surprisingly rewarding experience. It’s more than just a fun gardening project; it’s about connecting with your food, reducing waste, and enjoying the unparalleled freshness of homegrown produce. Forget those limp, store-bought stalks that have traveled miles – imagine crisp, flavorful celery, bursting with nutrients, ready to be harvested straight from your garden.
The beauty of this DIY trick lies in its simplicity and sustainability. By regrowing celery from the base, you’re not only saving money but also actively participating in a circular food system. You’re minimizing food waste and maximizing the potential of what you already have. Plus, the process itself is incredibly satisfying, watching a discarded piece of vegetable transform into a thriving plant.
But the benefits extend beyond mere convenience and cost-effectiveness. Homegrown celery boasts a superior flavor profile compared to its commercially grown counterparts. The taste is brighter, cleaner, and more intensely celery-like. You’ll notice the difference immediately, whether you’re adding it to soups, salads, smoothies, or simply enjoying it as a crunchy snack.
Don’t be afraid to experiment with variations! Try different types of celery, such as Pascal celery or red celery, to see which varieties thrive best in your climate and soil conditions. You can also explore different growing methods, such as hydroponics or container gardening, to adapt the process to your available space and resources. Consider companion planting with other vegetables like onions, garlic, or tomatoes, which can help deter pests and improve the overall health of your celery plants.
This DIY celery growing trick is a must-try for anyone looking to add a touch of green to their life and a boost of flavor to their meals. It’s a simple, sustainable, and incredibly rewarding way to enjoy fresh, homegrown celery.
We wholeheartedly encourage you to give this a try. It’s a fantastic project for beginners and experienced gardeners alike. Once you’ve harvested your first batch of homegrown celery, we’d love to hear about your experience! Share your tips, tricks, and photos in the comments below. Let’s build a community of celery-growing enthusiasts and inspire others to embrace the joys of homegrown produce. What are you waiting for? Get growing!
Frequently Asked Questions (FAQ)
1. What kind of celery works best for regrowing?
The best celery for regrowing is typically organic celery purchased from a grocery store or farmer’s market. Organic celery is less likely to have been treated with chemicals that could inhibit growth. Look for celery with a healthy, intact base and firm stalks. Avoid celery that is wilted, discolored, or shows signs of rot. Pascal celery is a common and reliable variety for regrowing, but feel free to experiment with other types as well. The key is to start with a healthy base that shows signs of potential regrowth.
2. How long does it take to regrow celery from the base?
The time it takes to regrow celery from the base can vary depending on several factors, including the variety of celery, the growing conditions (temperature, sunlight, water), and the overall health of the base. Generally, you can expect to see new growth within a week or two after placing the base in water. After about 3-4 weeks, you should have a small celery plant that is ready to be transplanted into soil. However, it may take several months for the plant to mature and produce full-sized stalks. Be patient and provide consistent care, and you’ll be rewarded with fresh, homegrown celery.
3. What kind of soil is best for growing celery?
Celery thrives in rich, well-draining soil that is high in organic matter. A loamy soil is ideal, as it provides a good balance of drainage and water retention. Before planting, amend the soil with compost, well-rotted manure, or other organic materials to improve its fertility and structure. Celery also prefers a slightly acidic to neutral soil pH, ideally between 6.0 and 6.8. You can test your soil pH using a soil testing kit and adjust it accordingly with lime or sulfur. Ensure the soil is loose and well-aerated to allow for proper root development.
4. How much sunlight does celery need?
Celery needs at least 6 hours of sunlight per day to thrive. Choose a location in your garden that receives full sun, especially during the morning hours. If you live in a hot climate, providing some afternoon shade can help prevent the celery from bolting (going to seed prematurely). If you’re growing celery indoors, place it near a sunny window or use grow lights to supplement natural sunlight. Insufficient sunlight can result in leggy, weak plants with poor flavor.
5. How often should I water celery?
Celery needs consistent moisture to grow properly. Water deeply and regularly, especially during hot, dry weather. Aim to keep the soil consistently moist but not waterlogged. Overwatering can lead to root rot, while underwatering can cause the stalks to become tough and bitter. A good rule of thumb is to water when the top inch of soil feels dry to the touch. Mulching around the base of the plants can help retain moisture and suppress weeds.
6. What are some common pests and diseases that affect celery?
Celery can be susceptible to several pests and diseases, including aphids, celery leaf tiers, carrot weevils, early blight, late blight, and pink rot. Regularly inspect your plants for signs of infestation or disease. To prevent pest problems, consider using row covers or insecticidal soap. To prevent diseases, ensure good air circulation, avoid overhead watering, and practice crop rotation. If you notice any signs of disease, remove the affected leaves or plants immediately to prevent the spread of the problem.
7. Can I grow celery in containers?
Yes, you can successfully grow celery in containers, especially if you have limited garden space. Choose a large container that is at least 12 inches deep and wide to accommodate the celery’s root system. Use a well-draining potting mix that is rich in organic matter. Ensure the container has drainage holes to prevent waterlogging. Place the container in a sunny location and water regularly. Container-grown celery may require more frequent watering and fertilization than celery grown in the ground.
8. How do I harvest celery?
You can harvest celery when the stalks are at least 6-8 inches long and have reached your desired size. To harvest, simply cut the stalks at the base of the plant with a sharp knife. You can harvest individual stalks as needed, or you can harvest the entire plant at once. After harvesting, store the celery in the refrigerator to keep it fresh.
9. Can I freeze celery?
Yes, you can freeze celery for later use. To freeze celery, wash and chop it into small pieces. Blanch the celery in boiling water for 2-3 minutes, then immediately transfer it to an ice bath to stop the cooking process. Drain the celery well and pack it into freezer bags or containers. Frozen celery may lose some of its crispness, but it will still retain its flavor and nutrients. It’s best used in cooked dishes like soups, stews, and sauces.
10. How can I encourage thicker stalks?
To encourage thicker celery stalks, ensure your plants receive adequate sunlight, water, and nutrients. Side-dress the plants with compost or fertilizer every few weeks to provide them with the necessary nutrients. You can also try blanching the stalks by mounding soil around them or wrapping them with paper or cardboard a few weeks before harvest. Blanching helps to whiten the stalks and make them more tender.


Leave a Comment