
Growing Cauliflower at Home might seem daunting, but trust me, with a few clever tricks and a little DIY spirit, you can harvest your own delicious, creamy cauliflower right in your backyard! Imagine serving a vibrant cauliflower cheese, knowing you nurtured the star ingredient from seed to table. That’s the magic we’re unlocking today.
Cauliflower, a descendant of wild cabbage, has a rich history, cultivated for centuries across the Mediterranean and eventually making its way to gardens worldwide. Its versatility in the kitchen and nutritional benefits have cemented its place as a beloved vegetable. But let’s be honest, buying cauliflower from the store can be expensive, and sometimes the quality just isn’t there. That’s where this DIY guide comes in!
I’m going to share some simple yet effective home gardening tricks that will empower you to successfully growing cauliflower at home, even if you’re a beginner. We’ll cover everything from choosing the right variety for your climate to protecting your precious plants from pests and diseases. Say goodbye to bland, overpriced supermarket cauliflower and hello to fresh, flavorful harvests straight from your garden. Get ready to roll up your sleeves and discover the joy of homegrown cauliflower!
Growing Cauliflower Yourself: Your Comprehensive DIY Guide
Hey garden friends! Cauliflower from your own garden – doesn’t that sound fantastic? I think so! And the best part: It’s not as difficult as you might think. With a little patience and the right tips, you too can soon be harvesting your own, crisp cauliflower. In this article, I’ll show you step by step how it’s done. Let’s get started!
The Basics: What Cauliflower Needs to Grow
Before we begin, let’s briefly discuss the most important needs of cauliflower. This way, you can ensure it feels perfectly happy in your garden.
- Sun: Cauliflower loves the sun! At least six hours of direct sunlight per day is ideal.
- Soil: The soil should be well-draining, rich in humus, and slightly acidic to neutral (pH value between 6.0 and 7.0).
- Water: Regular watering is important, especially during head formation. The soil should always be moist, but not wet.
- Nutrients: Cauliflower is a heavy feeder and requires a lot of nutrients, especially nitrogen, phosphorus, and potassium.
- Temperature: Optimal temperatures are between 15°C and 20°C (59°F and 68°F).
Step-by-Step Guide: From Seed to Cauliflower Head
Okay, now let’s get down to business! Here is a detailed guide on how to grow your own cauliflower.
1. Preparation: Seeds or Young Plants?
You have two options: either you start your cauliflower plants from seed indoors, or you buy young plants from a garden center. Both options have their pros and cons.
- Seeds:
- Advantages: Cheaper, wider variety of cultivars, you have full control over the cultivation.
- Disadvantages: More effort, longer waiting time until harvest.
- Young Plants:
- Advantages: Less effort, quicker harvest.
- Disadvantages: More expensive, limited variety of cultivars.
I personally prefer to start my cauliflower plants from seed. This way, I can ensure they are optimally cared for from the very beginning.
2. Sowing: The Right Way to Do It
If you have decided to sow seeds, you should start them indoors about six to eight weeks before the last expected frost date.
- Choose the right seeds: There are many different cauliflower varieties. Find out which variety is best suited for your climate and needs.
- Prepare the seed trays: Fill seed trays or small pots with seed starting mix.
- Sow the seeds: Place one to two seeds about 1 cm (0.4 inches) deep in each pot.
- Cover the seeds with soil: Press the soil down lightly and water it gently.
- Place the seed trays in a bright, warm place: The ideal germination temperature is around 20°C (68°F).
- Keep the soil moist: Water the soil regularly, but avoid waterlogging.
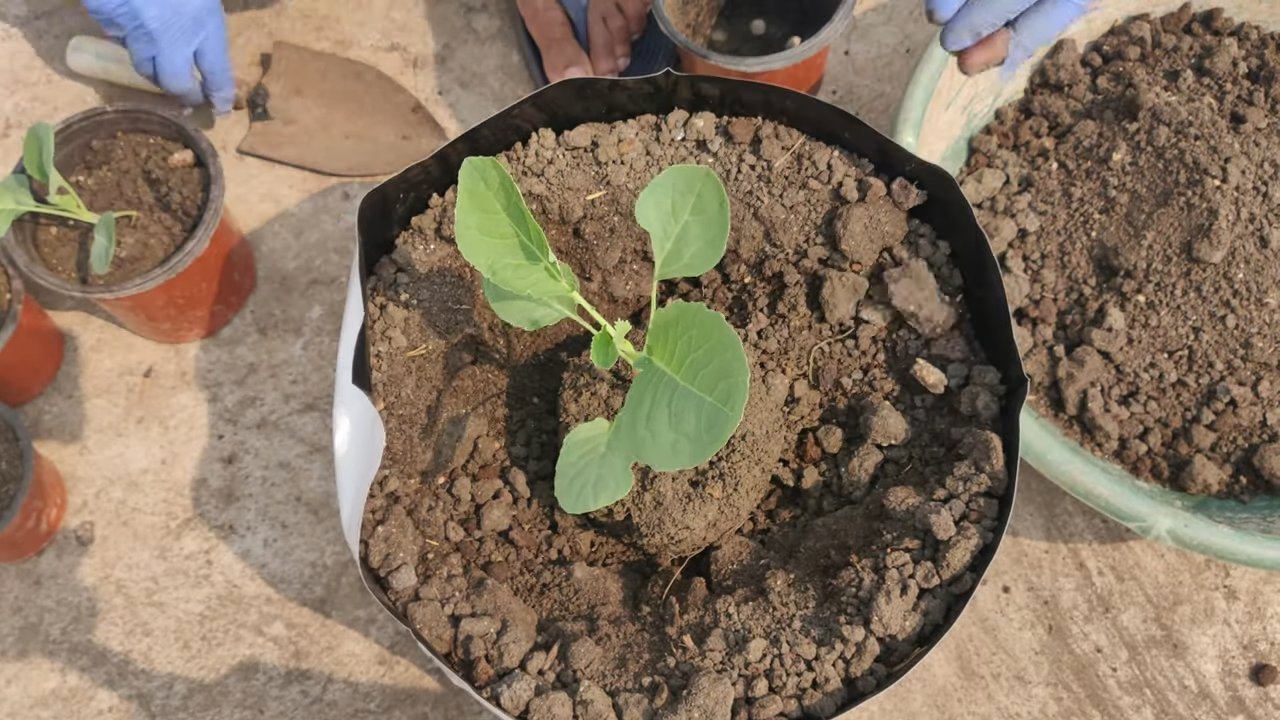
- Prick out the seedlings: As soon as the seedlings have developed their first true leaves (after about two to three weeks), you can prick them out. This means transplanting them into larger pots so they have more space to grow.
3. Planting: Into the Garden Bed!
As soon as the young plants are about 15 cm (6 inches) tall and there is no more danger of frost, they can be planted in the garden bed.
- Prepare the bed: Loosen the soil thoroughly and remove weeds. Work compost or organic fertilizer into the soil to enrich it with nutrients.
- Plant the young plants: Set the young plants in the bed at a distance of about 45 cm (18 inches) from each other and 60 cm (24 inches) between rows.
- Water the plants: Water the plants thoroughly after planting.
- Protect the plants from pests: Cauliflower is susceptible to various pests, such as cabbage whites or flea beetles. Protect the plants with an insect net or combat the pests with natural remedies.
4. Care: Keeping Your Cauliflower Healthy and Strong
Proper care is crucial for a bountiful harvest.
- Water regularly: Cauliflower needs regular water, especially during head formation. Make sure the soil is always moist, but not wet.
- Fertilize regularly: Fertilize the cauliflower every two to three weeks with an organic fertilizer or a special cabbage fertilizer.
- Remove weeds: Keep the bed weed-free so the cauliflower doesn’t have to compete for nutrients and water.
- Check for pests and diseases: Regularly inspect the plants for pests and diseases and treat them if necessary.
- Blanch the head (optional): If you want a particularly white cauliflower head, you can blanch it. To do this, bend some leaves over the head once it is about fist-sized. This prevents the head from getting too much sunlight and discoloring.
Challenges and Solutions: What to Do When Things Go Wrong?
Sometimes, not everything goes according to plan. Here are some common problems and how you can solve them:
- Yellow leaves: Can be a sign of a nutrient deficiency. Fertilize the cauliflower with a nitrogen-rich fertilizer.
- Small heads: Can be caused by a lack of water or too little fertilizer. Water and fertilize the cauliflower regularly.
- Pests: Combat pests with natural remedies or an insect net.
- Diseases: Remove affected leaves and treat the plants with a suitable fungicide.
The Harvest: The Time Has Finally Come!
After about 60 to 80 days, depending on the variety, your cauliflower is ready to be harvested.
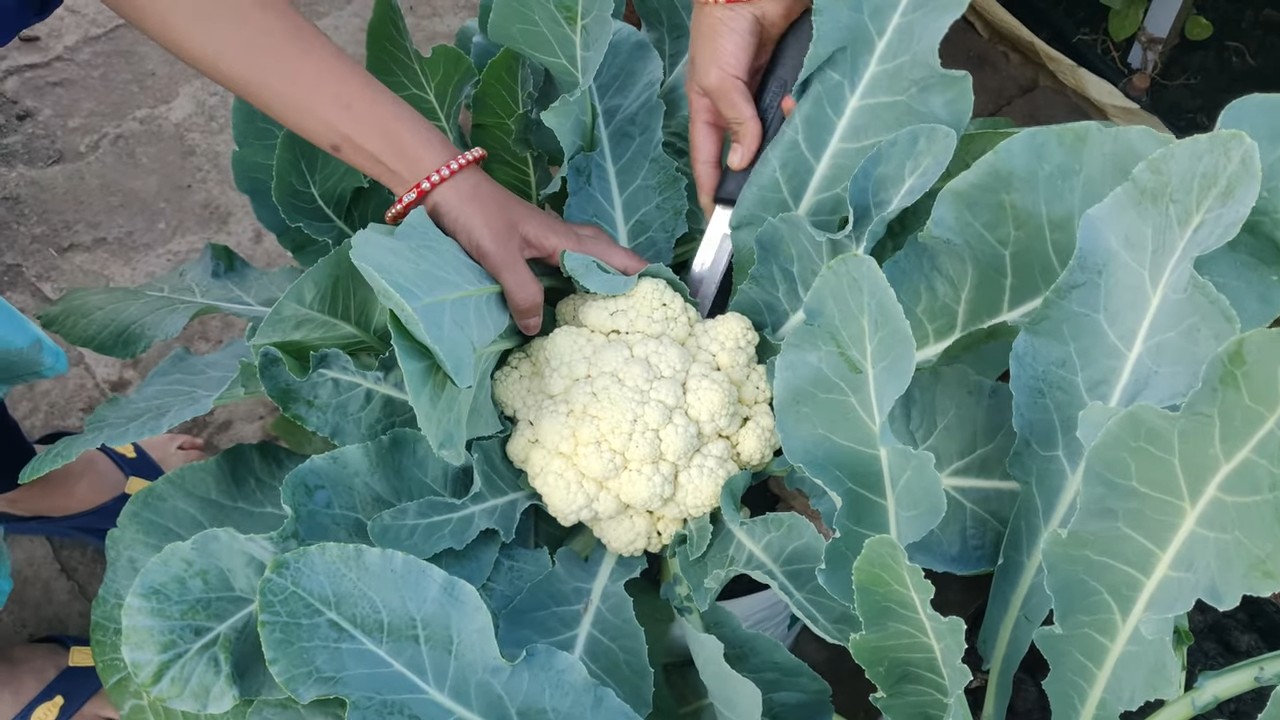
- When to harvest? Harvest the cauliflower as soon as the head has reached the desired size and the florets are still firm and tight.
- How to harvest? Cut the head off with a sharp knife. Leave a few leaves on the head to protect it from drying out.
After the Harvest: What Now?
After harvesting, you can store the cauliflower in the refrigerator. It will keep for about a week. You can also freeze it to preserve it for longer.
Variety Recommendations: Which Cauliflower Varieties Are the Best?
There are many different cauliflower varieties that differ in taste, size, and ripening time. Here are some of my favorites:
- ‘Snowball Y Improved’: A classic, early-maturing variety with pure white heads.
- ‘Romanesco’: a striking variety with spiral-shaped, green heads.
- ‘Purple of Sicily’: a colorful variety with purple heads.
- ‘Cheddar’: a variety with orange heads that is rich in beta-carotene.
Additional Tips and Tricks: How to Make Your Cauliflower Even Better
Soil improvement: Improve the soil before planting with compost or organic fertilizer.
Companion planting: Plant cauliflower together with other vegetables that protect it from pests or supplement its nutrient needs. Good partners include marigolds, sage, or beans.
Conclusion
So, there you have it! Growing cauliflower at home, while it might seem daunting at first, is an incredibly rewarding experience that brings the freshest, most flavorful produce right to your table. We’ve walked through the entire process, from selecting the right variety and preparing your soil to nurturing your plants and harvesting your beautiful heads of cauliflower.
Why is this DIY trick a must-try? Because store-bought cauliflower simply can’t compare to the taste and satisfaction of harvesting your own. You control the growing environment, ensuring your cauliflower is free from unwanted pesticides and herbicides. Plus, you get to enjoy the unique varieties that are often unavailable in supermarkets. Imagine serving a vibrant purple or orange cauliflower, grown with your own hands, at your next dinner party!
But the benefits extend beyond just flavor and control. Gardening, in general, is a fantastic stress reliever. Tending to your cauliflower plants provides a connection to nature and a sense of accomplishment as you watch them grow. It’s a healthy and engaging hobby that can be enjoyed by people of all ages.
Don’t be afraid to experiment! There are countless variations you can try to tailor your cauliflower growing experience to your specific preferences and climate. Consider succession planting to ensure a continuous harvest throughout the growing season. Try companion planting with herbs like rosemary or thyme to deter pests naturally. Or, explore different cauliflower varieties, such as Romanesco, with its stunning fractal patterns, or the vibrant Cheddar cauliflower, which adds a pop of color to any dish.
For those in warmer climates, you might consider starting your cauliflower indoors during the hottest months and transplanting them when the weather cools down. Gardeners in colder regions can extend their growing season by using row covers or cold frames to protect their plants from frost.
We’ve covered a lot of ground, but the most important thing is to just get started. Don’t let the perceived complexity hold you back. Even if your first attempt isn’t perfect, you’ll learn valuable lessons that will help you succeed next time. Every gardener, even the most experienced, has faced challenges and setbacks. The key is to persevere and enjoy the process.
Ready to embark on your cauliflower-growing adventure? We encourage you to give this DIY trick a try. Plant a few seeds, nurture your seedlings, and watch as your own beautiful heads of cauliflower begin to form. And most importantly, share your experience with us! We’d love to hear about your successes, your challenges, and any tips or tricks you’ve discovered along the way. Post photos of your cauliflower harvest on social media and tag us. Let’s build a community of home gardeners who are passionate about growing their own food.
Growing cauliflower at home is more than just a way to get fresh vegetables; it’s a journey of discovery, a connection to nature, and a source of immense satisfaction. So, grab your gardening gloves, prepare your soil, and get ready to experience the joy of growing your own cauliflower! You won’t regret it.
Frequently Asked Questions (FAQ)
What is the best time of year to plant cauliflower?
The best time to plant cauliflower depends on your climate. Cauliflower thrives in cool weather, so it’s generally planted in the spring or fall. For spring planting, start seeds indoors 6-8 weeks before the last expected frost. Transplant seedlings outdoors 2-3 weeks before the last frost. For fall planting, start seeds indoors in mid-summer and transplant seedlings outdoors in late summer or early fall. The goal is to have the cauliflower mature during cool weather. In warmer climates, you can grow cauliflower as a winter crop.
How much sunlight does cauliflower need?
Cauliflower requires at least 6 hours of direct sunlight per day. Choose a location in your garden that receives plenty of sunlight throughout the day. If you live in a particularly hot climate, some afternoon shade can be beneficial to prevent the cauliflower from bolting (going to seed prematurely).
What kind of soil is best for growing cauliflower?
Cauliflower prefers well-drained, fertile soil that is rich in organic matter. The ideal soil pH is between 6.0 and 7.0. Before planting, amend your soil with compost, aged manure, or other organic matter to improve its fertility and drainage. A soil test can help you determine the pH and nutrient levels of your soil and guide you on any necessary amendments.
How often should I water my cauliflower plants?
Cauliflower needs consistent moisture to thrive. Water deeply and regularly, especially during dry periods. Aim to keep the soil consistently moist but not waterlogged. Mulching around the plants can help retain moisture and suppress weeds. A good rule of thumb is to water when the top inch of soil feels dry to the touch.
How do I prevent cauliflower from bolting?
Bolting, or premature flowering, can occur when cauliflower plants are exposed to stress, such as extreme temperatures or inconsistent watering. To prevent bolting, choose heat-tolerant varieties if you live in a warm climate. Provide consistent watering and avoid letting the soil dry out completely. Mulching can also help regulate soil temperature and retain moisture.
What are some common pests and diseases that affect cauliflower?
Common pests that affect cauliflower include cabbage worms, aphids, and flea beetles. Diseases include clubroot, black rot, and downy mildew. To prevent pest and disease problems, practice good garden hygiene, such as removing plant debris and weeds. Use row covers to protect plants from pests. Inspect your plants regularly for signs of pests or diseases and take action promptly. Organic pest control methods, such as insecticidal soap or neem oil, can be effective for controlling many pests.
When is cauliflower ready to harvest?
Cauliflower is typically ready to harvest when the head is firm, compact, and about 6-8 inches in diameter. The exact size will vary depending on the variety. Check the seed packet or plant tag for specific harvesting information. The head should be white or the color specified for the variety you are growing. If the head starts to separate or the florets begin to open, it’s time to harvest.
How do I harvest cauliflower?
To harvest cauliflower, use a sharp knife to cut the head from the plant, leaving a few leaves attached to protect the head. Cut the stem at the base of the head. Handle the cauliflower head carefully to avoid bruising.
Can I eat the leaves of the cauliflower plant?
Yes, the leaves of the cauliflower plant are edible and nutritious. They can be cooked like other leafy greens, such as kale or collard greens. They have a slightly stronger flavor than the head of the cauliflower.
What are some creative ways to use my homegrown cauliflower?
The possibilities are endless! You can roast it, steam it, grill it, or mash it. Use it in soups, stews, or stir-fries. Make cauliflower rice as a healthy alternative to white rice. Puree it into a creamy sauce. Or, try pickling it for a tangy treat. Don’t forget to experiment with different spices and herbs to create unique and flavorful dishes. Growing your own cauliflower opens up a world of culinary possibilities!


Leave a Comment