
Growing cantaloupe in containers might sound like a challenge reserved for seasoned gardeners with sprawling acres, but I’m here to tell you it’s totally achievable, even if your “garden” is a sunny balcony or a cozy patio! Forget the image of endless fields; we’re bringing the sweet, juicy taste of summer right to your doorstep.
For centuries, cantaloupe has been a symbol of abundance and sweetness, gracing tables from ancient Egypt to Renaissance feasts. Its vibrant orange flesh and refreshing flavor have made it a beloved fruit across cultures. But what if you thought you needed a sprawling farm to enjoy this delicious treat fresh from the vine?
That’s where this DIY guide comes in! Many people shy away from growing cantaloupe because they believe it requires vast amounts of space. But with a few clever tricks and the right container, you can successfully cultivate your own cantaloupe, even in the most compact of living spaces. Imagine biting into a perfectly ripe, homegrown cantaloupe, knowing you nurtured it from seed to fruit. This guide will provide you with the knowledge and confidence to start growing cantaloupe in containers and enjoy the fruits (literally!) of your labor. Let’s get started!
“`html
Wassermelonen im Topf ziehen: So geht’s!
Ich liebe Wassermelonen! Und was gibt es Besseres, als sie selbst anzubauen? Aber nicht jeder hat einen riesigen Garten. Keine Sorge, denn ich zeige dir, wie du auch auf dem Balkon oder der Terrasse saftige Wassermelonen im Topf ziehen kannst. Es ist einfacher, als du denkst!
Die richtige Sorte wählen
Nicht alle Wassermelonensorten eignen sich für den Anbau im Topf. Wähle am besten kompakte oder “Bush”-Sorten. Diese Sorten sind speziell gezüchtet, um weniger Platz zu benötigen. Hier sind ein paar meiner Favoriten:
* ‘Sugar Baby’: Eine klassische, kleine Wassermelone mit rotem Fruchtfleisch. Sie reift relativ schnell und ist daher ideal für kürzere Sommer.
* ‘Bush Sugar Baby’: Eine noch kompaktere Version der ‘Sugar Baby’, perfekt für kleinere Töpfe.
* ‘Golden Midget’: Eine gelbfleischige Sorte, die früh reift und eine goldgelbe Schale hat, wenn sie reif ist.
* ‘Tiger Baby’: Eine Mini-Wassermelone mit gestreifter Schale und süßem, rotem Fruchtfleisch.
Was du brauchst: Die Materialliste
Bevor wir loslegen, stelle sicher, dass du alles griffbereit hast. Hier ist eine Liste der Dinge, die du benötigst:
* Wassermelonensamen: Wähle die Sorte, die dir am besten gefällt.
* Großer Topf: Mindestens 50 Liter Fassungsvermögen. Je größer, desto besser! Wassermelonen brauchen Platz für ihre Wurzeln.
* Hochwertige Blumenerde: Eine gut drainierende Blumenerde ist entscheidend. Du kannst auch spezielle Gemüseerde verwenden.
* Kompost: Für zusätzliche Nährstoffe.
* Langzeitdünger: Wassermelonen sind Starkzehrer und brauchen regelmäßige Düngung.
* Rankhilfe: Obwohl es sich um “Bush”-Sorten handelt, können die Ranken trotzdem etwas Unterstützung gebrauchen. Ein kleines Spalier oder ein paar Stäbe reichen aus.
* Gießkanne oder Gartenschlauch: Zum regelmäßigen Gießen.
* Mulch: Um die Feuchtigkeit im Boden zu halten und Unkraut zu unterdrücken. Stroh oder Holzhackschnitzel eignen sich gut.
* Ggf. Vorkulturgefäße: Für die Anzucht der Samen im Haus.
Schritt-für-Schritt-Anleitung: So ziehst du deine Wassermelonen
1. Die Vorkultur (optional)
Ich empfehle, die Wassermelonensamen im Haus vorzuziehen, besonders wenn du in einer Region mit kurzen Sommern lebst. Das gibt den Pflanzen einen Vorsprung.
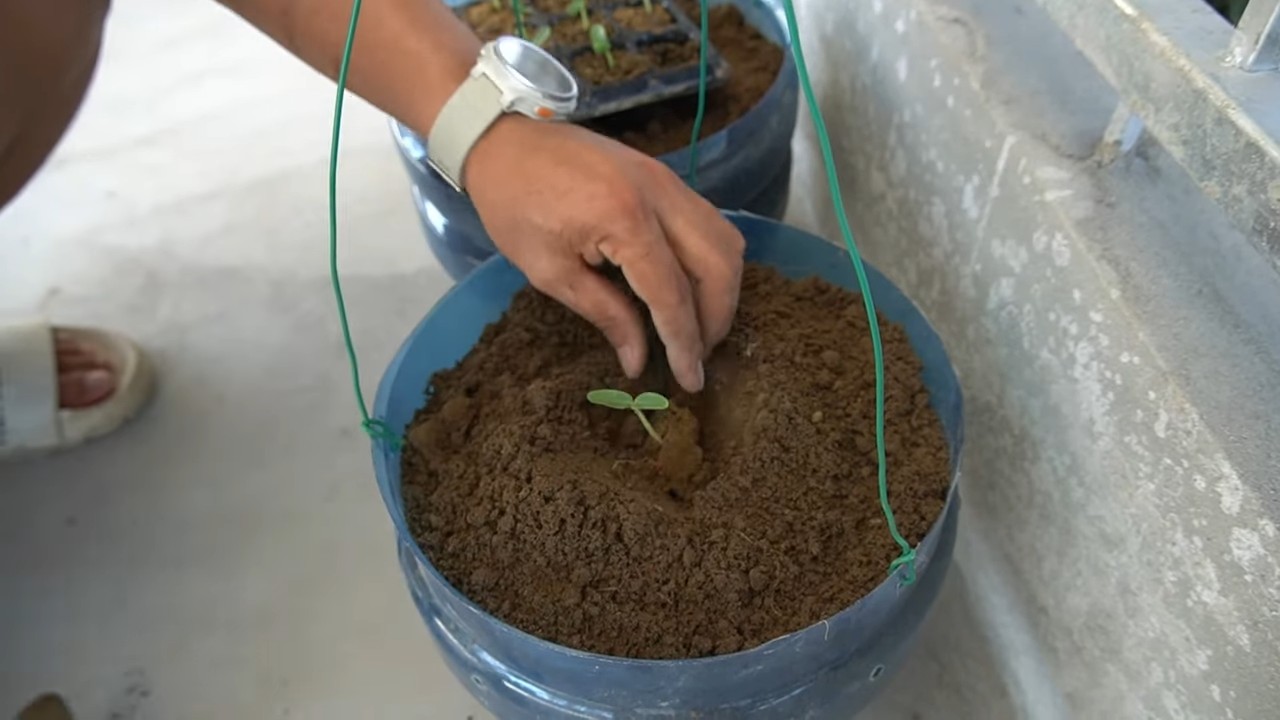
1. Samen aussäen: Fülle kleine Töpfe oder Anzuchtschalen mit Anzuchterde. Lege pro Topf 2-3 Samen etwa 1-2 cm tief in die Erde.
2. Gießen: Befeuchte die Erde vorsichtig mit einer Sprühflasche.
3. Warm stellen: Wassermelonensamen keimen am besten bei Temperaturen zwischen 25 und 30 Grad Celsius. Stelle die Töpfe an einen warmen Ort, z.B. auf eine Heizmatte oder in die Nähe eines Heizkörpers.
4. Feucht halten: Die Erde sollte immer leicht feucht sein, aber nicht nass.
5. Licht: Sobald die Samen gekeimt sind (nach etwa 5-10 Tagen), stelle die Töpfe an einen hellen Ort, z.B. auf eine Fensterbank.
6. Pikieren: Wenn die Sämlinge 2-3 echte Blätter haben, kannst du sie in größere Töpfe umtopfen. Wähle nur den stärksten Sämling pro Topf aus.
2. Der Umzug ins Freie
Sobald die Temperaturen steigen und keine Frostgefahr mehr besteht (in der Regel Mitte Mai), können die Wassermelonen ins Freie umziehen.
1. Topf vorbereiten: Fülle den großen Topf mit einer Mischung aus Blumenerde, Kompost und Langzeitdünger. Achte darauf, dass der Topf Abzugslöcher hat, damit überschüssiges Wasser ablaufen kann.
2. Pflanzen: Hebe die Sämlinge vorsichtig aus den Anzuchttöpfen und setze sie in den großen Topf. Achte darauf, dass die Wurzeln nicht beschädigt werden.
3. Abstand: Wenn du mehrere Pflanzen in einen Topf setzen möchtest, achte auf einen Abstand von mindestens 30-40 cm zwischen den Pflanzen. Ich empfehle aber, pro Topf nur eine Pflanze zu setzen, um optimale Ergebnisse zu erzielen.
4. Angießen: Gieße die Pflanzen nach dem Einpflanzen gründlich an.
5. Rankhilfe anbringen: Stecke die Rankhilfe in den Topf und leite die Ranken der Wassermelone daran entlang.
3. Die Pflege: Gießen, Düngen, und mehr
Wassermelonen brauchen viel Pflege, um gut zu wachsen und leckere Früchte zu produzieren.
1. Gießen: Wassermelonen brauchen viel Wasser, besonders während der Fruchtbildung. Gieße regelmäßig und gründlich, besonders an heißen Tagen. Achte darauf, dass die Erde nicht austrocknet. Vermeide aber Staunässe, da dies zu Wurzelfäule führen kann. Am besten gießt du am Morgen, damit die Blätter über den Tag abtrocknen können.
2. Düngen: Wassermelonen sind Starkzehrer und brauchen regelmäßige Düngung. Verwende einen Langzeitdünger oder dünge alle 2-3 Wochen mit einem Flüssigdünger für Gemüse. Achte auf eine ausgewogene Nährstoffzusammensetzung.
3. Mulchen: Eine Mulchschicht hilft, die Feuchtigkeit im Boden zu halten und Unkraut zu unterdrücken. Lege eine Schicht Stroh oder Holzhackschnitzel um die Pflanzen.
4. Bestäubung: Wassermelonen sind auf die Bestäubung durch Bienen und andere Insekten angewiesen. Wenn du keine Bienen in deinem Garten hast, kannst du die Blüten auch selbst bestäuben. Nimm dazu einen kleinen Pinsel und übertrage den Pollen von den männlichen auf die weiblichen Blüten. Die männlichen Blüten erkennst du daran, dass sie keinen Fruchtansatz haben.
5. Fruchtansatz unterstützen: Wenn die Früchte größer werden, kann es sinnvoll sein, sie mit einem Netz oder einer Unterlage zu stützen, damit sie nicht auf dem Boden liegen und faulen.
6. Ausgeizen: Entferne regelmäßig Seitentriebe, um die Energie der Pflanze auf die Fruchtbildung zu konzentrieren.
4. Die Ernte: Wann ist die Wassermelone reif?
Die Erntezeit hängt von der Sorte und den Wetterbedingungen ab. In der Regel sind Wassermelonen etwa 80-100 Tage nach der Aussaat reif. Aber wie erkennst du, ob eine Wassermelone reif ist? Hier sind ein paar Anzeichen:
* Der Klang: Klopfe auf die Wassermelone. Wenn sie hohl klingt, ist sie wahrscheinlich reif.
* Die Farbe: Die Schale der Wassermelone sollte ihre Farbe verändert haben und etwas matter wirken.
* Der Stiel: Der Stiel, der die Wassermelone mit der Pflanze verbindet, sollte trocken und braun sein.
* Die Stelle, die auf dem Boden lag: Die Stelle, an der die Wassermelone auf dem Boden lag, sollte gelblich verfärbt sein.
Wenn du dir unsicher bist, kannst du auch eine kleine Probe nehmen. Schneide ein kleines Stück aus der Wassermelone und probiere es. Wenn es süß und saftig schmeckt, ist die Wassermelone reif.
5. Probleme und Lösungen
Auch beim Anbau von Wassermelonen im Topf können Probleme auftreten. Hier sind ein paar häufige Probleme und wie du sie lösen kannst:
* Blattläuse: Blattläuse können die Blätter der Wassermelone befallen. Sprühe die Pflanzen mit einer Seifenlauge oder einem biologischen Insektizid ab.
* Echter Mehltau: Echter Mehltau ist eine Pilzkrankheit, die sich durch einen weißen Belag auf den Bl
Conclusion
So, there you have it! Growing cantaloupe in containers might seem like a daunting task, reserved for those with sprawling gardens and endless sunshine. But as we’ve shown, with a little planning, the right techniques, and a dash of patience, you can absolutely cultivate these sweet, juicy melons right on your patio, balcony, or even a sunny windowsill.
Why is this DIY trick a must-try? Because it opens up the world of fresh, homegrown cantaloupe to everyone, regardless of their living situation. Imagine biting into a perfectly ripe cantaloupe, bursting with flavor, knowing that you nurtured it from seed to fruit, all within the confines of a container. The satisfaction is unparalleled! Plus, you’ll have complete control over the growing environment, ensuring your cantaloupes are free from harmful pesticides and herbicides. You’ll also save money compared to buying them at the grocery store, especially if you enjoy cantaloupe regularly.
But the benefits extend beyond just the delicious fruit. Container gardening is a fantastic way to connect with nature, reduce stress, and add a touch of beauty to your living space. Watching your cantaloupe vine grow and develop is a rewarding experience in itself.
Looking for variations? Consider experimenting with different cantaloupe varieties. Smaller, personal-sized cantaloupes like ‘Sugar Cube’ or ‘Minnesota Midget’ are particularly well-suited for container growing. You can also try training your cantaloupe vine to grow vertically on a trellis or support structure. This not only saves space but also improves air circulation, reducing the risk of fungal diseases. Another variation is to add companion plants to your container. Marigolds, for example, can help deter pests, while basil can improve the flavor of your cantaloupe.
Don’t be afraid to get creative with your container selection. While a large pot is essential, you can use repurposed containers like old buckets, tubs, or even grow bags. Just make sure they have adequate drainage holes.
We understand that growing cantaloupe in containers can seem intimidating at first, but we encourage you to take the plunge. The rewards are well worth the effort. Remember to provide your cantaloupe with plenty of sunlight, water, and nutrients, and be patient as it grows.
We’re confident that you’ll be enjoying your own homegrown cantaloupe in no time. So, grab your seeds, soil, and container, and get ready to embark on a delicious gardening adventure.
We’d love to hear about your experiences! Share your photos, tips, and challenges in the comments below. Let’s build a community of container cantaloupe growers and learn from each other. Happy gardening!
Frequently Asked Questions (FAQ)
What is the best size container for growing cantaloupe?
A container that holds at least 20 gallons is recommended for growing cantaloupe. The larger the container, the more room the roots have to grow, which translates to a healthier and more productive plant. Look for containers that are at least 18-24 inches in diameter and depth. Fabric grow bags are also an excellent option, as they provide good drainage and aeration.
How much sunlight does cantaloupe need?
Cantaloupe requires at least 6-8 hours of direct sunlight per day to thrive. Choose a location for your container that receives ample sunlight throughout the day. If you live in a particularly hot climate, you may need to provide some afternoon shade to prevent the plant from overheating.
What type of soil is best for growing cantaloupe in containers?
Use a well-draining potting mix that is rich in organic matter. Avoid using garden soil, as it can become compacted in containers and restrict root growth. You can amend your potting mix with compost, aged manure, or other organic materials to improve its fertility and drainage. A slightly acidic to neutral pH (around 6.0-7.0) is ideal.
How often should I water my cantaloupe plant?
Water your cantaloupe plant regularly, especially during hot, dry weather. The soil should be kept consistently moist but not waterlogged. Check the soil moisture by sticking your finger into the soil about an inch deep. If it feels dry, it’s time to water. Water deeply, allowing the water to drain out of the bottom of the container. Avoid overhead watering, as this can promote fungal diseases.
What kind of fertilizer should I use for cantaloupe?
Feed your cantaloupe plant with a balanced fertilizer every 2-3 weeks. Look for a fertilizer that is specifically formulated for vegetables or fruits. You can also use a liquid fertilizer or a slow-release granular fertilizer. Follow the instructions on the fertilizer package for application rates. During the flowering and fruiting stages, you can switch to a fertilizer that is higher in phosphorus and potassium to promote fruit development.
How do I pollinate my cantaloupe flowers?
Cantaloupe plants have separate male and female flowers. The female flowers have a small, immature fruit at the base, while the male flowers do not. Bees and other pollinators typically pollinate cantaloupe flowers. However, if you are growing cantaloupe indoors or in an area with limited pollinators, you may need to hand-pollinate the flowers. To hand-pollinate, use a small paintbrush to transfer pollen from the male flower to the female flower. Do this in the morning, when the flowers are open.
How long does it take for cantaloupe to mature?
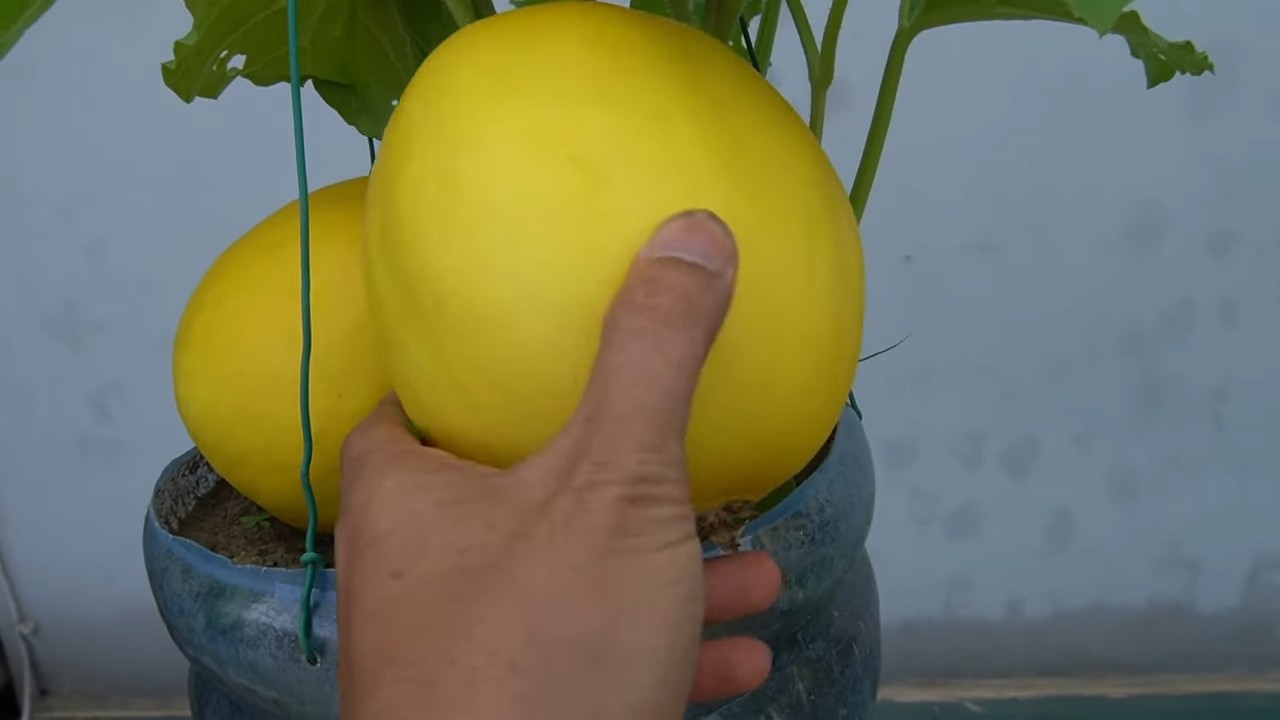
Cantaloupe typically takes 70-90 days to mature from seed. The exact time will depend on the variety, growing conditions, and climate. You’ll know your cantaloupe is ripe when it turns a golden color, the stem begins to crack near the fruit, and it has a sweet aroma.
What are some common pests and diseases that affect cantaloupe?
Common pests that affect cantaloupe include aphids, squash bugs, and cucumber beetles. These pests can be controlled with insecticidal soap, neem oil, or by handpicking them off the plants. Common diseases that affect cantaloupe include powdery mildew, downy mildew, and fusarium wilt. These diseases can be prevented by providing good air circulation, avoiding overhead watering, and using disease-resistant varieties.
Can I grow cantaloupe indoors?
Yes, you can grow cantaloupe indoors, but it requires a lot of light. You’ll need to provide supplemental lighting, such as grow lights, to ensure the plant receives enough light. You’ll also need to hand-pollinate the flowers.
How do I prune my cantaloupe plant?
Pruning can help improve air circulation and promote fruit development. Remove any yellowing or dead leaves. You can also prune the lateral vines to encourage the plant to focus its energy on producing fruit.
What do I do if my cantaloupe plant is not producing fruit?
There are several reasons why your cantaloupe plant may not be producing fruit. It could be due to lack of pollination, insufficient sunlight, or nutrient deficiencies. Make sure your plant is receiving enough sunlight, water, and fertilizer. If you suspect lack of pollination, try hand-pollinating the flowers.
How do I know when to harvest my cantaloupe?
A ripe cantaloupe will have a sweet aroma, a golden color, and the stem will begin to crack near the fruit. The skin will also feel slightly soft to the touch. Gently twist the fruit from the vine. If it comes off easily, it’s ripe.
Can I save seeds from my cantaloupe to plant next year?
Yes, you can save seeds from your cantaloupe to plant next year. Allow the cantaloupe to fully ripen on the vine. Then, scoop out the seeds and rinse them thoroughly. Spread the seeds out on a paper towel to dry completely. Store the dried seeds in an airtight container in a cool, dry place.
Leave a Comment