
Growing Broccoli from Seed might seem intimidating, but trust me, it’s one of the most rewarding experiences a home gardener can have! Forget those expensive, often lackluster heads from the grocery store. Imagine biting into crisp, vibrant broccoli you nurtured from a tiny seed right in your own backyard. Doesn’t that sound delicious?
For centuries, broccoli has been a staple in diets around the world, with its roots tracing back to the Roman Empire. The Romans prized it for its nutritional value and unique flavor, and now, you can easily cultivate this ancient superfood yourself. But why bother with seeds when you can buy transplants? Well, starting from seed gives you complete control over the variety you grow, ensuring you get exactly the type of broccoli you love. Plus, it’s significantly cheaper!
In this DIY guide, I’m going to share all my secrets for successfully growing broccoli from seed. From choosing the right varieties for your climate to mastering the art of transplanting, I’ll walk you through every step of the process. Whether you’re a seasoned gardener or just starting out, these simple tricks and hacks will help you achieve a bountiful broccoli harvest. Get ready to enjoy fresh, flavorful broccoli straight from your garden – it’s easier than you think!

Brokkoli aus Samen ziehen: Dein DIY-Leitfaden für eine reiche Ernte
Hey Gartenfreunde! Ich liebe es, mein eigenes Gemüse anzubauen, und Brokkoli ist da keine Ausnahme. Es ist nicht nur super gesund, sondern auch überraschend einfach, es selbst aus Samen zu ziehen. In diesem Artikel zeige ich dir Schritt für Schritt, wie du das auch schaffen kannst. Keine Angst, es ist wirklich einfacher als du denkst!
Was du brauchst: Deine Brokkoli-Ausrüstung
Bevor wir loslegen, lass uns sicherstellen, dass wir alles parat haben. Hier ist eine Liste der Dinge, die du für den Anbau von Brokkoli aus Samen benötigst:
* Brokkolisamen: Wähle eine Sorte, die für dein Klima geeignet ist. Informiere dich am besten im Fachhandel oder online.
* Anzuchterde: Normale Blumenerde ist oft zu schwer für die zarten Keimlinge. Anzuchterde ist locker und nährstoffarm, ideal für den Start.
* Anzuchtgefäße: Kleine Töpfe, Anzuchtschalen oder sogar Eierkartons funktionieren super. Hauptsache, sie haben Abzugslöcher.
* Sprühflasche: Zum sanften Befeuchten der Erde.
* Pflanzetiketten: Damit du nicht vergisst, was du wo gesät hast.
* Gießkanne: Für später, wenn die Pflanzen größer sind.
* Gartenerde: Für das Auspflanzen ins Beet.
* Kompost oder organischer Dünger: Um den Boden im Beet anzureichern.
* Schneckenkorn (optional): Brokkoli ist leider sehr beliebt bei Schnecken.
* Vlies (optional): Zum Schutz vor Schädlingen und Frost.
Der Zeitplan: Wann du Brokkoli säen solltest
Der Zeitpunkt der Aussaat hängt stark von deinem Klima ab. Generell gilt:
* Frühjahrsaussaat: Für eine Ernte im Sommer. Beginne mit der Aussaat im Haus etwa 6-8 Wochen vor dem letzten erwarteten Frost.
* Sommeraussaat: Für eine Ernte im Herbst. Säe die Samen im Juni oder Juli direkt ins Beet oder in Anzuchtgefäße.
Ich persönlich bevorzuge die Frühjahrsaussaat, da ich so länger etwas von meiner Brokkoli-Ernte habe.
Aussaat im Haus: Der Start in die Brokkoli-Saison
Hier kommt der spannende Teil: Die Aussaat!
1. Vorbereitung der Anzuchtgefäße: Fülle deine Anzuchtgefäße mit Anzuchterde. Drücke die Erde leicht an, aber nicht zu fest.
2. Aussaat der Samen: Lege 2-3 Samen pro Gefäß auf die Erde. Bedecke die Samen mit einer dünnen Schicht Anzuchterde (ca. 0,5 cm).
3. Bewässerung: Befeuchte die Erde vorsichtig mit einer Sprühflasche. Die Erde sollte feucht, aber nicht nass sein.
4. Standort: Stelle die Anzuchtgefäße an einen hellen, warmen Ort. Eine Fensterbank ist ideal. Die optimale Keimtemperatur liegt bei 18-22°C.
5. Feuchtigkeit: Halte die Erde gleichmäßig feucht. Du kannst die Gefäße auch mit einer durchsichtigen Folie oder einem Deckel abdecken, um die Luftfeuchtigkeit zu erhöhen. Achte aber darauf, regelmäßig zu lüften, um Schimmelbildung zu vermeiden.
6. Geduld: Nach etwa 5-10 Tagen sollten die ersten Keimlinge zu sehen sein.
Pikieren: Den kleinen Brokkoli-Pflanzen mehr Platz geben
Sobald die Keimlinge ihre ersten richtigen Blätter (neben den Keimblättern) entwickelt haben, ist es Zeit zum Pikieren. Das bedeutet, dass du die kleinen Pflanzen in größere Töpfe umpflanzt, damit sie mehr Platz zum Wachsen haben.
1. Vorbereitung: Fülle größere Töpfe (ca. 8-10 cm Durchmesser) mit Anzuchterde.
2. Vereinzeln: Hebe die Keimlinge vorsichtig mit einem Pikierstab oder einem Löffel aus den Anzuchtgefäßen. Versuche, die Wurzeln so wenig wie möglich zu beschädigen. Wenn du mehrere Samen pro Gefäß gesät hast, wähle den stärksten Keimling aus und entferne die anderen.
3. Einpflanzen: Setze jeden Keimling in einen eigenen Topf. Die Wurzeln sollten ausreichend Platz haben. Fülle den Topf mit Erde auf und drücke sie leicht an.
4. Bewässerung: Gieße die Pflanzen vorsichtig an.
5. Standort: Stelle die pikierten Pflanzen wieder an einen hellen, warmen Ort.
Abhärten: Die Brokkoli-Pflanzen auf das Leben im Freien vorbereiten
Bevor du die Brokkoli-Pflanzen ins Beet pflanzt, musst du sie an die Bedingungen im Freien gewöhnen. Dieser Prozess nennt sich Abhärten.
1. Beginne langsam: Stelle die Pflanzen für ein paar Stunden pro Tag ins Freie, an einen geschützten Ort.
2. Steigere die Zeit: Verlängere die Zeit im Freien jeden Tag um ein paar Stunden.
3. Schutz vor Sonne und Wind: Schütze die Pflanzen vor direkter Sonneneinstrahlung und starkem Wind.
4. Dauer: Nach etwa einer Woche sollten die Pflanzen bereit sein, ins Beet gepflanzt zu werden.
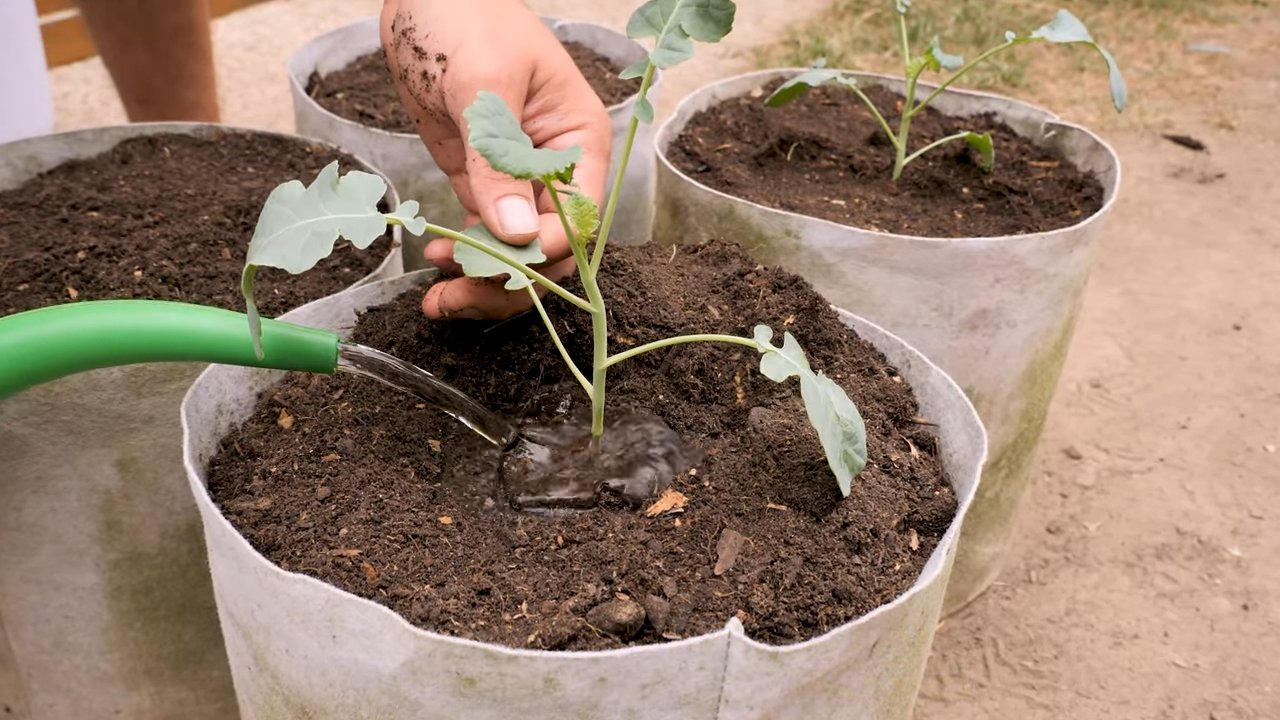
Auspflanzen ins Beet: Der große Umzug
Jetzt kommt der Moment, auf den wir alle gewartet haben: Das Auspflanzen der Brokkoli-Pflanzen ins Beet!
1. Vorbereitung des Beets: Lockere den Boden im Beet auf und entferne Unkraut. Reichere den Boden mit Kompost oder organischem Dünger an. Brokkoli braucht einen nährstoffreichen Boden.
2. Pflanzabstand: Pflanze die Brokkoli-Pflanzen im Abstand von etwa 40-50 cm zueinander.
3. Pflanzlöcher: Grabe Pflanzlöcher, die groß genug sind, um die Wurzelballen der Pflanzen aufzunehmen.
4. Einsetzen der Pflanzen: Setze die Pflanzen vorsichtig in die Pflanzlöcher. Die Oberkante des Wurzelballens sollte mit der Erdoberfläche abschließen.
5. Auffüllen: Fülle die Pflanzlöcher mit Erde auf und drücke sie leicht an.
6. Bewässerung: Gieße die Pflanzen gründlich an.
7. Schutz vor Schädlingen: Schütze die Pflanzen vor Schnecken, indem du Schneckenkorn streust oder einen Schneckenzaun aufstellst. Ein Vlies kann auch helfen, Schädlinge fernzuhalten.
Pflege: Damit dein Brokkoli prächtig gedeiht
Nach dem Auspflanzen ist es wichtig, die Brokkoli-Pflanzen gut zu pflegen, damit sie prächtig gedeihen.
* Bewässerung: Gieße die Pflanzen regelmäßig, besonders bei trockenem Wetter. Brokkoli braucht viel Wasser.
* Düngung: Dünge die Pflanzen alle paar Wochen mit einem organischen Dünger.
* Unkrautbekämpfung: Entferne regelmäßig Unkraut, damit die Brokkoli-Pflanzen nicht um Nährstoffe konkurrieren müssen.
* Schädlingsbekämpfung: Kontrolliere die Pflanzen regelmäßig auf Schädlinge und bekämpfe sie bei Bedarf. Kohlweißlinge und Blattläuse sind häufige Probleme.
* Stützung: Wenn die Brokkoli-Pflanzen sehr groß werden, kann es sinnvoll sein, sie zu stützen, damit sie nicht umknicken.
Ernte: Der Lohn deiner Mühe
Nach etwa 60-80 Tagen (je nach Sorte) ist es endlich soweit: Du kannst deinen eigenen Brokkoli ernten!
1. Zeitpunkt: Ernte den Brokkoli, wenn die Röschen fest und geschlossen sind. Wenn die Röschen gelb werden oder sich öffnen, ist der Brokkoli überreif.
2. Erntetechnik: Schneide den Brokkoli-Kopf mit einem scharfen Messer ab. Lasse dabei etwa 10-15 cm des Stiels stehen.
3. Nachernte: Oft bilden sich nach der Hau
Conclusion
So, there you have it! Growing broccoli from seed might seem daunting at first, but as you’ve seen, it’s a surprisingly rewarding and cost-effective way to enjoy fresh, delicious broccoli right from your own garden. Forget those expensive, often less-than-fresh heads at the grocery store. With a little patience and these simple steps, you can cultivate vibrant, healthy broccoli plants that will provide you with a bountiful harvest.
The beauty of this DIY approach lies not only in the savings but also in the control you have over the entire process. You get to choose the specific variety of broccoli that suits your taste and climate, ensuring the best possible flavor and yield. Plus, there’s an undeniable satisfaction that comes from nurturing a plant from a tiny seed to a mature, edible vegetable. It’s a connection to nature that’s both grounding and incredibly fulfilling.
Don’t be afraid to experiment! Once you’ve mastered the basics, consider trying different broccoli varieties. Romanesco broccoli, with its stunning fractal florets, is a visually appealing and delicious option. Or, explore sprouting broccoli, which produces numerous smaller heads over a longer period. You can also adjust the timing of your planting to extend your harvest season. Succession planting, where you sow seeds every few weeks, will ensure a continuous supply of fresh broccoli throughout the growing season.
Another variation to consider is companion planting. Broccoli thrives when planted alongside certain other vegetables and herbs. For example, planting rosemary or thyme near your broccoli can help deter pests, while planting lettuce or spinach can provide ground cover and help retain moisture in the soil. Researching companion planting options can further enhance your broccoli growing experience and lead to even healthier, more productive plants.
We understand that every garden is unique, and what works in one location might not work in another. That’s why we encourage you to adapt these techniques to your specific environment and growing conditions. Pay attention to your soil, monitor your plants for any signs of pests or diseases, and adjust your watering and fertilizing schedule as needed.
Ultimately, the key to successful broccoli growing from seed is observation and adaptation. Don’t be discouraged if you encounter challenges along the way. Every mistake is a learning opportunity, and with each season, you’ll become a more skilled and confident gardener.
We are confident that you’ll find this DIY trick to be a game-changer for your garden. The taste of homegrown broccoli is simply unmatched, and the satisfaction of knowing you grew it yourself is priceless. So, grab some seeds, prepare your soil, and get ready to embark on a rewarding journey of growing your own delicious and nutritious broccoli.
We’d love to hear about your experiences! Share your tips, tricks, and photos in the comments below. Let’s create a community of broccoli enthusiasts and learn from each other. Happy gardening! Let us know how your **growing broccoli from seed** goes!
Frequently Asked Questions (FAQ)
1. What is the best time to start broccoli seeds indoors?
The ideal time to start broccoli seeds indoors is typically 6-8 weeks before the last expected frost in your area. This allows the seedlings to develop a strong root system before being transplanted outdoors. To determine the best time for your region, consult a local gardening calendar or your local agricultural extension office. They can provide specific dates based on historical weather patterns. Remember, starting too early can result in leggy, weak seedlings, while starting too late can shorten your growing season and reduce your yield.
2. What type of soil is best for growing broccoli from seed?
Broccoli thrives in well-drained, fertile soil that is rich in organic matter. A slightly acidic to neutral pH of 6.0 to 7.0 is ideal. Before planting, amend your soil with compost, aged manure, or other organic materials to improve its structure, drainage, and nutrient content. If your soil is heavy clay, consider adding sand or perlite to improve drainage. A soil test can help you determine the pH and nutrient levels of your soil, allowing you to make necessary adjustments before planting.
3. How often should I water my broccoli plants?
Broccoli plants require consistent moisture, especially during hot weather. Water deeply and regularly, aiming to keep the soil consistently moist but not waterlogged. The frequency of watering will depend on your climate, soil type, and the age of your plants. Check the soil moisture regularly by inserting your finger into the soil a few inches deep. If the soil feels dry, it’s time to water. Mulching around your broccoli plants can help retain moisture in the soil and reduce the need for frequent watering.
4. What are some common pests and diseases that affect broccoli, and how can I prevent them?
Broccoli is susceptible to several pests and diseases, including cabbage worms, aphids, flea beetles, clubroot, and downy mildew. To prevent these problems, practice good garden hygiene, such as removing plant debris and weeds regularly. Use row covers to protect your plants from pests. Inspect your plants regularly for signs of infestation or disease, and take action promptly if you notice any problems. Organic pest control methods, such as insecticidal soap or neem oil, can be effective against many common pests. Crop rotation can also help prevent soilborne diseases.
5. How do I know when my broccoli is ready to harvest?
Broccoli is ready to harvest when the central head is firm and tight, with tightly closed florets. The size of the head will vary depending on the variety, but generally, you should harvest before the florets begin to open and turn yellow. Use a sharp knife to cut the head from the plant, leaving a few inches of stem attached. After harvesting the central head, the plant may produce smaller side shoots, which can also be harvested.
6. Can I grow broccoli in containers?
Yes, broccoli can be successfully grown in containers, provided you choose a large enough container (at least 5 gallons) and use a well-draining potting mix. Ensure the container has drainage holes to prevent waterlogging. Place the container in a sunny location that receives at least 6 hours of direct sunlight per day. Water regularly and fertilize as needed. Container-grown broccoli may require more frequent watering and fertilizing than broccoli grown in the ground.
7. What are some good companion plants for broccoli?
Several plants can benefit broccoli when planted nearby. These include:
* **Aromatic herbs:** Rosemary, thyme, and sage can deter pests.
* **Alliums:** Onions, garlic, and chives can repel aphids and other insects.
* **Legumes:** Beans and peas can fix nitrogen in the soil, benefiting broccoli.
* **Lettuce and spinach:** These can provide ground cover and help retain moisture.
* **Marigolds:** These can repel nematodes and other soil pests.
Avoid planting broccoli near other members of the brassica family (e.g., cabbage, cauliflower, kale), as they can attract the same pests and diseases.
8. How can I store harvested broccoli?
To store harvested broccoli, wrap it loosely in a damp paper towel and place it in a plastic bag in the refrigerator. Broccoli can typically be stored for up to a week using this method. Avoid washing the broccoli before storing it, as this can promote spoilage. You can also freeze broccoli for longer storage. To freeze broccoli, blanch it in boiling water for 3-5 minutes, then plunge it into ice water to stop the cooking process. Drain well and freeze in a single layer on a baking sheet before transferring to freezer bags or containers.
9. My broccoli plants are bolting (going to seed). What can I do?
Bolting, or premature flowering, can occur when broccoli plants are exposed to stress, such as high temperatures or drought. Once a plant bolts, the head becomes bitter and less palatable. To prevent bolting, choose heat-tolerant varieties, provide consistent watering, and protect your plants from extreme temperatures. If your broccoli plants do bolt, you can still harvest the leaves, which are edible and have a similar flavor to kale.
10. Is growing broccoli from seed organically possible?
Absolutely! Growing broccoli from seed organically is not only possible but also highly recommended for the best flavor and health benefits. Use organic seeds, amend your soil with organic compost and fertilizers, and rely on natural pest control methods. Avoid synthetic pesticides, herbicides, and fertilizers. By following organic gardening practices, you can ensure that your broccoli is free from harmful chemicals and packed with nutrients.

Leave a Comment