
Growing Bay Leaf Cuttings Indoors might seem like a challenge, but trust me, it’s a rewarding project that can bring the fresh, aromatic flavor of bay leaves right to your kitchen! For centuries, bay leaves have been prized not only for their culinary uses but also for their symbolic significance, representing victory and honor in ancient Greece and Rome. Imagine having a constant supply of fresh bay leaves, ready to enhance your soups, stews, and sauces, all thanks to your own green thumb.
But why bother with cuttings when you can buy dried bay leaves at the store? Well, the flavor of fresh bay leaves is simply unmatched – brighter, more vibrant, and far more complex than their dried counterparts. Plus, growing bay leaf cuttings indoors is a fantastic way to propagate your favorite bay laurel plant or even start a new one from a friend’s tree. It’s a sustainable and cost-effective way to enjoy this versatile herb year-round, especially if you live in a region with harsh winters where outdoor bay laurel trees struggle. I’m excited to share some simple DIY tricks and hacks that will make the process easier than you think, even if you’re a beginner gardener!
Propagating Bay Leaf Cuttings Indoors: A Gardener’s Guide
Hey there, fellow plant enthusiasts! Ever dreamt of having a constant supply of fresh bay leaves right at your fingertips? Well, you’re in luck! Propagating bay leaf cuttings indoors is totally doable, and I’m here to walk you through the entire process. It might seem a little intimidating at first, but trust me, with a little patience and the right steps, you’ll be harvesting your own homegrown bay leaves in no time.
Choosing the Right Cutting
Before we even think about soil or rooting hormones, we need to select the perfect cutting. This is crucial for success, so let’s get it right!
* Timing is Key: The best time to take bay leaf cuttings is in late spring or early summer. This is when the plant is actively growing, and the cuttings will have the best chance of rooting.
* Look for Healthy Growth: Choose stems that are healthy, vigorous, and free from any signs of disease or pests. Avoid stems that are too woody or too soft and flexible. You want something in between – semi-hardwood.
* Ideal Length: Aim for cuttings that are about 4-6 inches long. This gives them enough stem to root while still being manageable.
* Leaf Nodes Matter: Make sure your cutting has at least 2-3 leaf nodes (the points where leaves grow from the stem). These are where the roots will eventually emerge.
Preparing Your Cutting
Okay, you’ve got your perfect cutting. Now it’s time to prep it for rooting. This step is all about maximizing its chances of success.
* Remove Lower Leaves: Carefully remove the leaves from the bottom 1-2 inches of the cutting. This prevents them from rotting in the soil and allows the plant to focus its energy on root development.
* Leaf Reduction (Optional): If your cutting has large leaves, you can trim them in half. This reduces water loss through transpiration, which is especially helpful in the early stages of rooting.
* Make a Clean Cut: Use a sharp, clean knife or pruning shears to make a clean cut just below a leaf node. A clean cut helps prevent disease and promotes faster rooting.
* Consider Scarification: Gently scrape the bottom inch of the stem with your knife. This is called scarification, and it can encourage root formation by exposing the cambium layer (the layer just beneath the bark). Be gentle, you don’t want to damage the stem.
Rooting Medium and Container
The right rooting medium and container are essential for providing the cutting with the support and moisture it needs to develop roots.
* Well-Draining Medium: Bay leaf cuttings need a well-draining rooting medium to prevent rot. A mix of perlite and peat moss (or coco coir) is a great option. You can also use a commercial seed starting mix.
* Small Containers: Use small pots or seedling trays for your cuttings. This helps to conserve space and prevents the rooting medium from becoming waterlogged.
* Drainage Holes are a Must: Make sure your containers have drainage holes to allow excess water to escape.
* Sterilize if Possible: While not strictly necessary, sterilizing your containers and rooting medium can help prevent fungal diseases. You can do this by washing the containers with soap and water and then soaking them in a diluted bleach solution. For the rooting medium, you can microwave it for a few minutes or bake it in the oven at a low temperature.
Rooting Hormone (Optional, but Recommended)
While bay leaf cuttings *can* root without rooting hormone, using it significantly increases your chances of success. I highly recommend it!
* Types of Rooting Hormone: Rooting hormone comes in powder, liquid, and gel forms. Powder is the most common and easiest to use.
* Application: Moisten the bottom inch of the cutting and then dip it into the rooting hormone powder. Tap off any excess powder.
* Why Use It?: Rooting hormone contains auxins, which are plant hormones that stimulate root development. It also helps to protect the cutting from fungal diseases.
Planting and Initial Care
Now for the exciting part – planting your cutting!
1. Moisten the Rooting Medium: Before planting, thoroughly moisten the rooting medium. It should be damp but not soggy.
2. Make a Hole: Use a pencil or your finger to create a hole in the rooting medium that is deep enough to accommodate the bottom inch of the cutting.
3. Insert the Cutting: Gently insert the cutting into the hole, making sure that the bottom leaf node is buried in the medium.
4. Firm the Soil: Gently firm the rooting medium around the cutting to provide support.
5. Water Gently: Water the cutting gently to settle the rooting medium.
6. Humidity is Key: Bay leaf cuttings need high humidity to root successfully. You can create a humid environment by placing the cutting in a plastic bag or under a humidity dome. Make sure the bag or dome doesn’t touch the leaves. You can also mist the cutting regularly with water.
7. Warmth and Light: Place the cutting in a warm location with bright, indirect light. Avoid direct sunlight, which can scorch the leaves. A temperature of around 70-75°F (21-24°C) is ideal.
Ongoing Care and Monitoring
The next few weeks are crucial for root development. Here’s what you need to do:
1. Maintain Humidity: Continue to maintain high humidity by keeping the cutting in a plastic bag or under a humidity dome. Open the bag or dome for a few minutes each day to allow for air circulation and prevent fungal growth.
2. Watering: Keep the rooting medium consistently moist but not soggy. Water when the top inch of the medium feels dry to the touch.
3. Check for Rooting: After a few weeks, gently tug on the cutting to see if it has rooted. If you feel resistance, it means that roots have formed. You can also gently dig around the base of the cutting to check for roots.
4. Ventilation: Once the cutting has rooted, gradually reduce the humidity by opening the bag or dome for longer periods each day. This will help the cutting to acclimate to the lower humidity of your home.
5. Fertilizing: Once the cutting has rooted, you can start to fertilize it with a diluted liquid fertilizer. Use a balanced fertilizer (e.g., 10-10-10) and follow the instructions on the label.
Transplanting Your Rooted Cutting
Congratulations! Your bay leaf cutting has rooted, and it’s time to give it a new home.
1. Choose a Pot: Select a pot that is slightly larger than the container the cutting is currently in. Make sure the pot has drainage holes.
2. Potting Mix: Use a well-draining potting mix for your bay leaf plant. A mix of potting soil, perlite, and compost is a good option.
3. Gently Remove the Cutting: Carefully remove the rooted cutting from its container. Be gentle to avoid damaging the roots.
4. Plant the Cutting: Place the cutting in the new pot and fill in around it with potting mix. Firm the soil gently.
5. Water Thoroughly: Water the newly transplanted cutting thoroughly.
6. Location: Place the pot in a location with bright, indirect light.
7. Ongoing Care: Continue to water and fertilize your bay leaf plant as needed. Allow the top inch of soil to dry out between waterings.
Troubleshooting
Even with the best care, things can sometimes go wrong. Here are some common problems and how to fix them:
* Cutting Rotting: If your cutting is rotting, it’s likely due to overwatering or poor drainage. Make sure your rooting medium is well-draining and that you’re not overwatering. You can also try using a fungicide.
* Cutting Not Rooting: If your cutting isn’t rooting, it could be due to a number of factors, such as low humidity, insufficient light, or poor-quality cuttings. Make sure you’re providing the cutting with the right conditions and that you’re using healthy, vigorous cuttings.
* Leaves Turning Yellow: Yellowing leaves can be a sign of overwatering, underwatering, or nutrient deficiency. Check the moisture level of the soil and adjust your watering accordingly. You can also try fertilizing your plant with a balanced fertilizer.
* Pests: Bay leaf plants can be susceptible to pests such as aphids and spider mites. Inspect your plant regularly for pests and treat them as needed with insecticidal soap or neem oil.
Final Thoughts
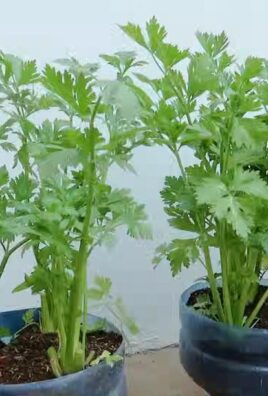
Growing bay leaf cuttings indoors is a rewarding experience that allows you to enjoy fresh, homegrown bay leaves year-round. With a little patience and attention to detail, you can successfully propagate your own bay leaf plants and add a touch of culinary magic to your home. Happy gardening!
Conclusion
So, there you have it! Mastering the art of growing bay leaf cuttings indoors is not only achievable but also incredibly rewarding. Imagine the satisfaction of snipping fresh, aromatic bay leaves from your own indoor plant, ready to infuse your culinary creations with their distinctive flavor. No more relying on dried, store-bought leaves that have lost their potency. This DIY trick offers a sustainable and cost-effective way to ensure a constant supply of this essential herb.
Why is this a must-try? Because it empowers you to take control of your herb garden, regardless of your outdoor space limitations. It’s a project that connects you with nature, even within the confines of your home. Plus, it’s a fantastic conversation starter! Imagine the envy of your friends and family when they see your thriving indoor bay leaf plant.
But the benefits don’t stop there. Growing your own bay leaf plant allows you to experiment with different varieties. While *Laurus nobilis* is the most common and widely used for culinary purposes, you might be surprised to discover other cultivars with subtle variations in aroma and flavor. Consider exploring dwarf varieties if space is a concern, or those with slightly different leaf shapes for added visual interest.
Furthermore, this method opens the door to propagation. Once your initial cuttings have successfully rooted and grown into healthy plants, you can take more cuttings from them, effectively multiplying your bay leaf supply. This is a great way to share your bounty with fellow cooking enthusiasts or even start a small herb-selling venture.
Don’t be afraid to experiment with different rooting mediums. While we’ve outlined a successful method, you might find that other combinations of perlite, vermiculite, and peat moss work equally well for you. The key is to maintain consistent moisture and provide adequate drainage.
We encourage you to embark on this exciting journey of growing bay leaf cuttings indoors. It’s a relatively simple process that yields significant rewards. The aroma alone is worth the effort! And remember, even if your first attempt isn’t entirely successful, don’t give up. Propagation can be a bit of a learning curve, but with patience and persistence, you’ll be enjoying your own homegrown bay leaves in no time.
So, grab your pruning shears, gather your supplies, and get ready to experience the joy of growing your own bay leaf plant indoors. We’re confident that you’ll find it to be a fulfilling and flavorful endeavor.
And now, we want to hear from you! Share your experiences, tips, and tricks in the comments below. What rooting medium worked best for you? Did you encounter any challenges, and how did you overcome them? Your insights will be invaluable to other readers who are just starting out. Let’s create a community of indoor bay leaf growers and share the love of this wonderful herb!
Frequently Asked Questions (FAQ)
Q: What is the best time of year to take bay leaf cuttings?
A: While you can technically take bay leaf cuttings at any time of year, the most successful period is generally during the late spring or early summer. This is when the plant is actively growing, and the cuttings are more likely to root quickly and vigorously. Avoid taking cuttings during the dormant winter months, as their chances of success are significantly lower. However, with proper indoor conditions, including consistent warmth and humidity, you can attempt rooting cuttings outside of the optimal season. Just be prepared for a potentially longer rooting time.
Q: How long does it take for bay leaf cuttings to root?
A: Rooting time can vary depending on several factors, including the time of year, the health of the cutting, and the environmental conditions. Generally, you can expect to see roots developing within 4-8 weeks. Be patient and avoid disturbing the cuttings too frequently, as this can hinder the rooting process. Look for signs of new growth, such as small leaves emerging from the stem, as an indication that roots have formed. You can also gently tug on the cutting to feel for resistance, which suggests that roots have anchored it in the rooting medium.
Q: What kind of soil should I use for my rooted bay leaf cuttings?
A: Once your bay leaf cuttings have developed a healthy root system, it’s time to transplant them into a suitable potting mix. A well-draining potting mix is crucial to prevent root rot. A good option is a mix of equal parts potting soil, perlite, and peat moss. This combination provides adequate drainage, aeration, and moisture retention. Avoid using heavy garden soil, as it can become compacted and suffocate the roots. You can also add a slow-release fertilizer to the potting mix to provide essential nutrients for the growing plant.
Q: How much sunlight do bay leaf plants need indoors?
A: Bay leaf plants thrive in bright, indirect sunlight. Place your plant near a sunny window, preferably one that faces east or west. Avoid direct sunlight, especially during the hottest part of the day, as it can scorch the leaves. If you don’t have access to a sunny window, you can supplement with artificial light, such as a grow light. Aim for at least 6-8 hours of light per day. Insufficient light can lead to leggy growth and reduced leaf production.
Q: How often should I water my indoor bay leaf plant?
A: Water your bay leaf plant when the top inch of soil feels dry to the touch. Avoid overwatering, as this can lead to root rot. Ensure that the pot has drainage holes to allow excess water to escape. During the winter months, when the plant is not actively growing, you can reduce the frequency of watering. Check the soil moisture regularly and adjust your watering schedule accordingly.
Q: Do I need to fertilize my bay leaf plant?
A: Yes, fertilizing your bay leaf plant regularly will help it to thrive. Use a balanced liquid fertilizer diluted to half strength every 2-4 weeks during the growing season (spring and summer). Avoid fertilizing during the dormant winter months. You can also use a slow-release fertilizer incorporated into the potting mix at the time of planting.
Q: How do I prune my bay leaf plant?
A: Pruning is essential for maintaining the shape and size of your bay leaf plant. Prune in the spring or early summer, after the plant has finished its initial growth spurt. Remove any dead, damaged, or crossing branches. You can also prune to shape the plant and encourage bushier growth. Use clean, sharp pruning shears to make clean cuts.
Q: Are bay leaf plants susceptible to pests or diseases?
A: While relatively pest-resistant, bay leaf plants can occasionally be affected by pests such as aphids, scale, and spider mites. Inspect your plant regularly for signs of infestation. If you detect pests, treat them with insecticidal soap or neem oil. Overwatering can also lead to root rot, so ensure that your plant has adequate drainage.
Q: Can I use the bay leaves from my indoor plant for cooking?
A: Absolutely! That’s the whole point of growing your own bay leaf plant. Once your plant is established and producing healthy leaves, you can harvest them for culinary use. Simply snip off a few leaves as needed. You can use them fresh or dry them for later use. To dry bay leaves, simply spread them out on a tray in a cool, dry place for a few days until they are brittle. Store dried bay leaves in an airtight container.
Q: My bay leaf plant’s leaves are turning yellow. What could be the problem?
A: Yellowing leaves can indicate several issues. Overwatering is a common culprit, so ensure the soil isn’t constantly soggy. Underwatering can also cause yellowing, so check the soil moisture regularly. Nutrient deficiencies can also lead to yellow leaves; try fertilizing with a balanced fertilizer. Finally, check for pests, as infestations can also cause leaf discoloration. Assess your plant’s conditions and address the most likely cause.

Leave a Comment