
Grow Tomatoes at Home, even if you think you don’t have a green thumb! Have you ever bitten into a perfectly ripe, sun-warmed tomato, bursting with flavor, and wished you could have that experience every day? I know I have! For centuries, cultivating tomatoes has been a cherished tradition, from their origins in South America, where they were initially viewed with suspicion, to becoming a staple in cuisines worldwide. Think of the vibrant sauces of Italy, the refreshing salsas of Mexico, and the comforting tomato soups enjoyed across the globe.
But what if I told you that achieving that garden-fresh tomato taste is easier than you think, even without a sprawling backyard? That’s right, this article is packed with simple, effective DIY tricks and hacks to help you grow tomatoes at home, regardless of your space or experience level.
In today’s world, where access to fresh, healthy produce can be a challenge, and let’s be honest, grocery store tomatoes often lack that authentic flavor, learning to cultivate your own is more important than ever. Plus, there’s something incredibly rewarding about nurturing a plant from seed to harvest. So, get ready to ditch the bland supermarket varieties and embark on a journey to grow your own delicious, juicy tomatoes right in your own home! Let’s get started!
Growing Tomatoes at Home: A Comprehensive DIY Guide
Hey there, fellow gardening enthusiasts! I’m so excited to share my tried-and-true method for growing delicious, juicy tomatoes right in your own backyard (or even on your balcony!). Forget those bland, store-bought tomatoes – nothing beats the taste of homegrown goodness. This guide will walk you through every step, from choosing the right variety to harvesting your bounty. Let’s get started!
Choosing Your Tomato Varieties
Before we even think about planting, we need to decide what kind of tomatoes we want to grow. There are so many options, it can be a little overwhelming! Here’s a breakdown to help you choose:
* **Determinate vs. Indeterminate:** This is a crucial distinction.
* **Determinate tomatoes** grow to a specific size and produce all their fruit at once, making them ideal for canning or making sauce. They’re also more compact, which is great for smaller spaces. Popular determinate varieties include Roma, Celebrity, and Rutgers.
* **Indeterminate tomatoes** keep growing and producing fruit throughout the season. They need staking or caging to support their growth, but they’ll reward you with a continuous harvest. Some popular indeterminate varieties are Beefsteak, Brandywine, and Cherry tomatoes.
* **Tomato Size:** Do you want tiny cherry tomatoes, medium-sized slicers, or giant beefsteaks?
* **Cherry tomatoes** are perfect for snacking and salads.
* **Slicing tomatoes** are your classic sandwich tomatoes.
* **Beefsteak tomatoes** are huge and meaty, perfect for burgers and BLTs.
* **Disease Resistance:** Look for varieties that are resistant to common tomato diseases like Fusarium wilt (F), Verticillium wilt (V), and Tomato Mosaic Virus (T). This will save you a lot of headaches later on.
* **Days to Maturity:** This tells you how long it will take for the tomatoes to ripen after planting. Choose varieties that fit your growing season.
My personal favorites are Roma for sauce, Early Girl for early harvests, and Sungold cherry tomatoes because they are incredibly sweet.
Starting Your Tomato Seeds (or Buying Seedlings)
You have two options here: start your own seeds indoors or buy seedlings from a nursery. Starting seeds gives you more control over the varieties you grow and can save you money, but it requires a bit more effort.
Starting Seeds Indoors
1. **Gather Your Supplies:** You’ll need:
* Seed starting trays or small pots
* Seed starting mix (this is different from regular potting soil – it’s lighter and drains better)
* Tomato seeds
* A spray bottle
* A heat mat (optional, but it helps with germination)
* A grow light (essential for strong seedlings)
2. **Sow the Seeds:** Fill your seed starting trays or pots with seed starting mix. Moisten the mix with the spray bottle. Plant 2-3 seeds per cell or pot, about ¼ inch deep. Gently cover the seeds with more mix.
3. **Provide Warmth and Moisture:** Place the trays or pots on a heat mat (if using) and cover them with a clear plastic dome or plastic wrap to create a humid environment. Keep the mix consistently moist, but not soggy.
4. **Germination:** The seeds should germinate in 5-10 days. Once they sprout, remove the plastic cover and place the seedlings under a grow light.
5. **Provide Light:** Keep the grow light on for 14-16 hours per day. Adjust the height of the light as the seedlings grow to keep it close to the plants without burning them.
6. **Thin the Seedlings:** Once the seedlings have their first true leaves (the second set of leaves that appear after the initial seed leaves), thin them to one seedling per cell or pot. Choose the strongest seedling and snip off the others at the soil line.
7. **Watering:** Water the seedlings regularly, allowing the top inch of soil to dry out between waterings.
8. **Fertilizing:** Start fertilizing the seedlings with a diluted liquid fertilizer (follow the instructions on the fertilizer label) once they have their second set of true leaves.
9. **Hardening Off:** About a week before you plan to transplant the seedlings outdoors, you need to “harden them off.” This means gradually exposing them to outdoor conditions to acclimate them to the sun, wind, and temperature changes. Start by placing them outside for an hour or two each day, gradually increasing the time over the course of a week.
Buying Seedlings
1. **Choose Healthy Seedlings:** Look for seedlings that are stocky, green, and have no signs of disease or pests. Avoid seedlings that are leggy (tall and spindly) or have yellowing leaves.
2. **Check the Roots:** Gently remove a seedling from its pot and inspect the roots. They should be white and healthy-looking, not brown and root-bound.
Preparing Your Garden Bed
Tomatoes need at least 6-8 hours of sunlight per day and well-drained soil.
1. **Choose a Sunny Location:** Select a spot in your garden that gets plenty of sunlight.
2. **Prepare the Soil:** Tomatoes prefer slightly acidic soil with a pH of 6.0-6.8. Amend the soil with compost or other organic matter to improve drainage and fertility. I like to add aged manure for an extra boost.
3. **Test Your Soil (Optional):** If you’re unsure about your soil’s pH, you can test it with a soil testing kit.
4. **Clear the Area:** Remove any weeds, rocks, or debris from the planting area.
5. **Dig Holes:** Dig holes that are slightly larger than the root balls of your seedlings. Space the holes according to the variety of tomato you’re growing. Determinate tomatoes can be spaced closer together (18-24 inches apart) than indeterminate tomatoes (24-36 inches apart).
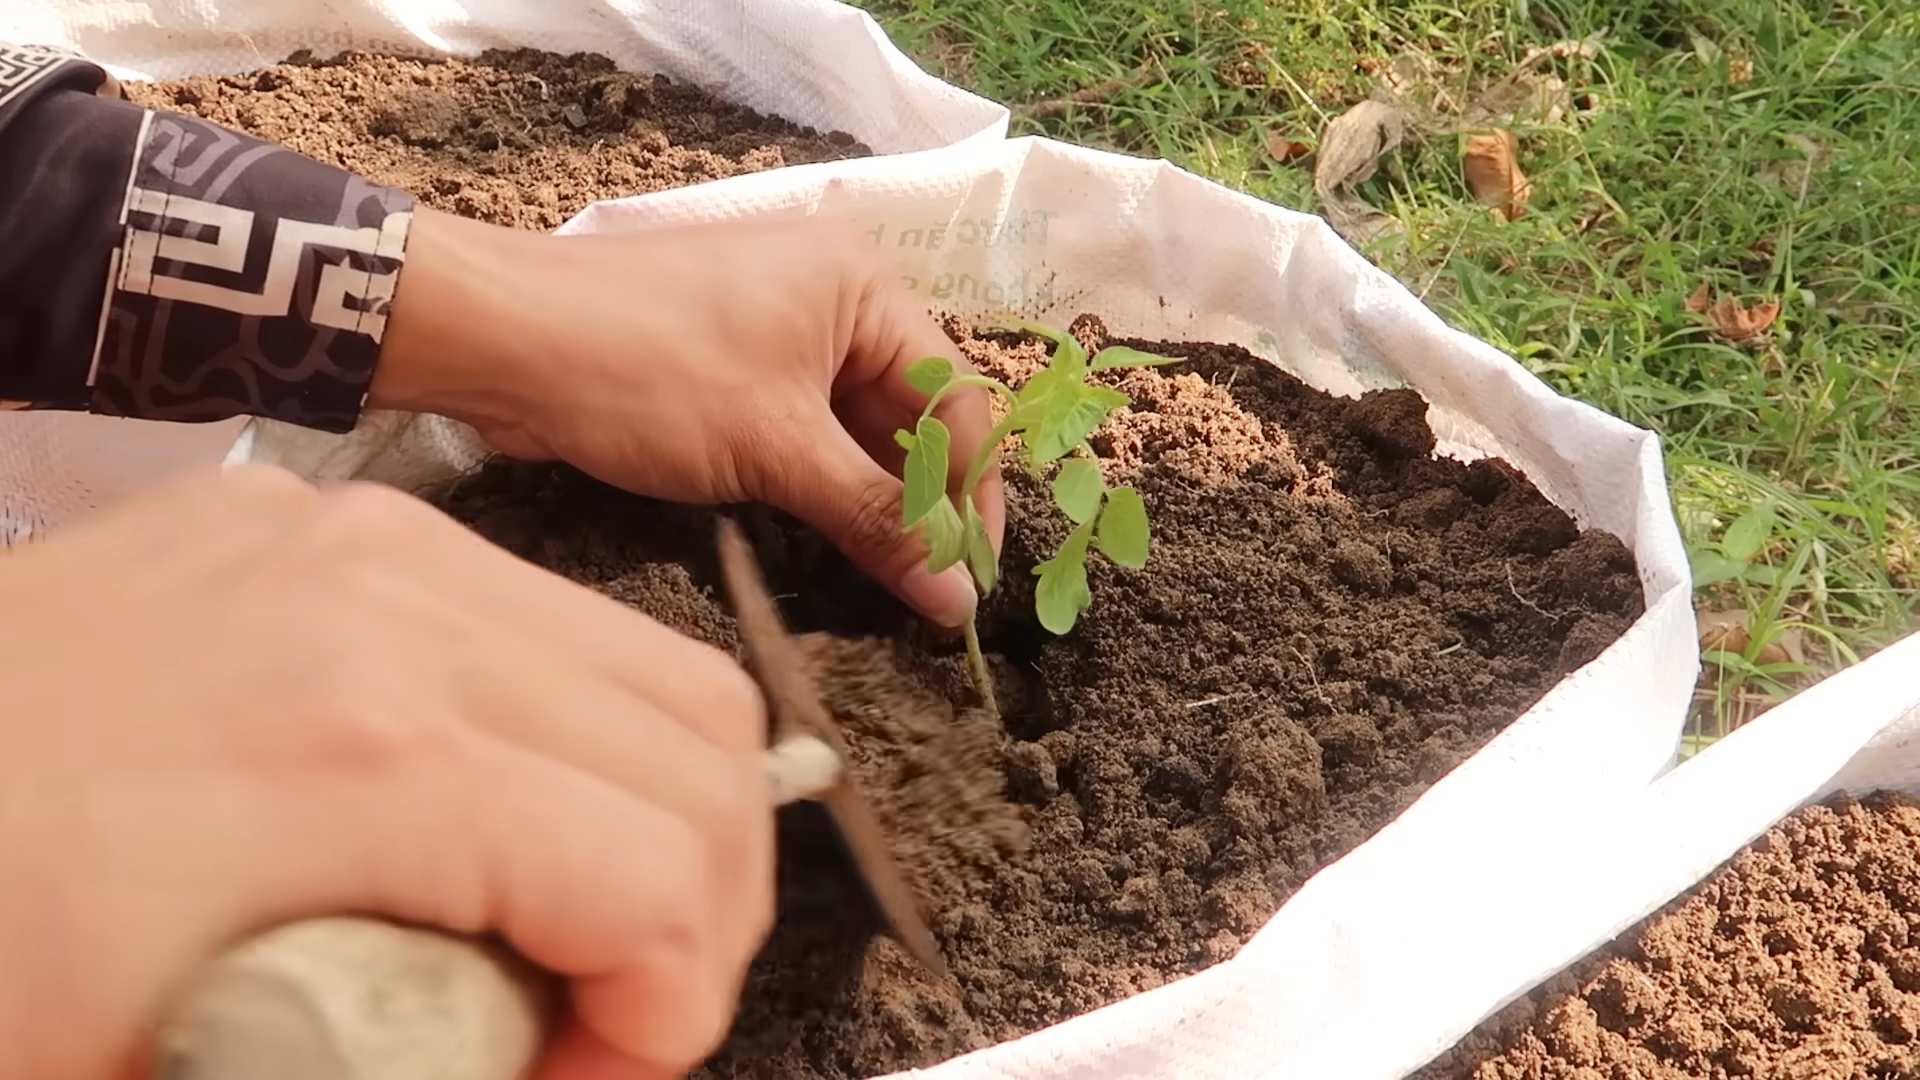
Transplanting Your Tomato Seedlings
This is a crucial step, so let’s do it right!
1. **Water the Seedlings:** Water the seedlings thoroughly before transplanting them.
2. **Remove the Seedlings from Their Pots:** Gently remove the seedlings from their pots, being careful not to damage the roots. If the roots are root-bound, gently loosen them with your fingers.
3. **Plant Deeply:** This is a trick I learned years ago, and it makes a huge difference! Plant the tomato seedlings deeper than they were in their pots, burying the stem up to the first set of leaves. Tomatoes can grow roots from their stems, so planting them deeply will encourage a stronger root system.
4. **Add Support:** Install stakes or cages at the time of planting, especially for indeterminate varieties. This will prevent the plants from sprawling on the ground and help support the weight of the fruit.
5. **Water Thoroughly:** Water the newly transplanted seedlings thoroughly.
6. **Mulch:** Apply a layer of mulch around the plants to help retain moisture, suppress weeds, and regulate soil temperature. Straw, wood chips, or shredded leaves work well.
Caring for Your Tomato Plants
Now that your tomatoes are in the ground, it’s time to give them the care they need to thrive.
1. **Watering:** Water deeply and regularly, especially during dry spells. Aim to water at the base of the plants to avoid wetting the foliage, which can lead to disease.
2. **Fertilizing:** Fertilize your tomato plants every 2-3 weeks with a balanced fertilizer. Follow the instructions on the fertilizer label.
3. **Pruning:** Pruning is important for indeterminate tomato varieties. Remove the suckers (the small shoots that grow between the main stem and the branches) to encourage the plant to focus its energy on producing fruit. Determinate tomatoes generally don’t need pruning.
4. **Pest and Disease Control:** Keep an eye out for pests and diseases. Common tomato pests include aphids, tomato hornworms, and whiteflies. Common tomato diseases include early blight, late blight, and blossom end rot.
* **Aphids:** Spray with insecticidal soap.
* **Tomato Hornworms:** Handpick them off the plants (they’re big and easy to spot!).
* **Whiteflies:** Spray with insecticidal soap or use sticky traps.
* **Early Blight:** Remove infected leaves and spray with a fungicide.
* **Late Blight:** This is a serious disease that can quickly kill your tomato plants. Remove infected plants immediately and dispose of them properly.
* **Blossom End Rot:** This is caused by a calcium deficiency. Add calcium to the soil or use a calcium-rich fertilizer. Consistent watering can also help prevent blossom end rot.
5. **Support:** Make sure your stakes or cages are providing adequate support as the plants grow.
Harvesting Your Tomatoes
Hey there, fellow gardening enthusiasts! I’m so excited to share my tried-and-true method for growing delicious, juicy tomatoes right in your own backyard (or even on your balcony!). Forget those bland, store-bought tomatoes – nothing beats the taste of homegrown goodness. This guide will walk you through every step, from choosing the right variety to harvesting your bounty. Let’s get started!
Choosing Your Tomato Varieties
Before we even think about planting, we need to decide what kind of tomatoes we want to grow. There are so many options, it can be a little overwhelming! Here’s a breakdown to help you choose:
* **Determinate vs. Indeterminate:** This is a crucial distinction.
* **Determinate tomatoes** grow to a specific size and produce all their fruit at once, making them ideal for canning or making sauce. They’re also more compact, which is great for smaller spaces. Popular determinate varieties include Roma, Celebrity, and Rutgers.
* **Indeterminate tomatoes** keep growing and producing fruit throughout the season. They need staking or caging to support their growth, but they’ll reward you with a continuous harvest. Some popular indeterminate varieties are Beefsteak, Brandywine, and Cherry tomatoes.
* **Tomato Size:** Do you want tiny cherry tomatoes, medium-sized slicers, or giant beefsteaks?
* **Cherry tomatoes** are perfect for snacking and salads.
* **Slicing tomatoes** are your classic sandwich tomatoes.
* **Beefsteak tomatoes** are huge and meaty, perfect for burgers and BLTs.
* **Disease Resistance:** Look for varieties that are resistant to common tomato diseases like Fusarium wilt (F), Verticillium wilt (V), and Tomato Mosaic Virus (T). This will save you a lot of headaches later on.
* **Days to Maturity:** This tells you how long it will take for the tomatoes to ripen after planting. Choose varieties that fit your growing season.
My personal favorites are Roma for sauce, Early Girl for early harvests, and Sungold cherry tomatoes because they are incredibly sweet.
Starting Your Tomato Seeds (or Buying Seedlings)
You have two options here: start your own seeds indoors or buy seedlings from a nursery. Starting seeds gives you more control over the varieties you grow and can save you money, but it requires a bit more effort.
Starting Seeds Indoors
1. **Gather Your Supplies:** You’ll need:
* Seed starting trays or small pots
* Seed starting mix (this is different from regular potting soil – it’s lighter and drains better)
* Tomato seeds
* A spray bottle
* A heat mat (optional, but it helps with germination)
* A grow light (essential for strong seedlings)
2. **Sow the Seeds:** Fill your seed starting trays or pots with seed starting mix. Moisten the mix with the spray bottle. Plant 2-3 seeds per cell or pot, about ¼ inch deep. Gently cover the seeds with more mix.
3. **Provide Warmth and Moisture:** Place the trays or pots on a heat mat (if using) and cover them with a clear plastic dome or plastic wrap to create a humid environment. Keep the mix consistently moist, but not soggy.
4. **Germination:** The seeds should germinate in 5-10 days. Once they sprout, remove the plastic cover and place the seedlings under a grow light.
5. **Provide Light:** Keep the grow light on for 14-16 hours per day. Adjust the height of the light as the seedlings grow to keep it close to the plants without burning them.
6. **Thin the Seedlings:** Once the seedlings have their first true leaves (the second set of leaves that appear after the initial seed leaves), thin them to one seedling per cell or pot. Choose the strongest seedling and snip off the others at the soil line.
7. **Watering:** Water the seedlings regularly, allowing the top inch of soil to dry out between waterings.
8. **Fertilizing:** Start fertilizing the seedlings with a diluted liquid fertilizer (follow the instructions on the fertilizer label) once they have their second set of true leaves.
9. **Hardening Off:** About a week before you plan to transplant the seedlings outdoors, you need to “harden them off.” This means gradually exposing them to outdoor conditions to acclimate them to the sun, wind, and temperature changes. Start by placing them outside for an hour or two each day, gradually increasing the time over the course of a week.
Buying Seedlings
1. **Choose Healthy Seedlings:** Look for seedlings that are stocky, green, and have no signs of disease or pests. Avoid seedlings that are leggy (tall and spindly) or have yellowing leaves.
2. **Check the Roots:** Gently remove a seedling from its pot and inspect the roots. They should be white and healthy-looking, not brown and root-bound.
Preparing Your Garden Bed
Tomatoes need at least 6-8 hours of sunlight per day and well-drained soil.
1. **Choose a Sunny Location:** Select a spot in your garden that gets plenty of sunlight.
2. **Prepare the Soil:** Tomatoes prefer slightly acidic soil with a pH of 6.0-6.8. Amend the soil with compost or other organic matter to improve drainage and fertility. I like to add aged manure for an extra boost.
3. **Test Your Soil (Optional):** If you’re unsure about your soil’s pH, you can test it with a soil testing kit.
4. **Clear the Area:** Remove any weeds, rocks, or debris from the planting area.
5. **Dig Holes:** Dig holes that are slightly larger than the root balls of your seedlings. Space the holes according to the variety of tomato you’re growing. Determinate tomatoes can be spaced closer together (18-24 inches apart) than indeterminate tomatoes (24-36 inches apart).
Transplanting Your Tomato Seedlings
This is a crucial step, so let’s do it right!
1. **Water the Seedlings:** Water the seedlings thoroughly before transplanting them.
2. **Remove the Seedlings from Their Pots:** Gently remove the seedlings from their pots, being careful not to damage the roots. If the roots are root-bound, gently loosen them with your fingers.
3. **Plant Deeply:** This is a trick I learned years ago, and it makes a huge difference! Plant the tomato seedlings deeper than they were in their pots, burying the stem up to the first set of leaves. Tomatoes can grow roots from their stems, so planting them deeply will encourage a stronger root system.
4. **Add Support:** Install stakes or cages at the time of planting, especially for indeterminate varieties. This will prevent the plants from sprawling on the ground and help support the weight of the fruit.
5. **Water Thoroughly:** Water the newly transplanted seedlings thoroughly.
6. **Mulch:** Apply a layer of mulch around the plants to help retain moisture, suppress weeds, and regulate soil temperature. Straw, wood chips, or shredded leaves work well.
Caring for Your Tomato Plants
Now that your tomatoes are in the ground, it’s time to give them the care they need to thrive.
1. **Watering:** Water deeply and regularly, especially during dry spells. Aim to water at the base of the plants to avoid wetting the foliage, which can lead to disease.
2. **Fertilizing:** Fertilize your tomato plants every 2-3 weeks with a balanced fertilizer. Follow the instructions on the fertilizer label.
3. **Pruning:** Pruning is important for indeterminate tomato varieties. Remove the suckers (the small shoots that grow between the main stem and the branches) to encourage the plant to focus its energy on producing fruit. Determinate tomatoes generally don’t need pruning.
4. **Pest and Disease Control:** Keep an eye out for pests and diseases. Common tomato pests include aphids, tomato hornworms, and whiteflies. Common tomato diseases include early blight, late blight, and blossom end rot.
* **Aphids:** Spray with insecticidal soap.
* **Tomato Hornworms:** Handpick them off the plants (they’re big and easy to spot!).
* **Whiteflies:** Spray with insecticidal soap or use sticky traps.
* **Early Blight:** Remove infected leaves and spray with a fungicide.
* **Late Blight:** This is a serious disease that can quickly kill your tomato plants. Remove infected plants immediately and dispose of them properly.
* **Blossom End Rot:** This is caused by a calcium deficiency. Add calcium to the soil or use a calcium-rich fertilizer. Consistent watering can also help prevent blossom end rot.
5. **Support:** Make sure your stakes or cages are providing adequate support as the plants grow.
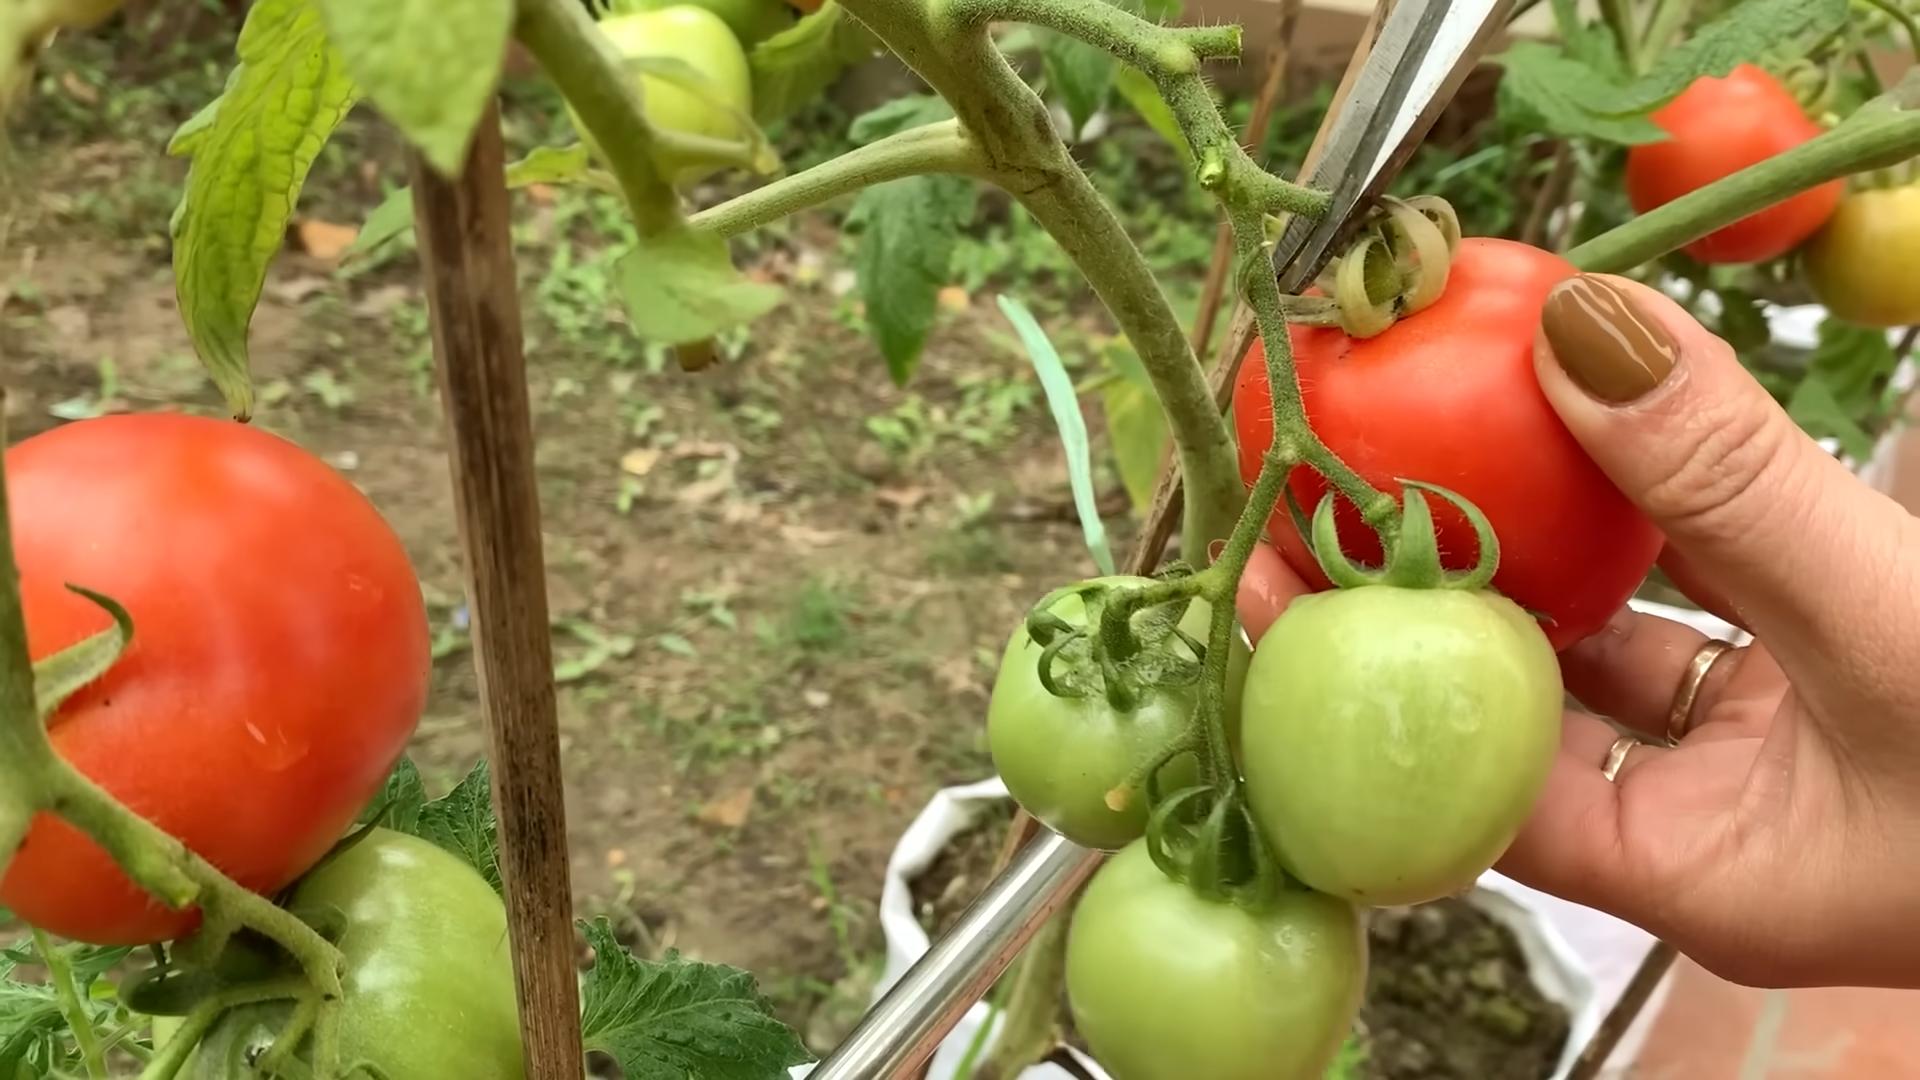
Harvesting Your Tomatoes
The moment we’ve all been waiting for!
1. **Ripeness:** Tomatoes are ripe when they are fully colored and slightly soft to the touch.
2. **Harvesting:** Gently twist the tomato off the
Conclusion
So, there you have it! Growing tomatoes at home, especially with these simple DIY tricks, is not just a gardening project; it’s an investment in flavor, freshness, and a deeper connection to your food. Forget those bland, store-bought tomatoes that lack the vibrant taste of summer. With a little effort and these easy-to-implement techniques, you can cultivate a thriving tomato patch right in your backyard, balcony, or even on a sunny windowsill.
Why is this a must-try? Because the difference in taste is undeniable. Homegrown tomatoes burst with a sweetness and acidity that you simply can’t find in commercially grown varieties. Plus, you control everything – from the soil composition to the watering schedule – ensuring your tomatoes are free from harmful pesticides and chemicals. You’re not just growing tomatoes; you’re growing peace of mind.
But the benefits extend beyond just taste and health. Gardening is a therapeutic activity, a chance to connect with nature, and a rewarding hobby that provides a sense of accomplishment. Watching your tiny seedlings grow into lush, fruit-bearing plants is an incredibly satisfying experience. And let’s not forget the bragging rights! Imagine serving a Caprese salad made entirely with ingredients you grew yourself.
Ready to take your tomato growing to the next level? Consider these variations and suggestions:
* Experiment with different varieties: From juicy beefsteaks to sweet cherry tomatoes and tangy Roma tomatoes, there’s a tomato variety for every palate. Don’t be afraid to try a few different types to see which ones thrive in your specific environment and which ones you enjoy the most.
* Companion planting: Enhance your tomato patch by planting basil, marigolds, or other companion plants. These plants can help deter pests, attract beneficial insects, and even improve the flavor of your tomatoes.
* Vertical gardening: If you’re short on space, consider growing your tomatoes vertically using trellises, cages, or hanging baskets. This is a great way to maximize your yield in a small area.
* Seed saving: Once you’ve found a tomato variety you love, save the seeds from your best fruits to plant next year. This is a sustainable way to ensure you always have a supply of your favorite tomatoes.
* Composting: Use your kitchen scraps and yard waste to create nutrient-rich compost that will nourish your tomato plants. Composting is a great way to reduce waste and improve the health of your soil.
Ultimately, the best way to learn is by doing. So, grab some seeds or seedlings, follow these simple DIY tricks, and get ready to enjoy the taste of homegrown goodness. We’re confident that you’ll be amazed at how easy and rewarding it is to grow your own tomatoes.
Don’t just take our word for it – try it yourself! We encourage you to embark on this tomato-growing adventure and share your experiences with us. What varieties did you choose? What challenges did you face? What successes did you celebrate? Share your tips, tricks, and photos in the comments below. Let’s create a community of tomato-growing enthusiasts and learn from each other. Happy gardening!
Frequently Asked Questions (FAQs)
Q: What is the best time to start growing tomatoes?
A: The best time to start growing tomatoes depends on your climate. In general, you should start seeds indoors 6-8 weeks before the last expected frost. If you’re buying seedlings from a nursery, wait until after the last frost to transplant them outdoors. Soil temperature should be at least 60°F (15°C) for optimal growth. A soil thermometer is a great tool to have.
Q: What kind of soil is best for growing tomatoes?
A: Tomatoes thrive in well-drained, fertile soil that is rich in organic matter. A slightly acidic soil pH of 6.0 to 6.8 is ideal. Amend your soil with compost, aged manure, or other organic materials to improve its drainage, fertility, and water-holding capacity. Avoid heavy clay soils, as they can become waterlogged and suffocate the roots.
Q: How often should I water my tomato plants?
A: Water your tomato plants deeply and regularly, especially during hot, dry weather. Aim to water at the base of the plant to avoid wetting the foliage, which can lead to fungal diseases. A good rule of thumb is to water when the top inch of soil feels dry to the touch. Mulching around your plants can help retain moisture and reduce the need for frequent watering.
Q: What are some common tomato pests and diseases, and how can I prevent them?
A: Common tomato pests include aphids, whiteflies, tomato hornworms, and spider mites. Common diseases include early blight, late blight, and blossom end rot. To prevent these problems, choose disease-resistant varieties, practice good sanitation (remove diseased leaves and debris), provide adequate air circulation, and avoid overwatering. You can also use organic pest control methods, such as insecticidal soap or neem oil. Blossom end rot is often caused by calcium deficiency, so ensure your soil has adequate calcium and maintain consistent watering.
Q: How much sunlight do tomato plants need?
A: Tomato plants need at least 6-8 hours of direct sunlight per day to produce a good yield. Choose a sunny location for your tomato patch, and make sure your plants are not shaded by trees or buildings. If you’re growing tomatoes indoors, use grow lights to supplement natural sunlight.
Q: How do I know when my tomatoes are ripe?
A: Tomatoes are typically ripe when they have reached their mature color (red, yellow, orange, etc.) and are slightly soft to the touch. Gently squeeze the tomato; it should give slightly but not be mushy. The aroma should also be fragrant and tomato-like. The stem should easily detach from the vine when the tomato is ripe.
Q: What is the best way to support tomato plants?
A: Tomato plants, especially indeterminate varieties, need support to prevent them from sprawling on the ground and becoming susceptible to pests and diseases. Use tomato cages, stakes, or trellises to support your plants. Install the supports early in the growing season, before the plants get too large. Tie the stems to the supports with soft twine or plant ties.
Q: Can I grow tomatoes in containers?
A: Yes, you can grow tomatoes in containers, but you’ll need to choose a large container (at least 10 gallons) and use a potting mix specifically formulated for vegetables. Dwarf or determinate varieties are best suited for container growing. Make sure the container has drainage holes, and water regularly. Fertilize your container-grown tomatoes every 2-3 weeks with a balanced fertilizer.
Q: What is the difference between determinate and indeterminate tomato varieties?
A: Determinate tomato varieties grow to a certain size and then stop, producing all their fruit at once. They are bushier and more compact than indeterminate varieties, making them a good choice for containers or small gardens. Indeterminate tomato varieties continue to grow and produce fruit throughout the growing season. They require staking or caging to support their growth.
Q: How can I improve the flavor of my homegrown tomatoes?
A: Several factors can influence the flavor of your homegrown tomatoes. Choose varieties known for their flavor, provide adequate sunlight and water, and amend your soil with compost or other organic matter. Avoid overwatering, as this can dilute the flavor. Let the tomatoes ripen fully on the vine before harvesting. Some gardeners believe that stressing the plants slightly by withholding water a few days before harvest can concentrate the flavors.
Leave a Comment