
Grow spinach indoors? Absolutely! Imagine fresh, vibrant spinach leaves gracing your salads and smoothies, even when the snow is falling outside. Forget those bland, pre-packaged greens from the grocery store. I’m here to show you how to cultivate your own thriving spinach patch right in the comfort of your home.
For centuries, cultivating food close to home has been a cornerstone of self-sufficiency. From ancient Roman kitchen gardens to the victory gardens of World War II, the ability to grow spinach indoors and other edibles has provided sustenance and a sense of empowerment. But you don’t need a sprawling estate or a green thumb passed down through generations to enjoy the benefits.
In today’s fast-paced world, knowing where your food comes from is more important than ever. Plus, let’s be honest, who wouldn’t love to save a few bucks and reduce their carbon footprint? This DIY guide will equip you with simple, effective tricks and hacks to successfully grow spinach indoors, regardless of your experience level. Get ready to ditch the store-bought spinach and embrace the joy of homegrown goodness!

Growing Spinach Indoors: A Beginner’s Guide
Hey there, fellow plant enthusiasts! Ever dreamt of having fresh, vibrant spinach readily available, even when the weather outside is frightful? Well, dream no more! Growing spinach indoors is totally achievable, and I’m here to guide you through every step of the process. Trust me, there’s nothing quite like snipping off a few leaves for a salad or smoothie, knowing you grew them yourself. Let’s get started!
Choosing the Right Spinach Variety
Not all spinach varieties are created equal, especially when it comes to indoor growing. We need to pick ones that are compact and bolt-resistant (meaning they won’t go to seed too quickly). Here are a few of my favorites:
* Baby’s Leaf Hybrid: This is a classic choice, known for its tender leaves and quick growth. It’s perfect for salads and baby spinach lovers.
* Space: As the name suggests, this variety is well-suited for smaller spaces. It’s also very heat-tolerant, which can be a bonus indoors.
* Tyee: This is another great option for indoor growing. It’s known for its disease resistance and its ability to produce large, flavorful leaves.
* Winter Bloomsdale: If you’re looking for a variety that can tolerate cooler temperatures, Winter Bloomsdale is a good choice.
Gathering Your Supplies
Before we dive into planting, let’s make sure we have everything we need. This will save you time and frustration later on.
* Spinach Seeds: Obviously! Choose a variety that suits your taste and growing conditions.
* Containers: You’ll need containers that are at least 6 inches deep. I prefer using rectangular planters, as they maximize space. Make sure they have drainage holes!
* Potting Mix: Use a high-quality potting mix that’s well-draining. Avoid using garden soil, as it can compact and hinder growth. I like a mix that includes peat moss, perlite, and vermiculite.
* Grow Lights: Spinach needs plenty of light to thrive indoors. A good set of grow lights is essential. Fluorescent or LED grow lights are both good options.
* Watering Can or Spray Bottle: For gentle watering.
* Fertilizer: A balanced liquid fertilizer will help your spinach grow strong and healthy.
* Seed Starting Tray (Optional): If you prefer to start your seeds indoors before transplanting.
Planting Your Spinach Seeds
Now for the fun part! Let’s get those seeds in the soil.
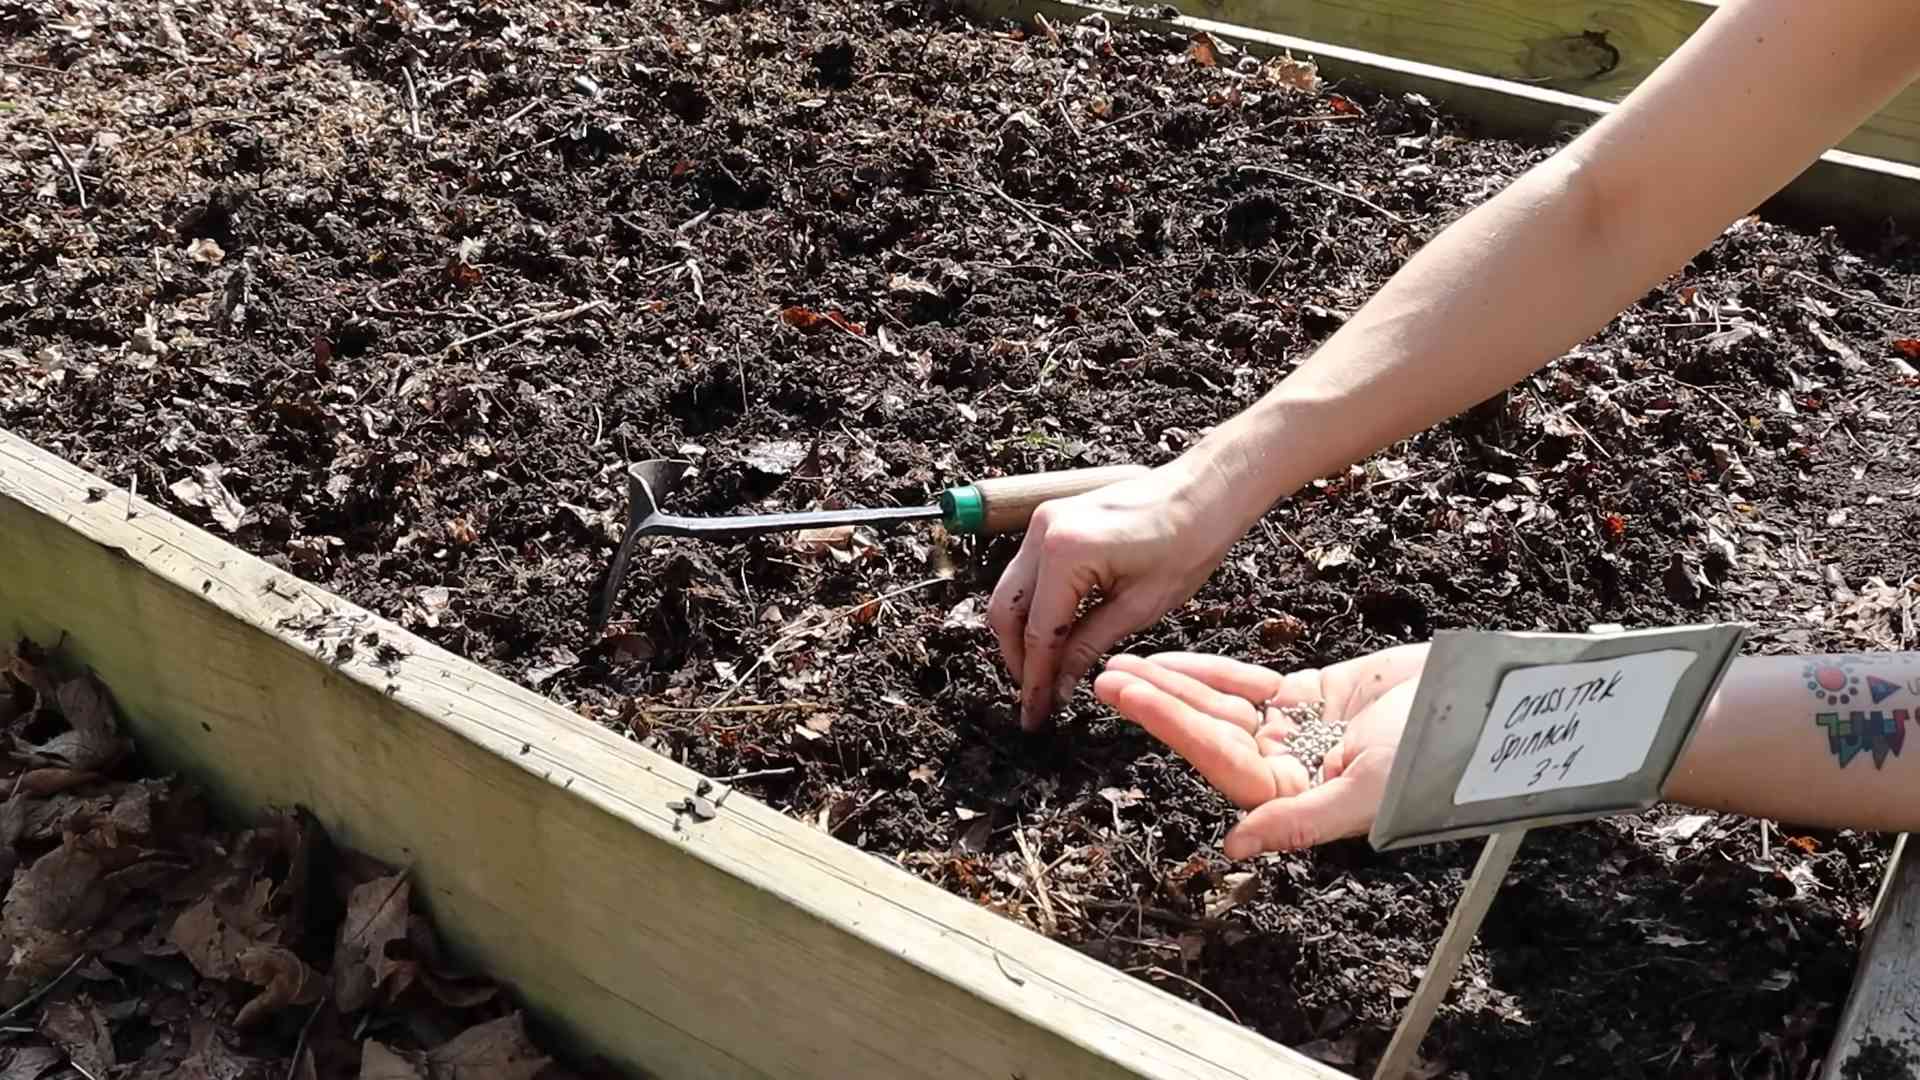
1. Prepare Your Containers: Fill your containers with potting mix, leaving about an inch of space at the top. Gently pat down the soil.
2. Sow the Seeds: Sprinkle the spinach seeds evenly over the surface of the soil. Aim for about 1 inch spacing between seeds.
3. Cover the Seeds: Cover the seeds with a thin layer of potting mix (about 1/4 inch).
4. Water Gently: Use a watering can or spray bottle to gently moisten the soil. Be careful not to overwater, as this can cause the seeds to rot.
5. Provide Light: Place your containers under your grow lights. If you’re using fluorescent lights, position them about 2-4 inches above the soil surface. If you’re using LED lights, follow the manufacturer’s instructions.
6. Maintain Moisture: Keep the soil consistently moist, but not soggy. Check the soil moisture daily and water as needed.
Germination and Early Growth
This is where the magic happens! Within a week or two, you should start to see tiny spinach seedlings emerging from the soil.
1. Monitor Germination: Keep an eye on your seedlings and make sure they’re getting enough light. If they start to look leggy (tall and spindly), it means they’re not getting enough light. Lower your grow lights or move them closer to the seedlings.
2. Thinning (If Necessary): Once your seedlings have developed a few true leaves (the second set of leaves), you may need to thin them out. This means removing some of the seedlings to give the remaining ones more space to grow. Aim for about 2-3 inches of space between plants. Don’t just pull them out! Gently snip them at the soil line with scissors to avoid disturbing the roots of the other seedlings.
3. Watering: Continue to water your seedlings regularly, keeping the soil consistently moist.
4. Fertilizing: Once your seedlings have been growing for a few weeks, you can start to fertilize them with a balanced liquid fertilizer. Follow the instructions on the fertilizer package. I usually dilute the fertilizer to half strength to avoid burning the delicate seedlings.
Caring for Your Indoor Spinach
Now that your spinach is growing, it’s important to provide it with the right care to ensure a bountiful harvest.
1. Light: Spinach needs at least 6 hours of light per day. If you’re using grow lights, keep them on for 12-14 hours per day.
2. Watering: Water your spinach regularly, keeping the soil consistently moist. Avoid overwatering, as this can lead to root rot. Check the soil moisture daily and water when the top inch of soil feels dry.
3. Temperature: Spinach prefers cool temperatures, ideally between 60-70°F (15-21°C). Avoid placing your spinach near heat sources, such as radiators or vents.
4. Humidity: Spinach prefers moderate humidity. If your home is very dry, you can increase the humidity by placing a tray of water near your plants or using a humidifier.
5. Fertilizing: Continue to fertilize your spinach every 2-3 weeks with a balanced liquid fertilizer.
6. Pest Control: Keep an eye out for pests, such as aphids and spider mites. If you notice any pests, you can try spraying your plants with insecticidal soap or neem oil.
Harvesting Your Spinach
The moment we’ve all been waiting for! Harvesting your own homegrown spinach is incredibly rewarding.
1. When to Harvest: You can start harvesting your spinach when the leaves are about 4-6 inches long.
2. How to Harvest: Use scissors or a sharp knife to cut the outer leaves of the plant, leaving the inner leaves to continue growing. This is known as “cut and come again” harvesting.
3. Harvest Regularly: Harvest your spinach regularly to encourage continued growth.
4. Storage: Store your harvested spinach in the refrigerator in a plastic bag or container. It will keep for several days.
Troubleshooting Common Problems
Even with the best care, you may encounter some problems while growing spinach indoors. Here are a few common issues and how to address them:
* Leggy Seedlings: This is usually caused by insufficient light. Lower your grow lights or move them closer to the seedlings.
* Yellowing Leaves: This can be caused by overwatering, underwatering, or nutrient deficiencies. Check the soil moisture and adjust your watering accordingly. Fertilize your plants with a balanced liquid fertilizer.
* Slow Growth: This can be caused by insufficient light, cool temperatures, or nutrient deficiencies. Make sure your plants are getting enough light and that the temperature is within the ideal range. Fertilize your plants with a balanced liquid fertilizer.
* Pests: Keep an eye out for pests, such as aphids and spider mites. If you notice any pests, you can try spraying your plants with insecticidal soap or neem oil.
Extending Your Harvest
Want to keep that spinach coming? Here are a few tips for extending your harvest:
* Succession Planting: Plant new seeds every few weeks to ensure a continuous supply of spinach.
* Cool Temperatures: Spinach thrives in cool temperatures. If your home is too warm, you can try moving your plants to a cooler location, such as a basement or garage.
* Bolting Prevention: Bolting (going to seed) is a common problem with spinach, especially in warm weather. To prevent bolting, choose bolt-resistant varieties and keep your plants well-watered.
Enjoying Your Homegrown Spinach
Congratulations! You’ve successfully grown spinach indoors. Now it’s time to enjoy the fruits (or rather, leaves) of your labor. Here are a few ideas for using your homegrown spinach:
* Salads: Add fresh spinach to your salads for a boost of nutrients and flavor.
* Smoothies: Blend spinach into your smoothies for a healthy and delicious drink.
* Soups: Add spinach to your soups for added vitamins and minerals.
* Sautéed Spinach: Sauté spinach with garlic and olive oil for a simple and flavorful side dish.
* Spinach Dip: Make a delicious spinach dip for parties or gatherings.
Growing spinach indoors is a rewarding experience that allows you to enjoy fresh, healthy greens year-round. With
Conclusion
So, there you have it! Growing spinach indoors isn’t just a fun project; it’s a gateway to fresh, nutritious greens right at your fingertips, regardless of the season. Forget those limp, pre-packaged bags from the grocery store. Imagine the satisfaction of snipping vibrant, crisp spinach leaves just moments before adding them to your salad, smoothie, or favorite dish. The difference in taste and texture is truly remarkable.
This DIY approach is a must-try for several compelling reasons. First, it puts you in complete control of your spinach’s growing environment, minimizing the risk of pests and diseases that can plague outdoor gardens. Second, it’s incredibly convenient. No more trekking to the store for spinach when you need it – it’s right there in your home! Third, it’s a sustainable and cost-effective way to enjoy fresh produce. You’ll reduce your carbon footprint by eliminating transportation and packaging waste, and you’ll save money in the long run by growing your own supply.
But the best part? It’s adaptable! Feel free to experiment with different varieties of spinach. Try baby spinach for tender leaves, or explore savoy spinach for a more robust flavor. You can also adjust the lighting and temperature to optimize growth based on your specific indoor environment. Consider adding companion plants like basil or chamomile to your indoor garden to enhance the flavor of your spinach and deter pests naturally. You can even use vertical planters to maximize space and create a stunning green wall in your home.
Don’t be intimidated if you’re new to indoor gardening. Growing spinach indoors is surprisingly easy, even for beginners. With a little attention and care, you’ll be harvesting your own delicious spinach in no time.
We wholeheartedly encourage you to give this DIY trick a try. It’s a rewarding experience that will transform the way you think about fresh produce. And most importantly, we want to hear about your journey! Share your experiences, tips, and photos with us in the comments below. Let’s create a community of indoor spinach growers and inspire others to embrace the joy of homegrown goodness. What are you waiting for? Start growing spinach indoors today and taste the difference!
Frequently Asked Questions (FAQ)
What kind of container should I use for growing spinach indoors?
The ideal container for growing spinach indoors should be at least 6-8 inches deep and wide enough to accommodate several plants. A rectangular container works well, as it allows for efficient use of space. Make sure the container has drainage holes to prevent waterlogging, which can lead to root rot. You can use plastic pots, terracotta pots, or even repurposed containers like buckets or tubs, as long as they are clean and have adequate drainage. Consider using fabric pots, as they allow for better aeration of the roots.
What type of soil is best for growing spinach indoors?
Spinach thrives in well-draining, nutrient-rich soil. A good potting mix specifically formulated for vegetables is an excellent choice. You can also create your own mix by combining equal parts of potting soil, compost, and perlite or vermiculite. The compost provides essential nutrients, while the perlite or vermiculite improves drainage and aeration. Avoid using garden soil, as it can be too heavy and may contain pests or diseases.
How much light does indoor spinach need?
Spinach requires at least 6-8 hours of light per day to grow properly. If you don’t have a sunny windowsill that provides enough natural light, you’ll need to supplement with artificial lighting. LED grow lights are a great option, as they are energy-efficient and provide the full spectrum of light that plants need. Position the grow lights a few inches above the spinach plants and adjust the height as the plants grow. You can also use fluorescent lights, but they are less energy-efficient than LEDs.
How often should I water my indoor spinach plants?
Water your spinach plants regularly, keeping the soil consistently moist but not waterlogged. Check the soil moisture by sticking your finger about an inch into the soil. If it feels dry, it’s time to water. Water deeply, allowing the excess water to drain out of the drainage holes. Avoid overhead watering, as it can promote fungal diseases. Instead, water at the base of the plants. Reduce watering during cooler periods or when the plants are not actively growing.
What temperature is ideal for growing spinach indoors?
Spinach prefers cool temperatures, ideally between 60-70°F (15-21°C). Avoid exposing your spinach plants to temperatures above 80°F (27°C), as this can cause them to bolt (go to seed) prematurely. If your home is too warm, you can try moving your spinach plants to a cooler location, such as a basement or garage. You can also use fans to circulate air and keep the plants cool.
How do I fertilize my indoor spinach plants?
Spinach is a heavy feeder, so it’s important to fertilize regularly. Use a balanced liquid fertilizer, such as a 10-10-10 or 20-20-20, diluted to half strength. Fertilize every 2-3 weeks, following the instructions on the fertilizer label. You can also use organic fertilizers, such as compost tea or fish emulsion. Avoid over-fertilizing, as this can burn the roots and damage the plants.
How long does it take to grow spinach indoors?
Spinach typically takes about 4-6 weeks to mature indoors, depending on the variety and growing conditions. You can start harvesting leaves when they are about 4-6 inches long. Harvest the outer leaves first, allowing the inner leaves to continue growing. This cut-and-come-again method will provide you with a continuous supply of fresh spinach.
What are some common pests and diseases that affect indoor spinach?
Common pests that can affect indoor spinach include aphids, spider mites, and whiteflies. Inspect your plants regularly for signs of infestation, such as small insects, webbing, or sticky residue. You can control these pests by spraying the plants with insecticidal soap or neem oil. Common diseases that can affect indoor spinach include powdery mildew and downy mildew. These diseases are caused by fungal pathogens and can be prevented by providing good air circulation and avoiding overhead watering. If you notice signs of disease, remove the affected leaves and spray the plants with a fungicide.
Can I grow spinach indoors year-round?
Yes, you can grow spinach indoors year-round, as long as you provide the right growing conditions. This includes adequate light, temperature, and moisture. You may need to adjust your growing practices depending on the season. For example, you may need to provide more supplemental lighting during the winter months.
How do I prevent spinach from bolting indoors?
Bolting is when spinach plants prematurely go to seed, which can make the leaves bitter. To prevent bolting, keep the temperature cool, provide adequate moisture, and harvest the leaves regularly. Avoid exposing your spinach plants to stress, such as drought or extreme temperatures. Choose bolt-resistant varieties of spinach for best results.


Leave a Comment